Welcome developer
Welcome to Mule Invaders, the video game inspired by the classic retro shooters Galaga and Space Invaders. In Mule Invaders, help Max the Mule destroy waves of enemies by spawning powerups using APIs. To protect Max on his journey to integrate the universe, create APIs in Anypoint Platform, deploy your application on CloudHub, then make HTTP requests to your APIs to spawn powerups while playing the game in realtime. When you use a REST client to send a POST request to your API, the flow will run and will trigger a powerup to spawn in the video game. The more powerups you trigger, the higher the score you can get.
So, what are you waiting for? Download Mule Invaders today by using the below links for Windows or Mac, and then build your integration by following the steps below.
Step 1: Signup for Anypoint Platform
To play Mule Invaders and build your first API or integration with MuleSoft, click the button below to create a free Anypoint Platform account.
Already have an account? Sign in.
Step 2: Build the integration
Now that we have created our MuleSoft account, let’s developed the backend logic of the video game using Flow Designer. If you click the blue button below, you will be taken to the Mule Invaders Exchange page where you can download and modify the integration right in your web browser. When you navigate to Exchange by clicking the button below, click Open Flow to open up the integration in Design Center.
Once you click Open Flow, you will need to click: Use this template which will import the entire project into your Anypoint Platform account. When you are prompted to provide a name for the Mule Applicaiton, name it: MuleInvaders.
When you click on the Use this template button, you will see some errors when loading the project. These errors are can be fixed easily! All you have to do is set up your HTTP Listener. An HTTP Listener is a very helpful Connector that enables you to listen to a URL for any new HTTP Request. When a new HTTP request is received by the HTTP Listener, anything that comes after the HTTP Listener in the flow will be executed at runtime.
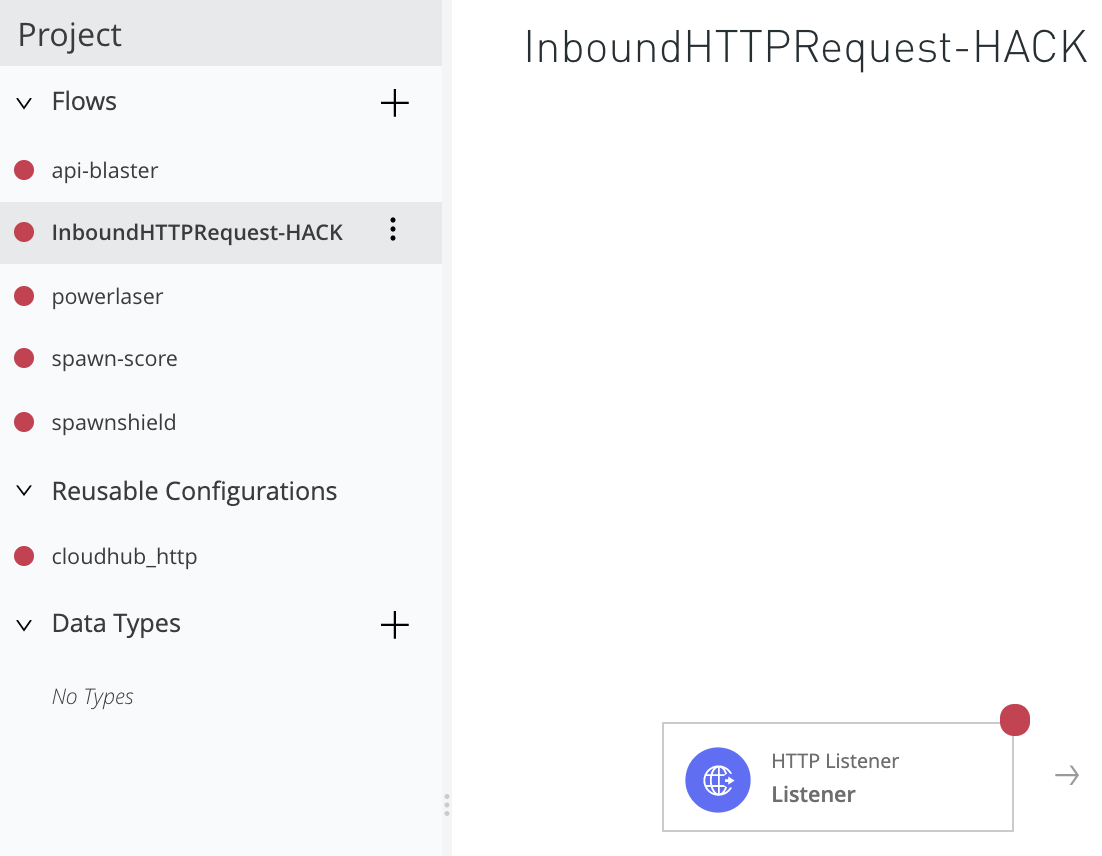
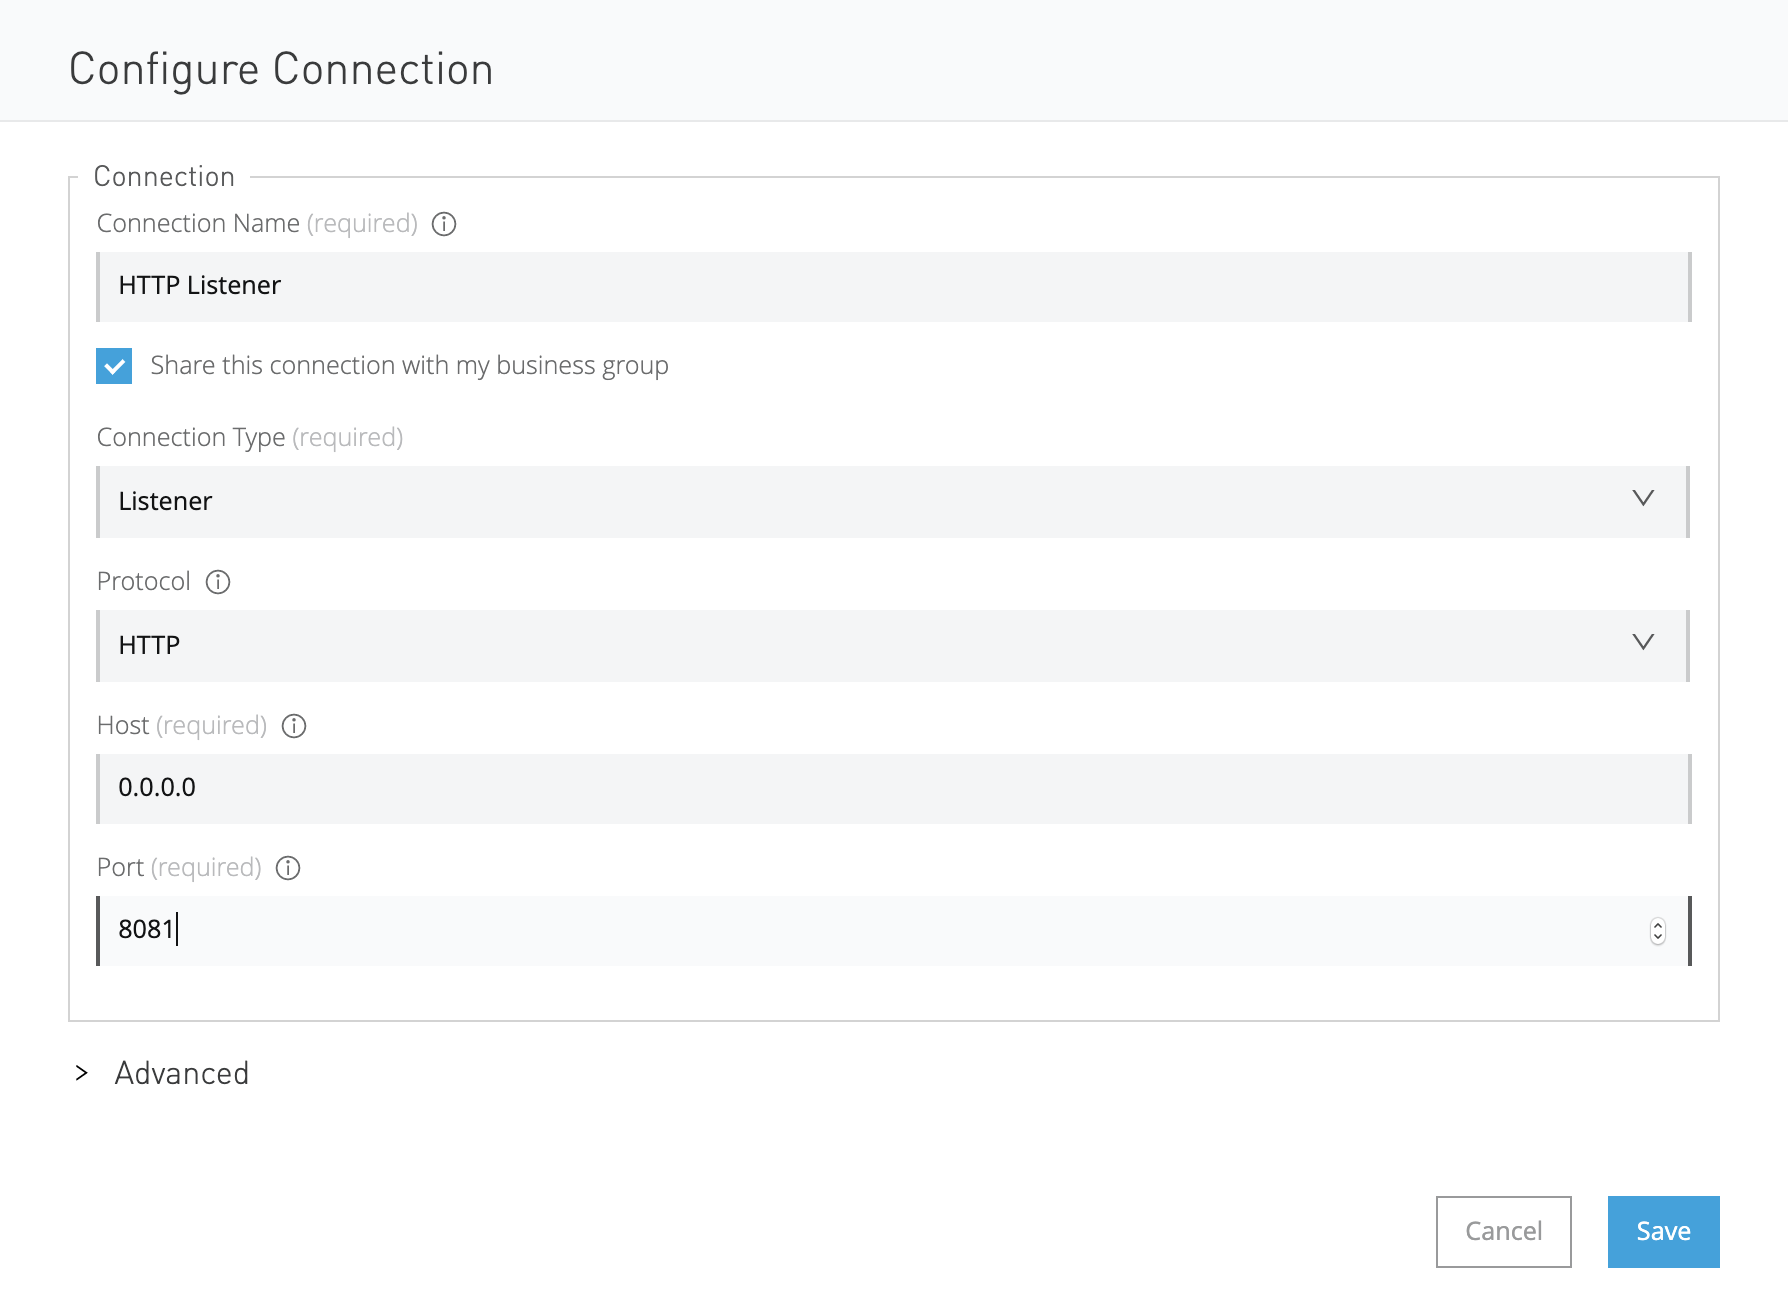
To set up the HTTP Listener, click on cloudhub_http on the left navigation bar, and then click Add Connection. Insert the credentials listed in the screenshot below by adding the Host as 0.0.0.0 and the Port as 8081.
Once you have added the HTTP listener credentials, click Save and you will notice that all the errors in the project will disappear.
How does the Mule Application work?
In the video game Mule Invaders, there are four powerups that you can unlock in the actual game through sending an HTTP request to one of the API endpoints we have just created. The main endpoint, /hack is the main endpoint that the game client is listening too. The game detects when a new UUID has been added to the Object Store under that endpoints unique key. When a new UUID has been added, the powerup will spawn in the video game. This works since the game polls the /hack endpoint for any new update to the object store twice a second.
Here is a brief description of what each endpoint will do in the video game Mule Invaders:
/hackThis is the endpoint that the Mule Invaders client application listens to and polls to listen for a new update from the KV Store.
/spawnshieldSpawnShield gives the player invincibility for 5 seconds and protects the player from incoming vulnerabilities. You can see in-game that the text will flash “protected by Anypoint Security” when the shield is spawned.
/powerlaserPowerLaser gives the player a spread laser cannon that changes the particle to red and allows you to kill enemies faster.
/api-blasterAPI Blaster increases the fire rate of laser cannons. Pew pew pew.
/spawnscoreSpawn score gives you bonus +1000 points and creates the slot machine sound effect.
Ready to play?
Now that you understand how the Mule application was built, and how each API endpoint affects the video game, go up to the top right of the Flow Designer window and click the Test button to try out the integration you just built.
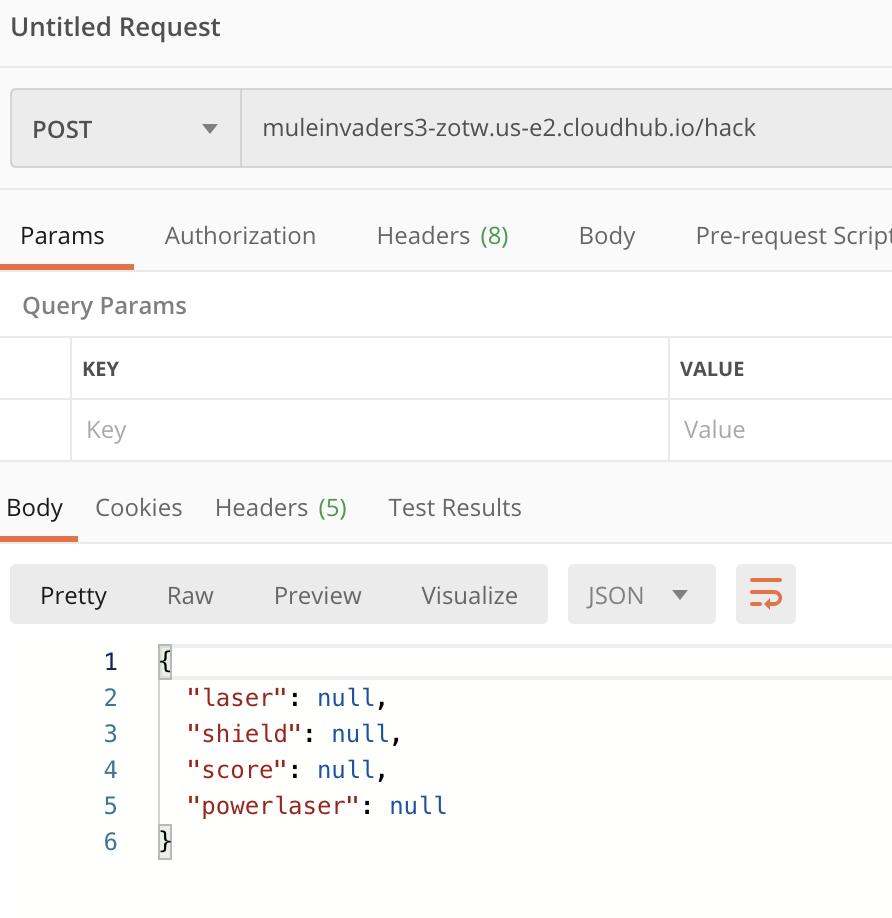
To test the integration, insert the mocking service URL into a REST client such as Postman, and make a POST request to the endpoint URL that you just created (don’t forget to add /hack on the end of the URL). Once you make the HTTP request, you should see is a null value response for each JSON key in all request body. This is because we currently have no values added in the Object Store under those key names.
To add a new value to the Object Store, change your request URL to /spawnscore instead of /hack and send an additional POST request.
Now once again change your request URL back from /spawnscore to /hack again, and you will notice that score now has a UUID assigned under that JSON key.

This JSON payload is how the game is able to detect if a new request has been made. Pretty simple right?
Publishing your integration
Now that you understand how the Mule Application works, let’s publish our application to CloudHub so we can get a dedicated URL for our application to run on. Click the drop-down arrow at the top right-hand side of the project and click the Deploy Application button. Select your target environment as Sandbox and name your application whatever you wish (must be a unique name). It will take a few minutes for your application to deploy, however when it finishes, navigate to Runtime Manager, then switch your environment to the one you selected which is Sandbox. The application should be illuminating a green dot stating that it is running. Click on the application, and grab the URL from the top of the page, copy it into your URL bar, and add http:// to the beginning and add the /hack endpoint to the end of the URL. That URL including the /hack endpoint will be the URL you insert into the video game.

Step 3: Download Mule Invaders
Next, we are going to download the Mule Invaders application for either Mac or PC. Each build will come in a compressed zip folder that you will have to unzip on your local machine.
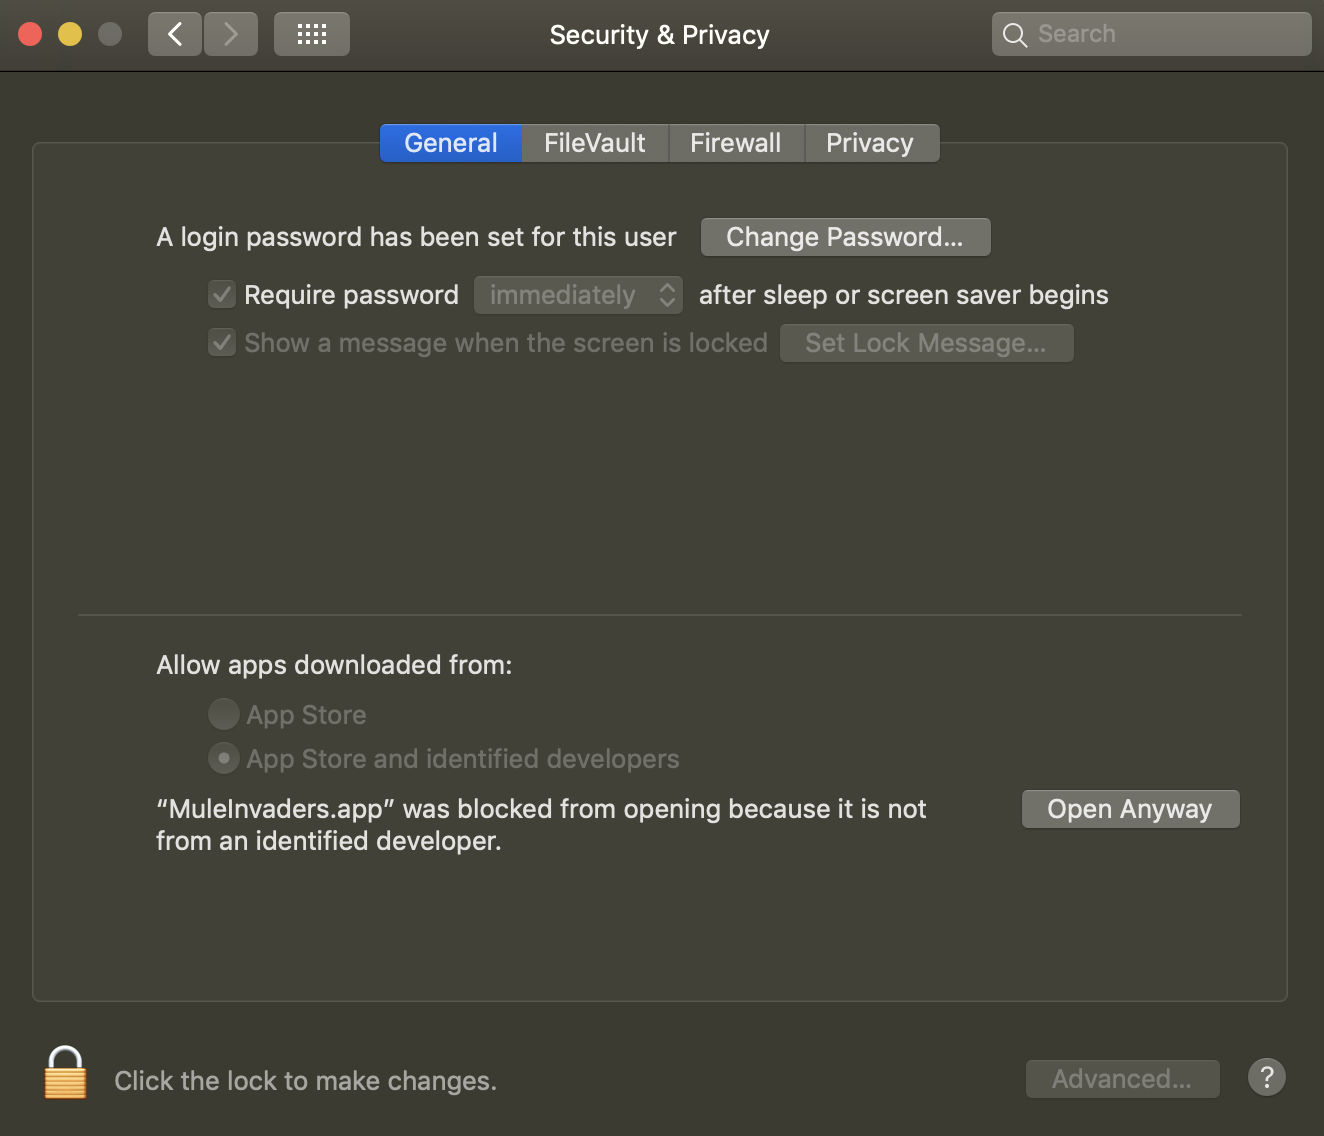
For Mac, when you open the application, you will get a warning saying that this application is not verified. To run the application, navigate to your Mac’s System Preferences, then click on Security and Privacy, then click on Open Anyway. On PC, simply just click Run Application.
Congratulations developer
Congratulations on completing all the steps to this tutorial. Now it’s time for the fun part, let’s play the game. When you launch the application, you will be greeted by the below screen which will prompt you to enter your CloudHub URL. Copy and paste the URL including the http:// and the /hack endpoint. Control your character using the WASD keys and fire your blaster with the space bar. Exit the application at any time by pressing the ESC key.
To spawn powerups in Mule Invaders with the APIs you just created, open up Postman and send HTTP POST requests to either /spawnshield, /powerlaser, /api-blaster, /spawnscore. As an extra challenge, see if you can create a front end or mobile application that sends API requests to the endpoints for you. You can see an example front end application located here.
If you have any issues with the application not spawning the powerups, make sure to check that your CloudHub URL is correctly entered.
Thanks again for trying out Mule Invaders. Want to keep learning how to develop powerful integrations and APIs with the MuleSoft platform? Visit our developer tutorial catalog for tutorials for all experience levels.
Enjoy the game? Tweet us your high score on Twitter @MuleDev
Thanks for playing.


Try Anypoint Platform for free
Start your 30-day free trial of the #1 platform for integration, APIs, and automation. No credit card required. No software to install.
Questions? Ask an expert.
