In this tutorial, we’ll walk you through how to publish and subscribe to streams of event data moving through an Apache Kafka cluster. You’ll learn how to:
- Setup a managed Apache Kafka cluster on Heroku
- Setup the Apache Kafka Connector configuration
- Subscribe to events on a Kafka topics using the
Message Listeneroperation - Use the
Publishoperation to send messages to Kafka topics
Use the Apache Kafka Connector to participate in event driven architectures. De-couple your applications by publishing and subscribing to streams of data moving through distributed event stores like Apache Kafka.
Prerequisites
Anypoint Studio- An interactive development environment for MuleSoft developers. See installing Anypoint Studio.Secure Properties Tool– A utility to encrypt or decrypt strings and values in a properties file or the entire file. See Encrypt Properties Using Secure Properties Tool and download the tool from the download link in that page.OpenSSL- A software library for applications that secure communications over computer networks. See OpenSSL for more information.Heroku developer account- Heroku lets you deploy, run and manage applications written in popular programming languages. See here for details.Heroku CLI– The Heroku Command Line Interface (CLI) lets you create and manage Heroku apps directly from the terminal. It’s an essential part of using Heroku.Apache Kafka on Heroku– A Kafka as a service offering from Heroku - note that charges do apply. See Apache Kafka on Heroku.Heroku Kafka CLI plugin- A plugin to help create and manage Kafka clusters running on Heroku. See here.
Setup Apache Kafka on Heroku
1 - Replace mule-kafka with a unique identifier. Create a new Heroku application by running the following Heroku CLI command.
1
heroku create mule-kafka
Output
1
2
Creating ⬢ mule-kafka... done
https://mule-kafka.herokuapp.com/ | https://git.heroku.com/mule-kafka.git
2 - Create a new Heroku Apache Kafka cluster attached to the application you just created using the following Heroku Kafka CLI command.
1
heroku addons:create heroku-kafka:basic-0 -a mule-kafka
Output
1
2
3
4
5
6
7
Creating heroku-kafka:basic-0 on ⬢ mule-kafka...
The cluster should be available in 5-15 minutes.
Run `heroku kafka:wait` to wait until the cluster is ready.
You can read more about managing Kafka at https://devcenter.heroku.com/articles/kafka-on-heroku#managing-kafka
kafka-corrugated-90941 is being created in the background. The app will restart when complete...
Use heroku addons:info kafka-corrugated-90941 to check creation progress
Use heroku addons:docs heroku-kafka to view documentation
3 - Check that your Kafka cluster is ready by running the following Heroku CLI Command. Note that it can take up to 15 mins for the state to update to created.
1
heroku addons:info heroku-kafka -a mule-kafka
Output
The status will update from creating to created when complete.
1
2
3
4
5
6
=== kafka-corrugated-90941
Attachments:  mule-kafka::KAFKA
Installed at: Wed Apr 06 2022 14:08:06 GMT+1000 (Australian Eastern Standard Time)
Owning app:   mule-kafka
Plan:         heroku-kafka:basic-0
State:        created
4 - Add a consumer group to the cluster using the following CLI command.
1
heroku kafka:consumer-groups:create mule-group -a mule-kafka
Output
1
2
Creating consumer group mule-group... done
Use `heroku kafka:consumer-groups` to list your consumer groups.
5 - Create an Apache Kafka topic called raw-stream.
1
heroku kafka:topics:create raw-stream --partitions 1 -a mule-kafka
Output
1
2
3
4
Creating topic raw-stream with compaction disabled and retention time 1 day on kafka-concave-04437... done
Use `heroku kafka:topics:info raw-stream` to monitor your topic.
Your topic is using the prefix apalachicola-1388.. Learn more in Dev Center:
https://devcenter.heroku.com/articles/multi-tenant-kafka-on-heroku#connecting-kafka-prefix
6 - Create 2 more topics called split-one and split-two.
1
2
heroku kafka:topics:create split-one --partitions 1 -a mule-kafka
heroku kafka:topics:create split-two --partitions 1 -a mule-kafka
7 - Export and remember the Heroku Kafka URL. This is a comma separated list of SSL URLs to the Kafka brokers making up our new cluster. Run the following command and make a note of the output. Your output will differ.
1
heroku config:get KAFKA_URL -a mule-kafka
Output
1
kafka+ssl://ec2-18-233-211-98.compute-1.amazonaws.com:9096,kafka+ssl://ec2-18-233-140-74.compute-1.amazonaws.com:9096,kafka+ssl://ec2-34-224-229-106.compute-1.amazonaws.com:9096,kafka+ssl://ec2-52-204-144-208.compute-1.amazonaws.com:9096,kafka+ssl://ec2-34-235-216-30.compute-1.amazonaws.com:9096,kafka+ssl://ec2-34-203-24-91.compute-1.amazonaws.com:9096,kafka+ssl://ec2-18-204-47-99.compute-1.amazonaws.com:9096,kafka+ssl://ec2-18-208-61-56.compute-1.amazonaws.com:909
8 - Export the Heroku Kafka prefix. Since we’re using the Basic plan in this tutorial our Kafka instance is multitenant. When integrating Kafka consumers we need to ensure topics and consumer groups are prefixed with the value of the KAFKA_PREFIX environment variable. Run the following command and make a note of the output. Your output will differ.
1
heroku config:get KAFKA_PREFIX -a mule-kafka
Output
1
apalachicola-1388.
Export the Heroku Kafka Certificates and Keys
All connections to Heroku Kafka support SSL encryption. Connecting over SSL means all traffic is encrypted and authenticated via a SSL client certificate. To connect to our Heroku Kafka instance we need to export the brokers SSL certificate (KAFKA_TRUSTED_CERT), the client certificate (KAFKA_CLIENT_CERT) and the client certificate key (KAFKA_CLIENT_CERT_KEY). These are all in PEM format.
1 - Export the certificates from your Kafka instance by running the following commands. These will export the contents of the required configuration variables into files located in the same directory.
1
2
3
4
5
heroku config:get KAFKA_TRUSTED_CERT -a mule-kafka >> kafka_trusted_cert.pem

heroku config:get KAFKA_CLIENT_CERT -a mule-kafka >> kafka_cert.pem

heroku config:get KAFKA_CLIENT_CERT_KEY -a mule-kafka >> kafka_key.pem
2 - Check you have 3 files created by checking the contents of your current directory. You should see the following:
1
kafka_cert.pem         kafka_key.pem          kafka_trusted_cert.pem
Convert PEM certificates to PKCS12 format
MuleSoft supports many different types of keystores. For this tutorial we are going to use the industry standard PKCS12 format for the keystore and JKS for the truststore.
1 - Use OpenSSL to generate a PKCS12 file containing the Heroku Kafka client certificate and the Heroku Kafka client certificate key. Run the following command to create a file called kafka_cert.pkcs12.
1
openssl pkcs12 -export -out kafka_cert.pkcs12 -in kafka_cert.pem -inkey kafka_key.pem
Output
You’ll be asked to enter an Export password. Make sure you remember it.
Create Keystore
Create a keystore to be used for the SSL connection and import the PKCS12 file containing the client certificate and key from the previous step.
1 - Enter the following command. Make sure you replace the values for your-key with a password you can remember. This creates a keystore with the name keystore.p12.
1
keytool -importkeystore -srckeystore kafka_cert.pkcs12 -srcstoretype pkcs12 -destkeystore keystore.p12 -deststorepass <your-key> -destkeypass <your-key> -deststoretype pkcs12
Output
1
2
3
4
Importing keystore kafka_cert.pkcs12 to keystore...
Enter source keystore password:
Entry for alias 1 successfully imported.
Import command completed:  1 entries successfully imported, 0 entries failed or cancelled
Create Truststore
Create a truststore and add the SSL certificate provided by Heroku Kafka.
1 - Truststores require the certificate to be in binary format. The current format exported from Heroku Kafka is PEM format. Run the following command to convert the PEM certificate to binary format (DER). This creates the binary file with the name cert.der
1
openssl x509 -in kafka_trusted_cert.pem -out cert.der -outform der
2 - Import the binary certificate into a new jks truststore called truststore.jks by running the following. When prompted, type yes.
1
keytool -importcert -file cert.der -keystore truststore.jks  -storepass <your-key>
Output
Only the last 2 lines of the output are shown for brevity.
1
2
Trust this certificate? [no]:  yes
Certificate was added to keystore
3 - Check you have the following new files created by checking the contents of your current directory. You should see keystore.p12 and truststore.jks:
1
2
cert.der                   kafka_cert.pkcs12          kafka_trusted_cert.pem             truststore.jks
kafka_cert.pem             kafka_key.pem              keystore.p12
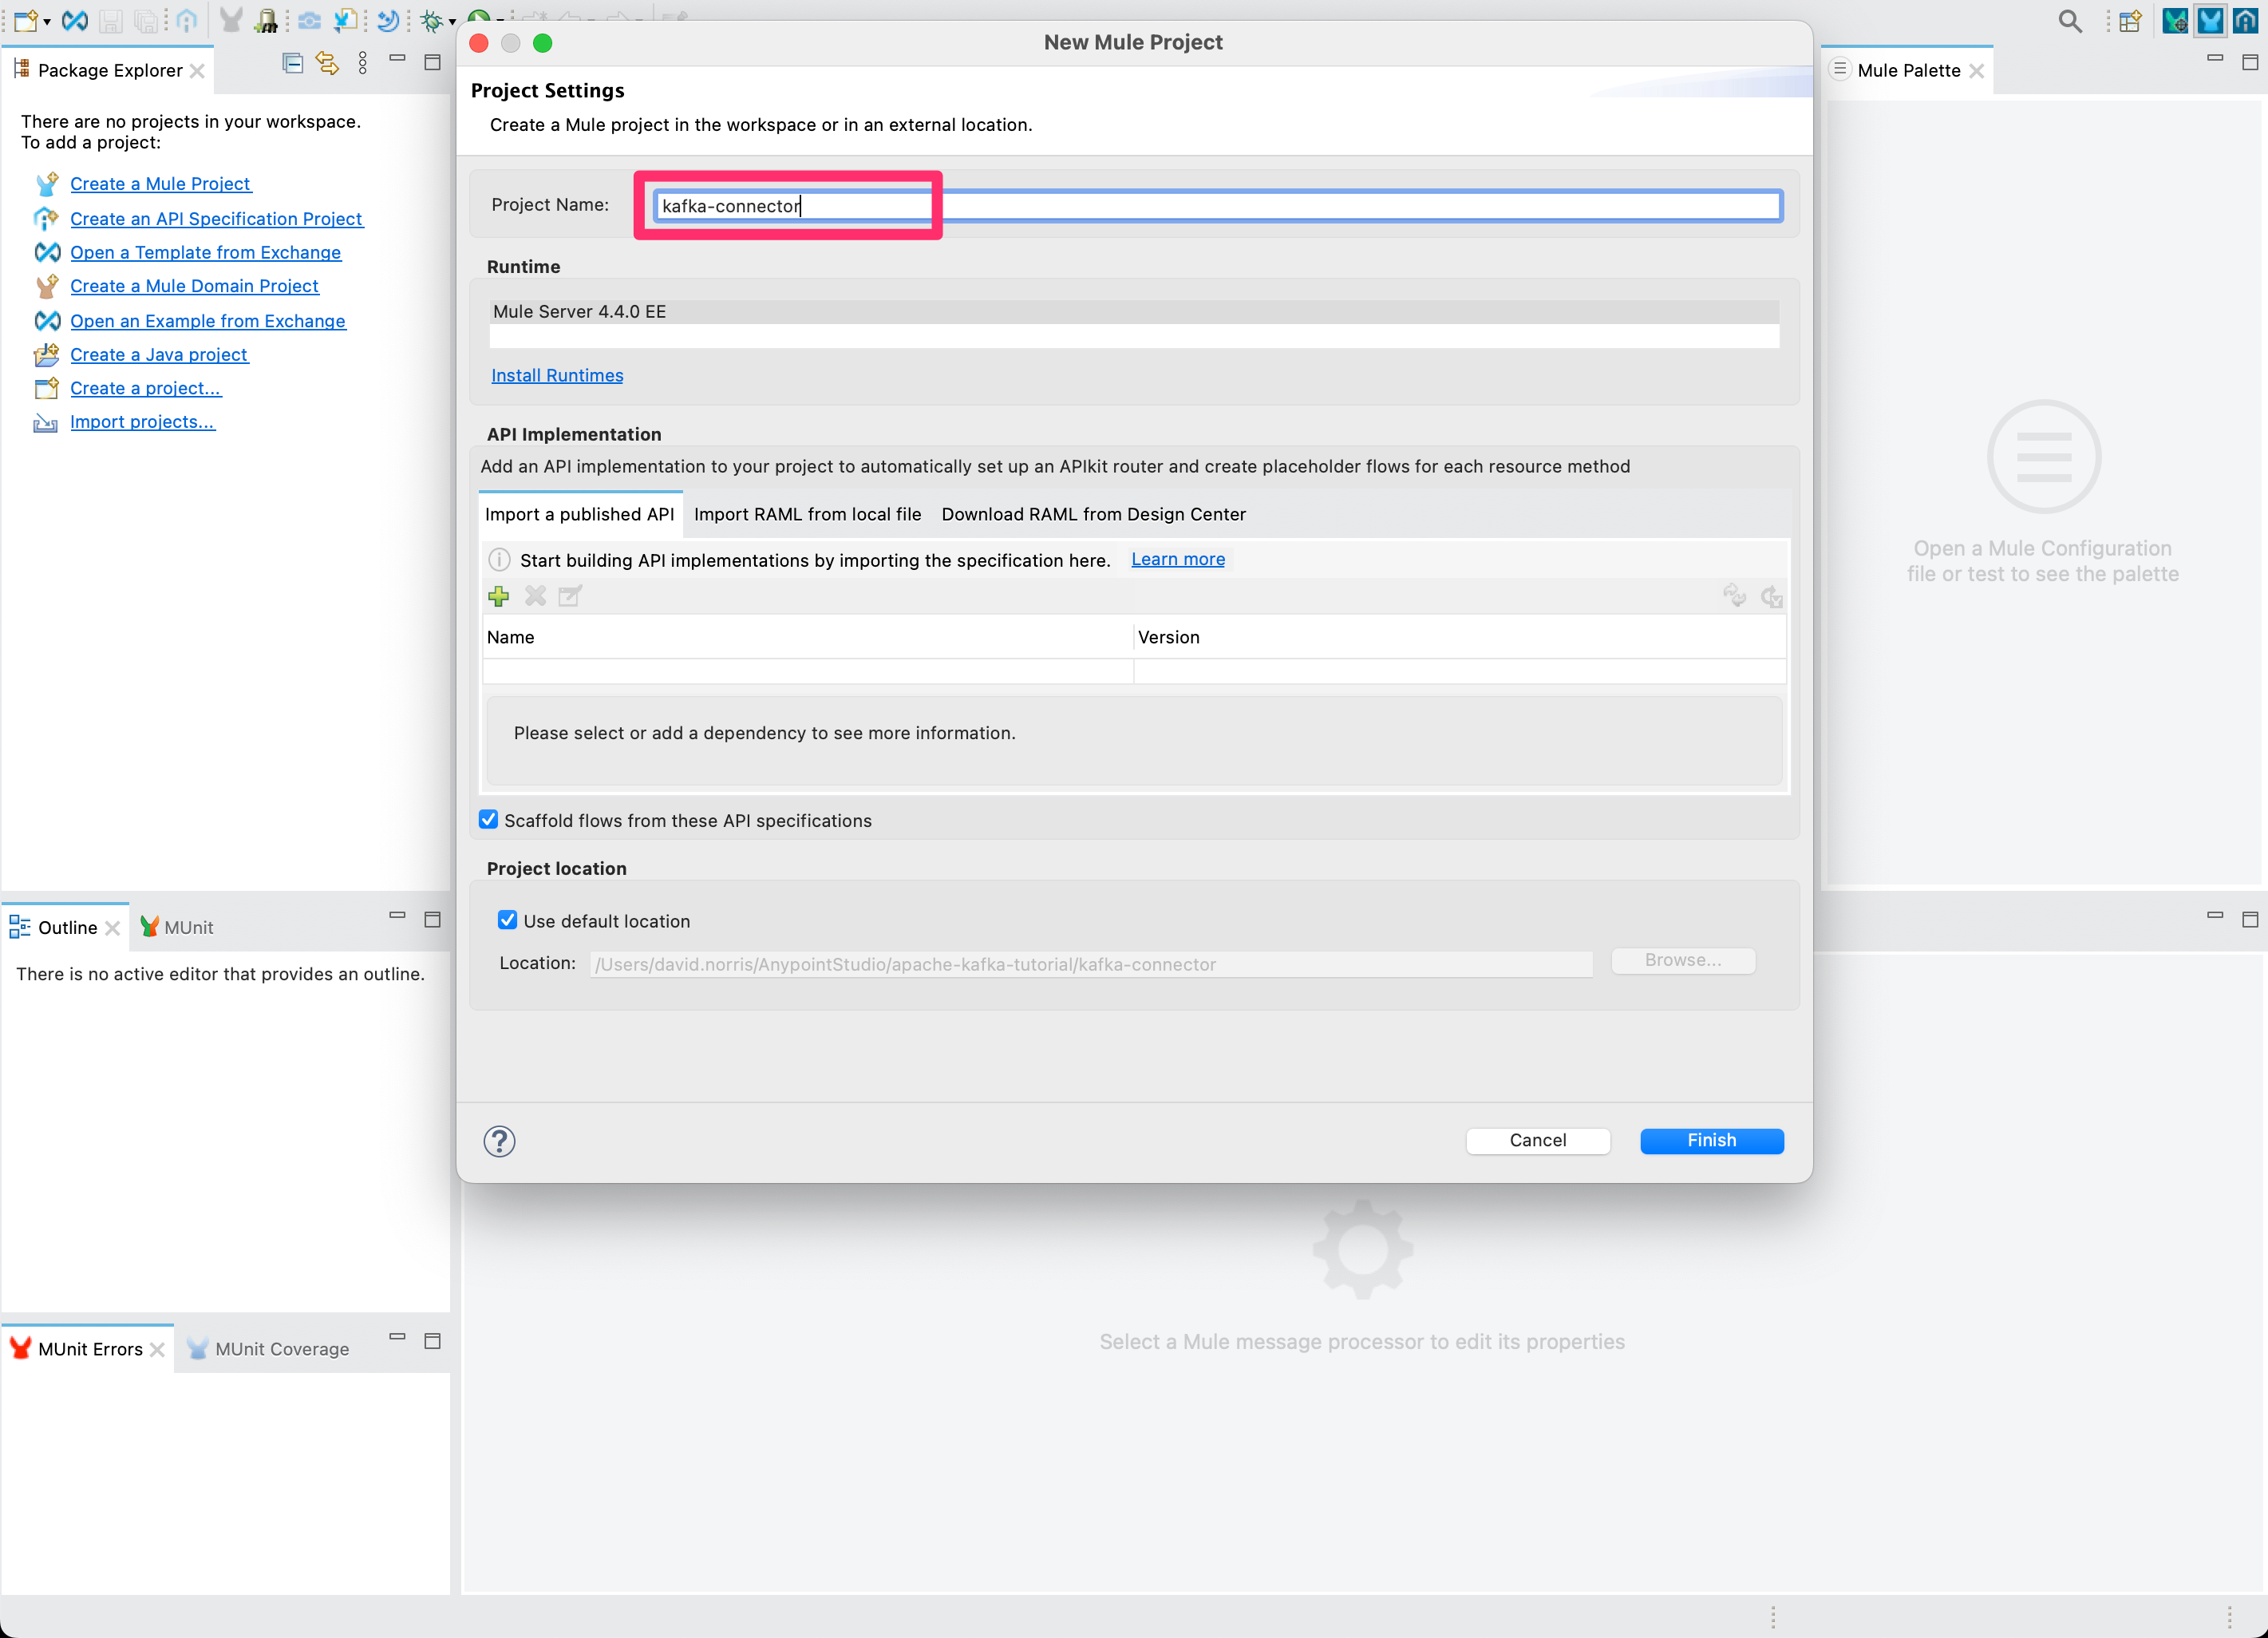
Create Mule Project
1 - Launch Anypoint Studio, click on File then select New > Mule Project. Call the project kafka-connector and click Finish.
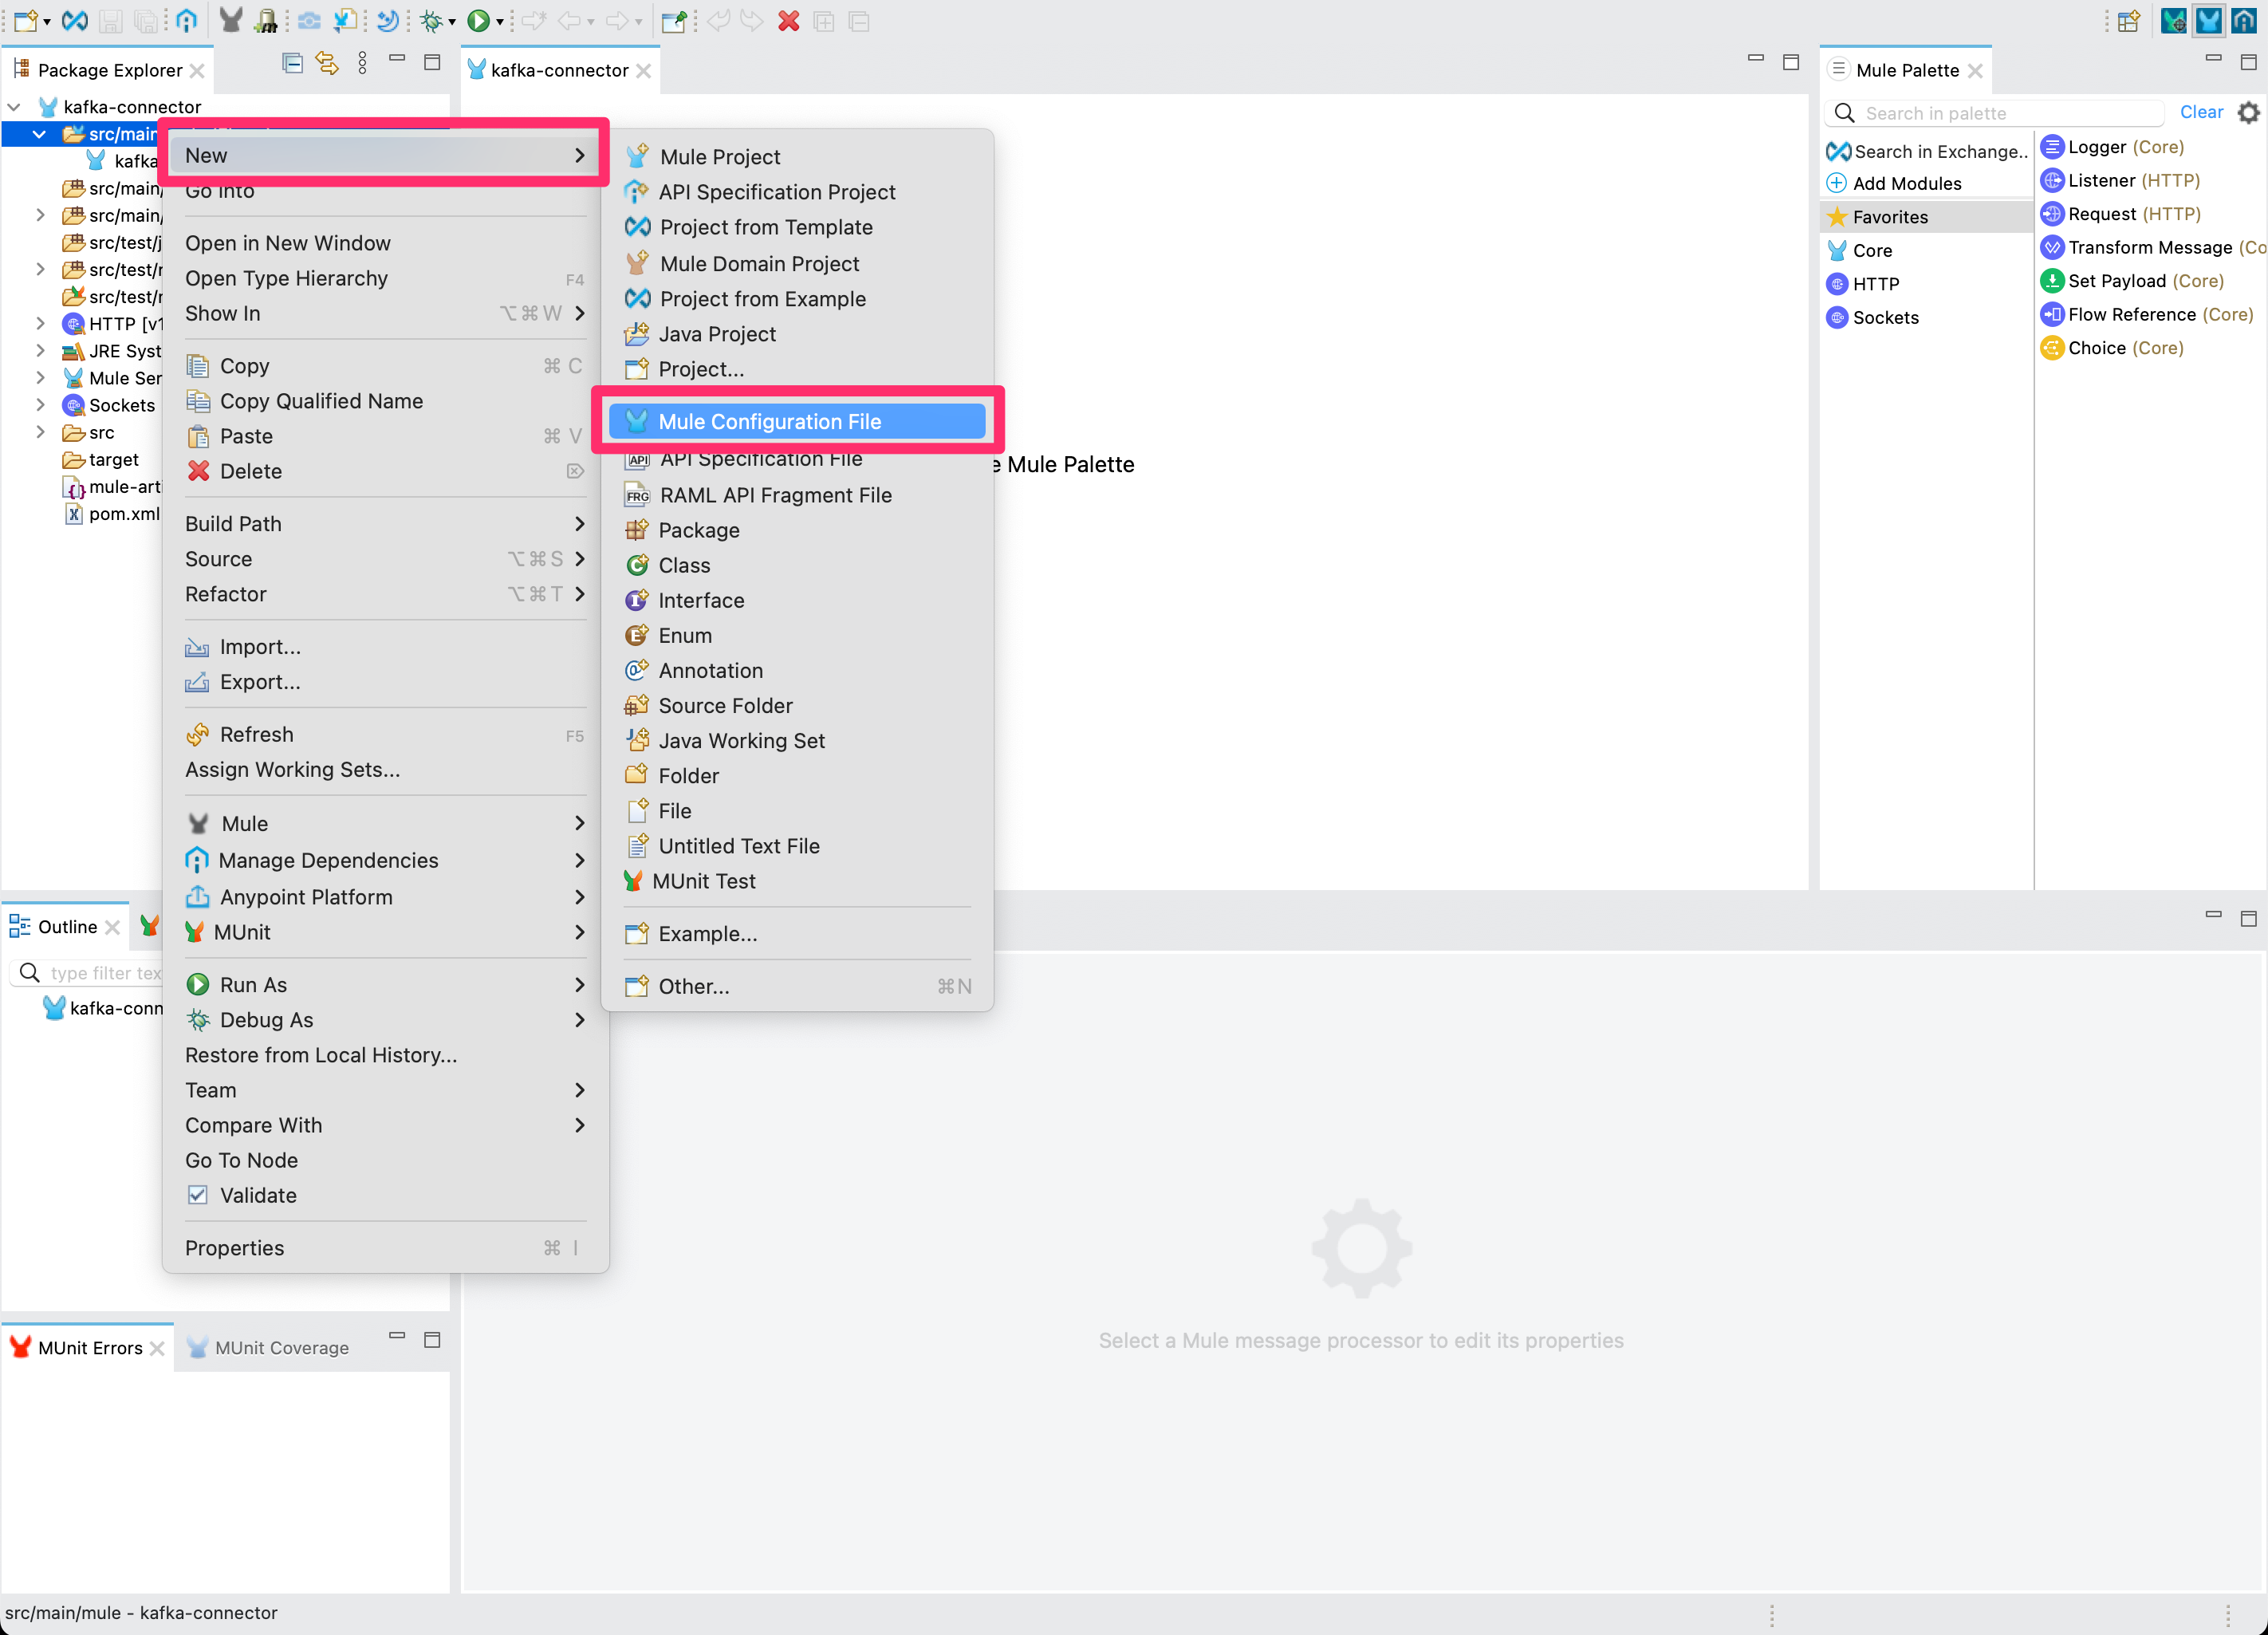
2 - Create a global.xml file to store your connector configuration. Right-click on the src/main/mule folder. Select New > Mule Configuration File.
Creating a global.xml configuration file is considered a best practice to follow. It allows you to share configuration details between multiple Mule flows within the same Mule application. This is where you can put shared error handling, connector configuration details and shared property files. In this tutorial we will be configuring a secured property file and Apache Kafka connector configuration.
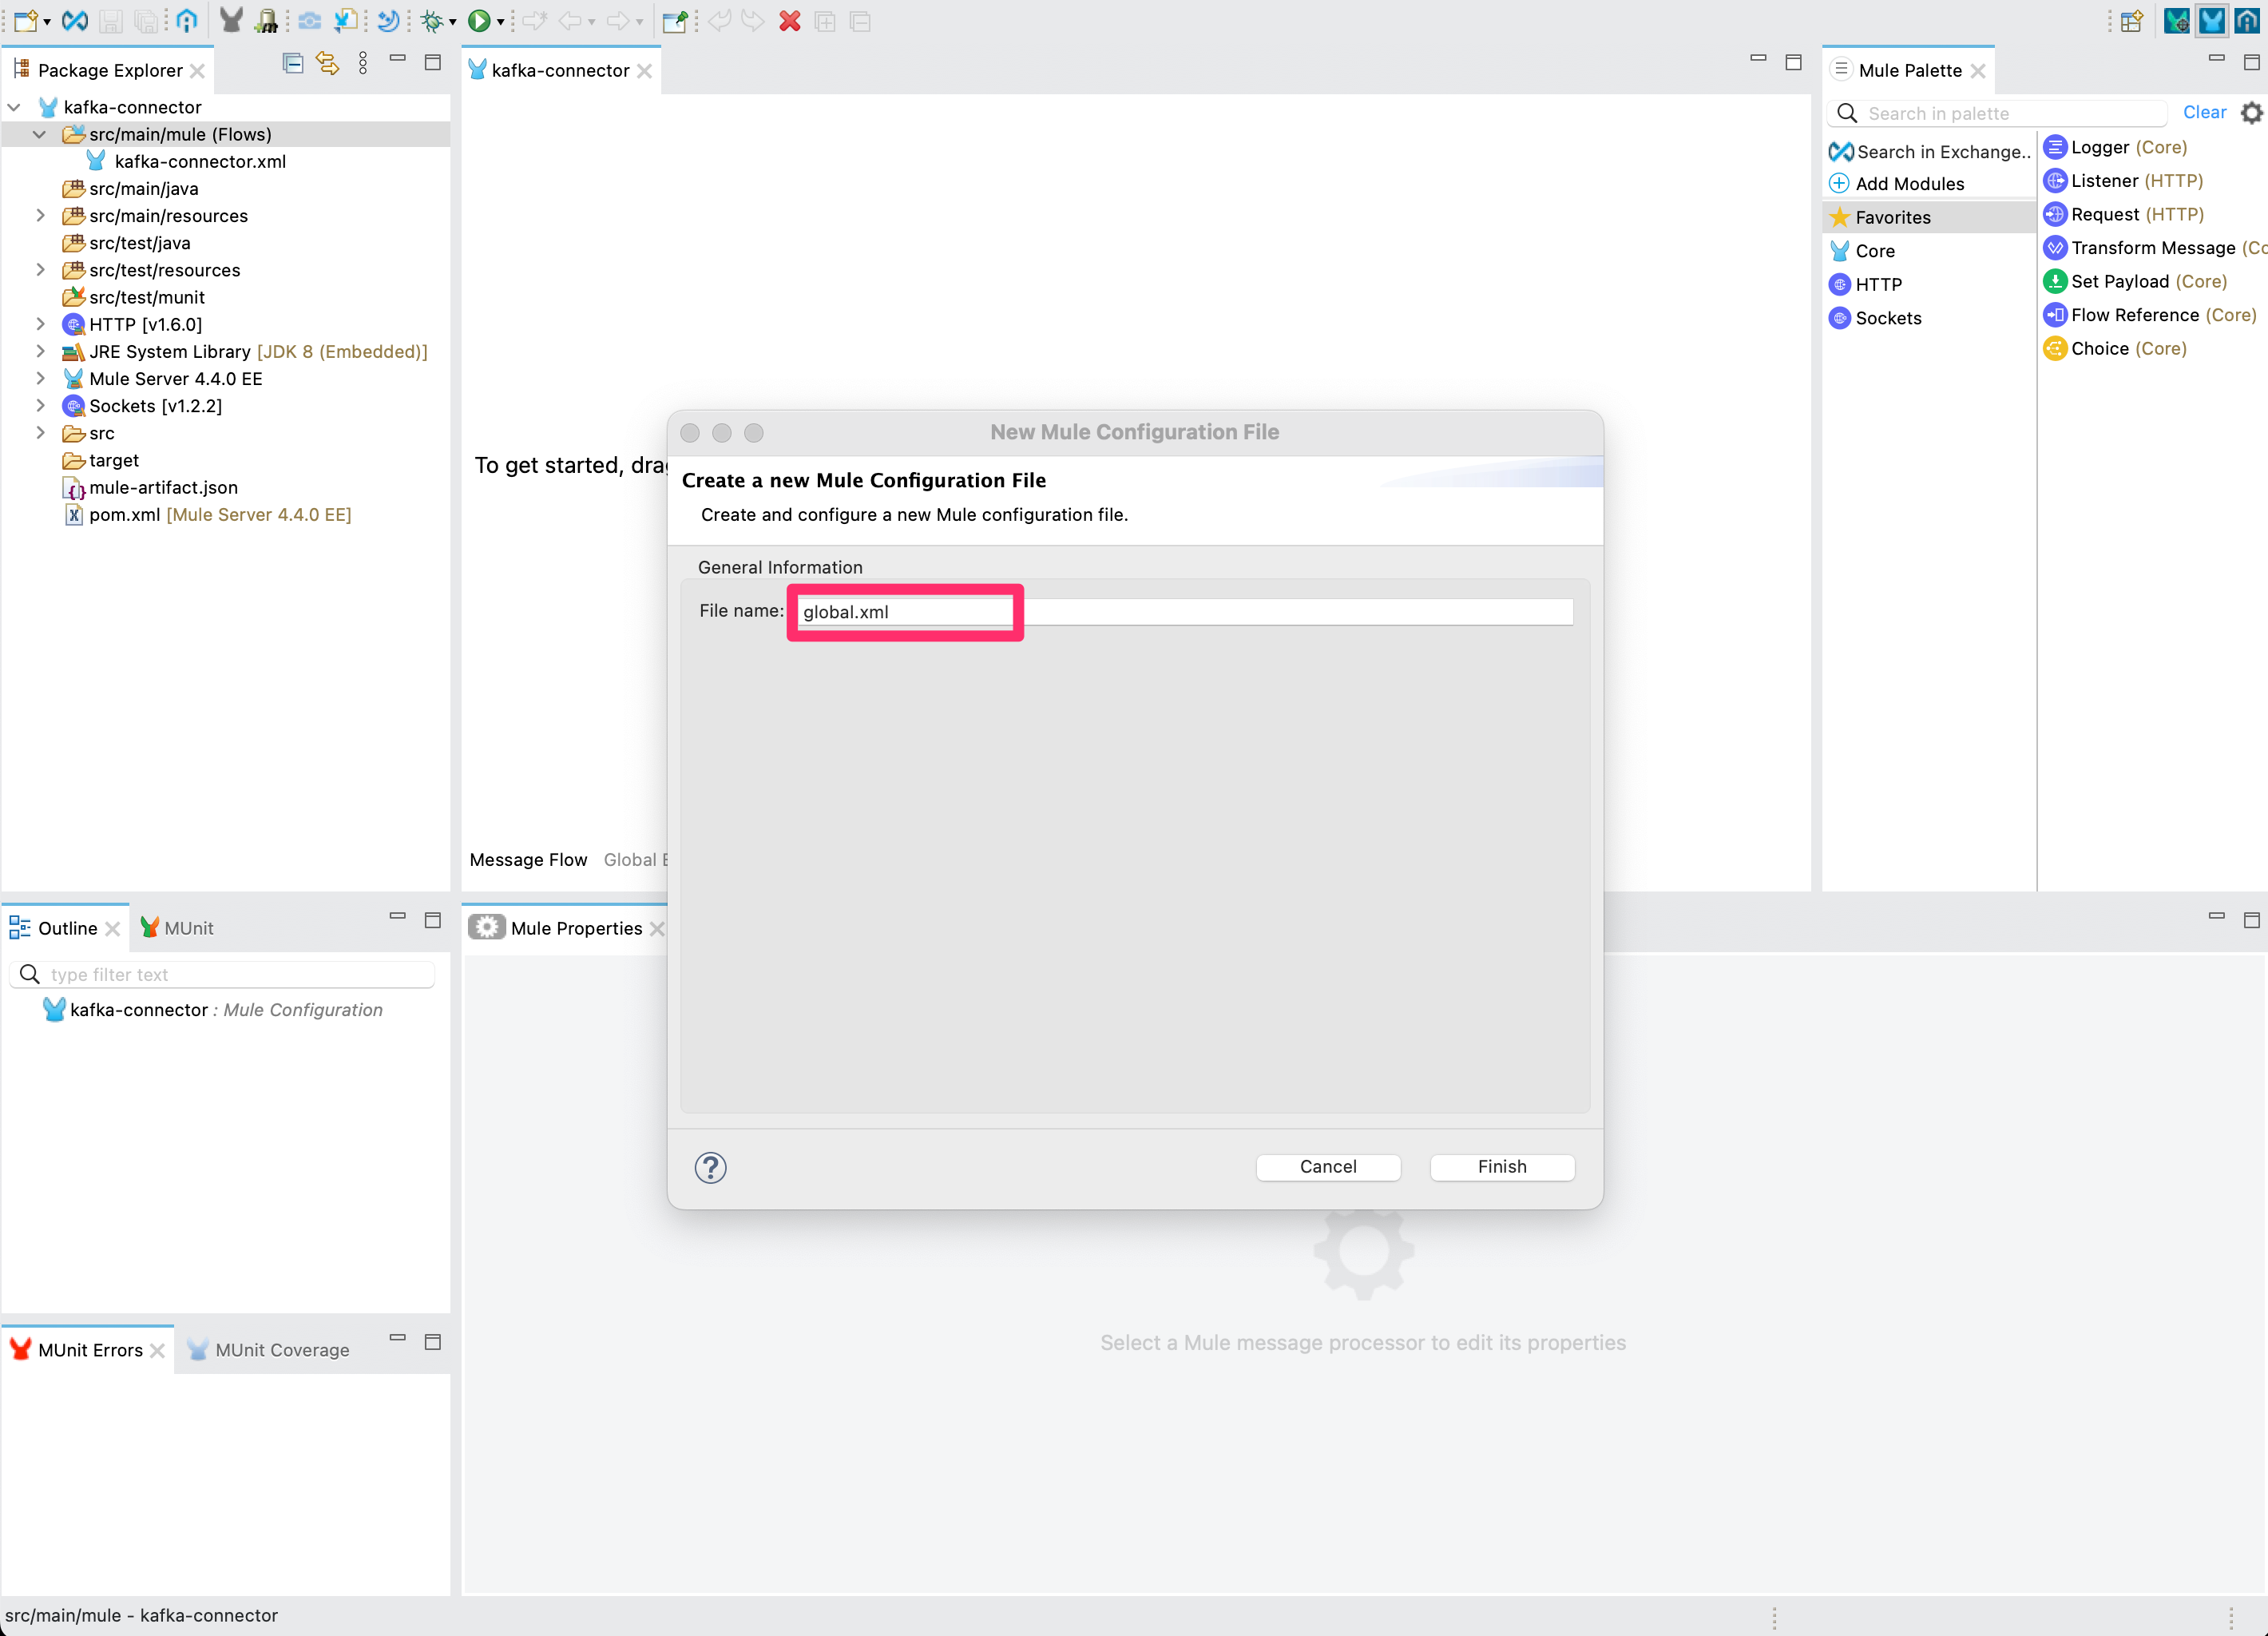
Name the file global.xml and click Finish.
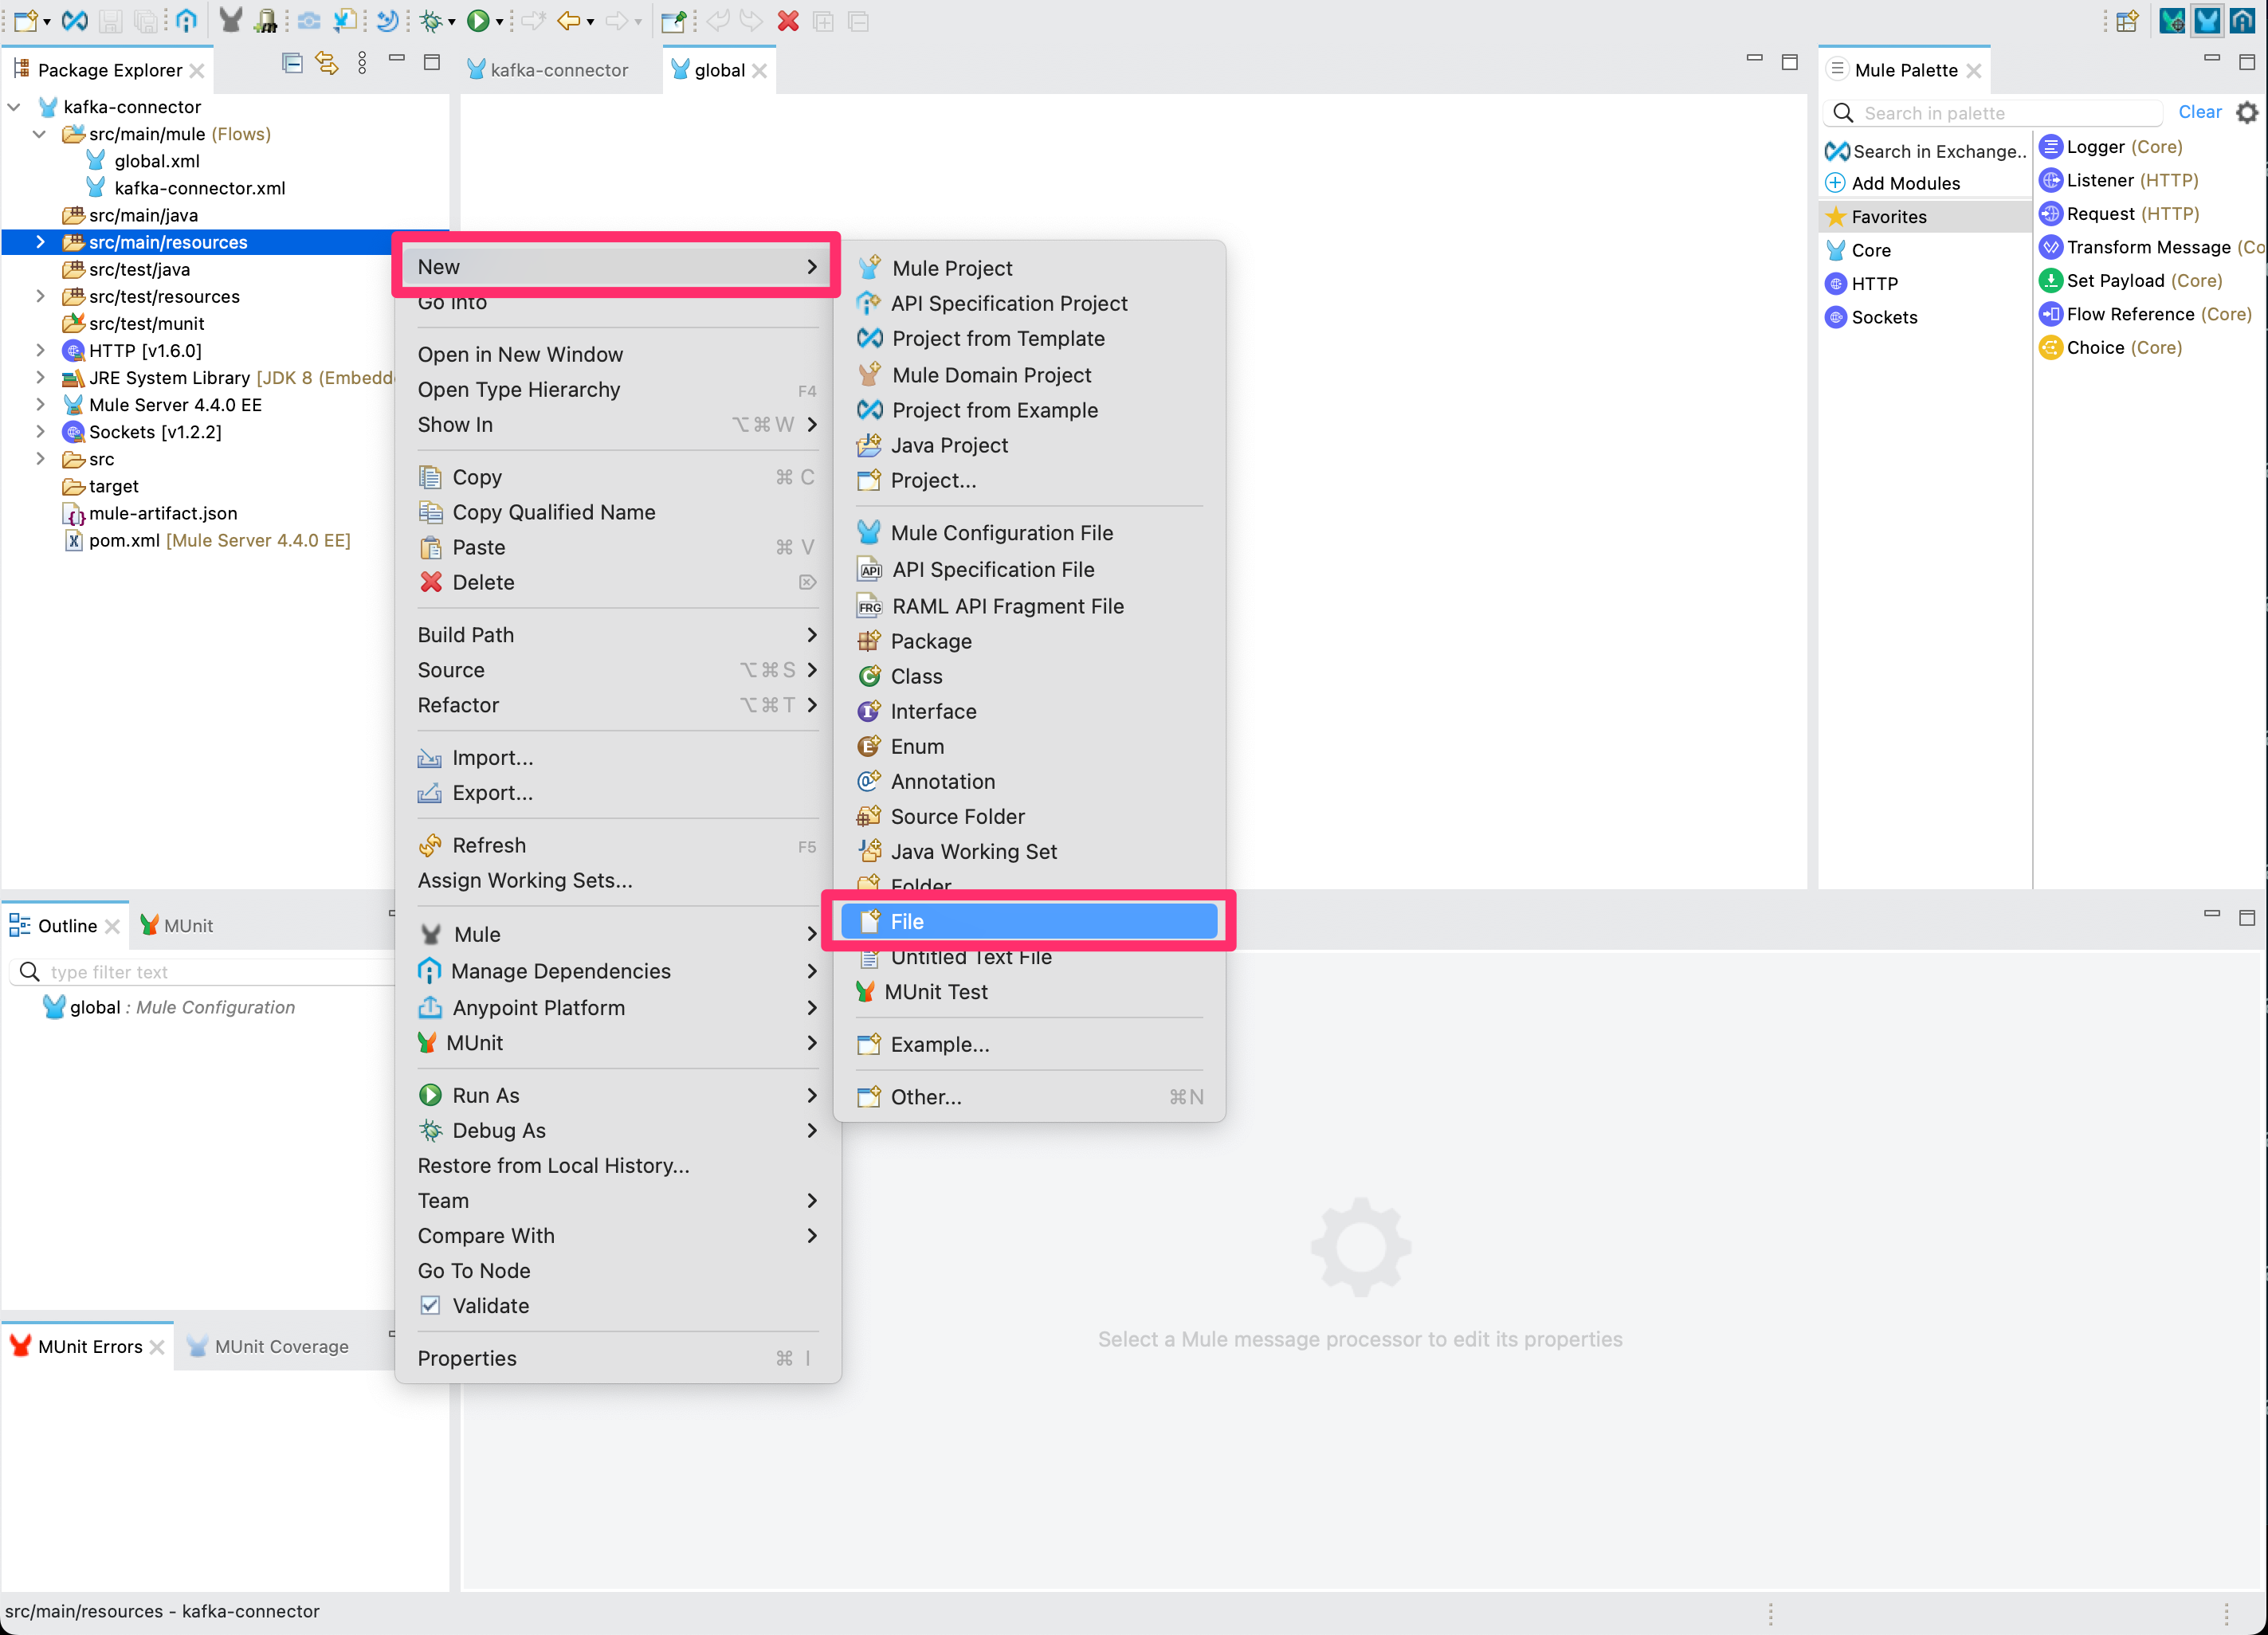
3 - Create a file to store your configuration variables. Right-click the src/main/resources folder, then select New > File to create a properties file to hold our Apache Kafka environment variables.
It is considered best practice to externalise aspects of your API implementations to make them easier to manage. In this tutorial we will be externalising the Apache Kafka configuration details into a properties file and encrypting sensitive values. Whilst beyond the scope of this tutorial, you should also consider having property files for each environment.
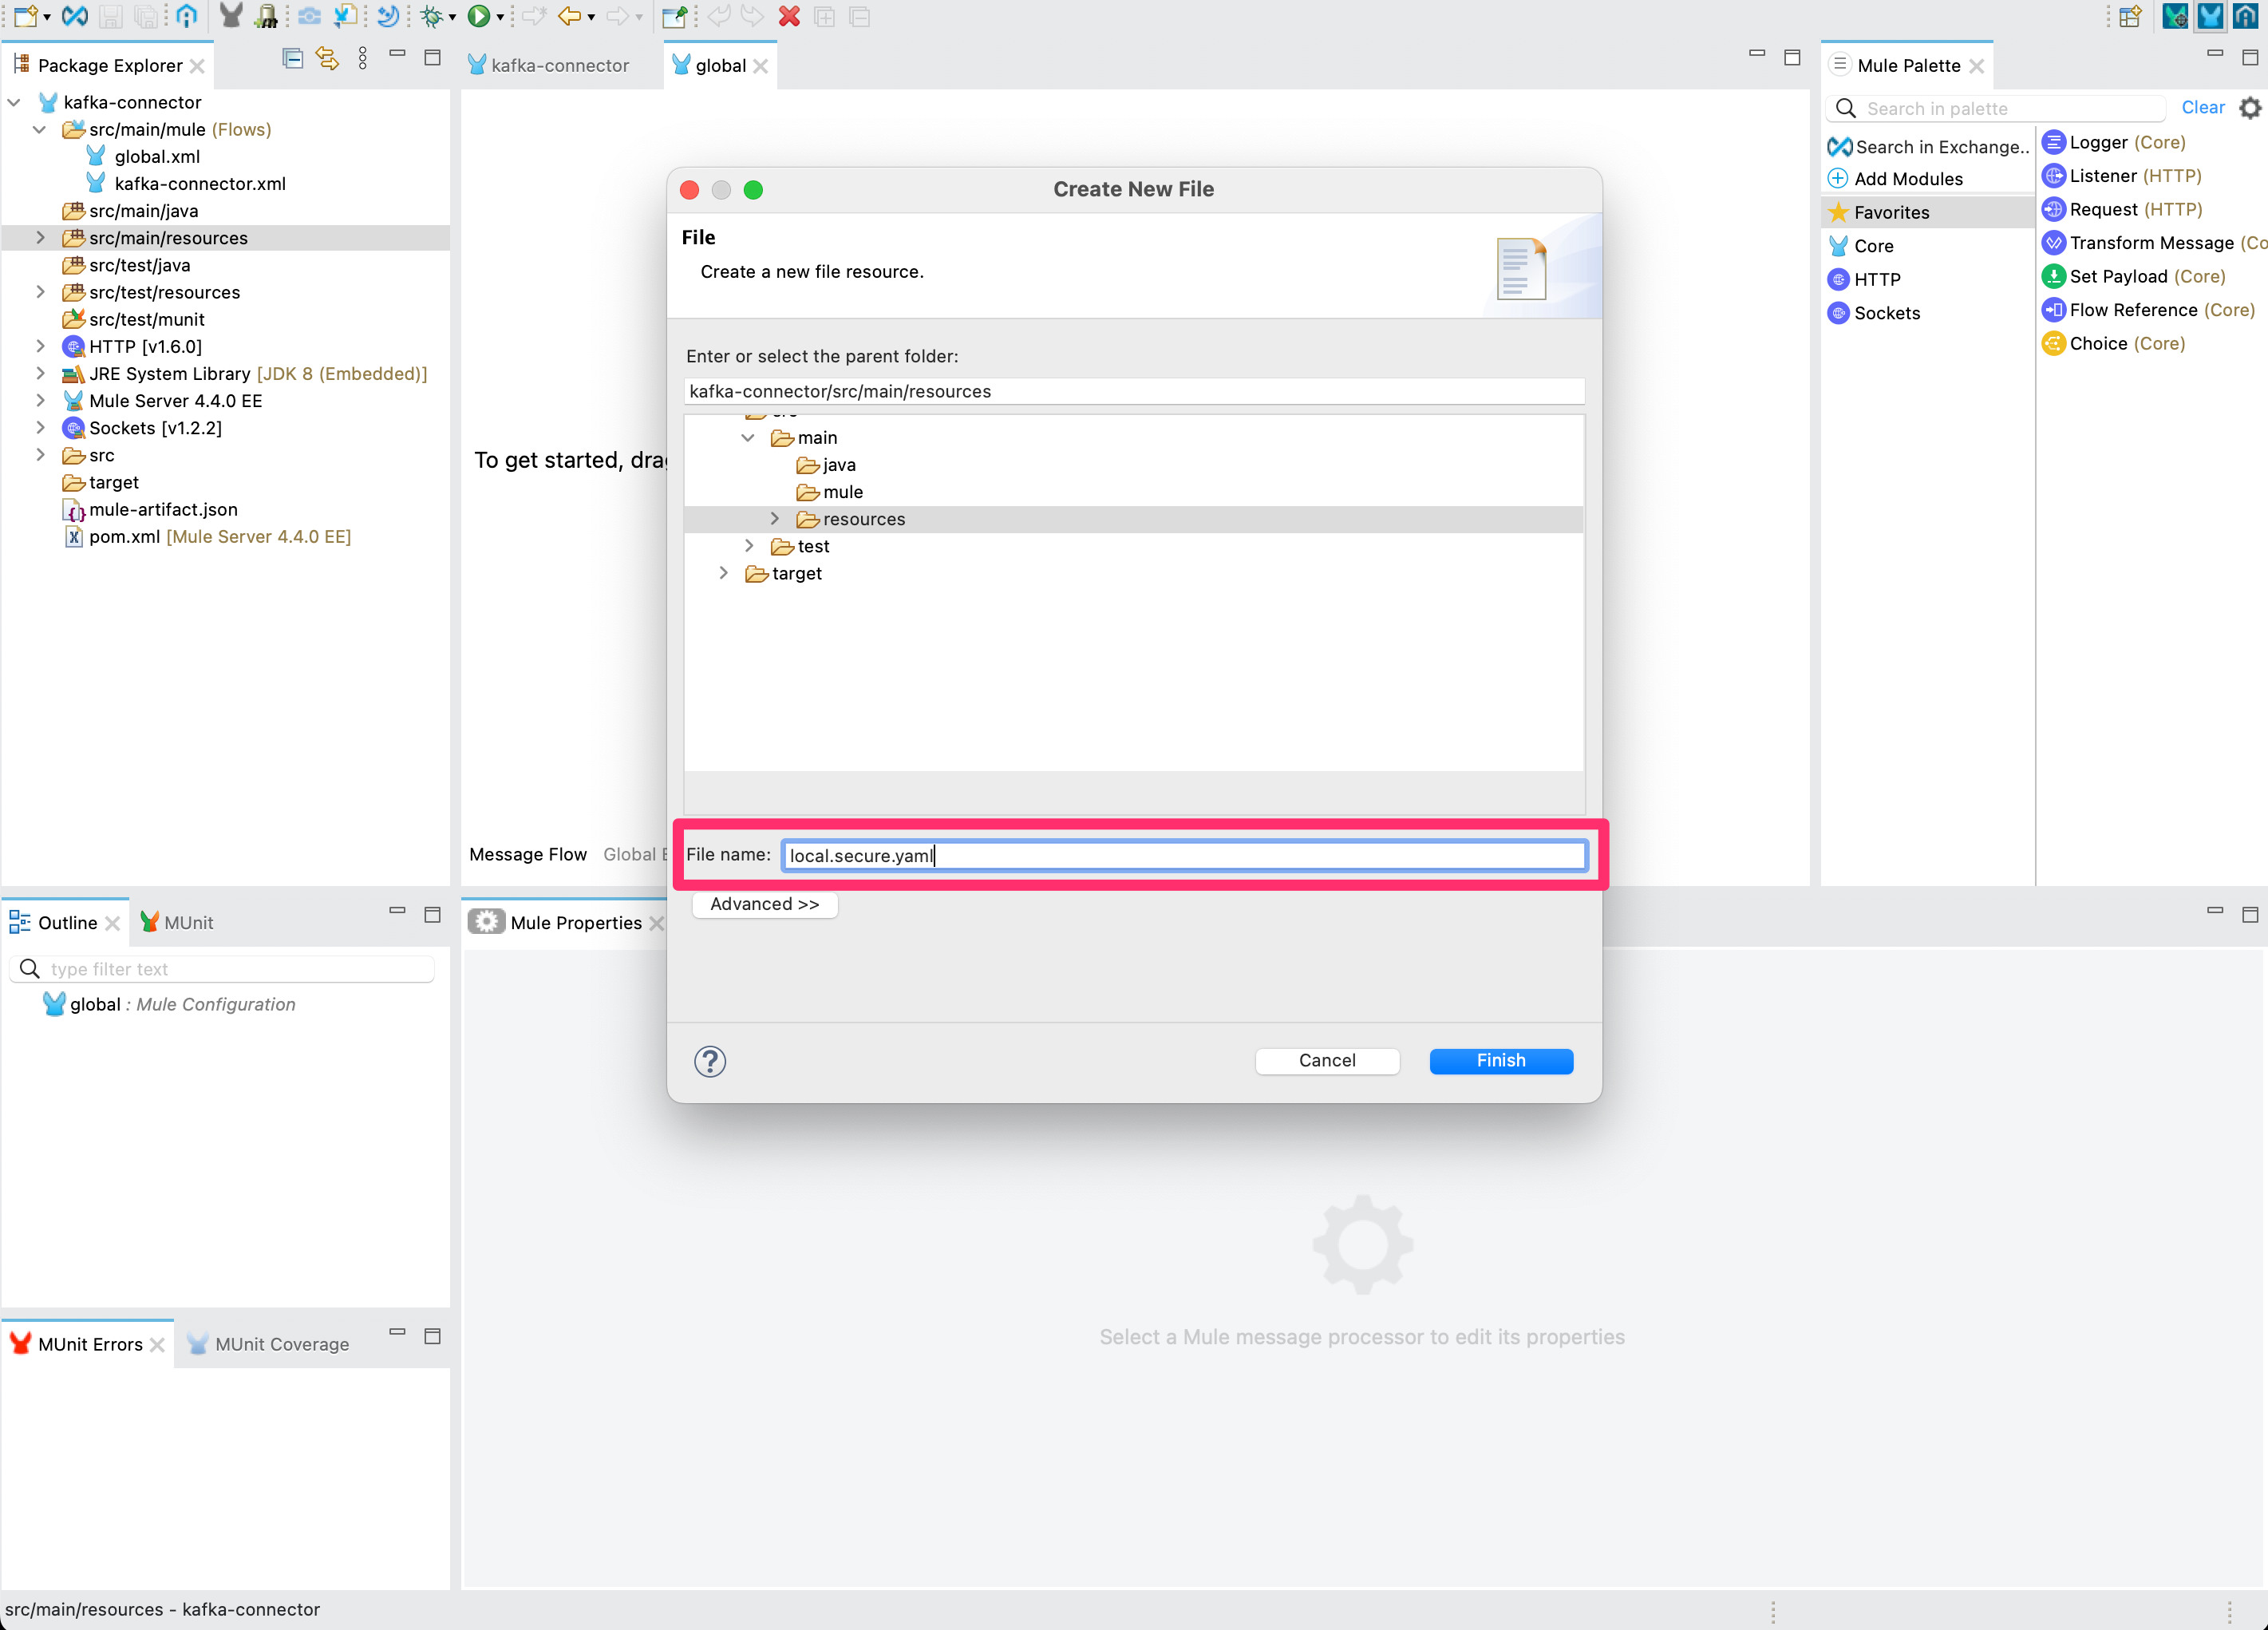
Call the file local.secure.yaml.
Inside the local.secure.yaml file create the following properties by copying and pasting the items below. Note that we’ve left placeholders for the sensitive values, keystorePassword, keystoreKeyPassword and truststorePassword, that we’ll address in the next step by encrypting them. At this stage just replace the values for serverURLs, consumerGroup and topics using the prefix you obtained in steps 7 and 8 when setting up your Heroku Kafka instance.
1
2
3
4
5
6
herokuKafka:
    serverURLs: "kafka+ssl://ec2-18-233-211-98.compute-1.amazonaws.com:9096,kafka+ssl://ec2-18-233-140-74.compute-1.amazonaws.com:9096,kafka+ssl://ec2-34-224-229-106.compute-1.amazonaws.com:9096,kafka+ssl://ec2-52-204-144-208.compute-1.amazonaws.com:9096,kafka+ssl://ec2-34-235-216-30.compute-1.amazonaws.com:9096,kafka+ssl://ec2-34-203-24-91.compute-1.amazonaws.com:9096,kafka+ssl://ec2-18-204-47-99.compute-1.amazonaws.com:9096,kafka+ssl://ec2-18-208-61-56.compute-1.amazonaws.com:9096"
    consumerGroup: "apalachicola-1388.mule-group"
    topics: "apalachicola-1388.raw-stream"
    keystorePassword: "![TBD]"
    truststorePassword: "![TBD]"
4 - Generate encrypted values to secure your Kafka truststore and keystore passwords. Download the Secure Properties Tool Jar file.
Open a terminal or command line prompt in the directory where this Jar file is located and run the following command replacing the value for <your-encryption-key> to be a unique string used to generate the encrypted value and <your-salesforce-password> which is the password you used when creating your Heroku Kafka keystore.
1
2
3
4
5
6
7
java -cp secure-properties-tool.jar com.mulesoft.tools.SecurePropertiesTool \
string \
encrypt \
Blowfish \
CBC \
<your-encryption-key> \
<your-keystore-password>
Output
1
Fee45tJ6uh/2bVFRReHvSA4Jg==
Make a note of the encrypted value in the output and repeat the steps to encrypt your keystore password and your truststore password.
5 - Add encrypted values to your local.secure.yaml file. After you get the encrypted values from the output, you add it to your local.secure.yaml file using the following syntax:
"![encryptedValue]"If your encrypted value was DeftJuh/2bVFRReHvSA4Jg==, then your property should be ![DeftJuh/2bVFRReHvSA4Jg==]. You should end up with something like this:
1
2
3
4
5
6
herokuKafka:
    serverURLs: "kafka+ssl://ec2-18-233-211-98.compute-1.amazonaws.com:9096,kafka+ssl://ec2-18-233-140-74.compute-1.amazonaws.com:9096,kafka+ssl://ec2-34-224-229-106.compute-1.amazonaws.com:9096,kafka+ssl://ec2-52-204-144-208.compute-1.amazonaws.com:9096,kafka+ssl://ec2-34-235-216-30.compute-1.amazonaws.com:9096,kafka+ssl://ec2-34-203-24-91.compute-1.amazonaws.com:9096,kafka+ssl://ec2-18-204-47-99.compute-1.amazonaws.com:9096,kafka+ssl://ec2-18-208-61-56.compute-1.amazonaws.com:9096"
    consumerGroup: "apalachicola-1388.mule-group"
    topics: "apalachicola-1388.raw-stream"
    keystorePassword: "![Defti6o1Io2t4dflGqs8o9S4A==]"
    truststorePassword: "![ai6o1Ioe3t5dnlGqs8o9S4A==]"
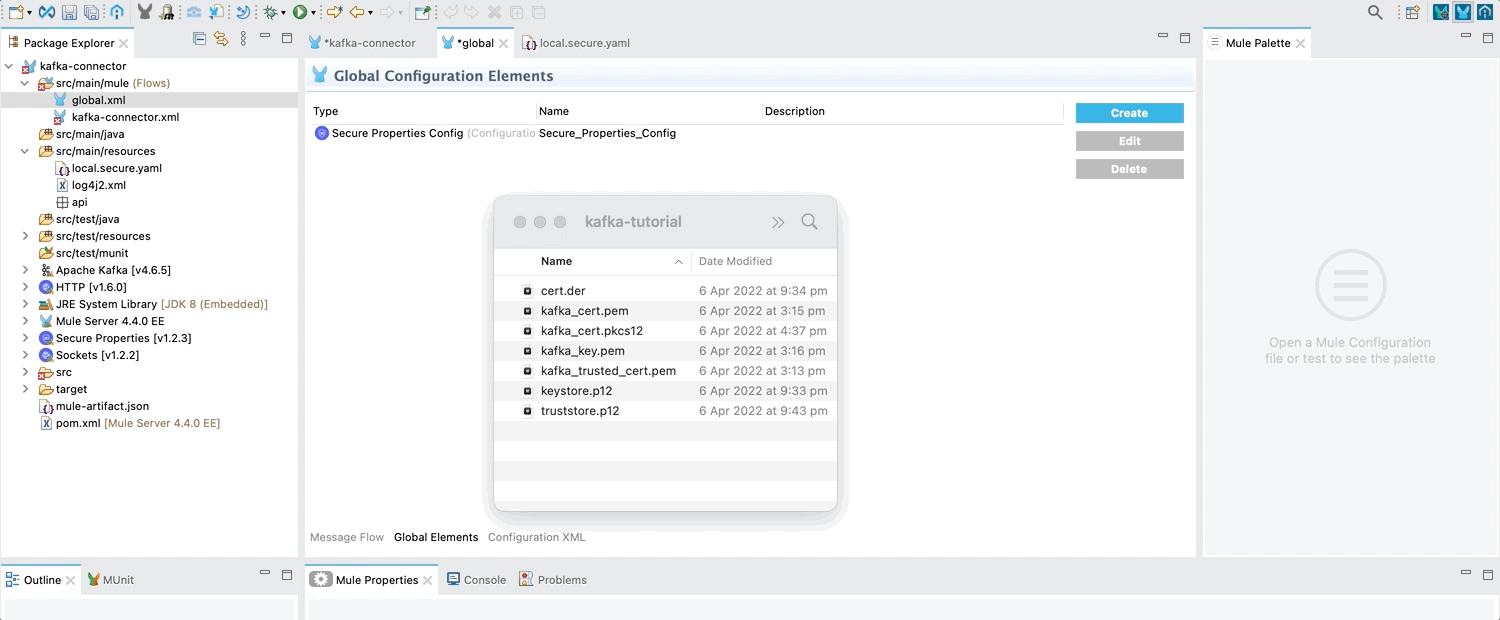
6 - Add the Mule Secure Configuration Properties module. In your global.xml file, select the Search in Exchange option from the Mule Palette. Search for the module and click on Add > then Finish.

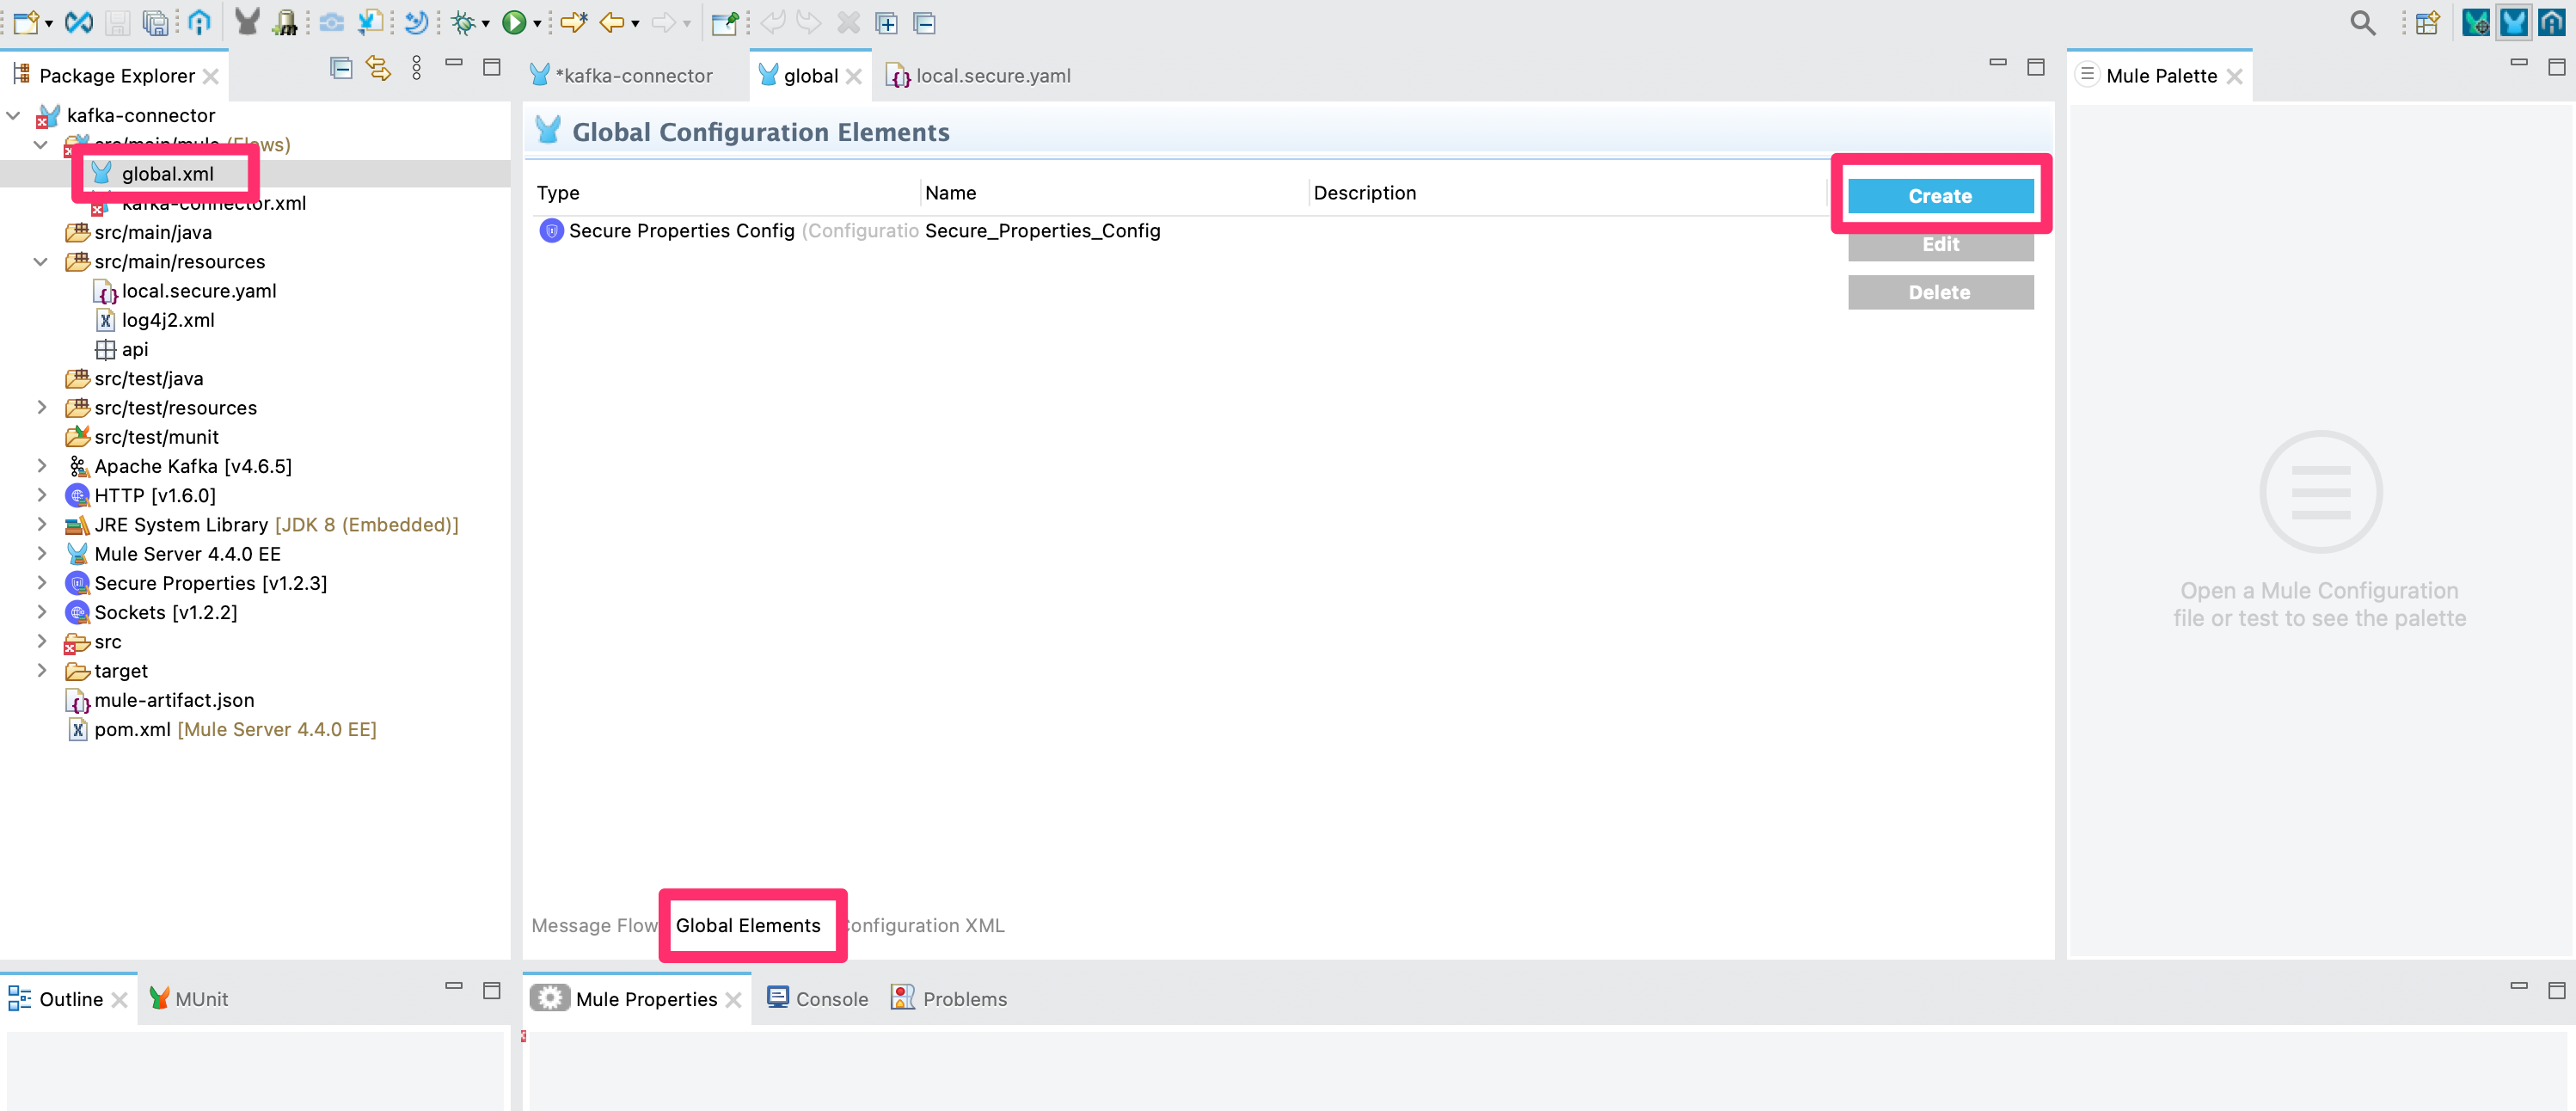
7 - Create the secure properties configuration.
In your global.xml file, go to the Global Elements view. Click the Create button and create a Secure Properties Config. Under File, type ${env}.secure.yaml. This is a dynamic file that allows developers to have more than one properties file with different variables per environment (like development, qa and prod) and set a property that is read at runtime to determine which file to use. When we run this project we’ll set a property for local testing that will result in the variables in local.secure.properties from being read at runtime.
Under Key, type ${encryption.key} and select Blowfish as the Algorithm.

8 - Hide encryption.key value from deployment properties.
Open the mule-artifact.json file in Anypoint Studio and add this line before the closing brackets (don’t forget to add a comma at the end of the minMuleVersion line):
1
"secureProperties": ["encryption.key"]
Add the Apache Kafka connector
1 - Add the Apache Kafka Connector - Mule 4 Anypoint connector to your project.
Double click on the file kafka-connector.xml under src/main/mule.
In the Mule Palette on the right hand side click Search in Exchange…. In the Add Dependencies to Project dialog search for the Apache Kafka Connector - Mule 4 module. Select the module and click Add then Finish.
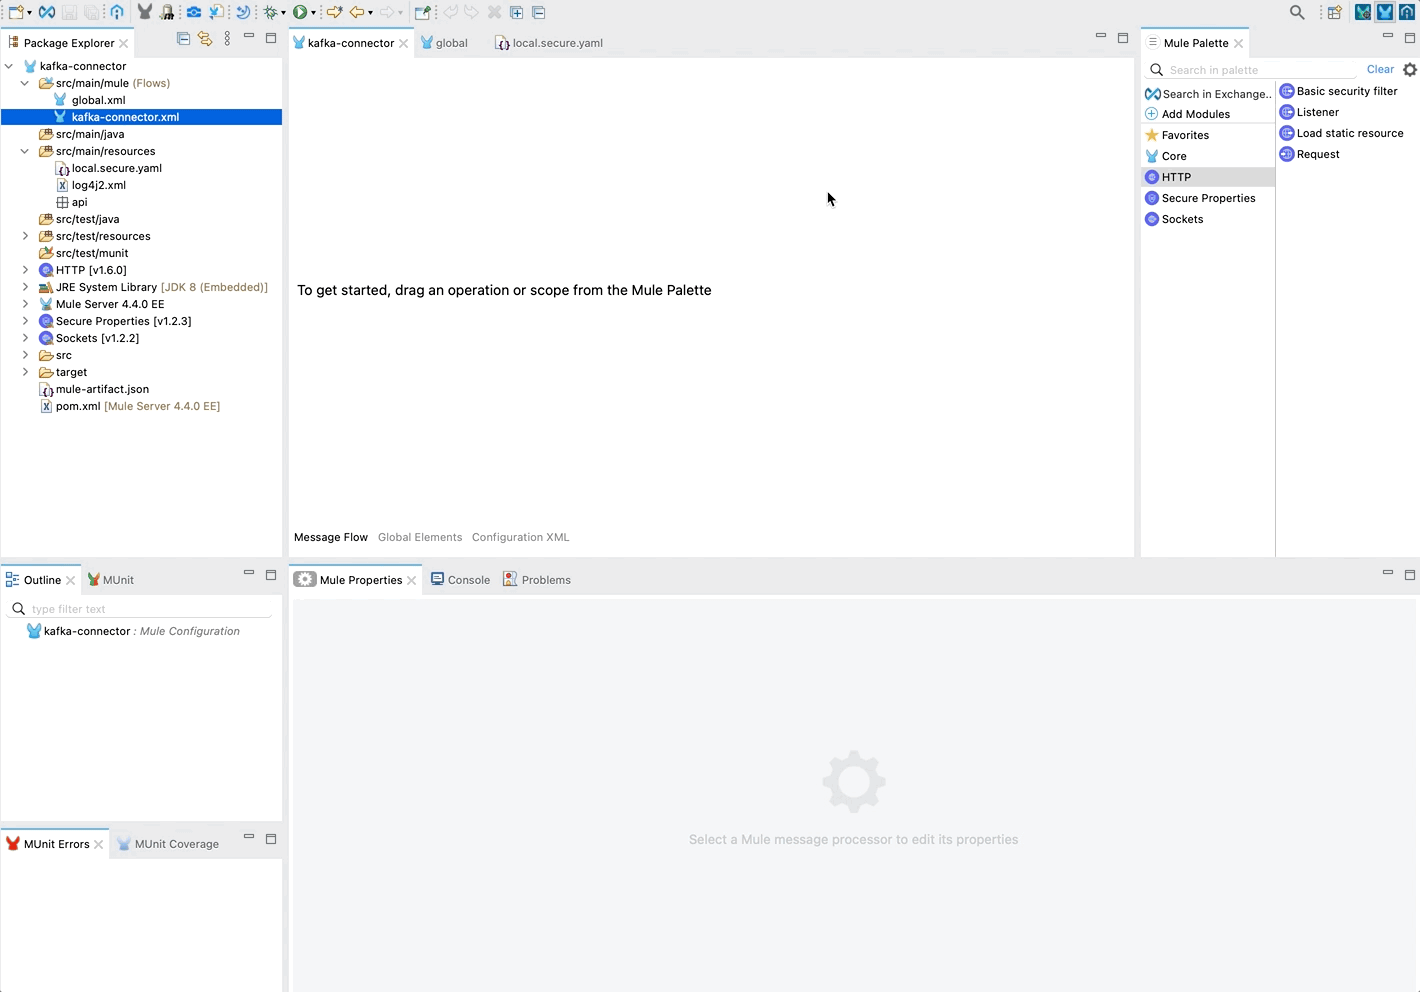
2 - Copy the keystore and truststore into your project
Drag and drop the keystore.p12 and truststore.p12 files you created earlier into the src/main/resources folder
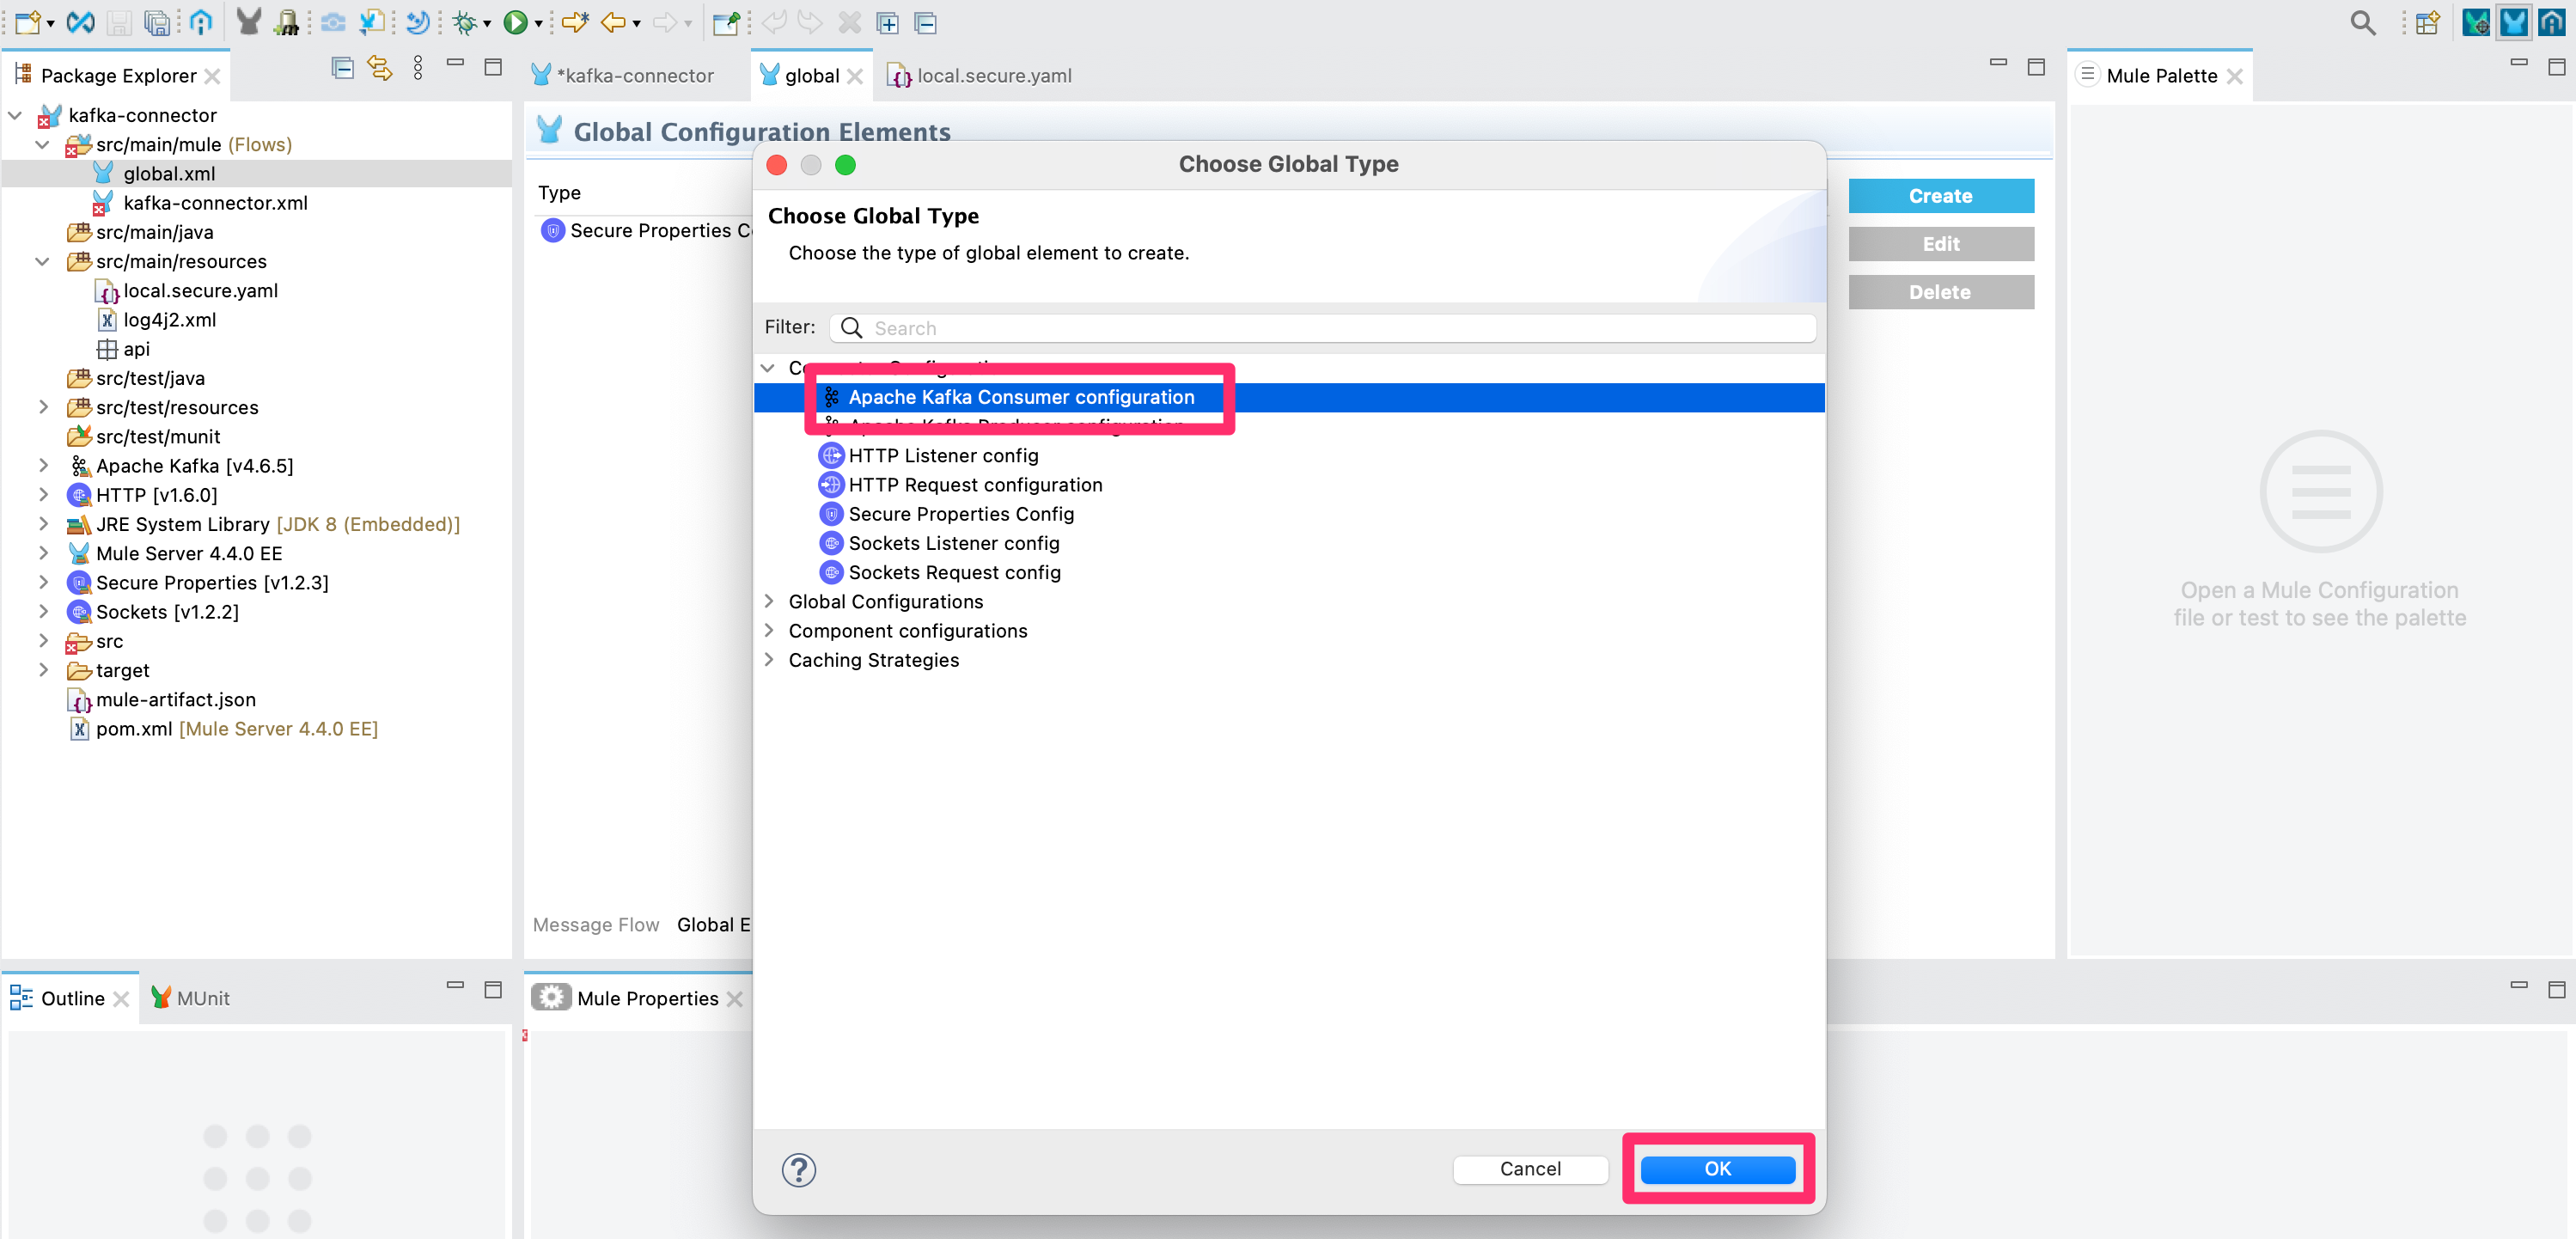
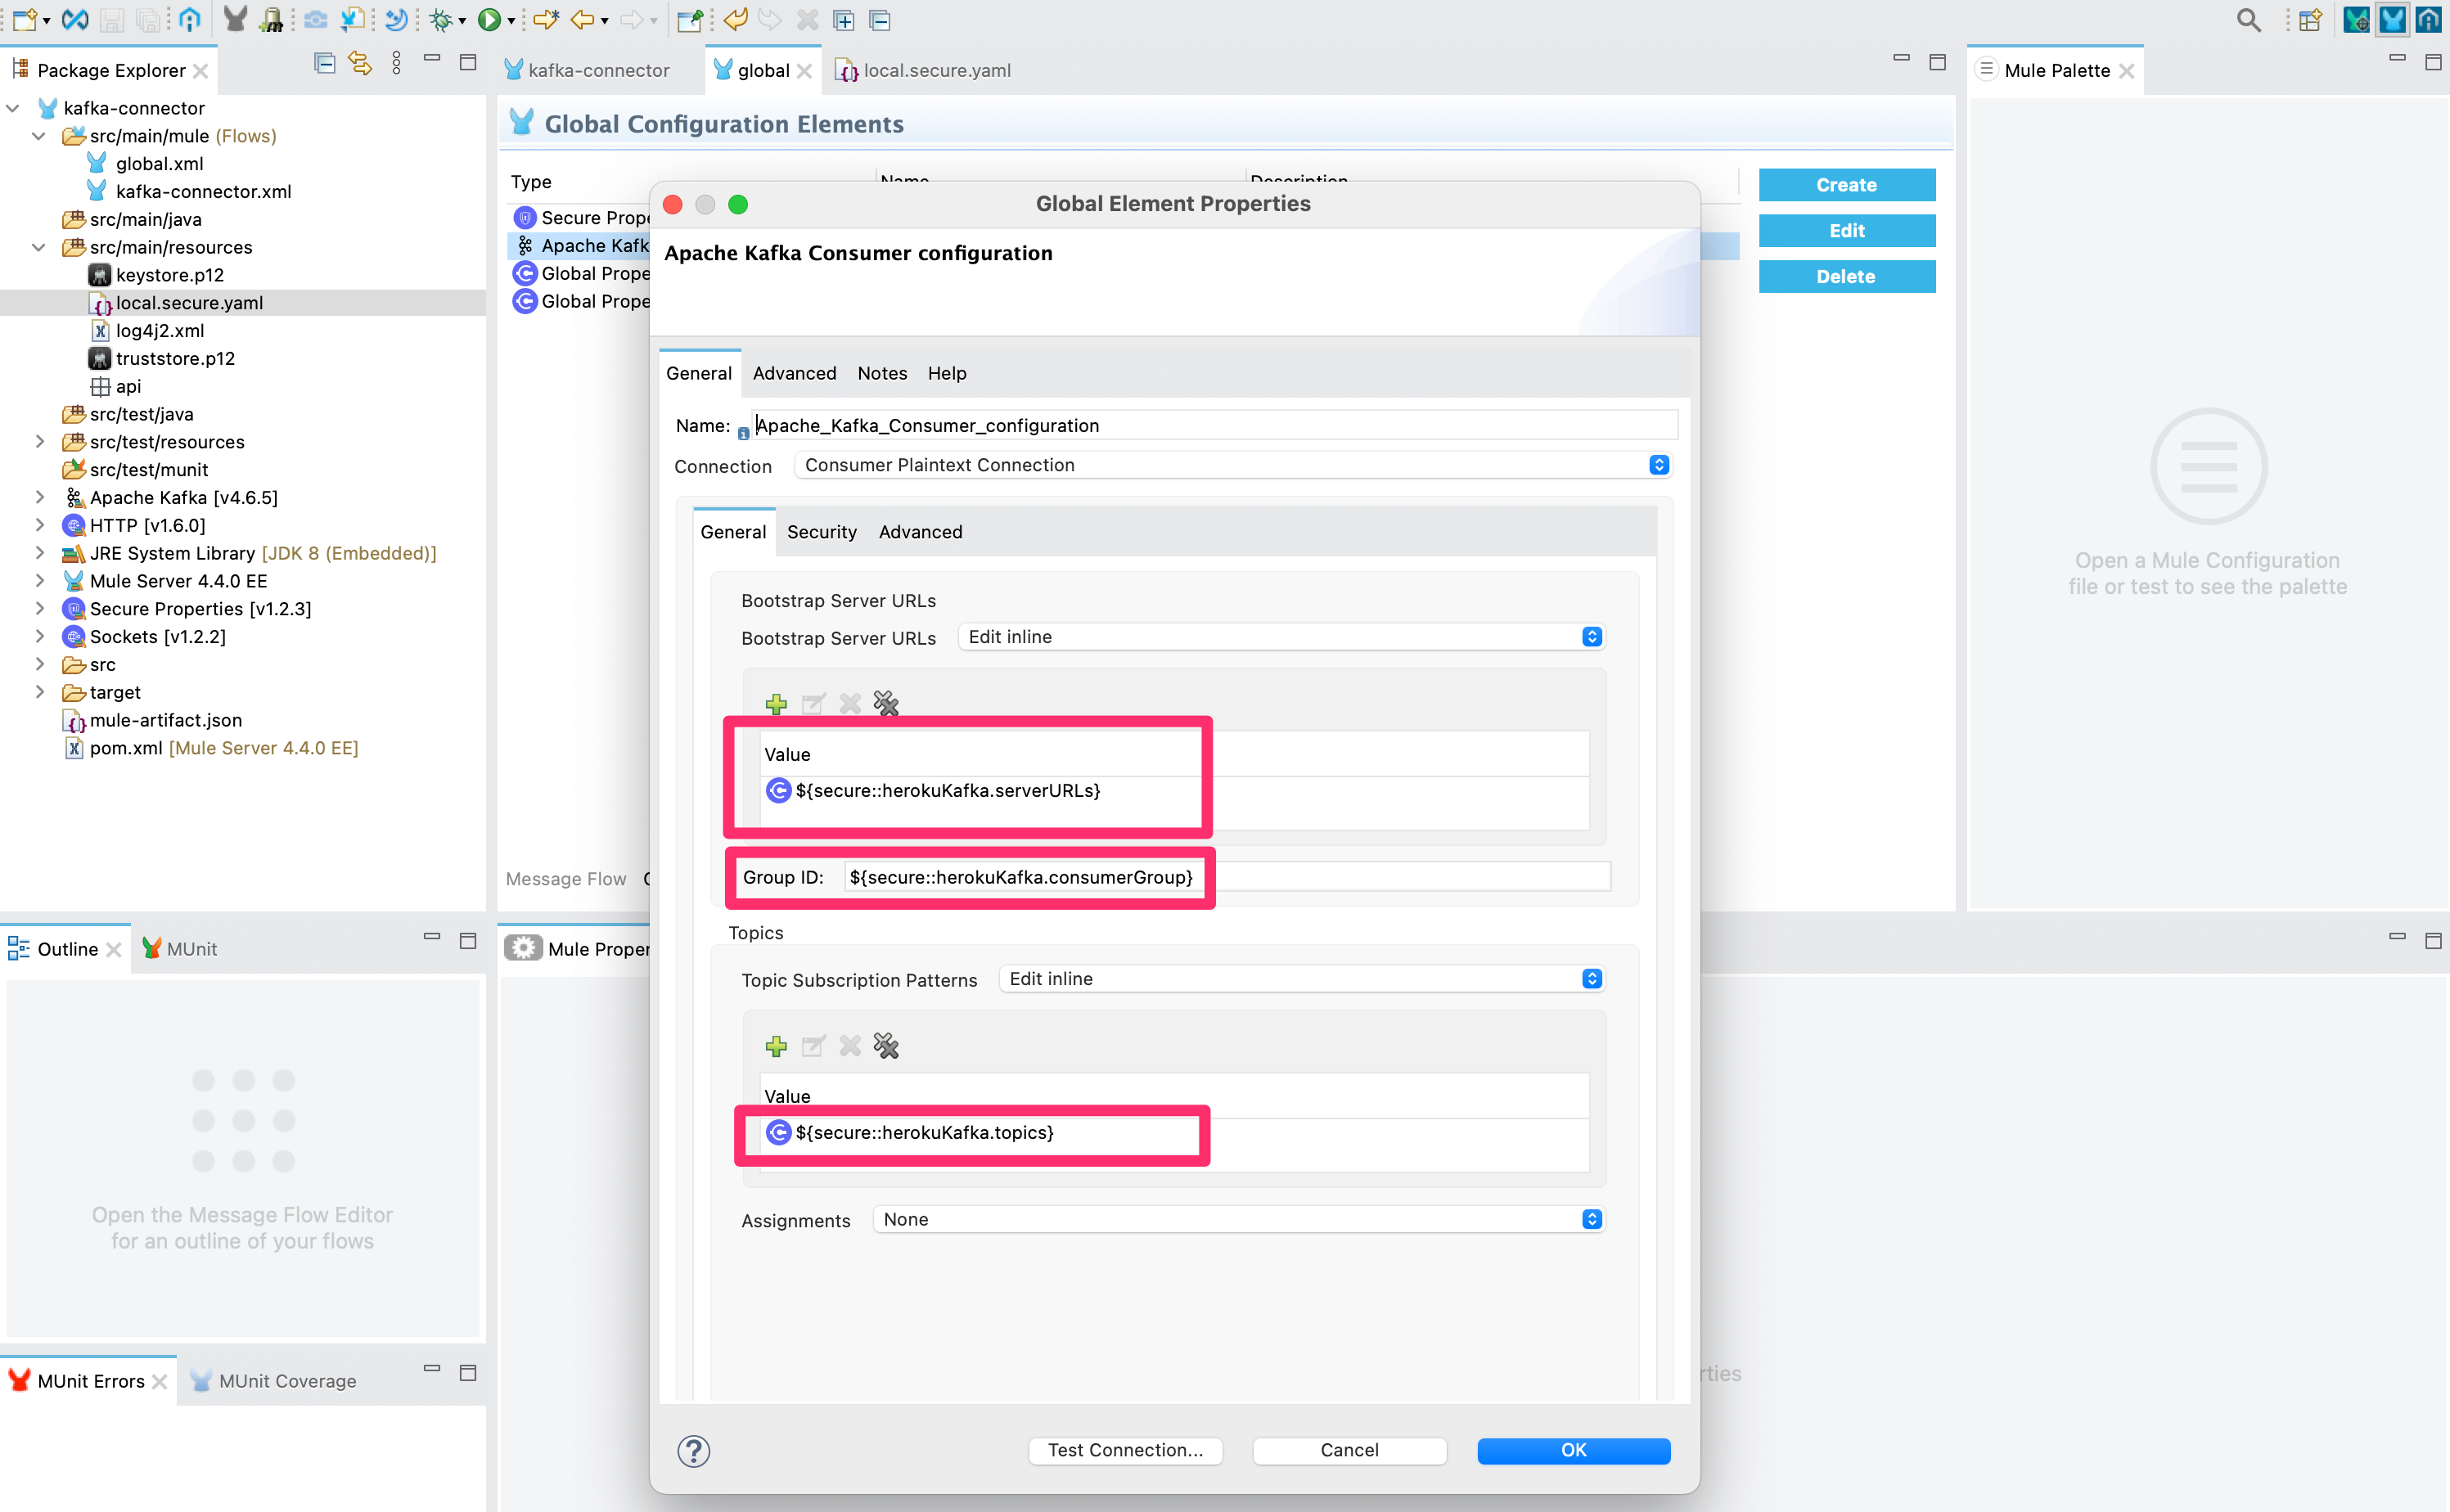
3 - Create a global configuration for the Apache Kafka Connector Consumer. Since we’ll be subscribing to events we need to create the authentication details needed to connect to our Kafka cluster telling it which consumer group, topics and security details to use.
Double click on the file global.xml under src/main/mule then navigate to the tab for Global Elements and click Create.
Select Apache Kafka Consumer configuration under the Connector Configuration section and click OK.
There are 2 tabs to be configured. Under General use the secure properties file we created earlier to refer to the variables needed using the syntax ${secure::property.name}. Enter the values below.
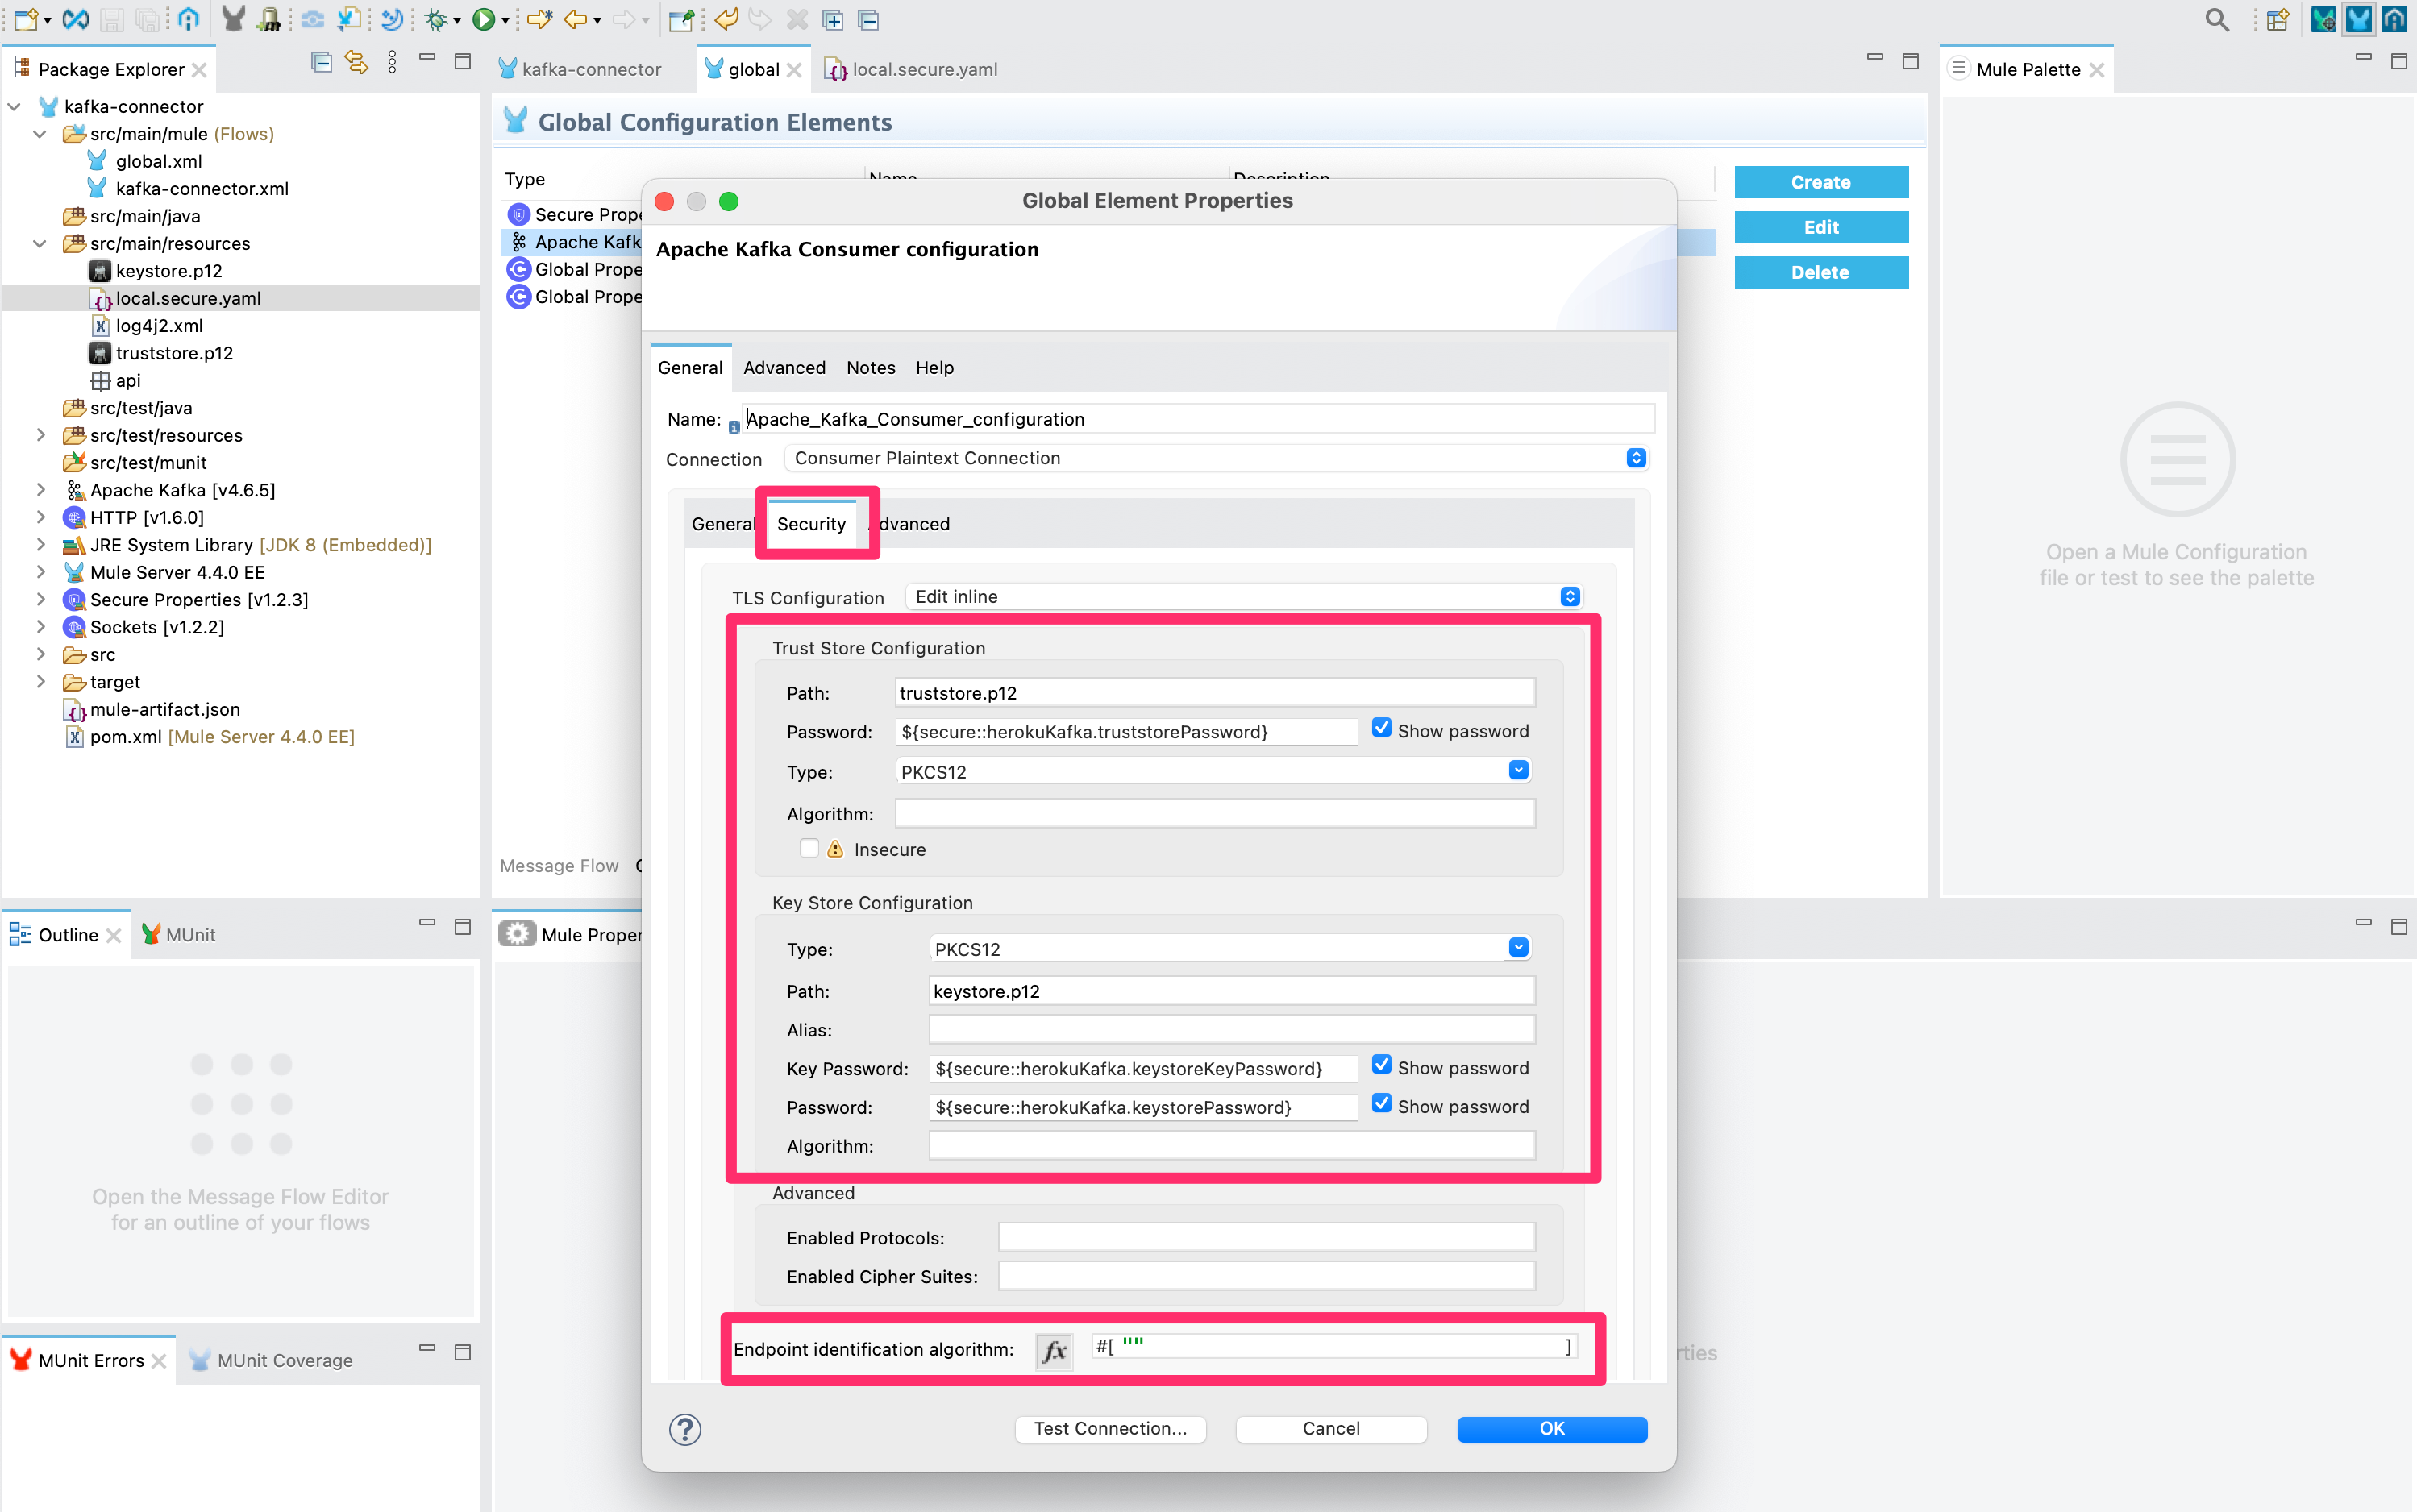
Next select the Security tab and enter the values below.
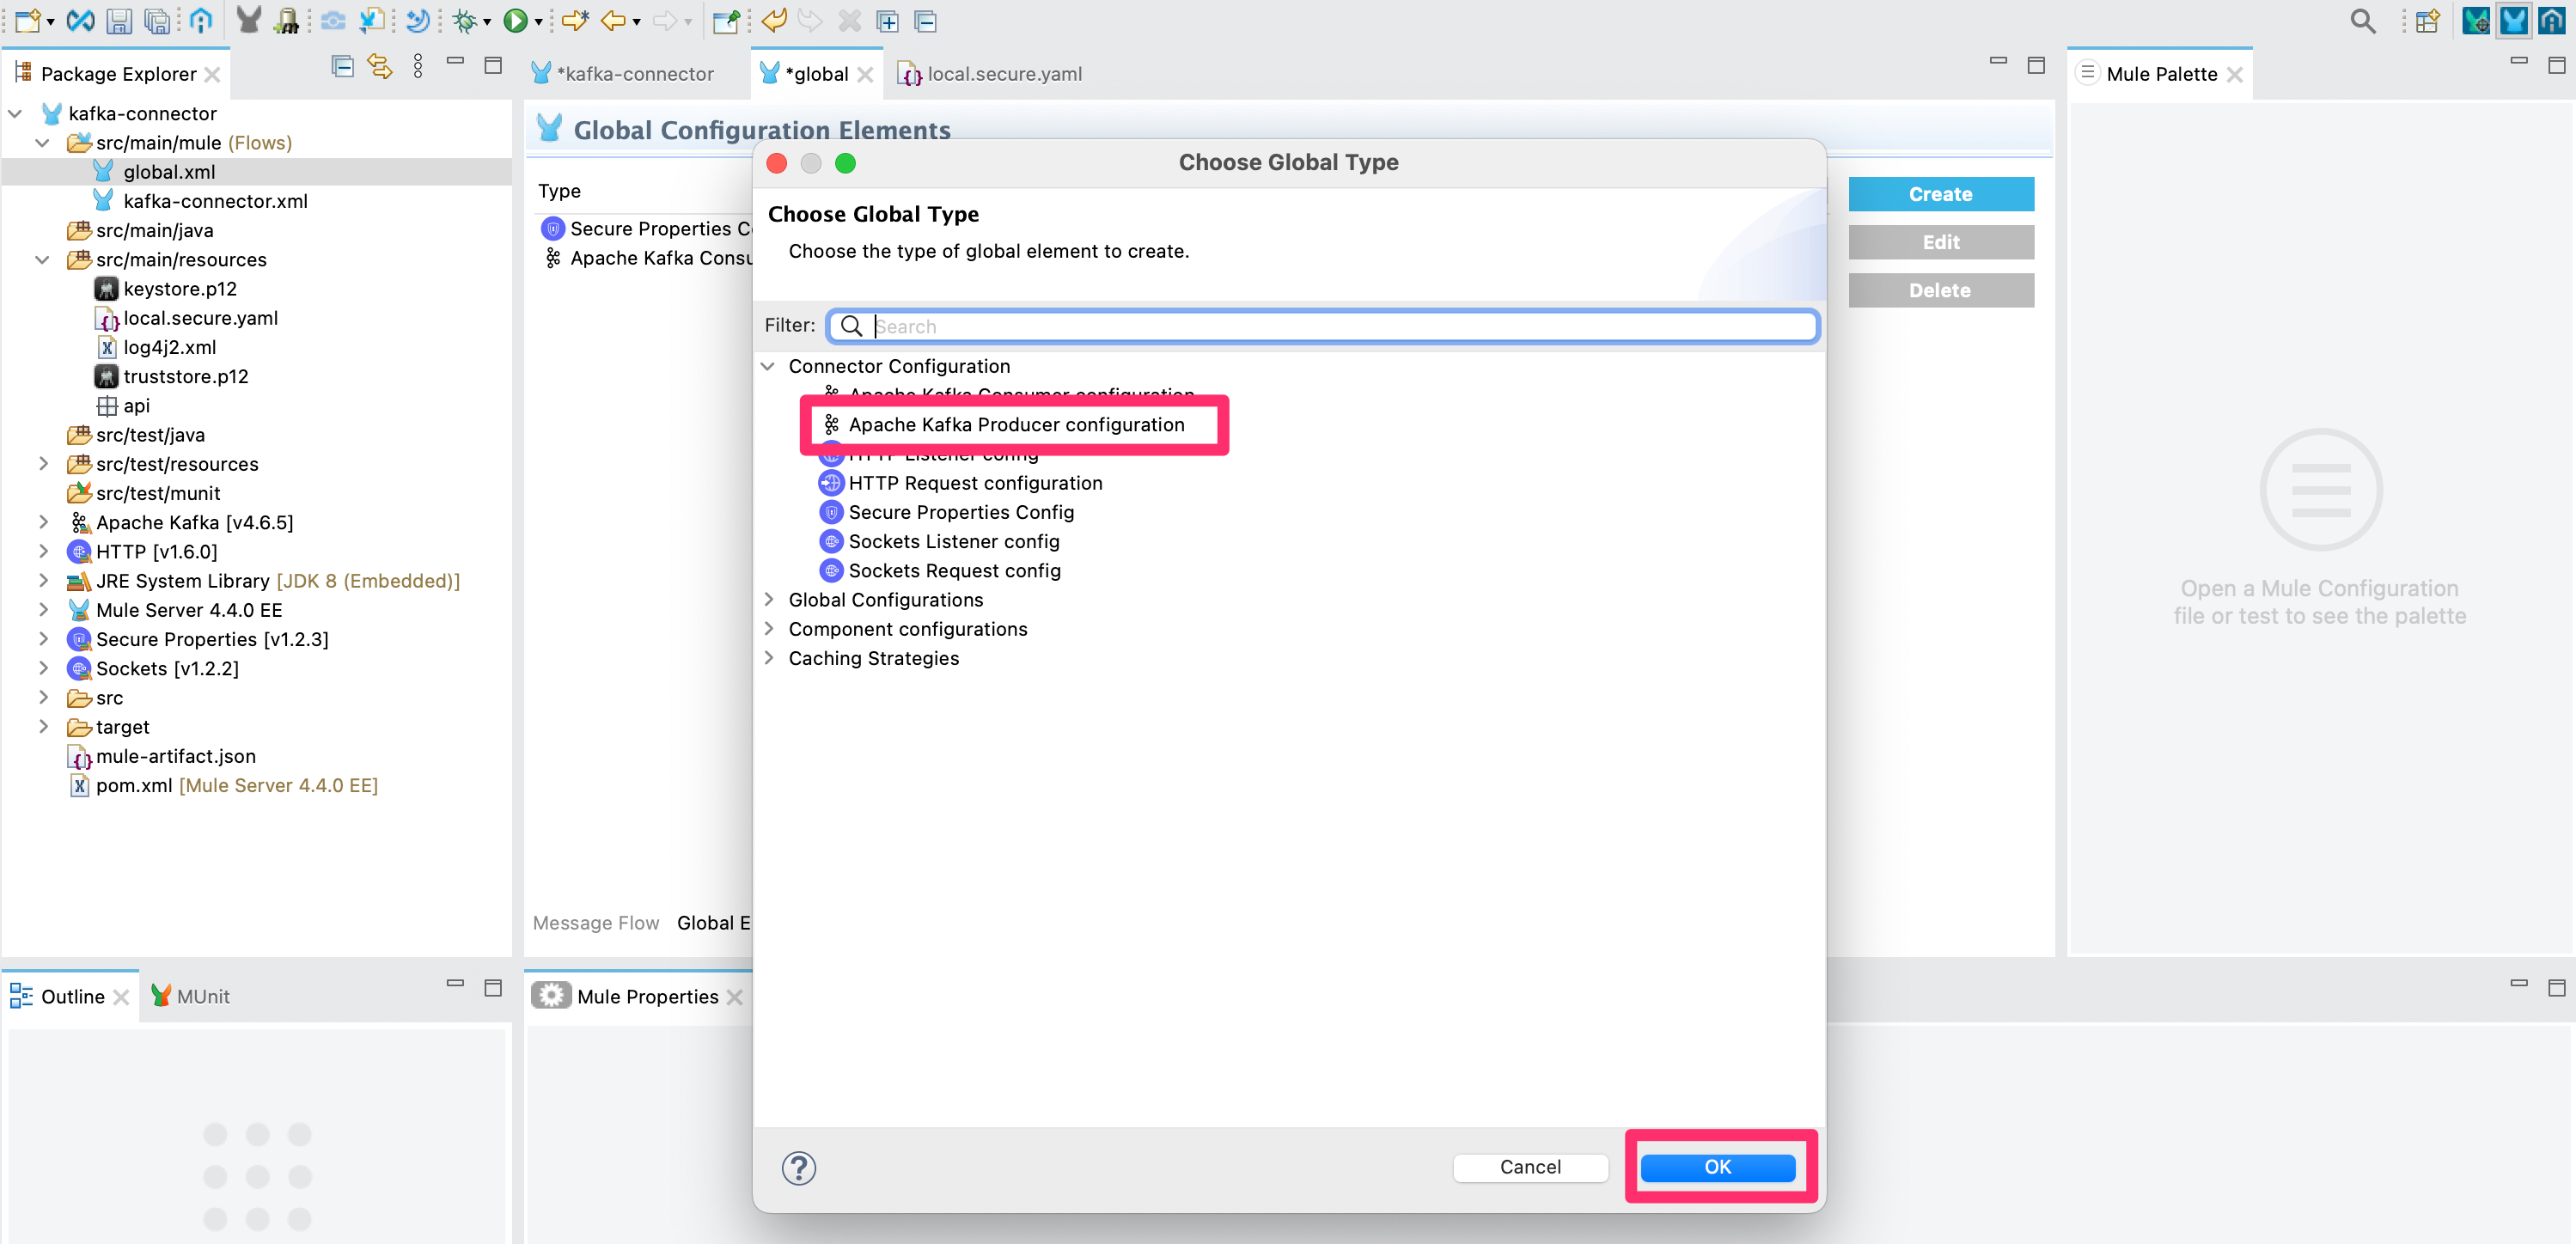
4 - Create a global configuration for the Apache Kafka Connector Producer. Since we’ll be publishing to Kafka we need to create the authentication details needed to be a producer too.
Double click on the file global.xml under src/main/mule then navigate to the tab for Global Elements and click Create.
Select Apache Kafka Producer configuration under the Connector Configuration section and click OK.
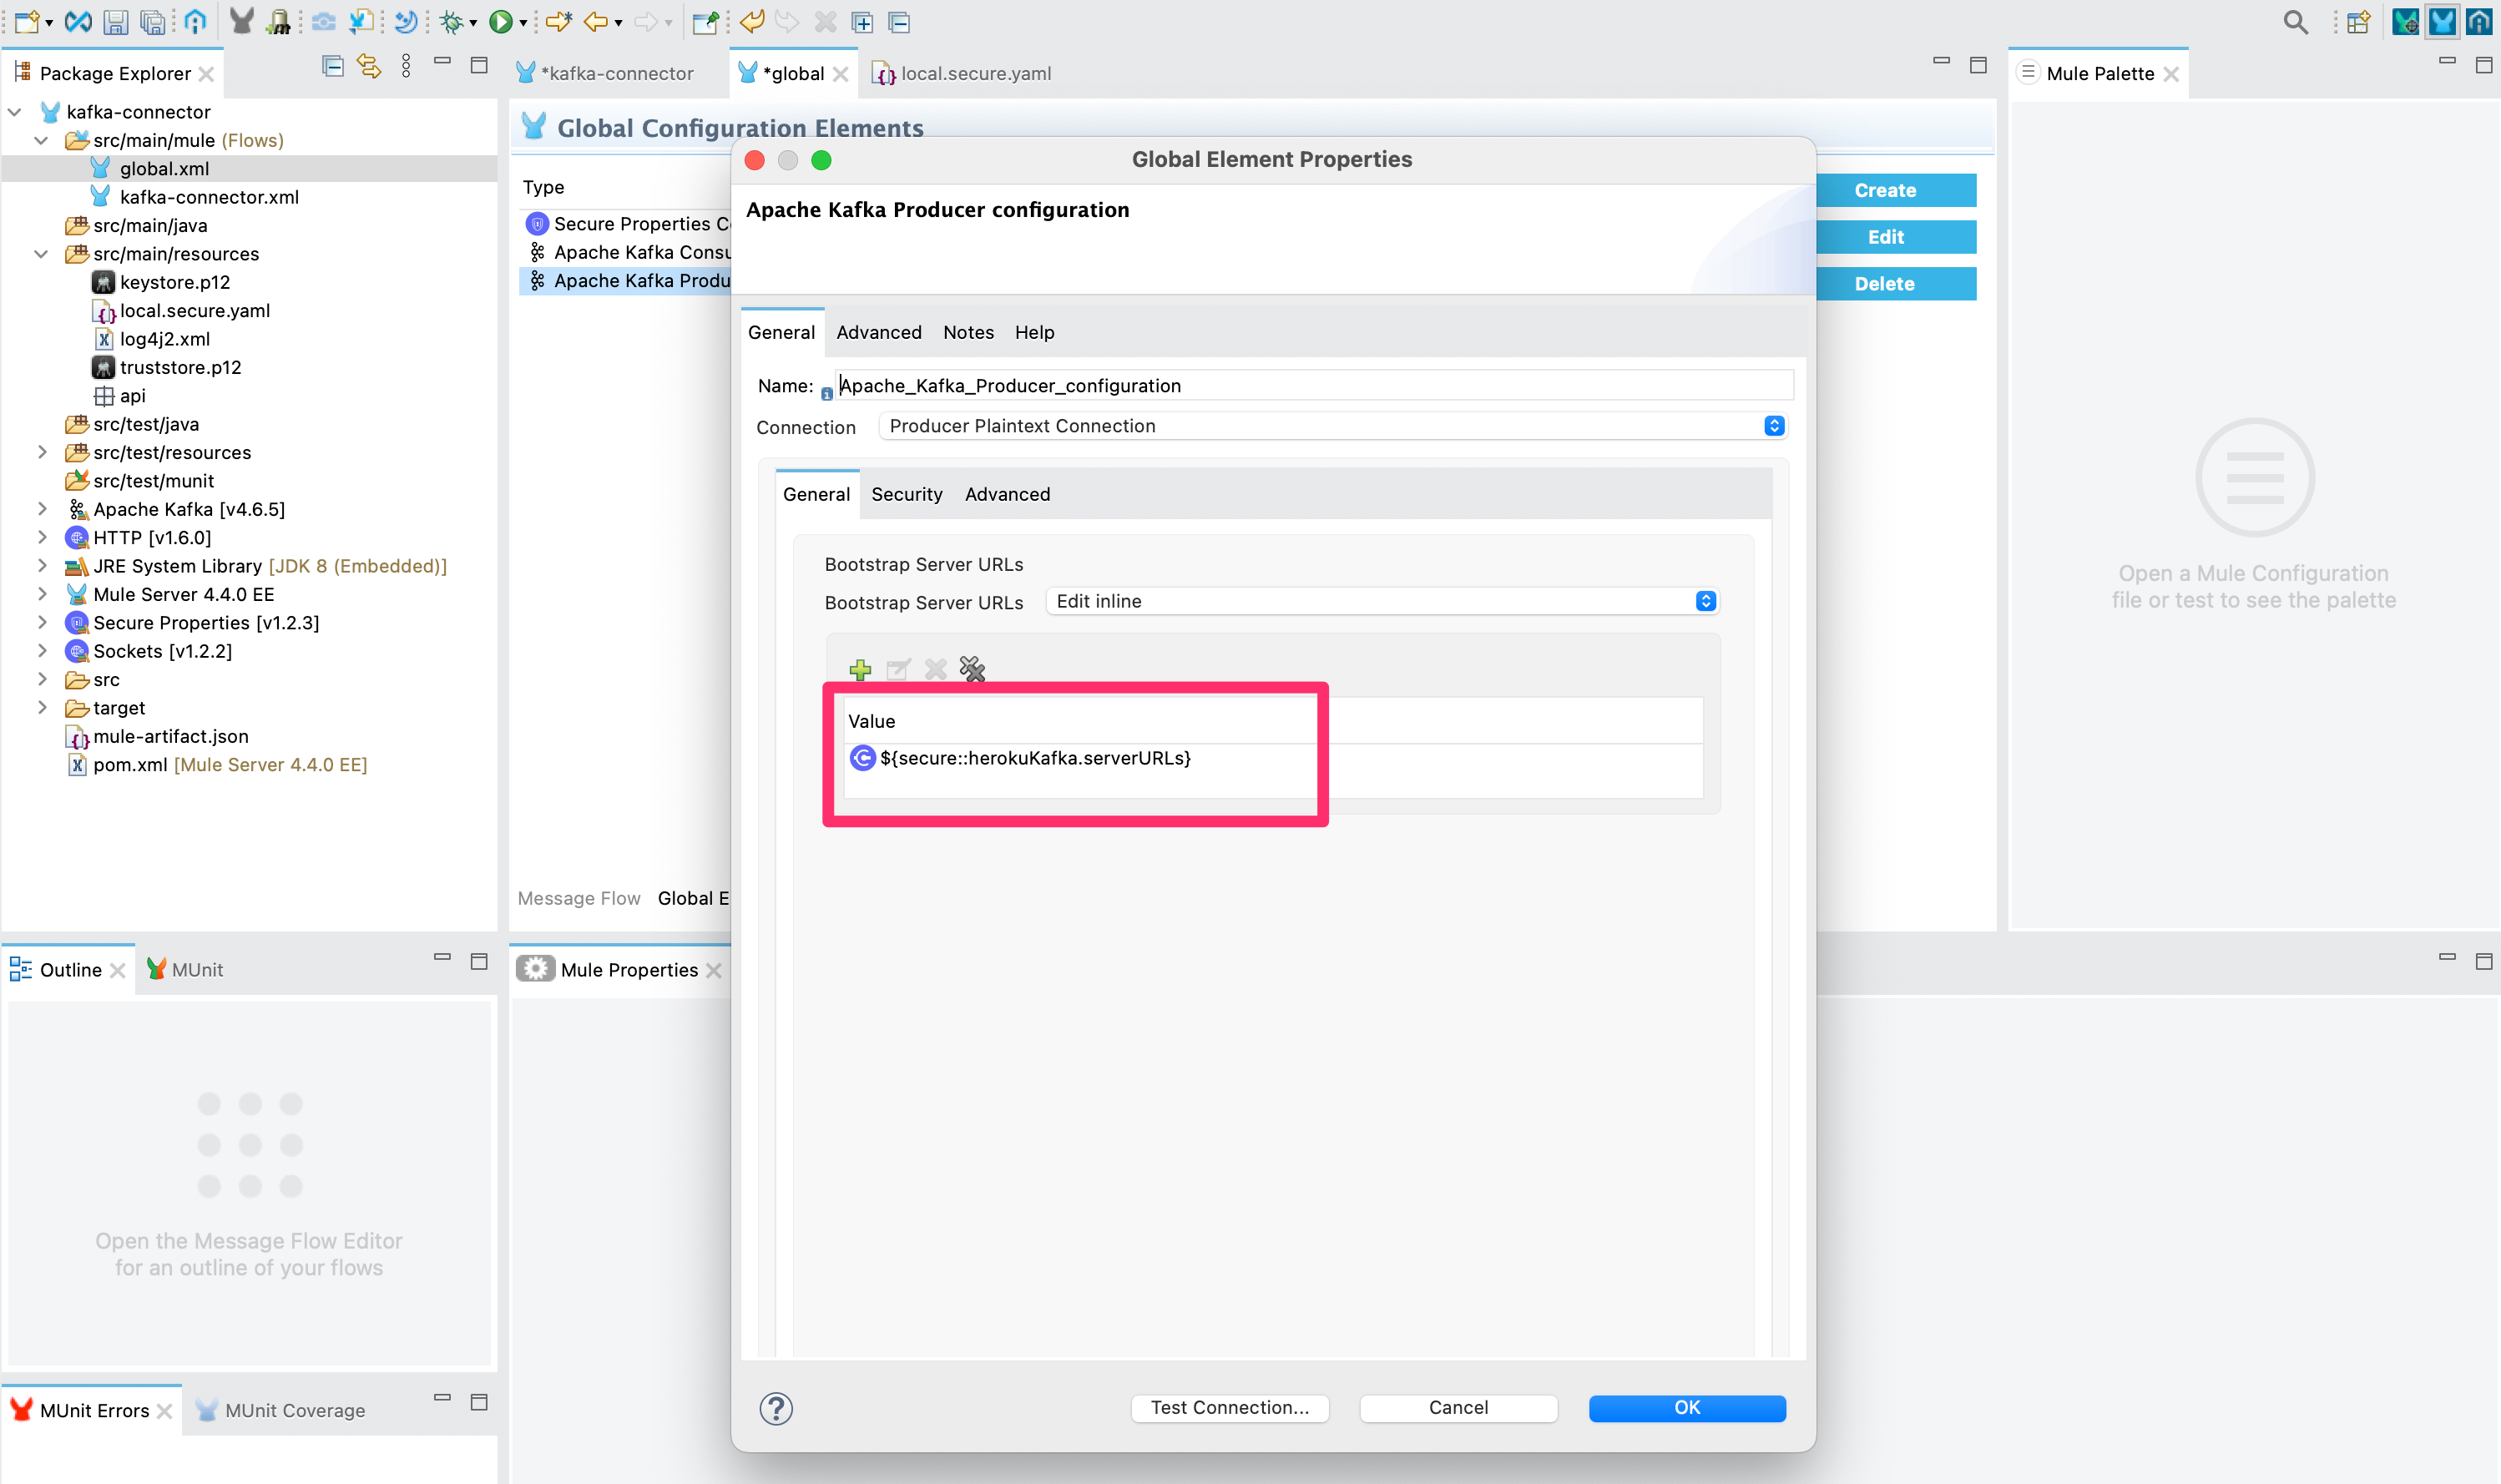
There are 2 tabs to be configured. Under General use the secure properties file we created earlier to refer to the variables needed using the syntax ${secure::property.name}. Enter the values below.
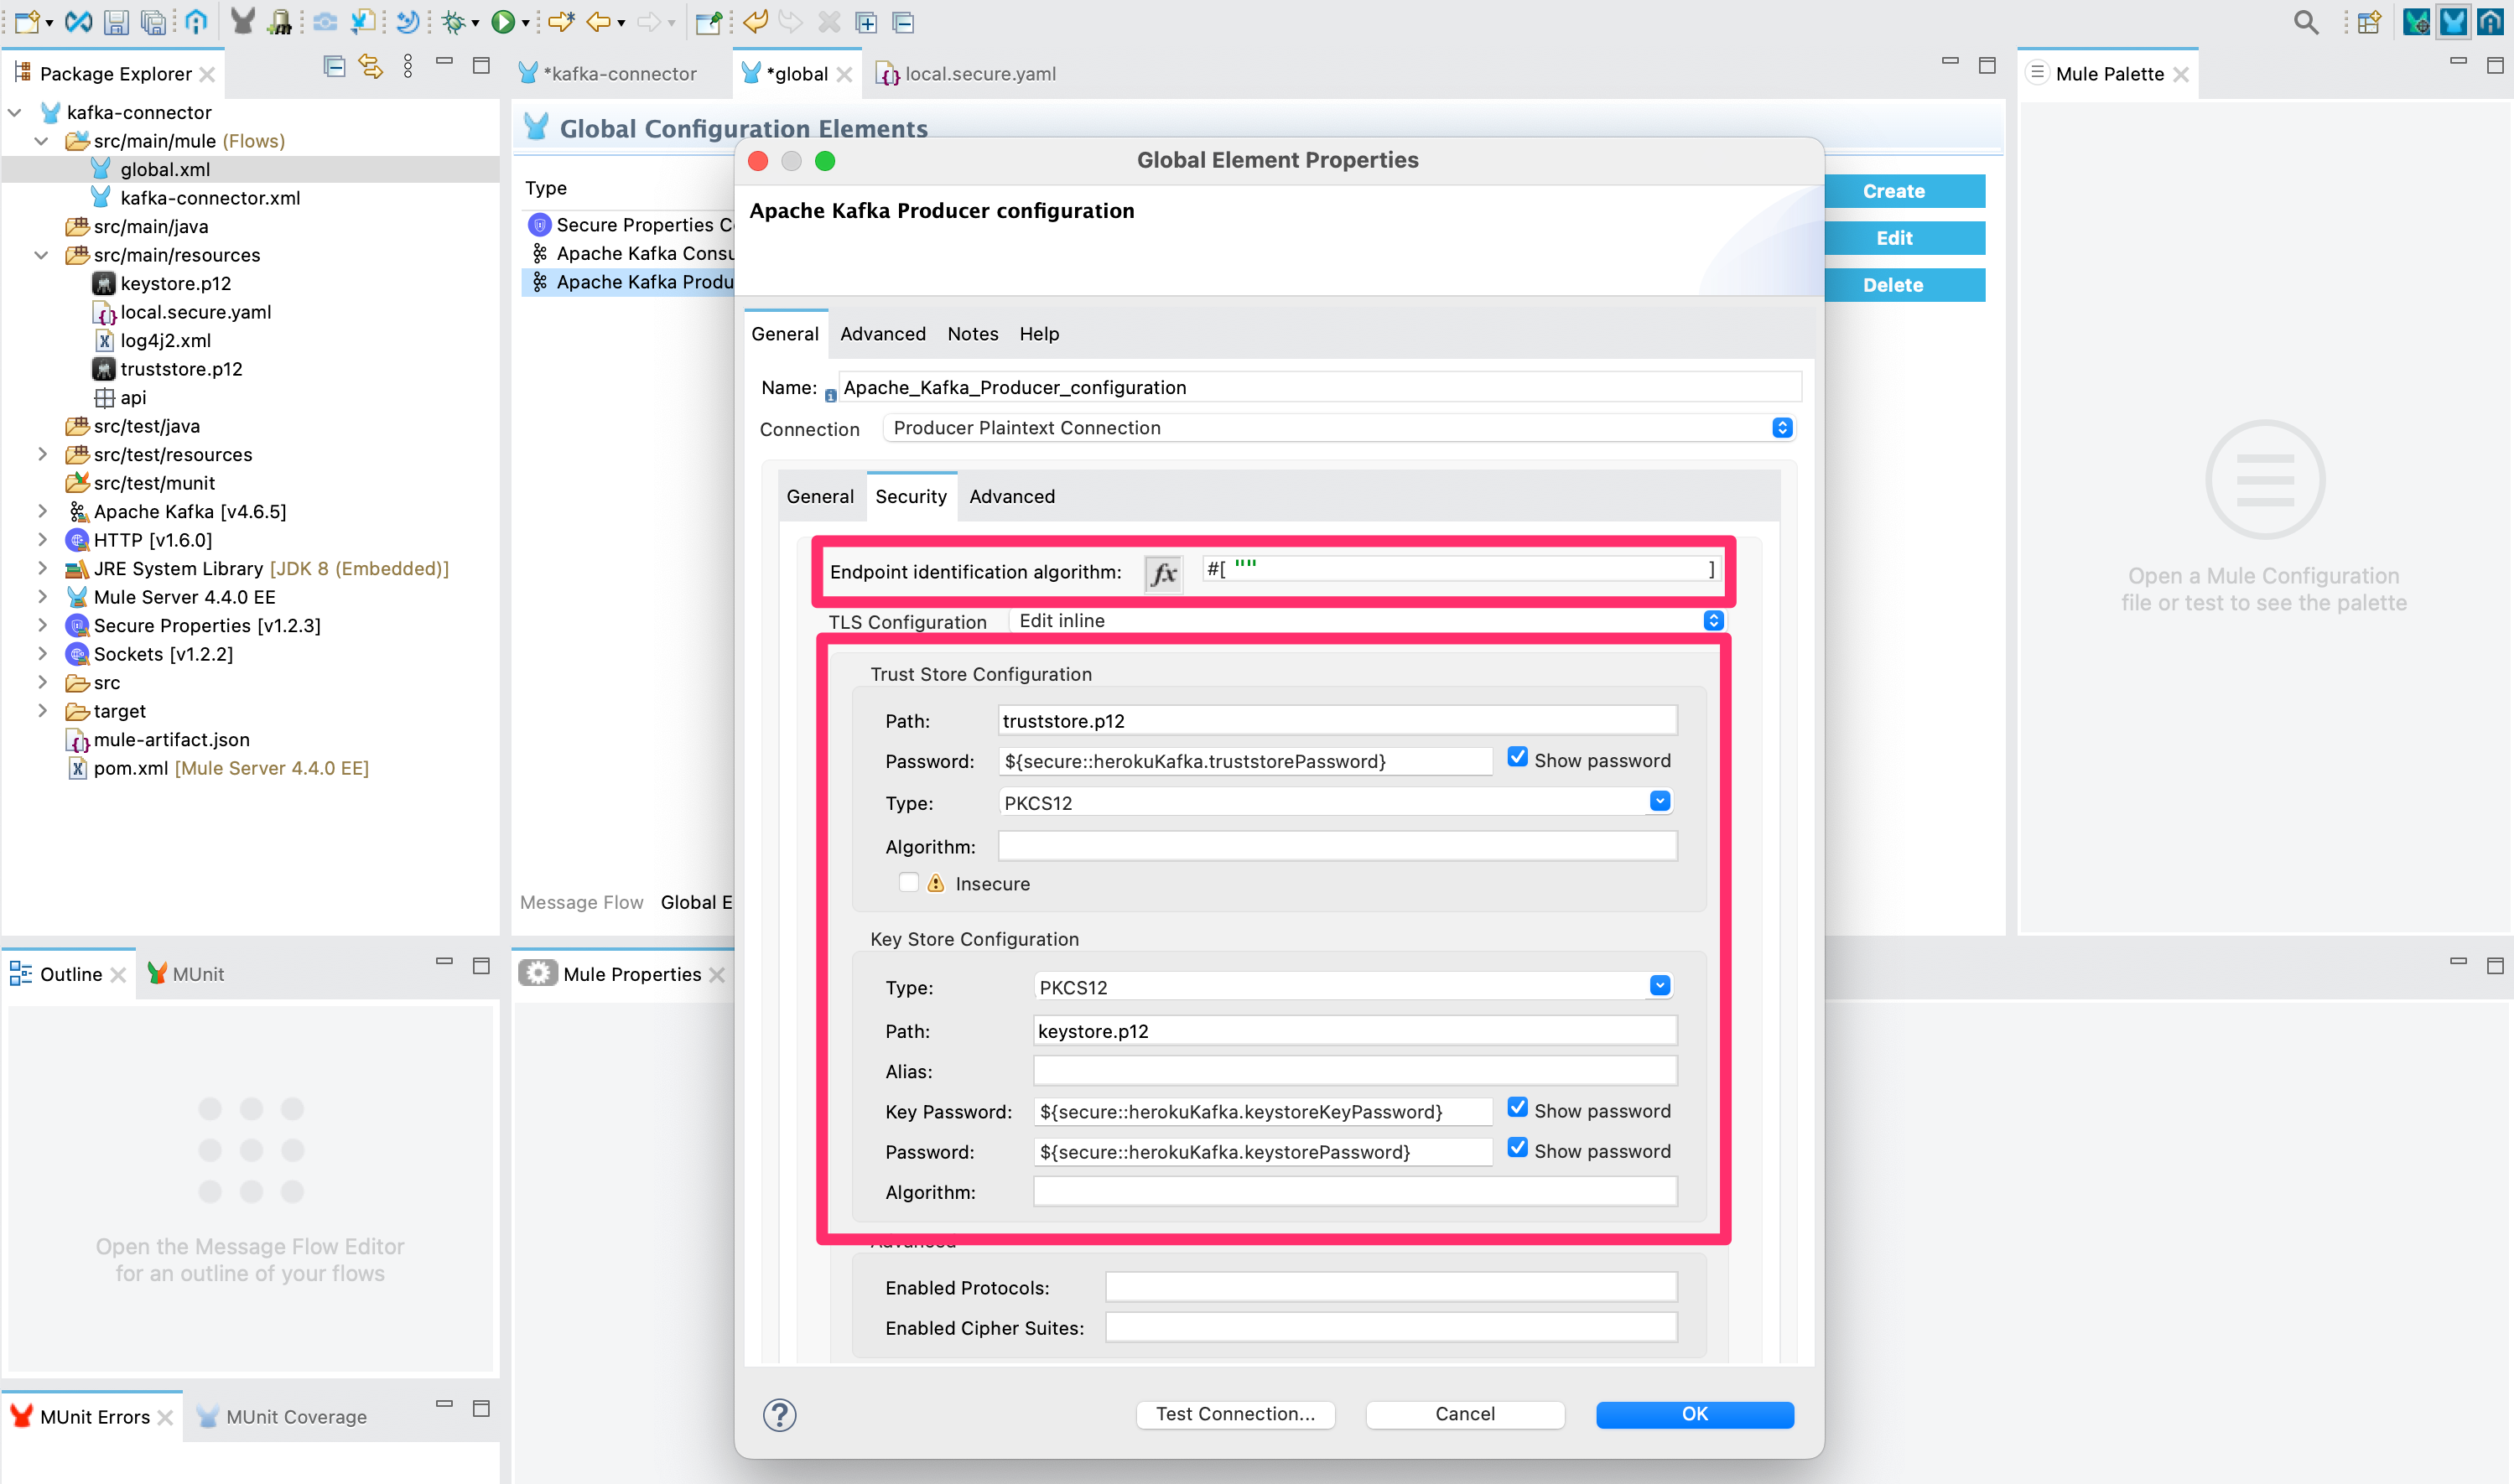
Next select the Security tab and enter the values below.
At this stage you will not be able to test the Apache Kafka connection since it will need properties set for {env} and {encryption.key} which will not exist until later in the tutorial.
Build the integration
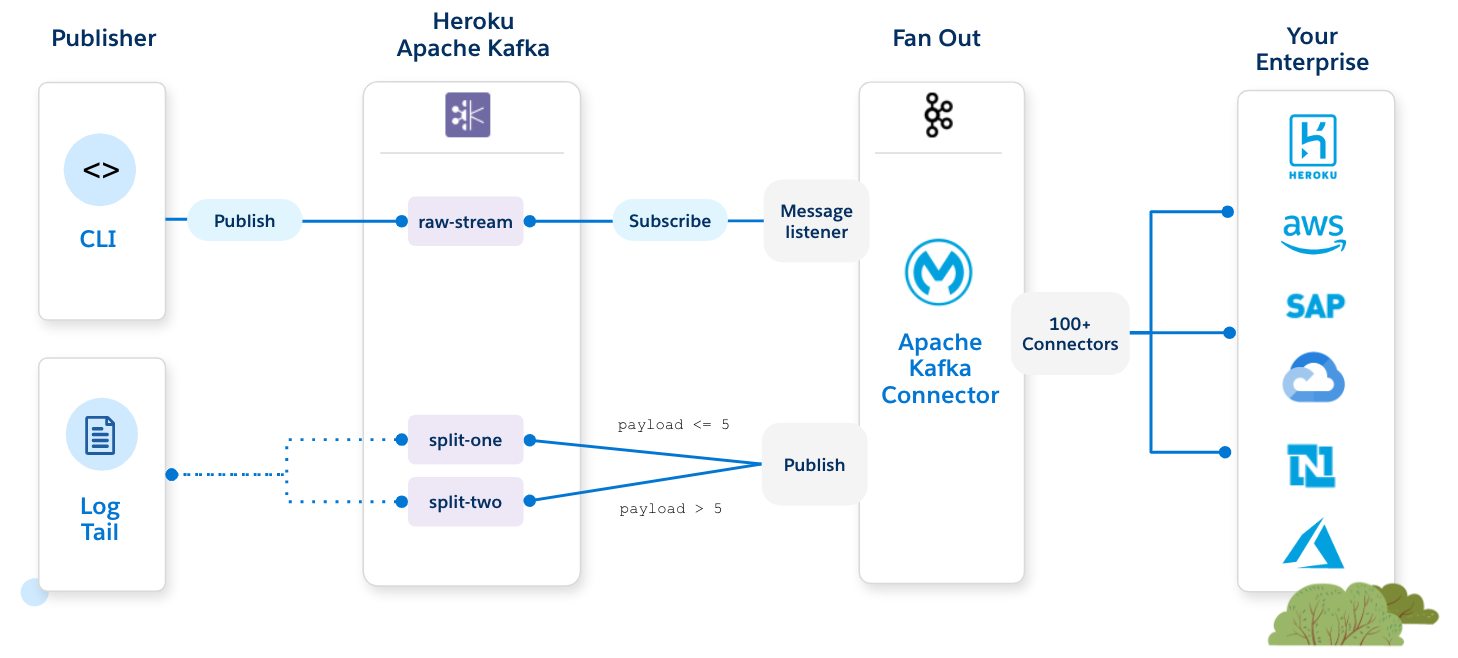
Now that we have all the building blocks needed we can create an end to end integration that subscribes to the events being sent to one of our Kafka topics then publish a message to another topic.
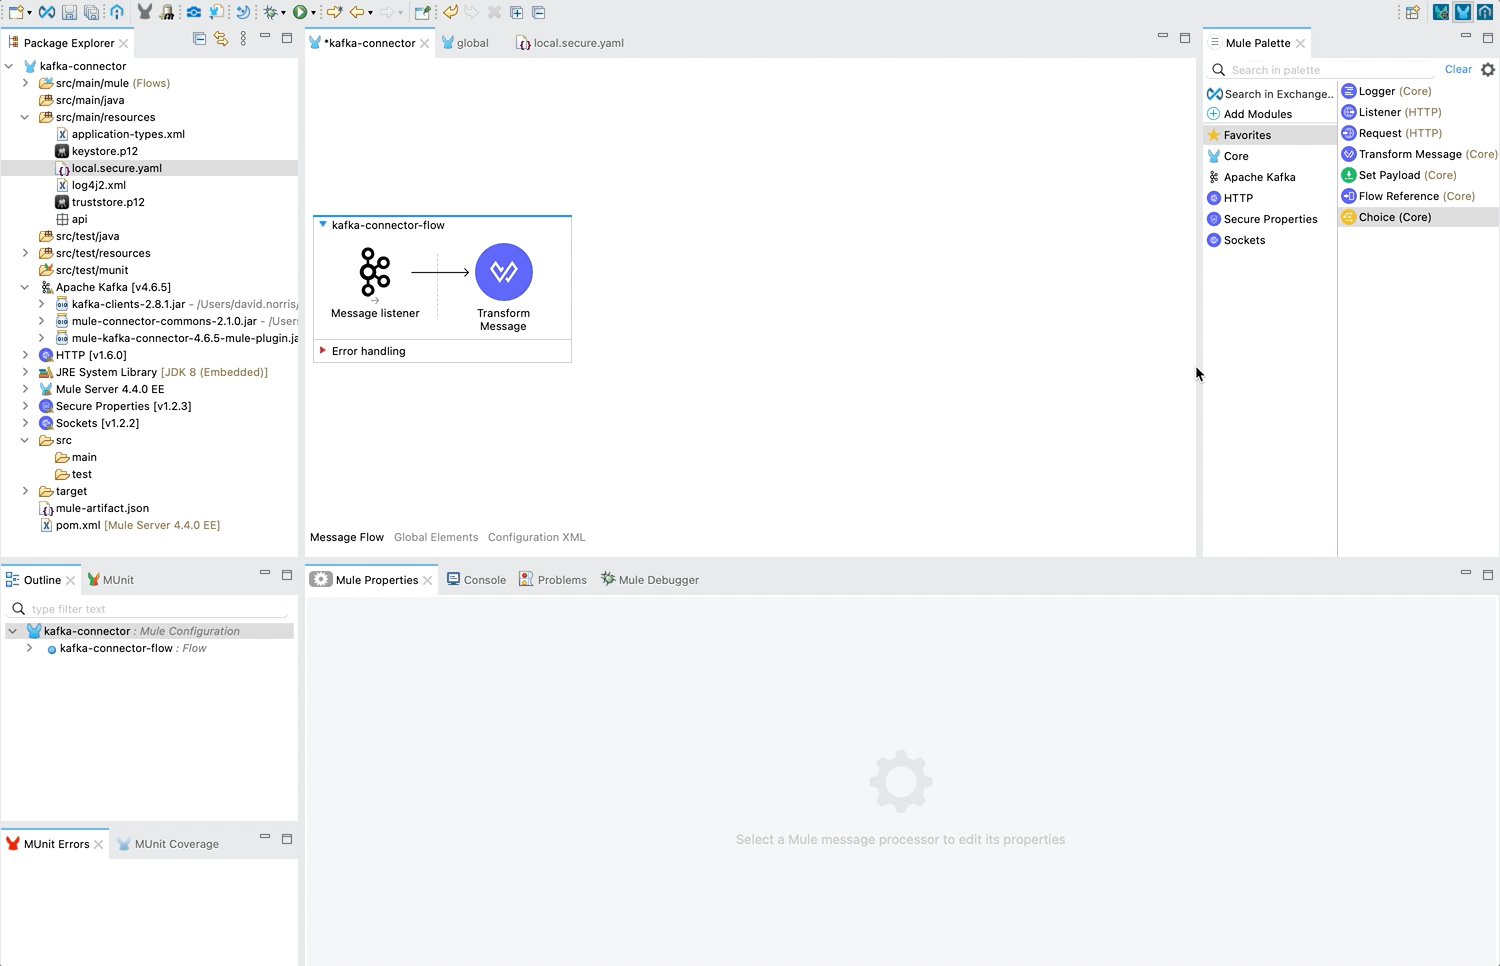
1 - Drag the Message listener operation into your project under Apache Kafka.
Double click on the file kafka-connector.xml under src/main/mule. Drag the Message listener method into your project from the Mule Palette under Apache Kafka.
The Connector Configuration in the properties will default to the Consumer configuration created in the previous section.
2 - Transform the binary inbound payload to JSON.
Drag the Transform Messsage module into your project from the Mule Palette under Core.
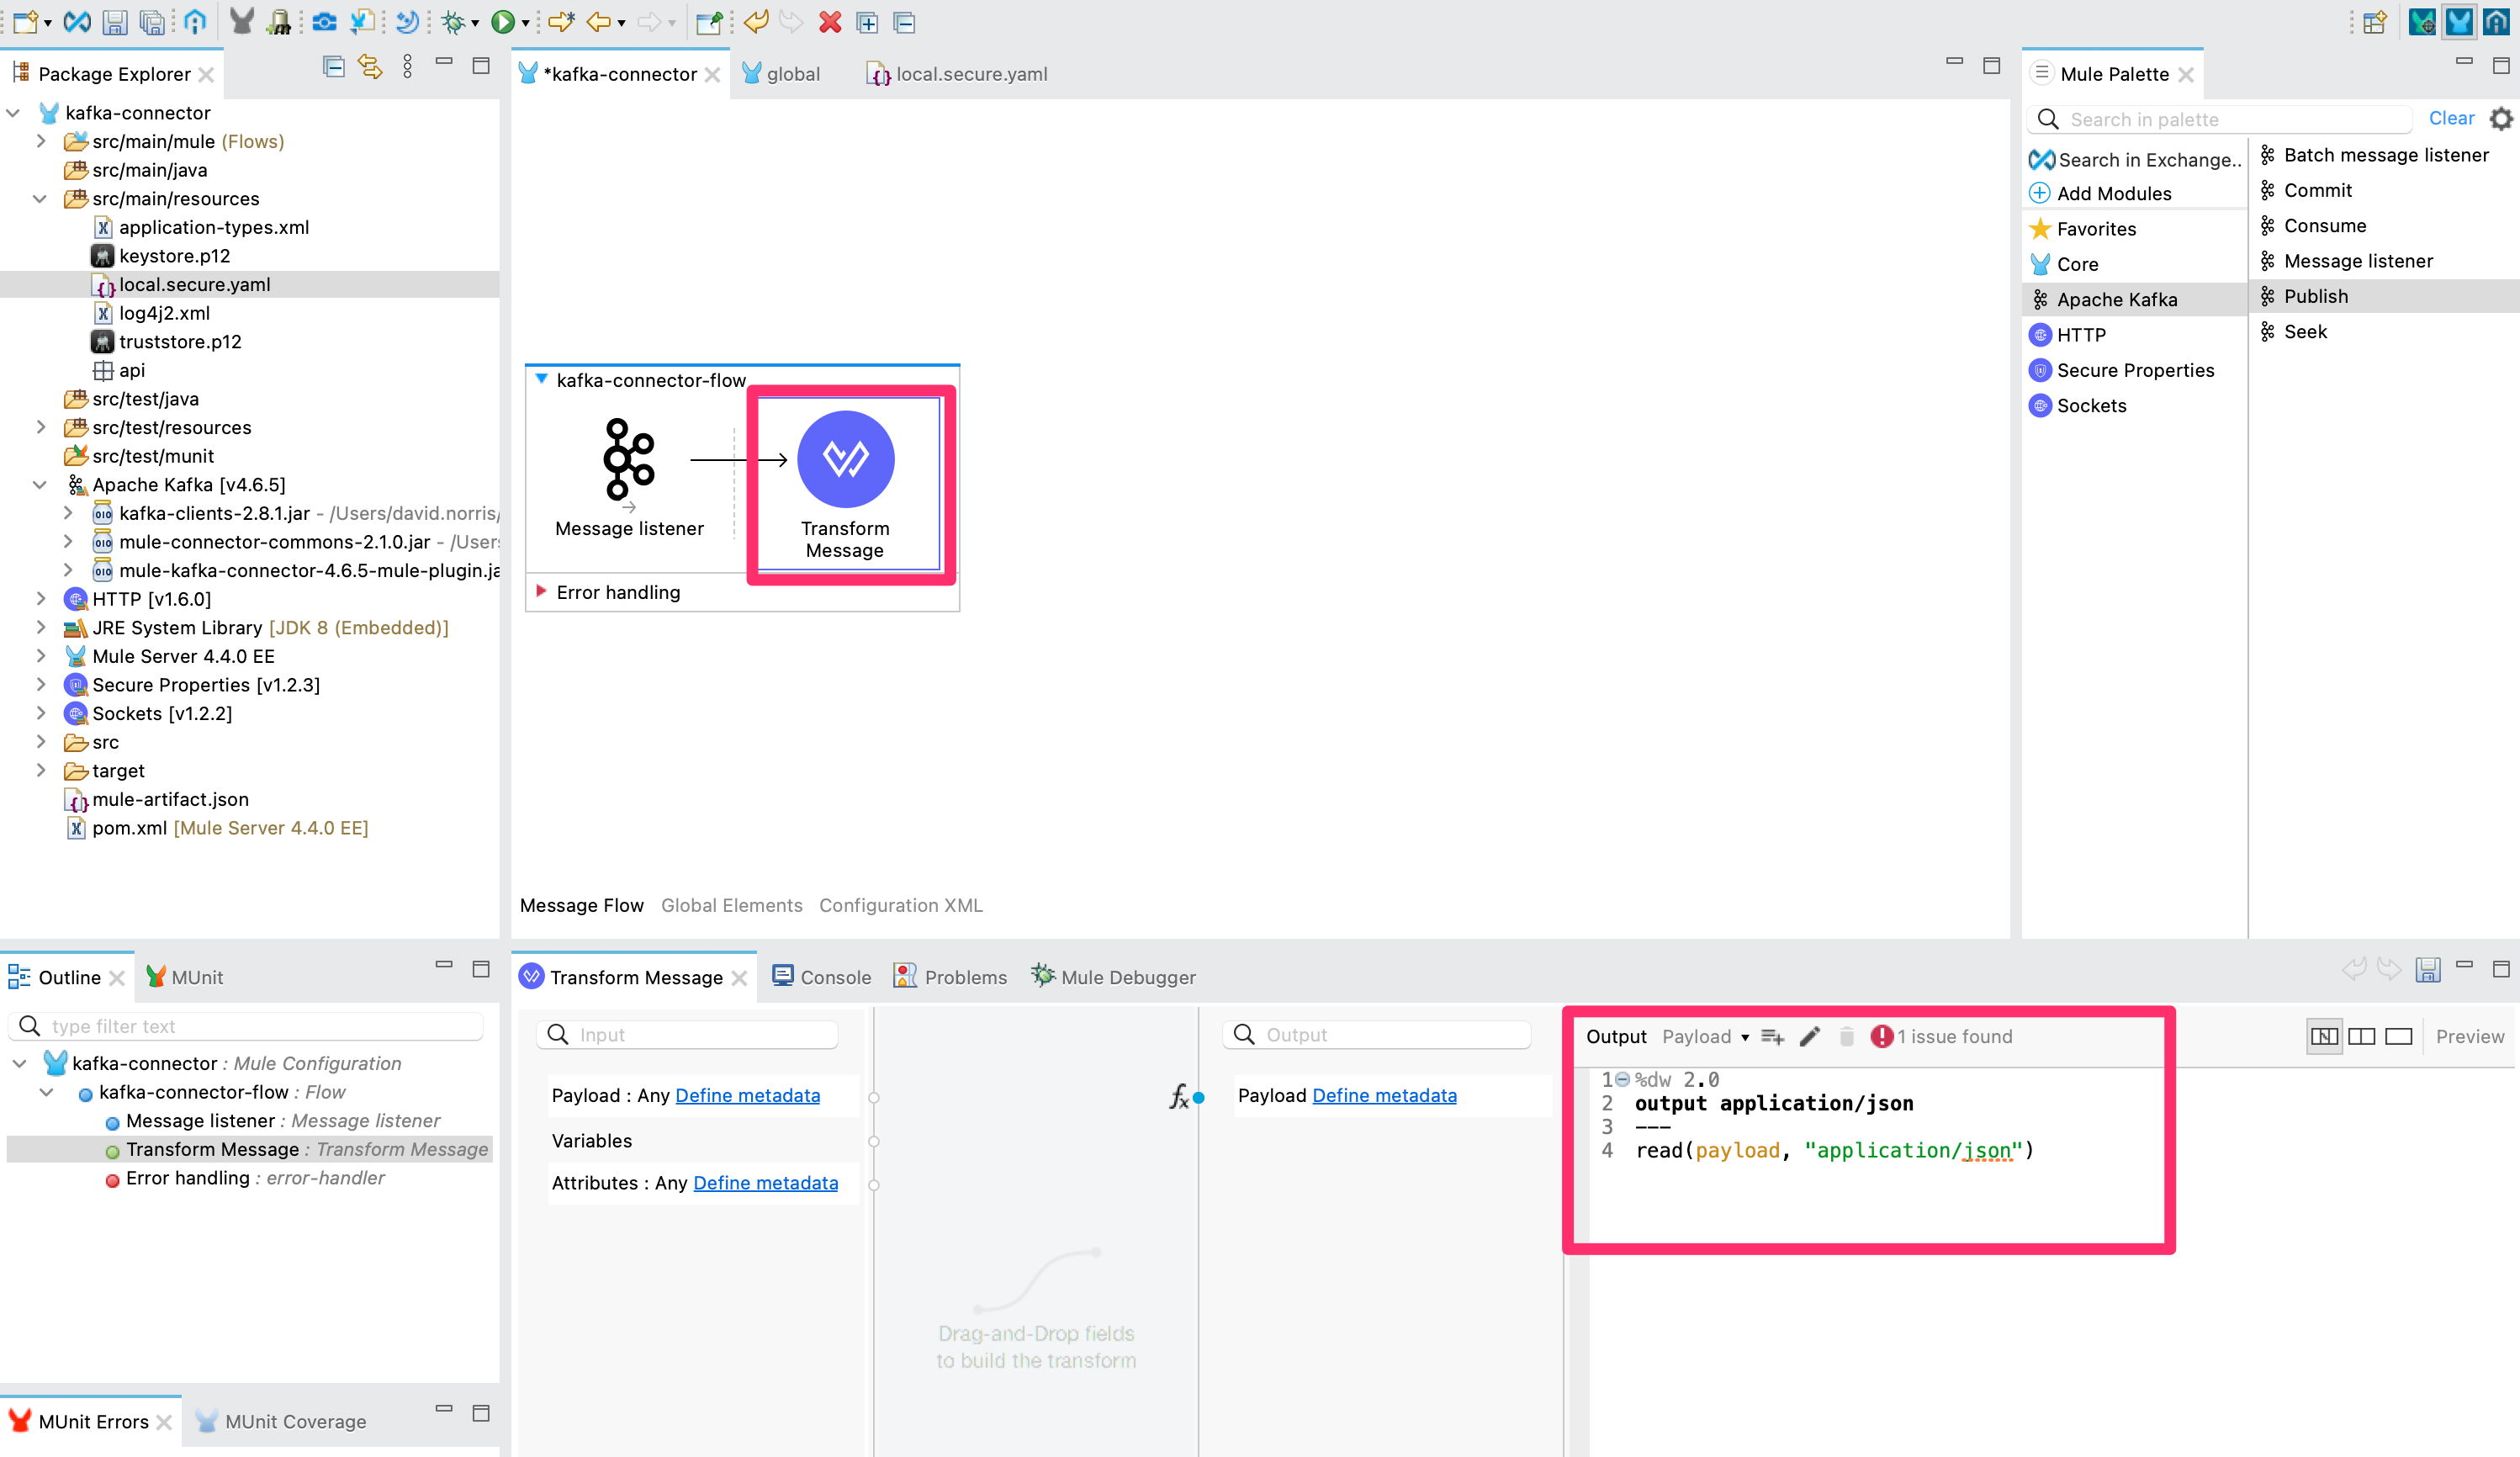
Update the DataWeave section to the following
1
2
3
4
%dw 2.0
output application/json
---
read(payload, "application/json")
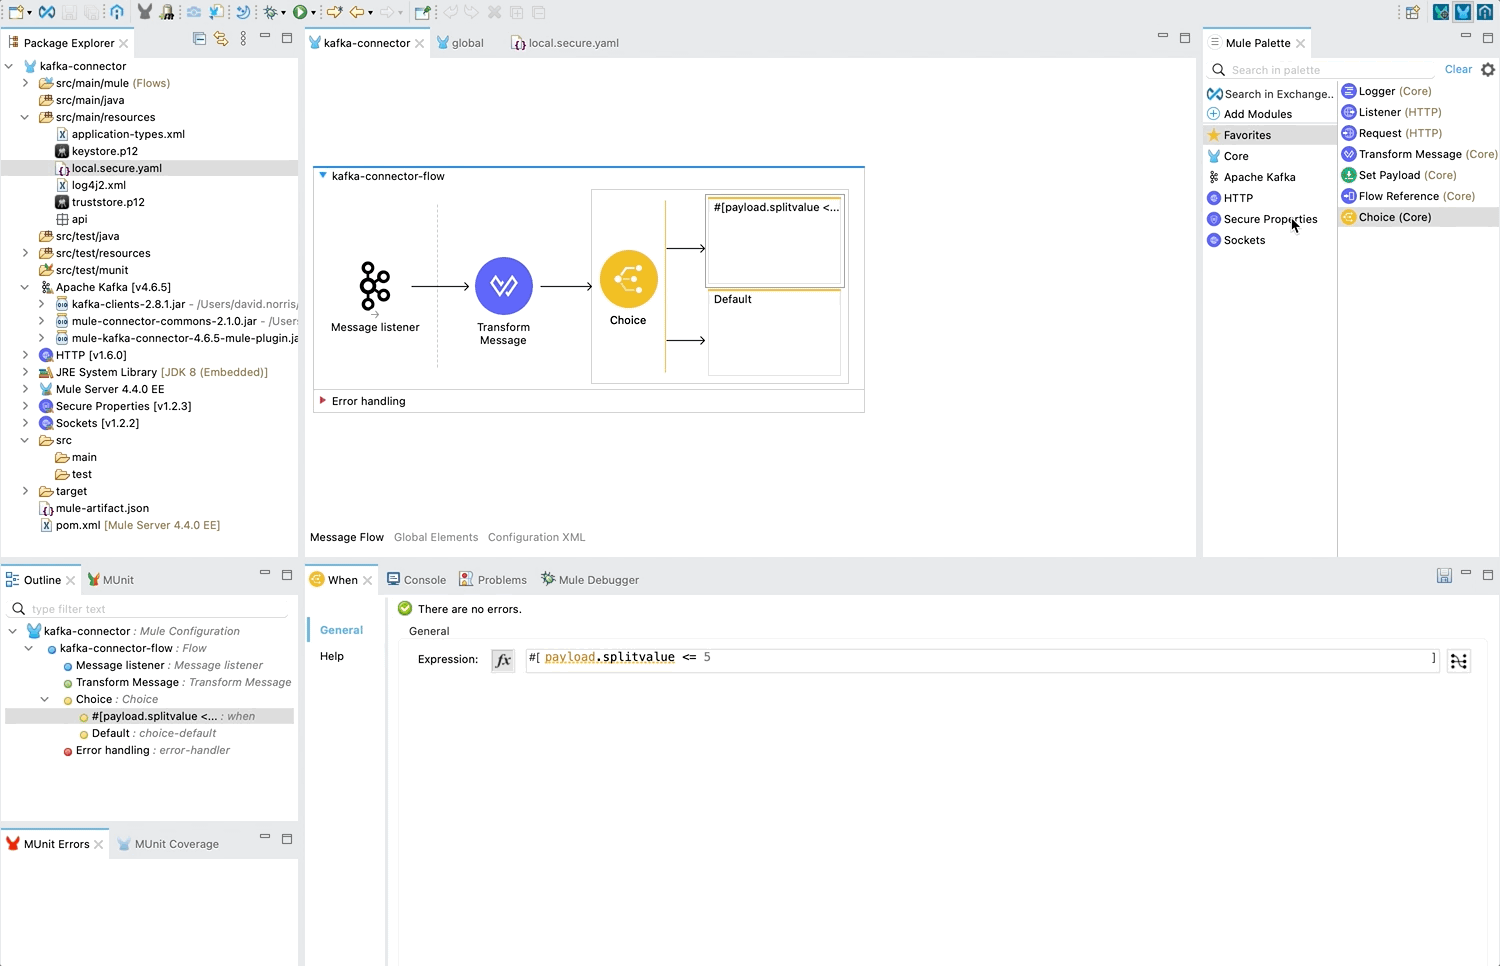
3 - Fan out to multiple downstream Apache Kafka topics based on a value in the innound payload.
Drag the Choice flow control into your project from the Mule Palette under Core.
Under the When option within the Choice flow control update the expression to the following
1
payload.splitvalue <= 5
This will look for a splitvalue property in the inbound message and execute the contents of the when if the value is 5 or less.
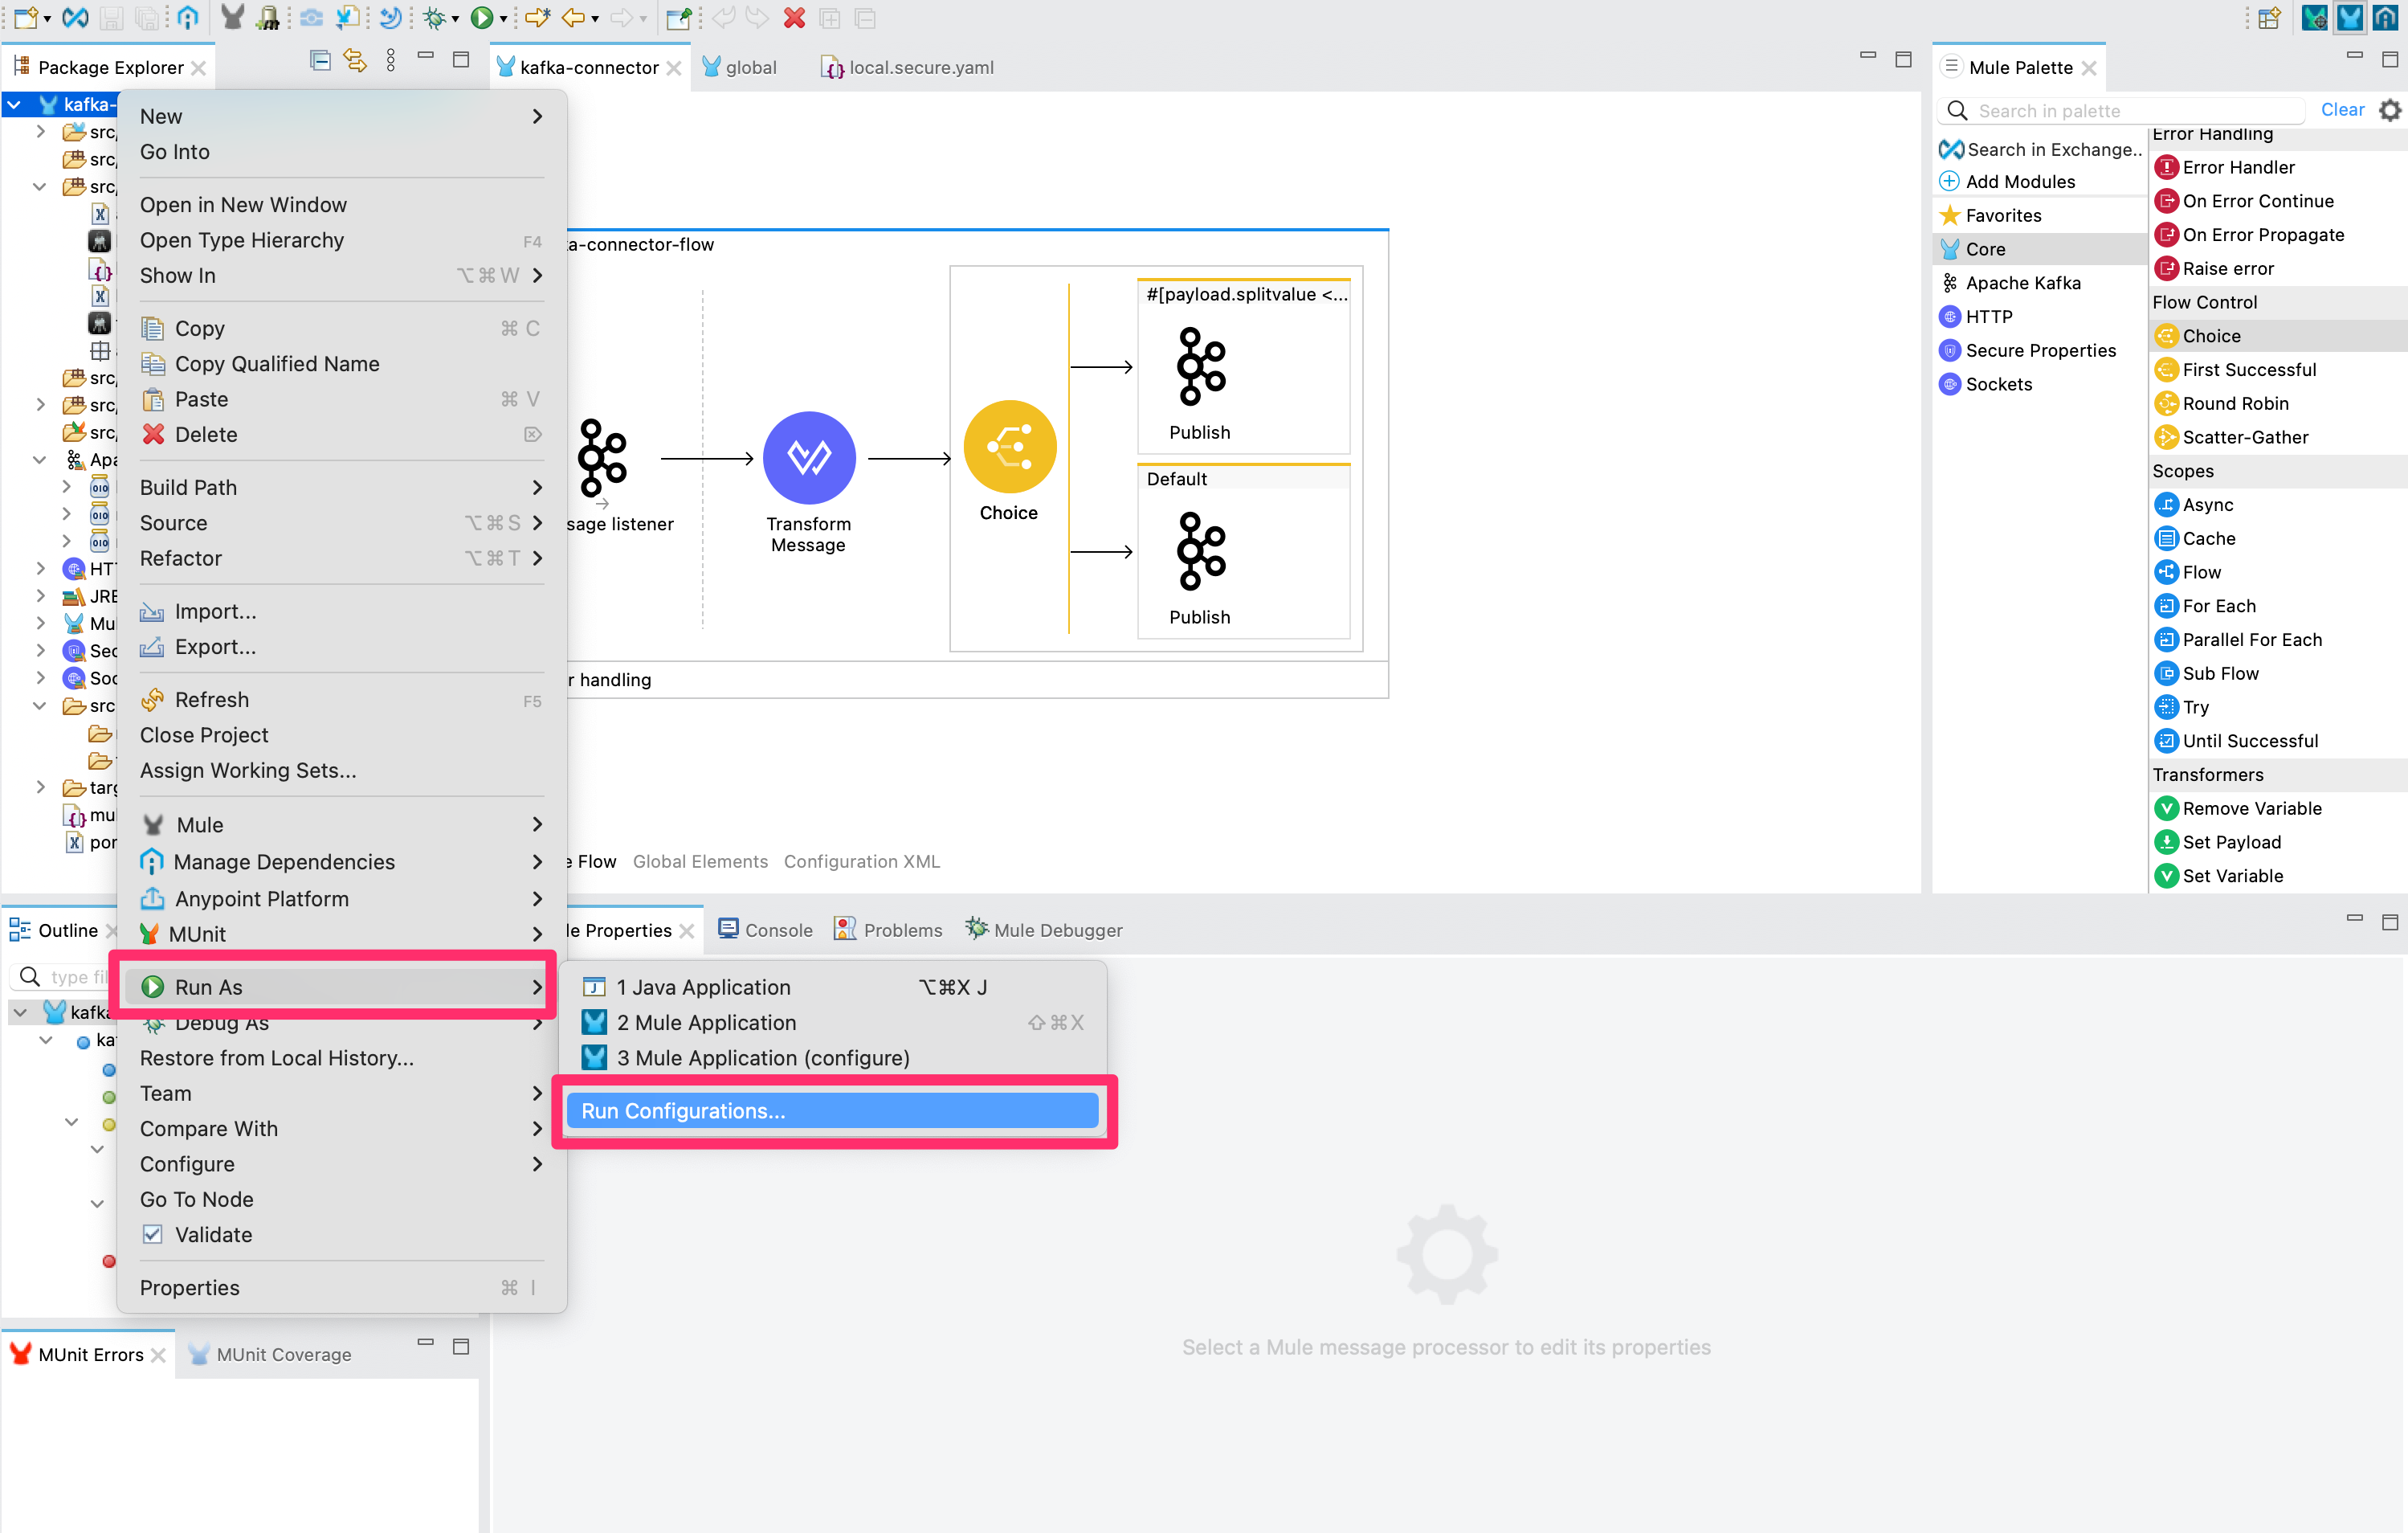
Drag the Publish operation into your project from the Mule Palette under Apache Kafka and drag it into the When section of the Choice flow control you added in the previous step.
In the properties section update the Topic to be apalachicola-1388.split-one
Repeat the steps to add a further Topic to the Default section of the Choice flow control. This time update the Topic to be apalachicola-1388.split-two
Test your project
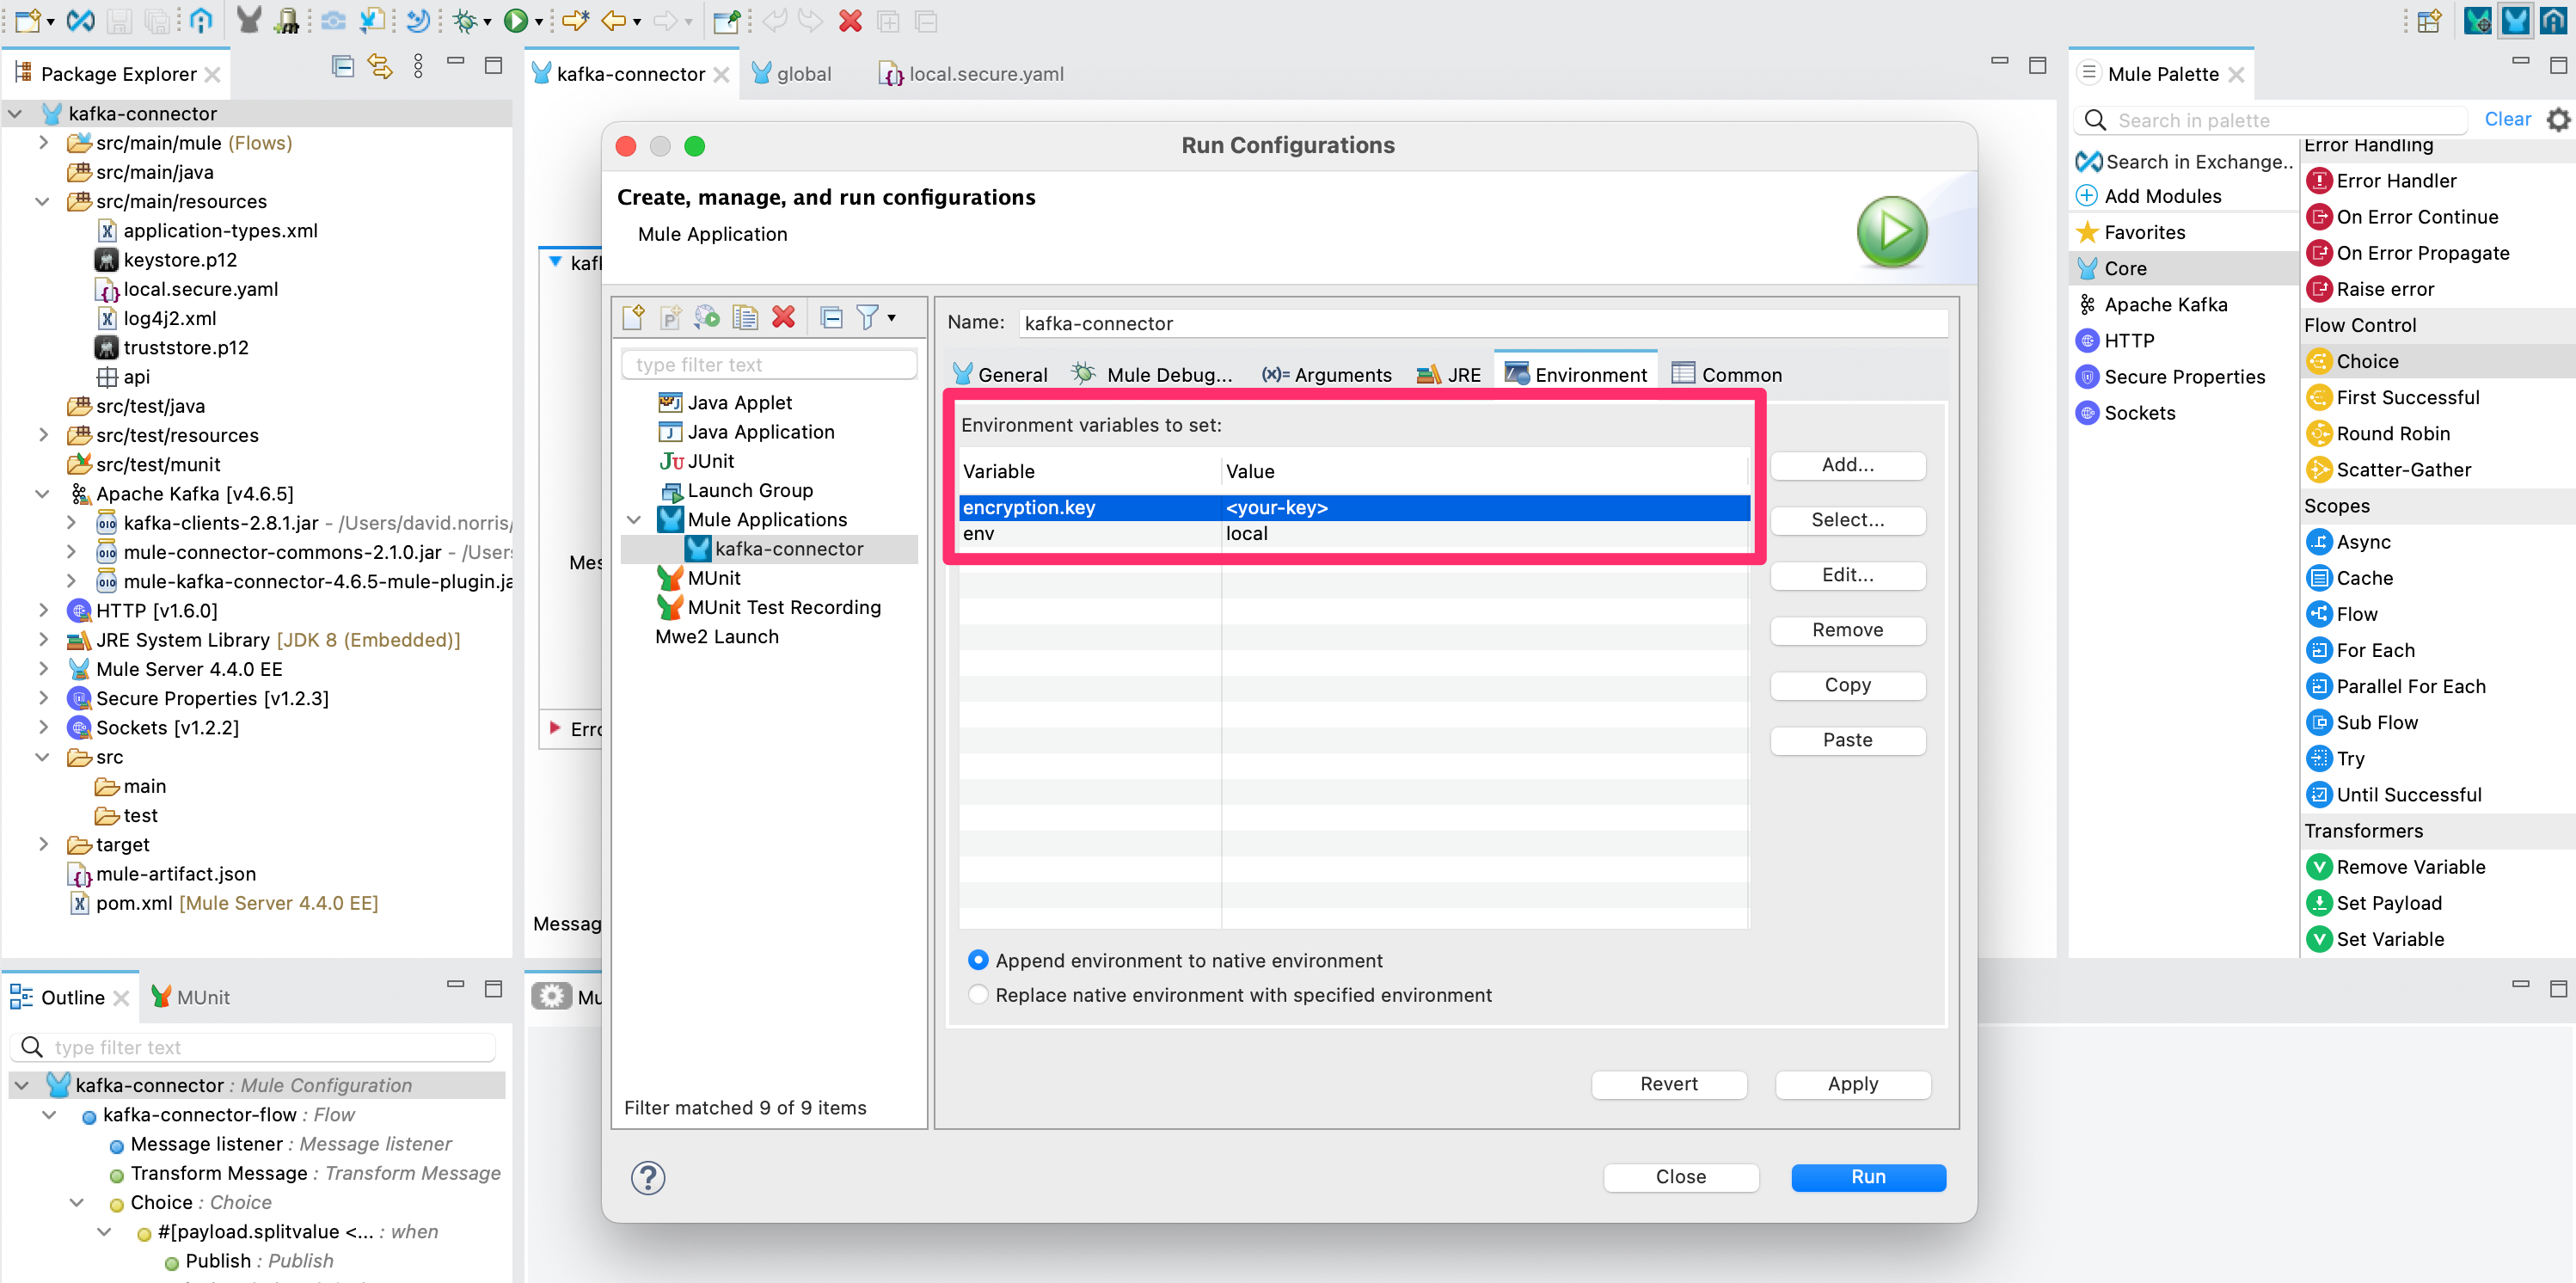
1 - Set environment variables to set env and encryption.key.
Earlier in the tutorial we setup a dynamic properties file and we secured sensitive data within it using an encryption key. Since env needs to change based on my deployment and encryption.key cannot be in my source code we can use properties set when the application runs.
For testing locally we’ll add 2 runtime configurations to Anypoint Studio. Right-click on the kafka-connector project. Select Run As > Run Configurations….
Then select the Environment tab and then Add. Enter the Name env with the value local then click Ok. Repeat the steps to create a new environment variable with the Name encryption.key and then use the key value you used earlier to encrypt your Salesforce password and token.
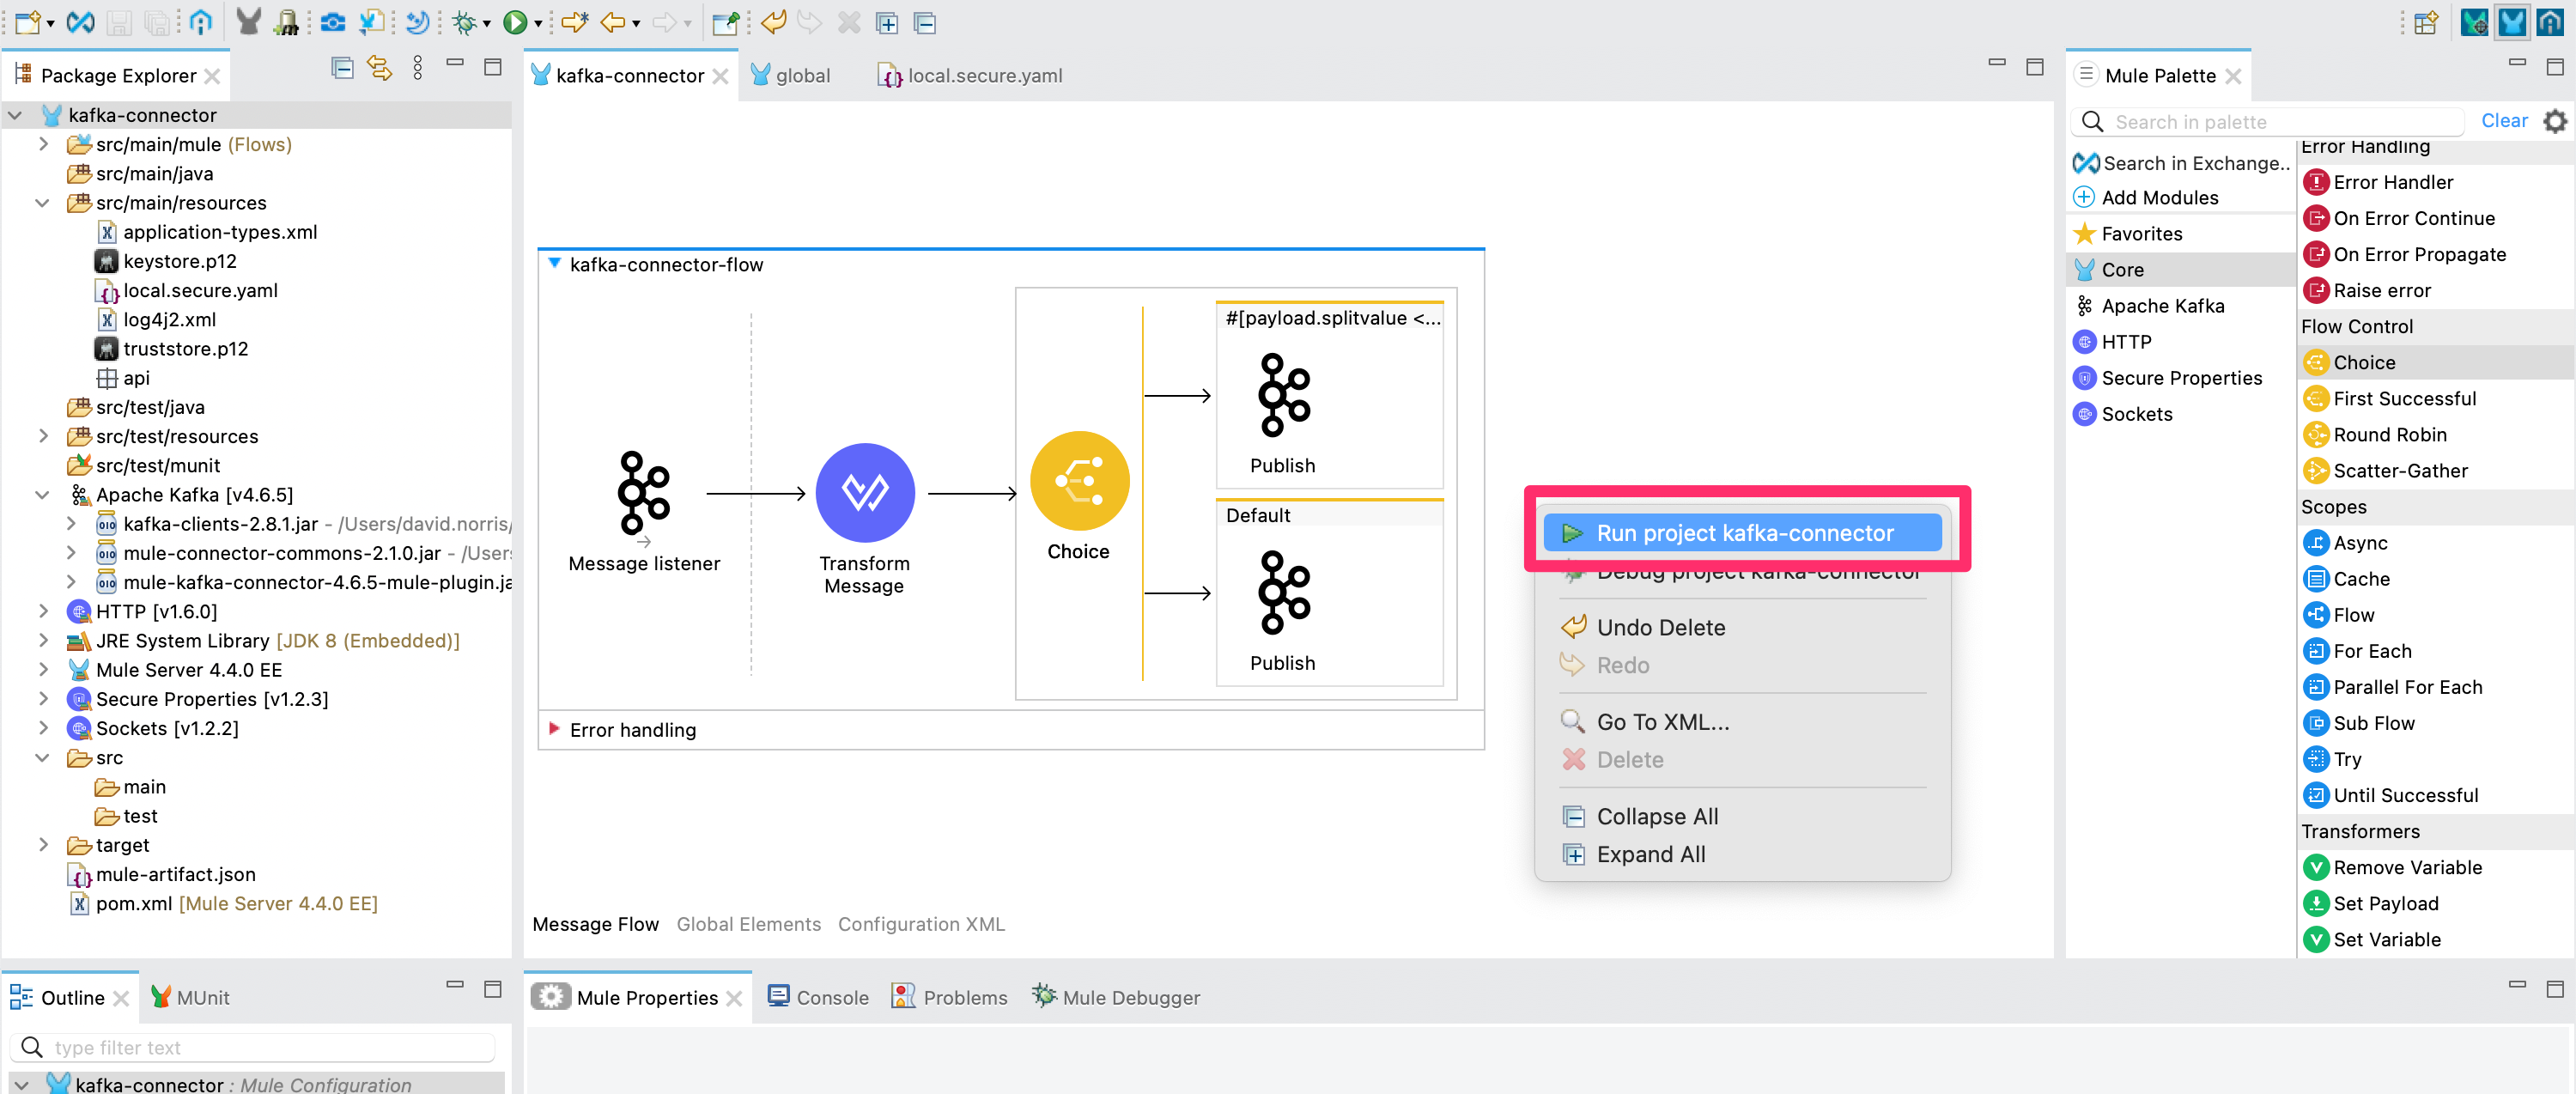
2 - Right click in the canvas and select Run project kafka-connector.
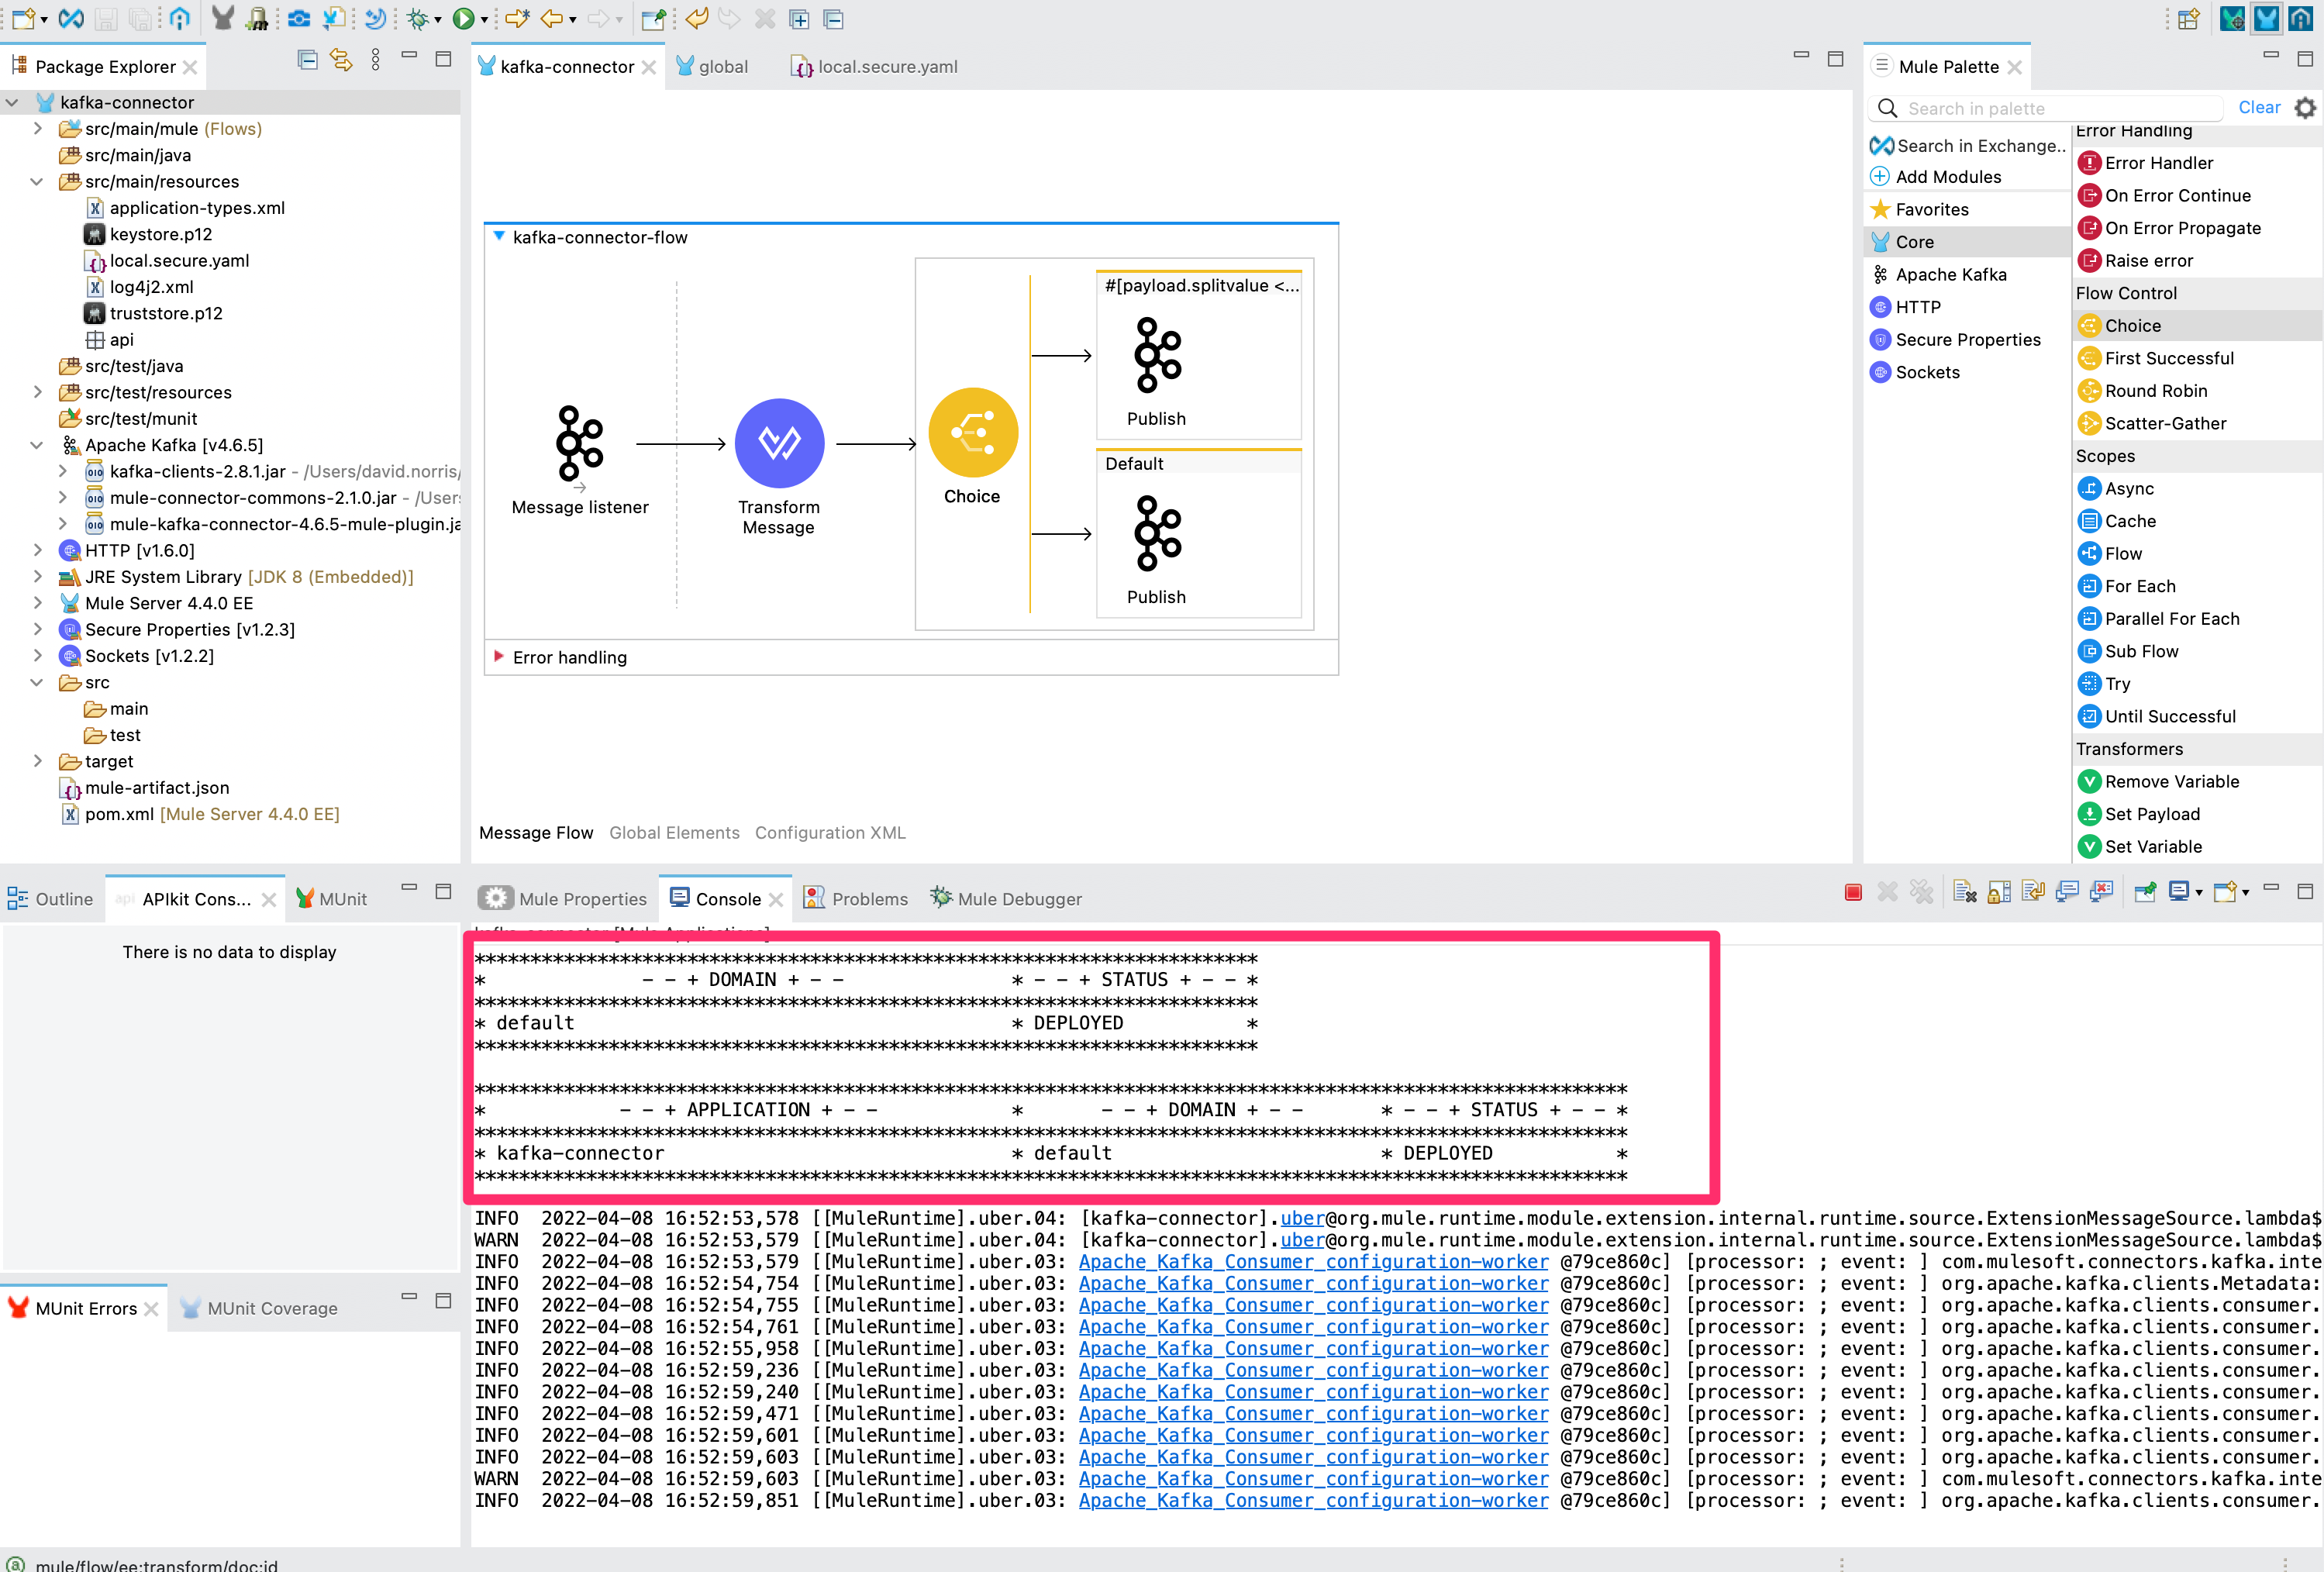
3 - Check the application was successfully deployed. Navigate to the console tab and verify the status is DEPLOYED.
4 - Open a command line prompt the tail the logs for the split-one Apache Kafka topic
1
heroku kafka:topics:tail split-one -a mule-kafka
5 - Open a second command line prompt to tail the logs for the split-two topic.
1
heroku kafka:topics:tail split-one -a mule-kafka
If our integration is implemented correctly then we should see messages arrive in split-one when we send a payoad to the raw-stream topic with a payload containing a splitvalue less than 5. Conversely any payload with a number greater than 5 should arrive in the split-two topic.
6 - Open a third command line prompt and send a message to the raw-stream topic with a payload containing a value less than 5.
1
heroku kafka:topics:write apalachicola-1388.raw-stream '{"splitvalue":1}' -a mule-kafka
7 - Verify that the window monitoring the split-one topic now has a new entry meaning your Mule app has successfully received the raw inbound message and based on the payload fanned-out and published to a subsequent topic.
Congratulations! You now have a basic Mule application that is subscribing to and publishing Apache Kafka events without needing to write a single line of code.
Next Steps
In this tutorial, we walked you through publishing and subscribing to streams of event data moving through an Apache Kafka cluster. You learned how to:
- Setup a managed Apache Kafka cluster on Heroku
- Setup the Apache Kafka Connector configuration
- Subscribe to events on a Kafka topics using the
Message Listeneroperation - Use the
Publishoperation to send messages to Kafka topics
Do you have any questions about the code? You can compare your Mule project with ours to make sure everything was set up correctly.


Try Anypoint Platform for free
Start your 30-day free trial of the #1 platform for integration, APIs, and automation. No credit card required. No software to install.
Questions? Ask an expert.
