Cors Overview
Many MuleSoft developers struggle with configuring cross-origin resource sharing (CORS) when deploying their mule application or API to API Manager. It’s important to remember that a CORS policy doesn’t protect your API, it helps protect your browser and web application. When a web page makes an HTTP request to your API to load an asset such as a font, image, or JSON file, that request can come from many different places across the internet. If these HTTP requests go unchecked, the security of your browser may be at risk. For example, your browser may be subject to hijacking, or your browser could potentially blindly download malicious code. As a result, many modern browsers follow security policies to mitigate such risks. If you have ever seen this error in your console, you are more than familiar with a CORS error.

Before CORS became standardized, there was no way to call an API endpoint under different domains since it was blocked by the Same-Origin Policy. CORS enables developers to allow requests to be made on behalf of you and at the same time, block potential malicious requests made by JavaScript.
| Website Domain | API Domain | Blocked? |
|---|---|---|
| example.com | api.com | Yes |
| example.com | api.example.com | Yes |
| example.com | example.com/api | No |
For instance, attackers can plant scripts on various websites (eg. in ads displayed via Google Ads) to make an AJAX call to your domain and gain access with your credentials. If the server does not respond with specific headers to a “simple” GET or POST request — the request will still be sent. The data will still be received, however, the browser will not allow JavaScript to access the response. If your browser tries to make a “non-simple” request (eg. a request that includes cookies, or which Content-type is other than application/x-ww-form-urlencoded, multipart/form-data or text-plain) a mechanism called preflight will be used and an OPTIONS the request will be sent to the server. A common example of “non-simple” request is to add cookies or custom headers — your browser sends such a request and the server does not respond properly, only the preflight call will be made (without the extra headers) but the actual HTTP request the browser meant to make will not be sent. The preflight request is triggered by your client JS engine as another call to your backend by default under the options method before calling your actual call to confirm that it is safe to do the actual call before making it. If you are new to MuleSoft, and haven’t already created an account, please click the Start Free Trial button below to get started in only a few minutes.
Already have an account? Sign in.
Preflight Request Explained
Most servers will allow GET requests but may block requests to modify resources on the server. Servers don’t just blindly block requests though; they have a process in place that first checks and then communicates to the client (your web browser) to determine which requests are allowed. The pre-flight call is also a mechanism that the browser uses to “check first” if there is any restriction on the API side. When a request is made using any of the following HTTP request methods, a standard preflight request will be made before the original request.
- PUT
- DELETE
- CONNECT
- OPTIONS
- TRACE
- PATCH
Preflight requests use the OPTIONS method. The preflight request is sent before the original request, hence the term “preflight.” The purpose of the preflight request is to determine whether or not the original request is safe (for example, a DELETE request). The server will respond to the preflight request and indicate whether or not the original request is safe. If the server specifies that the original request is safe, it will allow the original request. Otherwise, it will block the original request. The request methods above aren’t the only thing that will trigger a preflight request. If any of the headers that are automatically set by your browser (i.e., user agent) are modified, that will also trigger a preflight request.
Simple Requests
Preflight requests are not mandatory in case of Simple requests (if all of the following conditions are met)
If the method is
- GET
- HEAD
- POST
If we manually set headers like:
- Accept
- Accept-Language
- Content-Language
- Content-Type (refer below for more conditions)
If we set only the following Content-Type:
- application/x-www-form-urlencoded
- multipart/form-data
- text/plain
Setting up the CORS Testing Tool
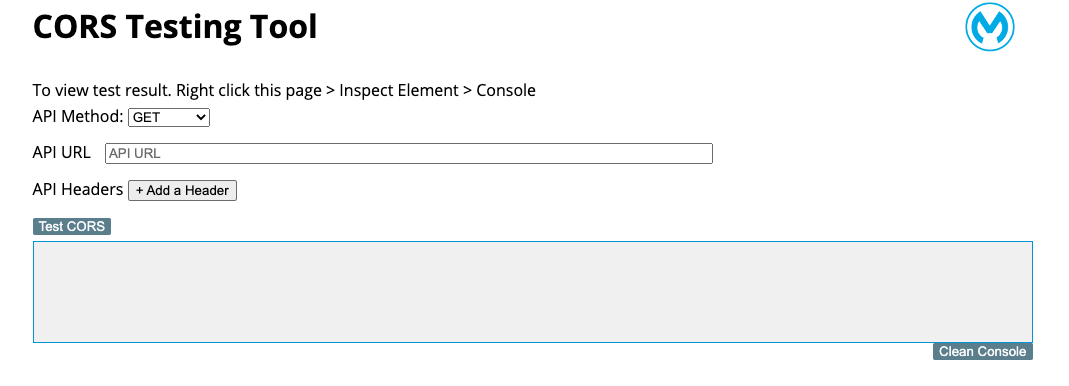
The CORS Testing Tool was created by Ahmed Heidar, and is a deployable Mule application that you can deploy to CloudHub. The application has a very simple UI that will allow you to execute CORS policy tests before handing off your application to front end developers who will call your API’s from the client side application.
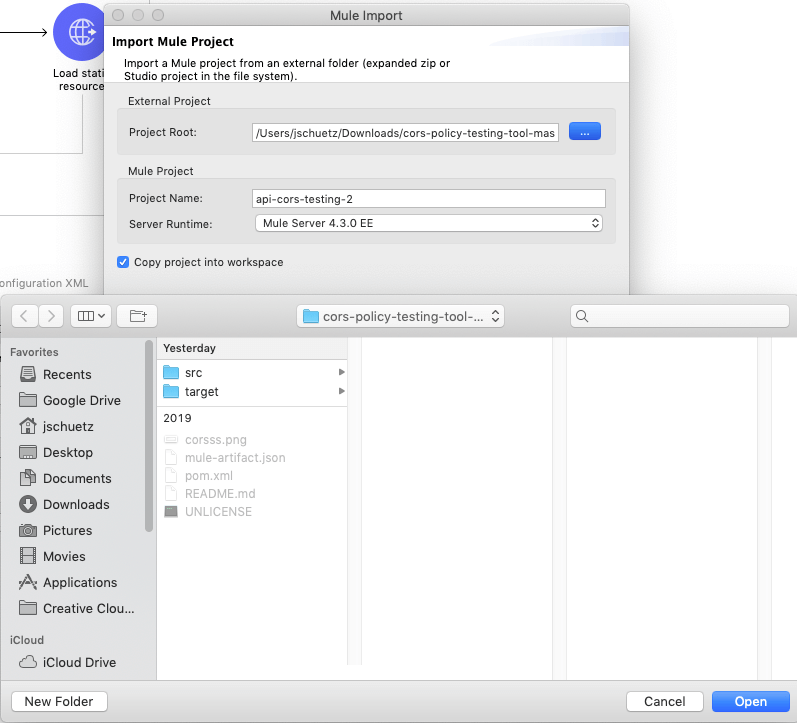
First, click the link above to download the CORS Testing Tool Mule application. Download the ZIP folder to your local machine then open up Anypoint Studio. Go to File -> Import then select Anypoint Studio project from File System.
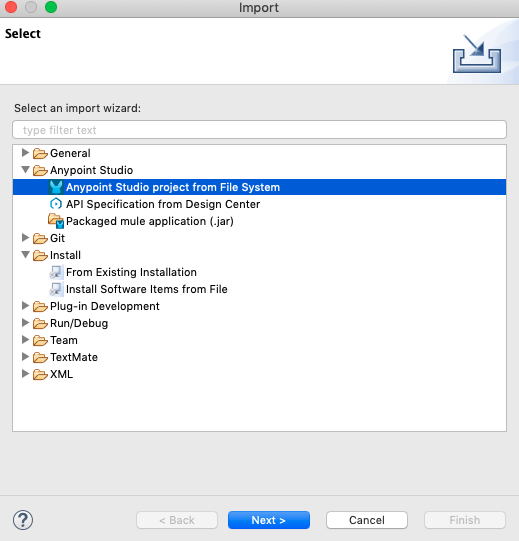
Select your unzipped project folder, and click the Finish button.
Now that you have created your project, make sure that you are running the newest version of the Mule runtime engine, and Run the project. Once your application is deployed, navigate to your localhost URL on 0.0.0.0/8081 to open up the CORS Testing Tool web application.
How to config CORS on API Manager
In this example, we’ve created an API that we have deployed to CloudHub and is currently being managed by API Manager. If you want to learn how to setup API Autodiscovery so your mule application can be discovered by API Manager, read this tutorial. In this example, we want to execute a GET request to our example-api which is hosted on CloudHub.
| API endpoint | http://xxxxxx.us-s1.cloudhub.io |
| Headers | client-id, client-secret |
| Method | GET |
When you attempt to make a GET request to the API endpoint, the GET request will be blocked by the CORS policy and you will see the following error in the console:
"Access to XMLHttpRequest at 'http://xxxxxxxx.us-s1.cloudhub.io' from origin 'http://www.example.com ' has been blocked by CORS policy: Response to preflight request doesn't pass access control check: No 'Access-Control-Allow-Origin' header is present on the requested resource.."
To avoid this error, you need to enable your CORS policy in API Manager.
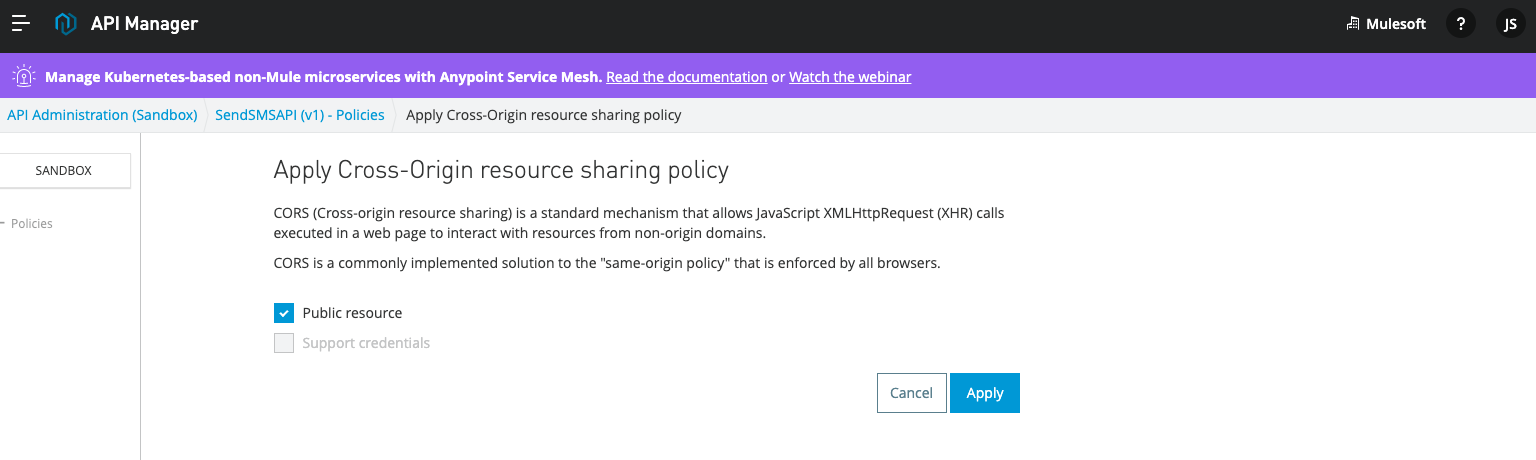
First, navigate to API Manager and select your preferred environment. Then go to the Policies menu option and click Add New Policy. Select Cross-Origin resource sharing and select the version that is applicable with your runtime version.
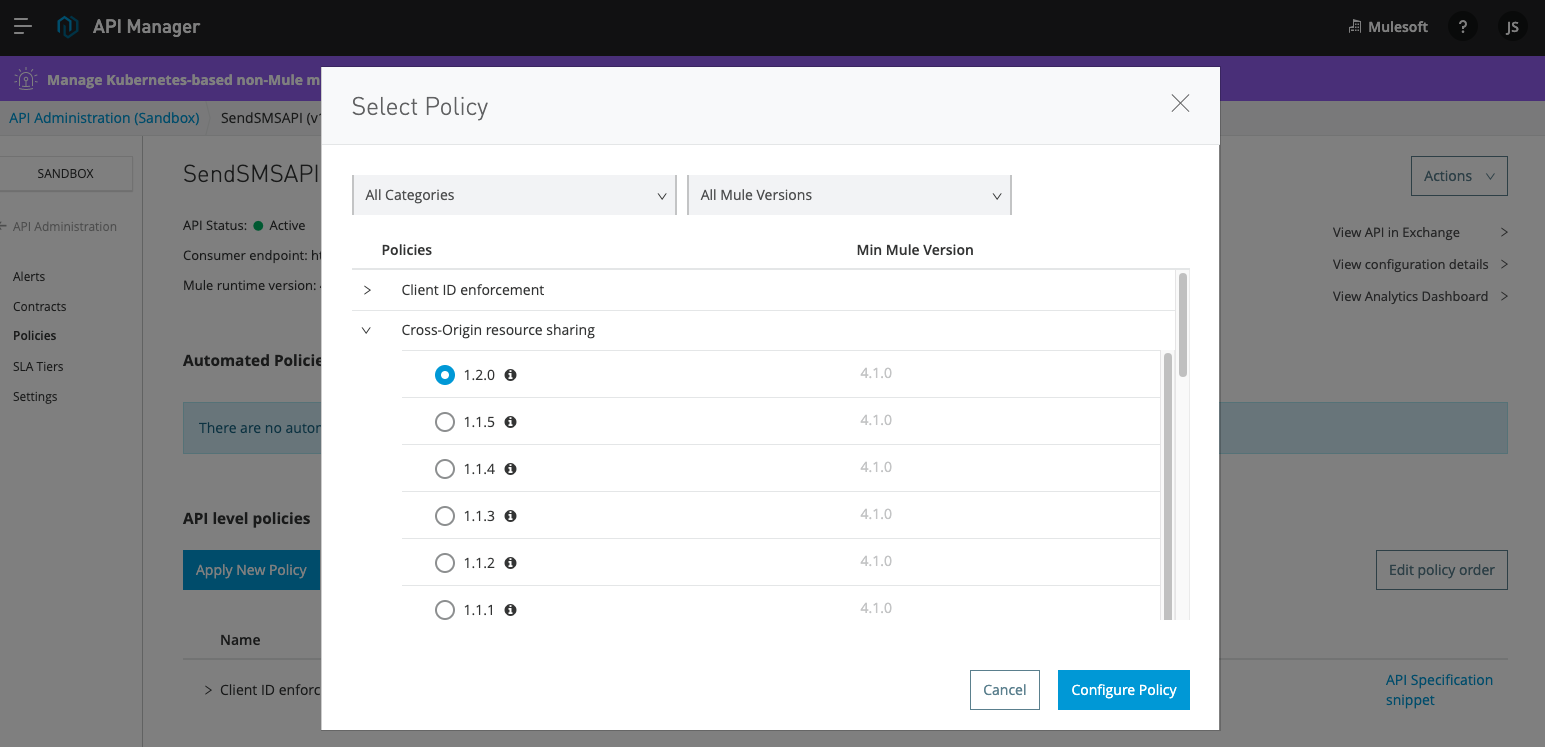
When you click on Configure Policy, there are two options to select from. Public resource and Support credentials. Selecting Public resource is preferred since it allows the API to be accessed by any website domain and allows the origin to be a wildcard *. However, if you want to restrict specific origins and have more granular control, unchecking Public resource will help.
When you Uncheck Public resource, you will see options to define your allowed origins, access control max age, and other settings for your CORS policy.
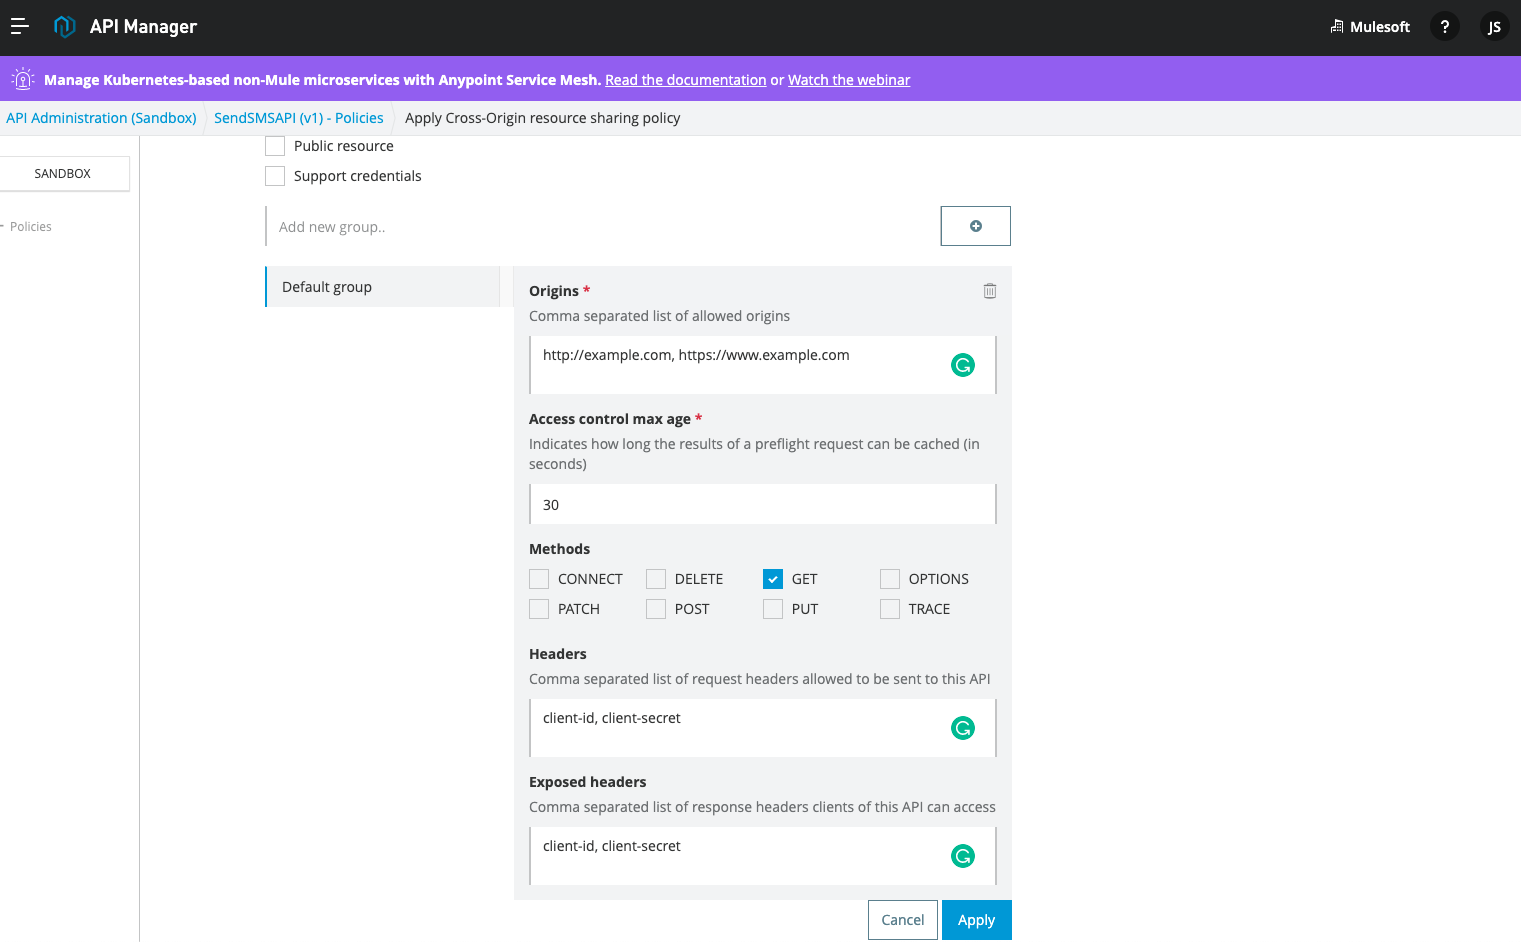
- Origins allow you to add multiple origins with a comma to separate the values.
- Access control max age allows you to add a max age for caching the preflight option method requests. This is a very powerful option since the preflight request is triggered by JavaScript, and can potentially have a long response time which can impact the end-user experience for non-functional requests.
- Methods allow you to define what type of request can be sent to the API, and all unchecked methods will be blocked by the CORS policy.
- Headers allow you to define which ones are marked as safe.
- Exposed headers allow you to define which headers you want to expose in the response so it can be used for subsequent calls.
Once you have finished entering in your CORS options, apply the changes and wait a couple of seconds for your API policy to propagate. You can test your API using the CORS Testing Tool to verify that the errors have disappeared and the two calls have been triggered by the preflight options request.
Thank you so much for reading this tutorial and thank you Ahmed Heidar for your contribution. To read more MuleSoft developer tutorials, please visit the developer tutorials homepage by clicking here. If this tutorial helped you, please consider leaving a rating below.


Try Anypoint Platform for free
Start your 30-day free trial of the #1 platform for integration, APIs, and automation. No credit card required. No software to install.
Questions? Ask an expert.
