We would like to thank Sonali Shah for their contribution to this developer tutorial.
This tutorial was updated in October 2022 and is based on the DataWeave 2.0 (BETA) extension for Visual Studio Code.
This tutorial will navigate through the DataWeave extension/plugin for Visual Studio Code (or VSCode). We will learn how to:
- Install the DataWeave extension in Visual Studio Code
- Create a new DataWeave library project
- Add a new custom module
- Generate documentation for your code
- Test your code with the live preview
- Add Unit Tests for your code
Prerequisites
- Java - Make sure you have Java version 8 installed on your computer. You can download JDK 8 here. Once installed, you can confirm your Java version by running
java -version. - Apache Maven - Make sure you have Apache Maven version 3.6.3 or higher installed on your computer. You can download it here. Once installed, you can confirm your Maven version by running
mvn -v. - Visual Studio Code - We will use this code editor to modify the code and to use the DataWeave extension. You can install the latest version here.
Install the DataWeave extension in VSCode
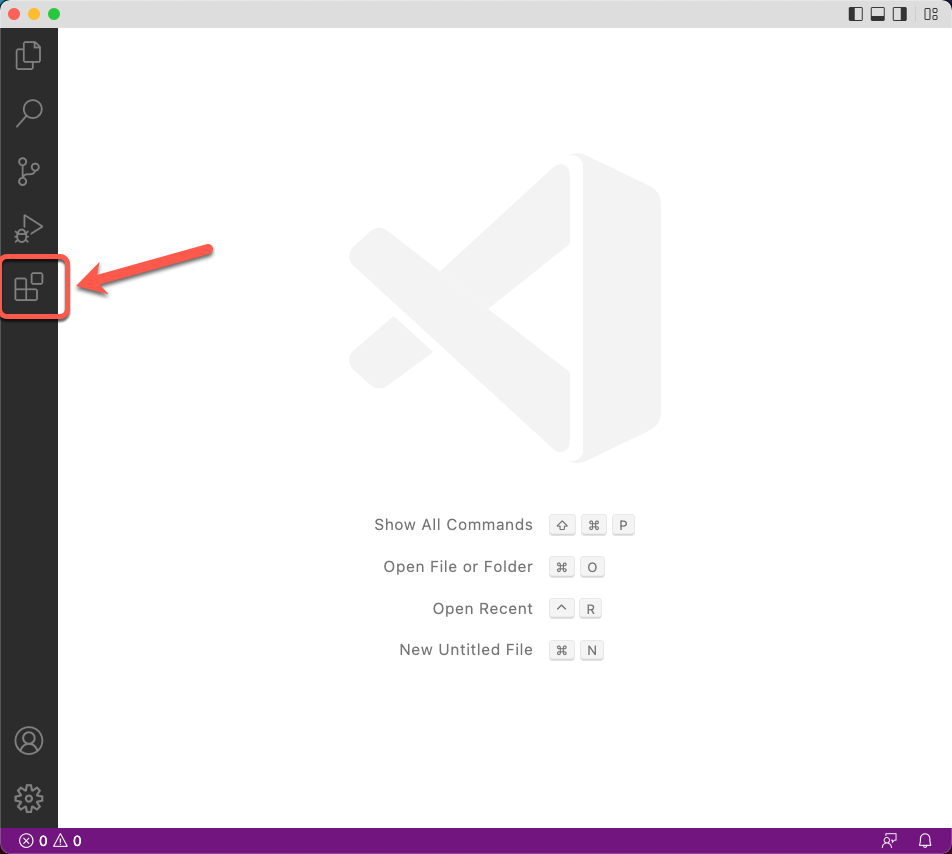
Let’s first start with installing MuleSoft’s DataWeave extension DataWeave 2.0 (BETA) into Visual Studio Code. First, click on the Extensions button on the left.
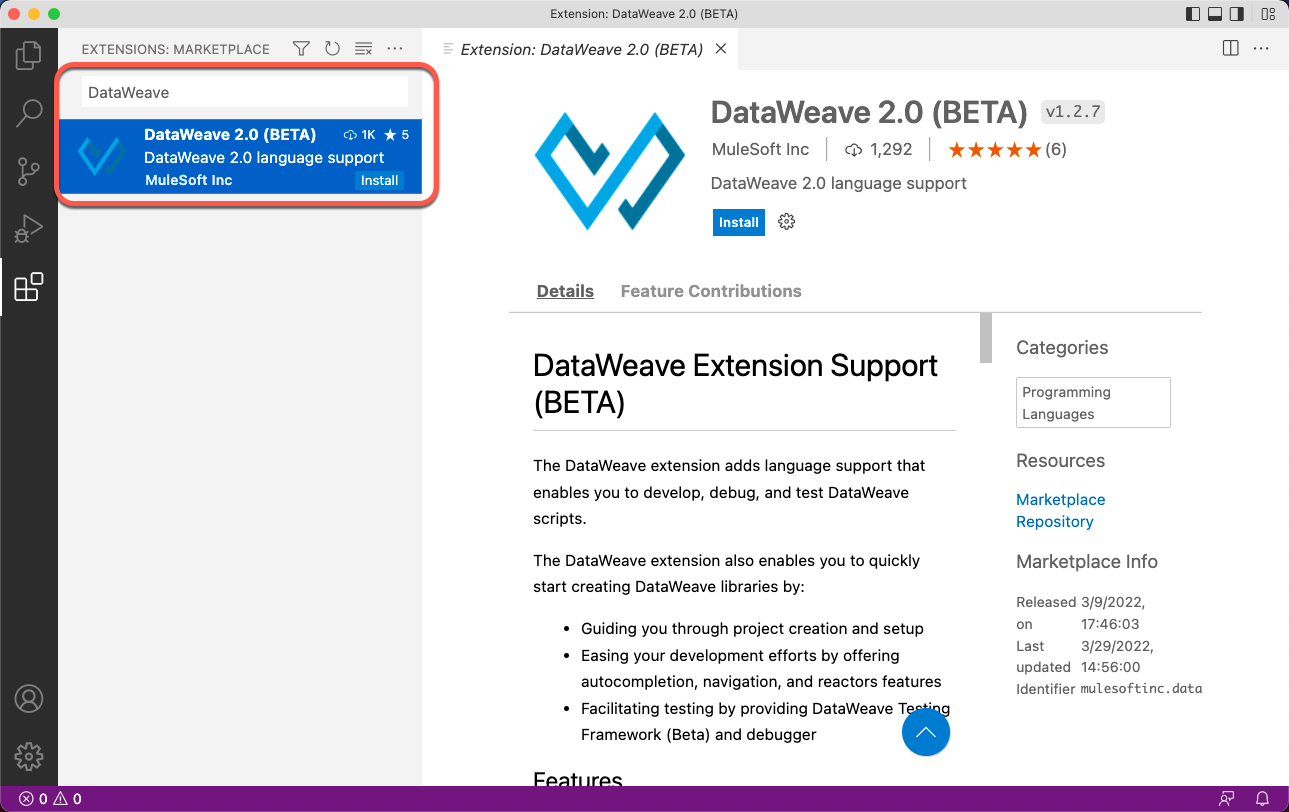
Search for the DataWeave extension and click Install.
That’s it! You have installed the DataWeave extension in VSCode.
If you experience problems with the extension or the project, make sure you:
1) Installed the latest version of Visual Studio Code. You can click on Code > Check for updates to make sure you have the latest version.
2) Installed the plugin from MuleSoft Inc and not from other sources. If you have other versions installed, remove them first.
Create a new DataWeave library project
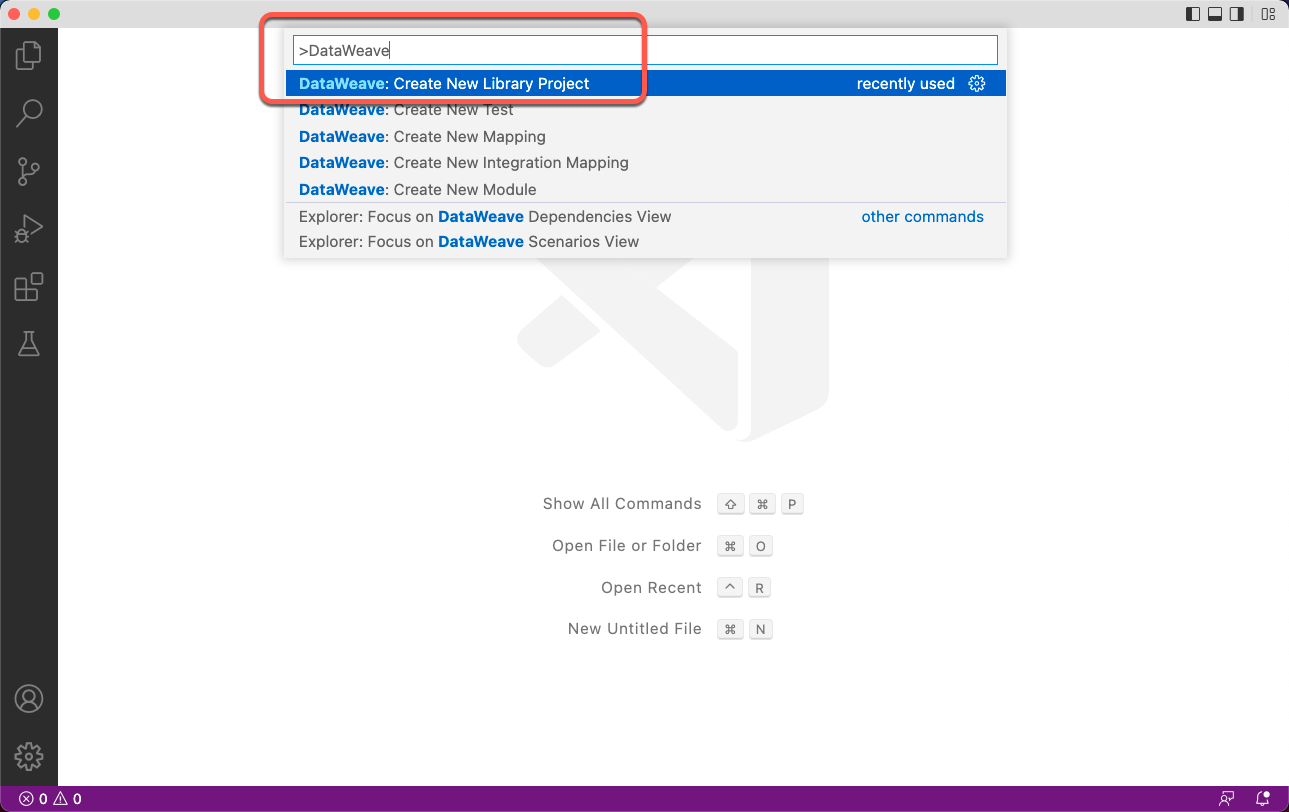
In Visual Studio Code, select View > Command Palette and search for DataWeave: Create New Library Project.
Use the shortcut Ctrl+Shift+N (Windows) or ⇧ + ⌘ + P (Mac) to open the command palette.
Add the following values in each field. In the future, you should add your Anypoint Platform’s organization ID in the Organization ID field to deploy your library to Exchange, but for now, we’re just exploring the extension’s capabilities.
| Field | Value |
|---|---|
| Organization ID | org.mycompany |
| Artifact ID | standard-date-formats-library |
| Version | 1.0.0-SNAPSHOT |
| Project name | Standard Date Formats |
| Location | Your preferred path, i.e., /Users/user/dw |
If you want to add an actual Organization ID from Anypoint Platform after creating the project, you can adjust it in the pom.xml file, under the groupId field. We’ll explore how to do this in the next tutorial.
This will lead us to the creation of a library project with the following structure.
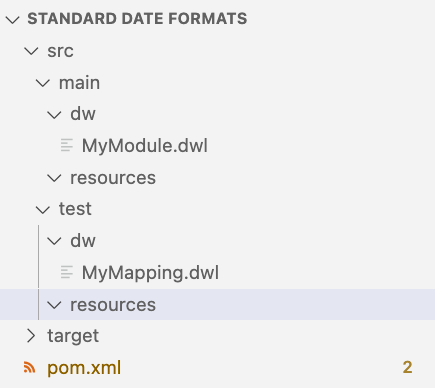
The modules should be saved under src/main/dw, while the unit or integration tests should be saved under src/main/test. There are a few autogenerated files like MyModule.dwl and MyMapping.dwl just to get you started but they can be removed if not required. It is important to give a meaningful name to the DataWeave files.
If you want to share the mapping for reusability purposes, you should add it under src/main/dw. This makes it accessible from your Mule application later in the process. However, if you just want to test your code with a simple mapping, it is best to add it under src/test/dw. For more information, see Create Custom Modules and Mappings.
Let’s remove both .dwl files to create our own in the following steps.
Add a new custom module
Create a new DateFormatConversion.dwl file (or a New Module) under src/main/dw and add the following code.
1
2
3
%dw 2.0
fun dateTimeConversion (dateTime: DateTime, dateTimeFormat: String) =
  dateTime as String {format: dateTimeFormat}
This code defines a function dateTimeConversion that converts a given DateTime into the given desired format. The function requires two parameters:
dateTime- This is the provided DateTimedateTimeFormat- This is the format in which the DateTime is to be converted
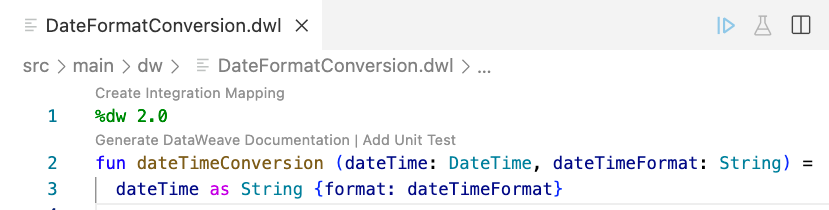
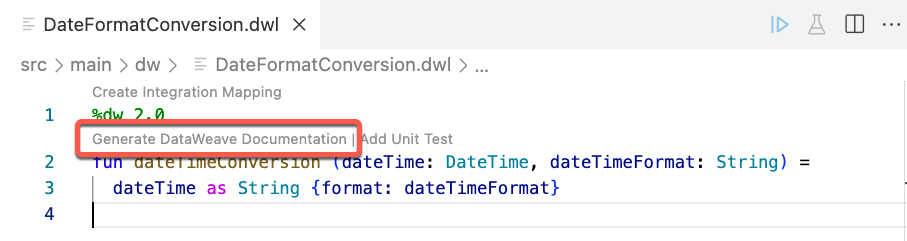
You will notice some suggestions appear in the code, like Generate DataWeave Documentation or Add Unit Test. Let’s explore these in more detail.
Generate documentation for your code
Click on the Generate DataWeave Documentation link on top of your function’s definition.
This generates base documentation for you to modify with your explanations and based on the code you already created.
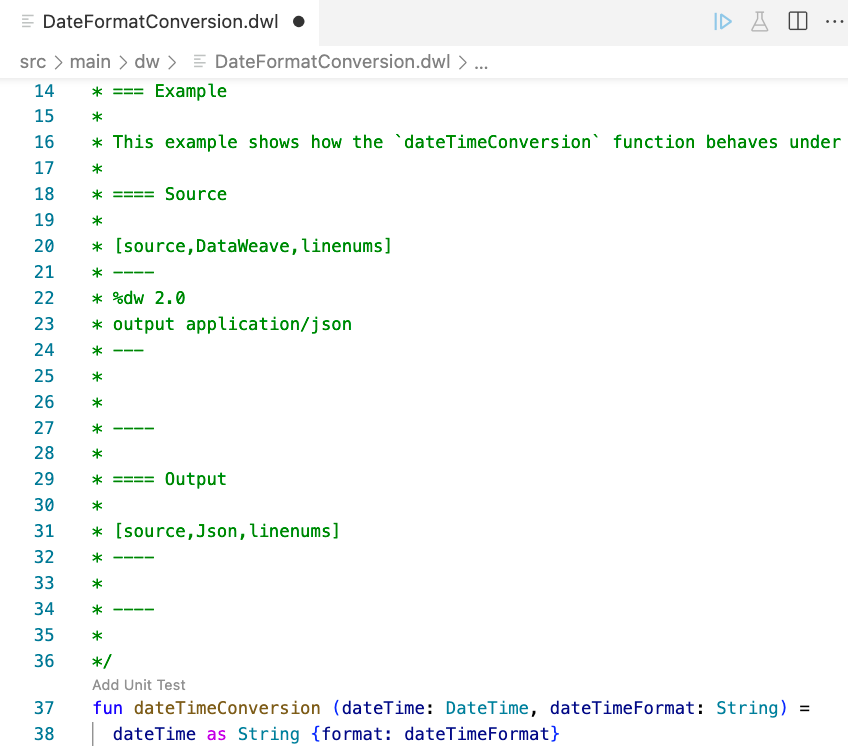
You can add descriptions and examples. You can copy and paste the following DataWeave documentation or add your explanations.
1
2
3
4
5
6
7
8
9
10
11
12
13
14
15
16
17
18
19
20
21
22
23
24
25
26
27
28
29
30
31
32
33
34
35
36
37
38
39
40
41
42
43
/**
* Converts a given `DateTime` into the given desired format.
*
* === Parameters
*
* [%header, cols="1,1,3"]
* |===
* | Name | Type | Description
* | `dateTime` | DateTime | This is the provided DateTime
* | `dateTimeFormat` | String | This is the format in which the DateTime is to be converted
* |===
*
* === Example
*
* This example shows how the `dateTimeConversion` function behaves under different inputs.
*
* ==== Source
*
* [source,DataWeave,linenums]
* ----
* %dw 2.0
* output application/json
* import dateTimeConversion from DateFormatConversion
* ---
* {
*   one: dateTimeConversion(now(), "dd-MM-yyyy hh:mm:ss a"),
*   two: dateTimeConversion(now(), "yy-MM-dd"),
*   three: dateTimeConversion(now(), "hh:mma")
* }
* ----
*
* ==== Output
*
* [source,Json,linenums]
* ----
* {
*   "one": "02-06-2022 02:01:40 PM",
*   "two": "22-06-02",
*   "three": "02:01PM"
* }
* ----
*
*/
This documentation is useful for two reasons:
- The new developers that see our code will have more context on how it works
- If/when we publish this library to Exchange, the documentation pages will be automatically defined by making use of the code’s documentation
It’s not required to add the documentation, but it’s a best practice to keep a cleaner, more understandable code.
Test your code with the live preview
Another powerful feature provided by the extension is that we can test the function by creating a mapping in src/test/dw and check whether it is working fine by clicking on the preview option (similar to the online DataWeave playground).
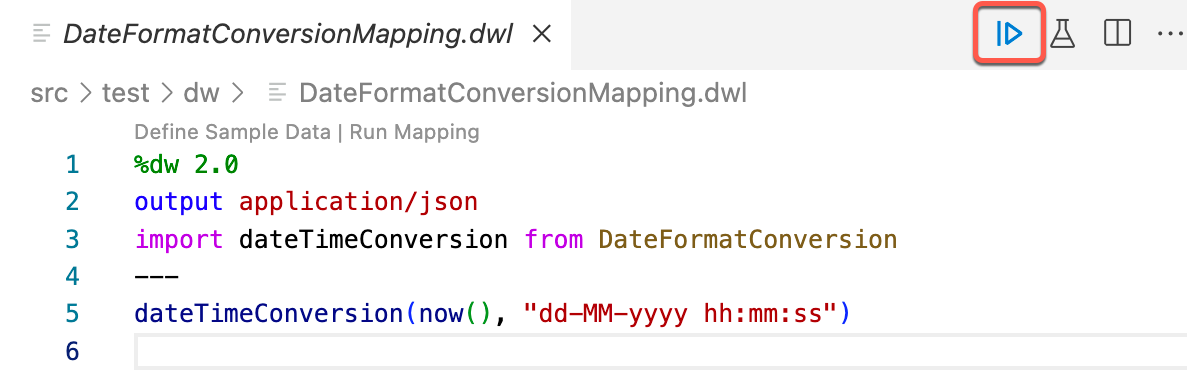
Create a new file under src/test/dw (or a New Mapping) called DateFormatConversionMapping.dwl and paste the following code.
1
2
3
4
5
%dw 2.0
output application/json
import dateTimeConversion from DateFormatConversion
---
dateTimeConversion(now(), "dd-MM-yyyy hh:mm:ss")
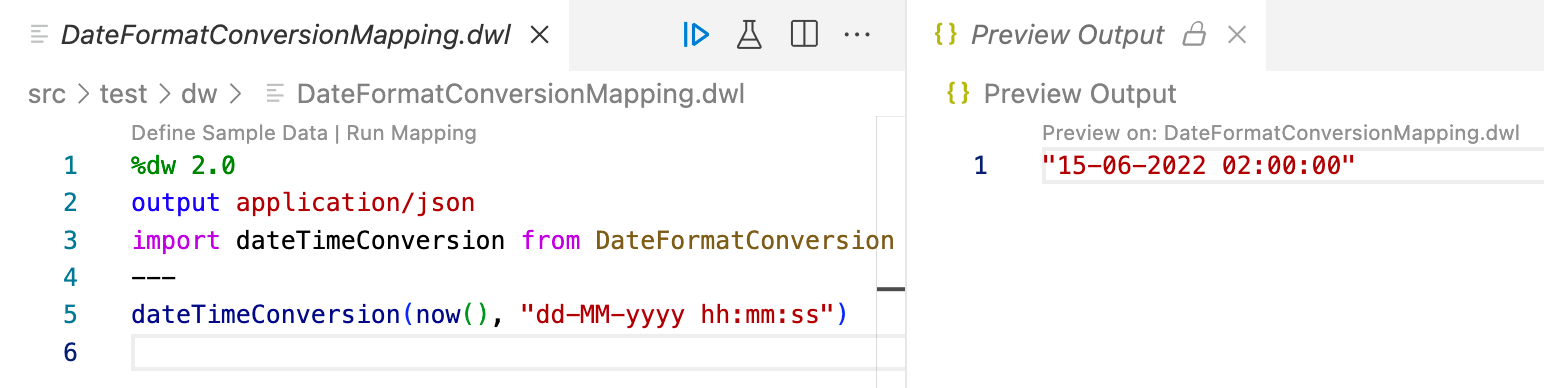
Now click on the Run Preview button.
Make sure the root project folder in Visual Studio Code is the actual DataWeave library’s folder (i.e., library/src). You might get issues if you attempt to run the preview from a different project folder (i.e., myfolder/library/src).
This opens a new tab or window with the Preview Output.
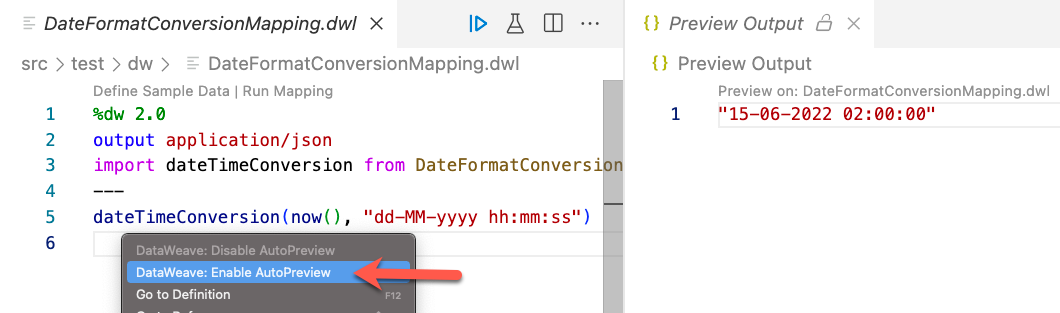
However, every time you make a change you need to click on the Run Preview button to see it reflected in the output. If you want to make use of the same functionality from the DataWeave Playground (to reflect the changes automatically), go to your mapping file, right-click on it, and select DataWeave: Enable AutoPreview.
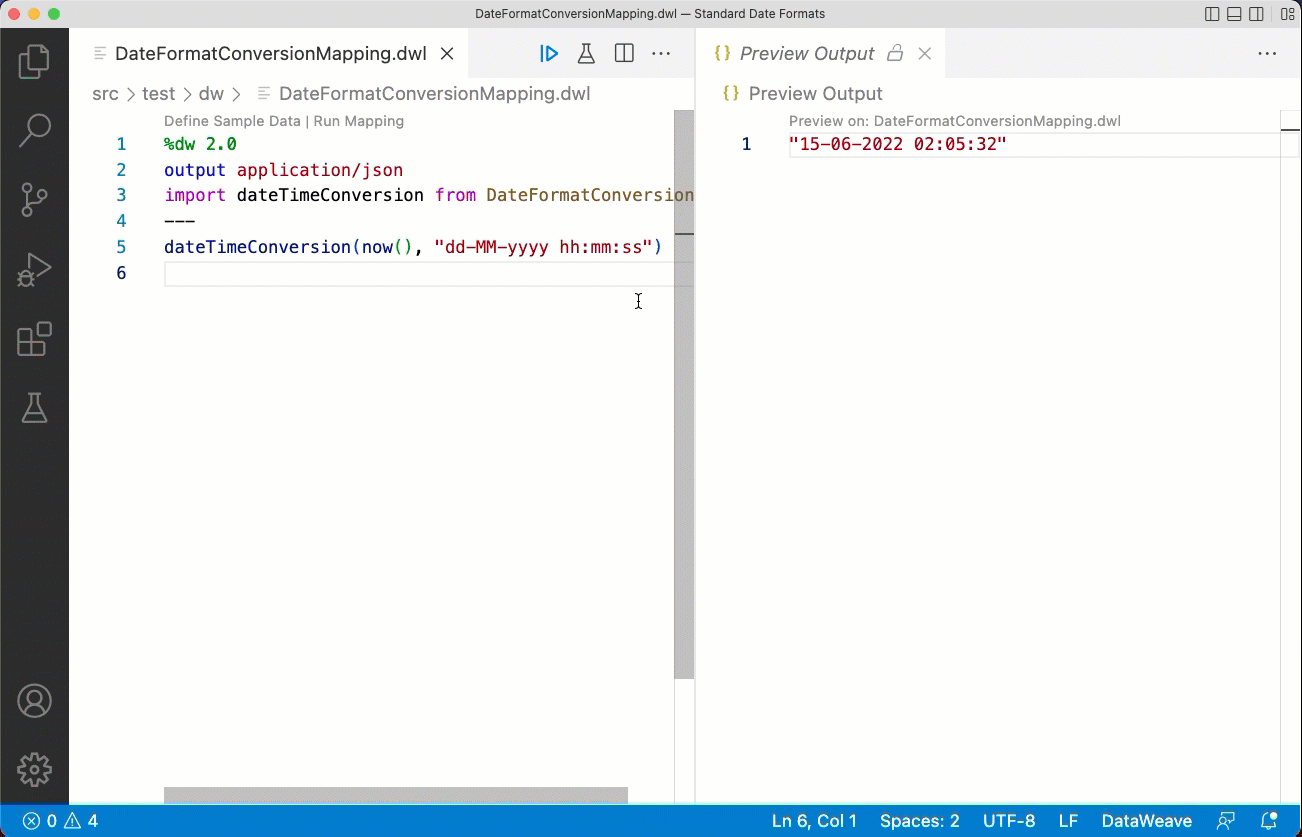
Now you can make changes to the mapping and see them reflected immediately on the output window.
Add Unit Tests for your code
Let’s now click on the Add Unit Test link on top of the definition file (DateFormatConversion.dwl).
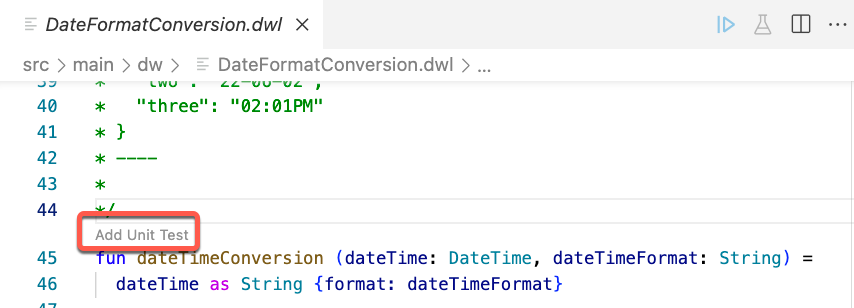
This will create a new file (DateFormatConversionTest) under src/test/dw where you will be able to add custom unit tests for your code. Paste the following code in this new file.
1
2
3
4
5
6
7
8
9
10
11
12
13
14
15
16
17
18
19
20
21
%dw 2.0
import * from dw::test::Tests
import * from dw::test::Asserts

import * from DateFormatConversion

var date: DateTime = "2022-06-06T10:00:00" as DateTime
---
"DateFormatConversion" describedBy [
    "dateTimeConversion" describedBy [
        "Date format" in do {
            dateTimeConversion(date, "dd-MM-yyyy") must equalTo("06-06-2022")
        },
        "Time format" in do {
            dateTimeConversion(date, "hh:mma") must equalTo("10:00AM")
        },
        "Date and Time format" in do {
            dateTimeConversion(date, "dd-MM-yyyy hh:mm:ss a") must equalTo("06-06-2022 10:00:00 AM")
        }
    ],
]
Now you can click on the green arrow button on the left to run the tests.
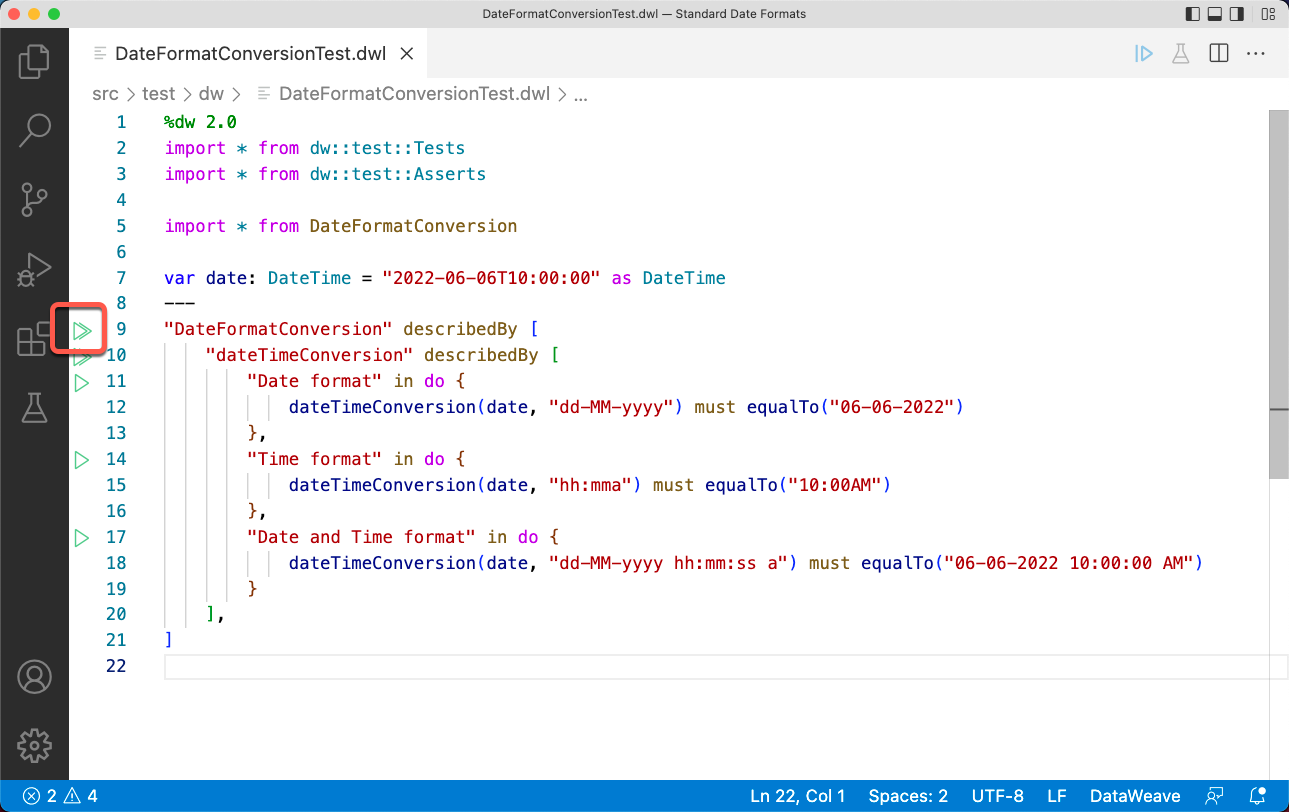
You should see green checks next to the tests, meaning they passed!

Adding unit tests is not required, just as generating documentation is not required for your projects. But it is a best practice to create quality code. Especially if you will be sharing DataWeave libraries in Exchange with a broader audience.
To learn more about the testing functions and modules, see DataWeave Assertions Library.
Next Steps
Do you have any questions about the code? You can compare your DataWeave library with ours to make sure everything was set up correctly.
In this tutorial, we navigated through the DataWeave extension/plugin for Visual Studio Code (or VSCode). We learned how to:
- Install the DataWeave extension in Visual Studio Code
- Create a new DataWeave library project
- Add a new custom module
- Generate documentation for your code
- Test your code with the live preview
- Add Unit Tests for your code
In the next tutorial, we’ll learn how to deploy a DataWeave library to Anypoint Exchange and how to consume DataWeave libraries published in Exchange from our Mule applications.
Click on the Next button below to continue to the next tutorial.


Try Anypoint Platform for free
Start your 30-day free trial of the #1 platform for integration, APIs, and automation. No credit card required. No software to install.
Questions? Ask an expert.
