Overview
Is this your first time developing with MuleSoft? If so, please read our Hello Mule tutorial to learn how to build your first API/application in Anypoint Studio and deploy it to CloudHub.
With new advances in technology driving down the cost of storing and analyzing historical data, businesses are increasingly using the information to compile custom reports and dashboards in BI tools. As larger and more complex data sets are involved, data warehousing coupled with simple ETL/ELT integration patterns have grown in popularity as a way to extract insights from these large data sets. Mulesoft offers a simple and flexible way to implement batch and ETL/ELT services. This tutorial will guide you through the basics of setting up a Mule flow that extracts data from a CSV file and transforms it before bulk uploading to Amazon Redshift.
This tutorial will guide you through the process for building a Batch ETL Mule Flow for Redshift in Anypoint Studio. You can also download the pre-build Flow from Anypoint Exchange here.
In this tutorial, you will learn…
- What data warehousing is and how it is used
- The methods used to work with large data sets: ETL/ELT and batch processing
- Why Mulesoft is well suited for ETL/ELT and batch data warehousing use cases
- How to use Anypoint Studio to setup an ETL workflow that extracts data from a CSV file hosted on an FTP server, transforms the data, and then loads it into Amazon Redshift
What is data warehousing and what is it used for?
Data warehousing is the secure and organized electronic storage of data, usually in large sizes, maintained by an organization for future reference. Common data warehouses include Amazon Redshift, Snowflake, Google BigQuery, IBM Db2, and Microsoft Azure Synapse among many others. Data warehousing serves 3 main functions: analytics to gain insight into a company’s operations, long term data storage for future reference (such as customer transaction records and receipts), and compliance with financial and data security requirements.
What methods can be used to work with data warehouses?
Traditionally, large data sets have been consumed using the ETL approach, which stands for “Extract, Transform, Load”. Data is extracted from a data source, transformed into the necessary format (such as a table with only specific values rather than the full data set) on a staging environment, and then loaded into a data warehouse for further dashboarding/analytics and visualization. ETL is useful when frequent updates to data are not needed, and users would like to save on computing costs by transforming small amounts of data in a staging server before pushing to the target. ETL is also most common when working with on-prem data storage solutions
As cloud computing becomes more affordable, however, a new trend known as ELT is emerging. This stands for “Extract, Load, Transform” and allows users to directly transfer data from the source data warehouse to the destination tool before computing the transformations needed. This is most common with large amounts of data that may need frequent updates. You can learn more about ETL/ELT integration patterns in the following MuleSoft Whitepaper
Let’s Try it! Building an ETL service using Mulesoft Anypoint Platform
Getting Started
To get started, click the buttons below to create a free MuleSoft Anypoint Platform account and download Anypoint Studio.
Already have an account? Sign in.
Next download Anypoint Studio for FREE by clicking here
The Problem
Now that you have set up your Anypoint Platform account and installed Anypoint Studio, we are ready to begin! The ETL process we will implement today creates a solution for the following scenario:
Danny works for Northern Trail Outfitters (NTO), a retailer of sports apparel, gear, and nutrition products. NTO has decided to send all of their customers a free t-shirt! NTO’s list of customers along with their shirt sizes currently resides in a CSV file, and the prices for each shirt size reside in an Amazon Redshift Database. Danny has been tasked with creating a new table in Redshift that contains the list of customers, their shirt sizes, and the price for each shirt so that management can get an idea of the total cost of this giveaway. But there is a catch! NTO is sold out of the 3XL size, so NTO notified and checked with their customers ahead of time and now any customer that is listed as a 3XL will need to be sent a 2XL shirt instead.
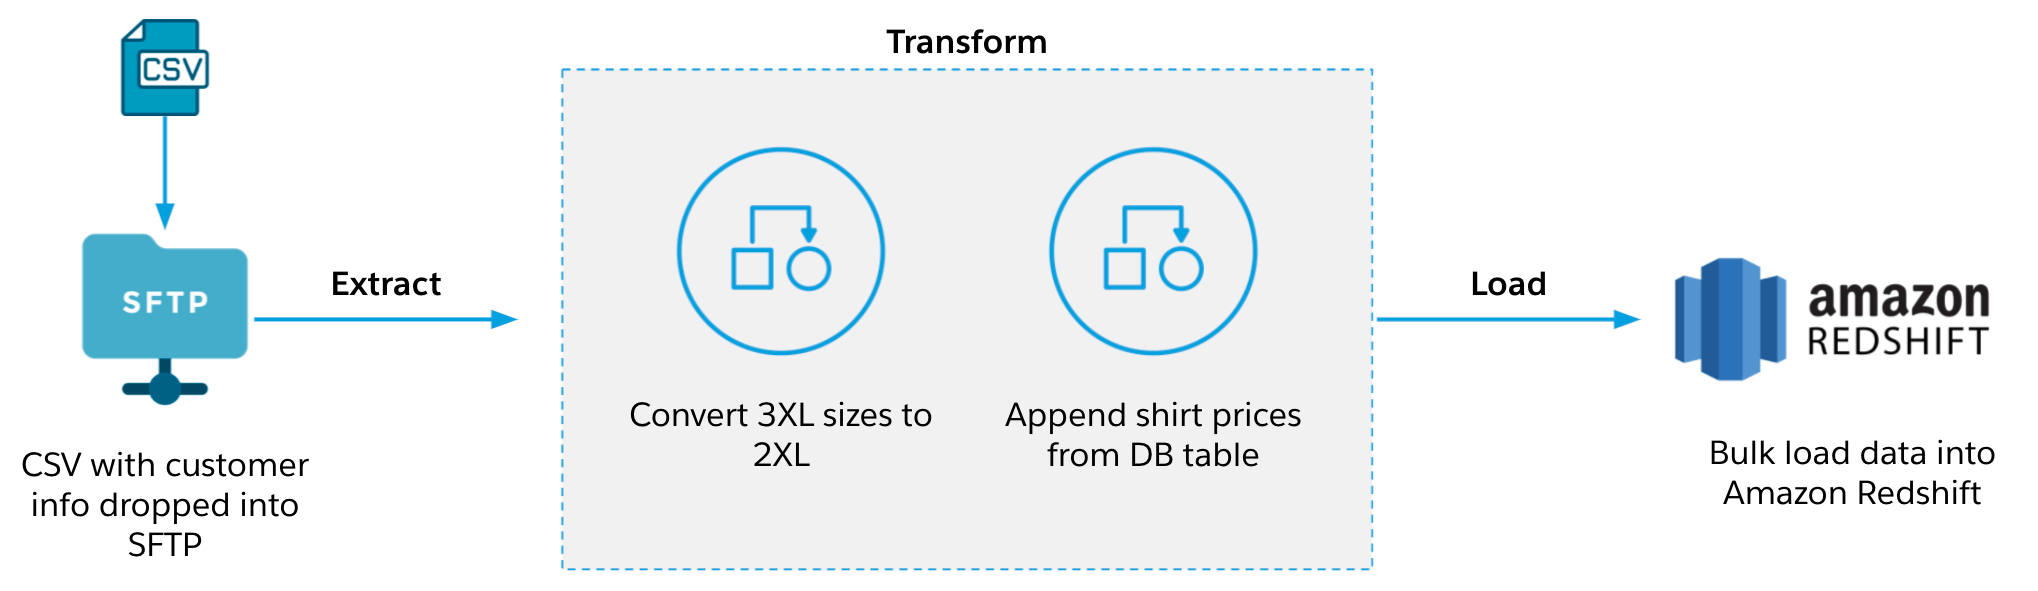
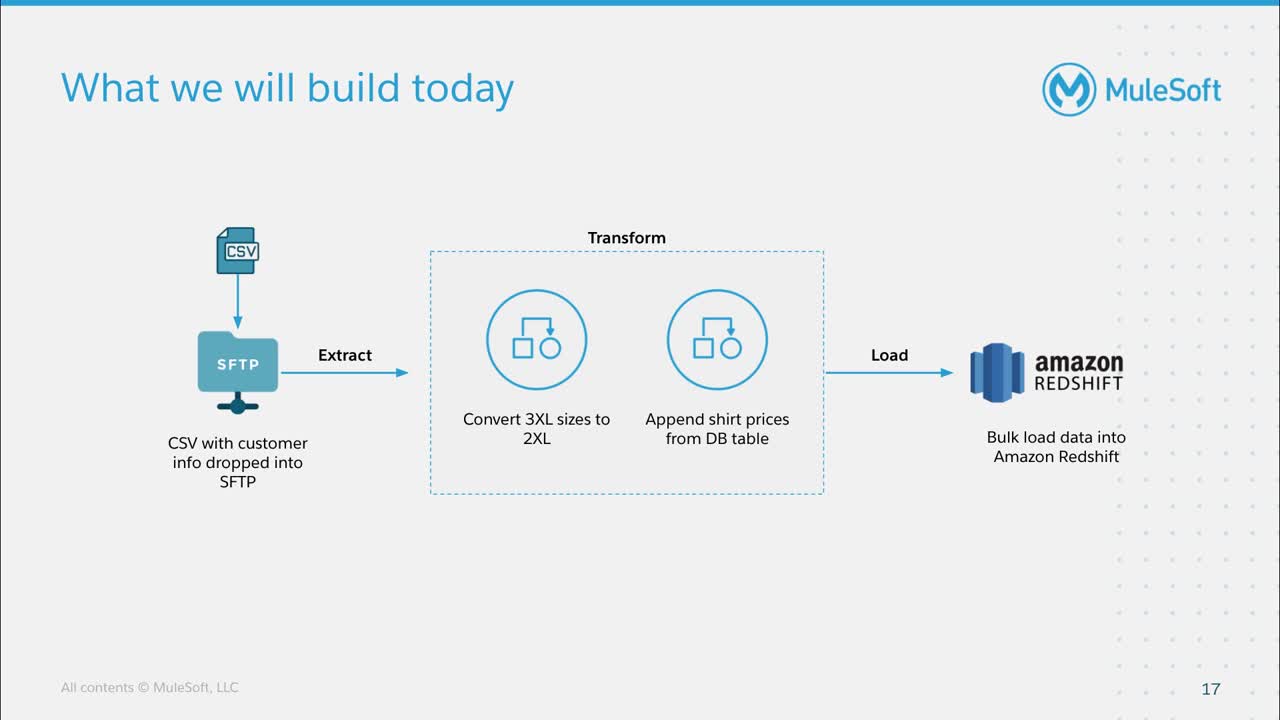
Let’s help Danny build an integration that extracts the list of customers and their shirt sizes from the CSV file, extracts the shirt prices from the Amazon Redshift database, transforms 3XL sizes to 2XL, transforms the data to add shirt prices, combines the results into a single table, and loads the data into a new Amazon Redshift table.
Provision an Amazon Redshift Cluster
First we must configure Amazon Redshift with a new cluster and database that we will work with. This will be the source of shirt price information, and the target for your final data.
- Login to your AWS admin portal.
- Search for “Redshift” and navigate to it.
- At the right, you will see an option to “Create Cluster”. Select that and follow the prompts to create a cluster that you can use to test your ETL workflow. Remember the username and password that you configure during setup. You can learn more about getting started with Amazon Redshift here and how to create a sample cluster here
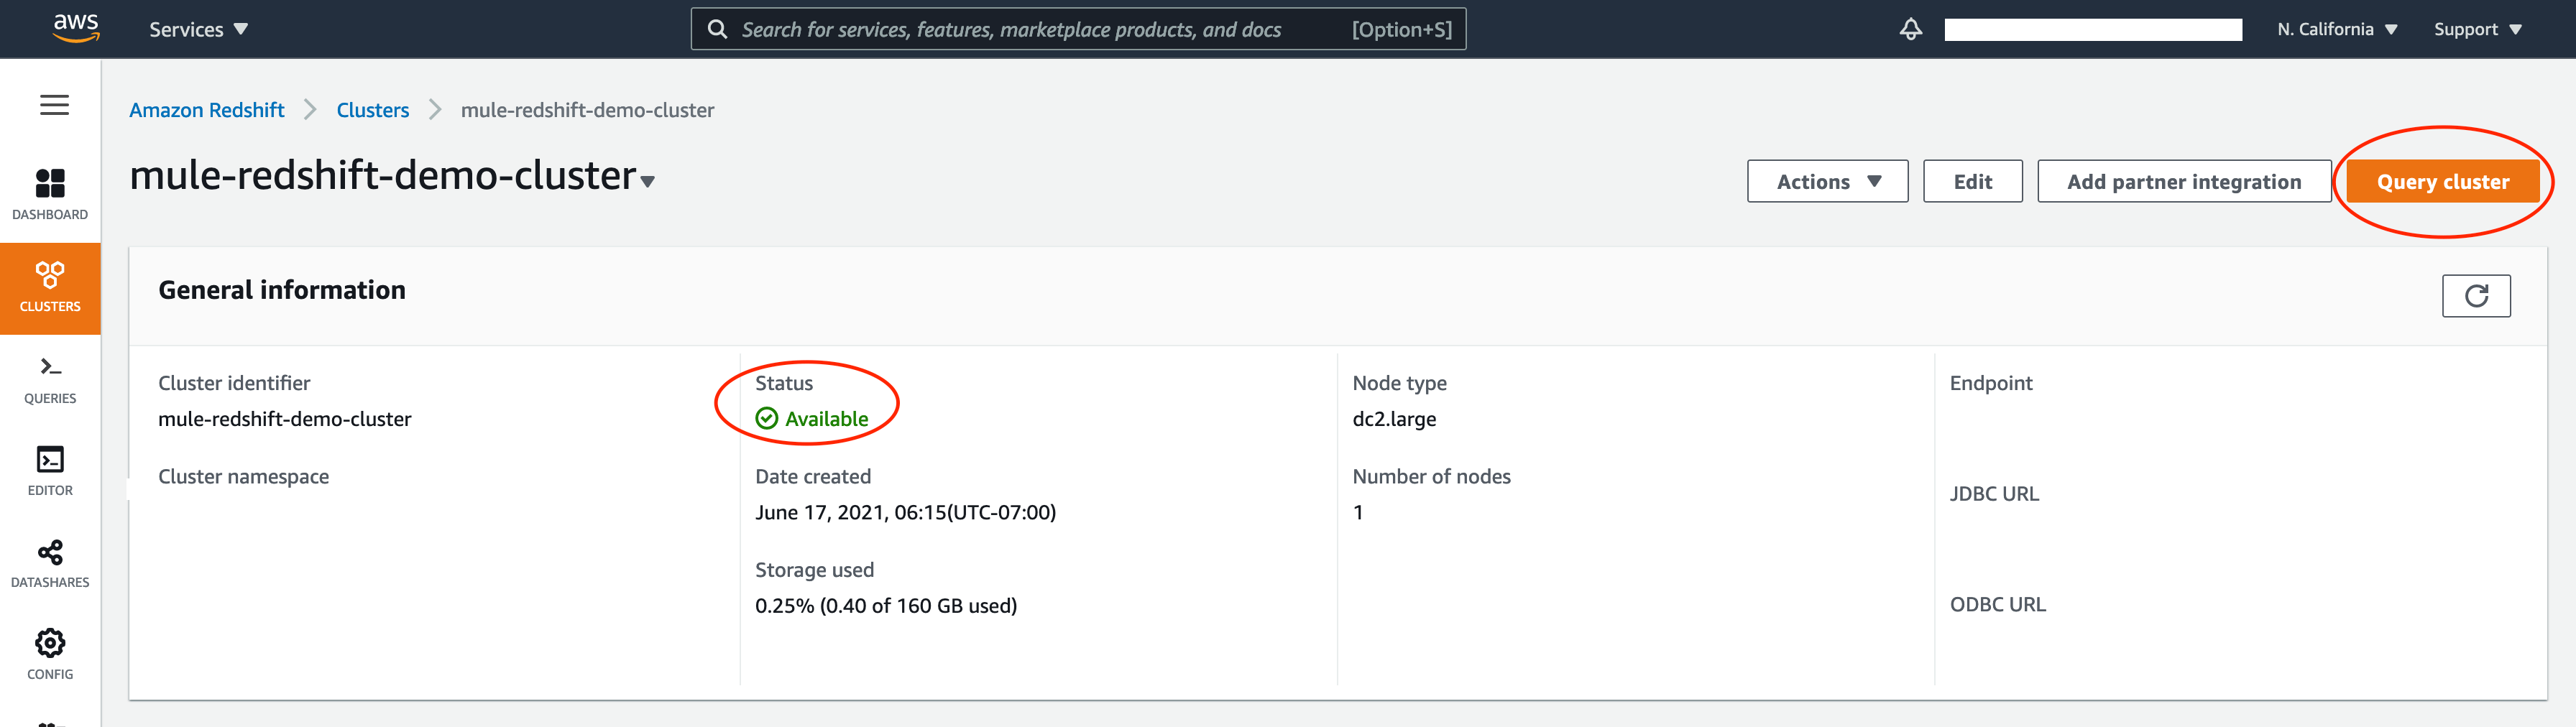
Now that you have configured the cluster, wait for the cluster Status to become “Available”, and then you can create a new Amazon Redshift table for the purposes of this tutorial. Open the Redshift Query Editor as shown in the image above (and outlined at the bottom of this page) and run the following two queries in this sequence:
Query 1:
create table shirt_prices(
            shirt_size varchar(255),
            shirt_price int);
Query 2:
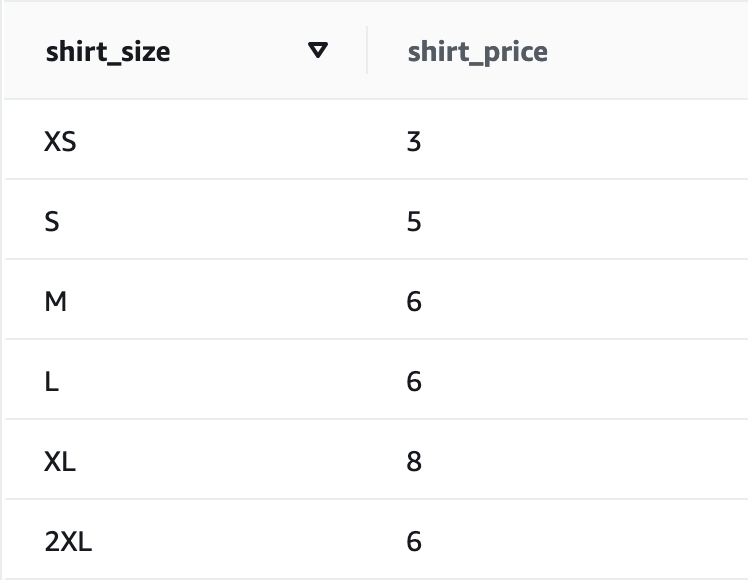
insert into shirt_prices values
('XS', 3),
('S', 5),
('M', 6),
('L', 6),
('XL', 8),
('2XL', 6);
You have now created a table in Redshift called “shirt_prices” that looks like this:
We have completed the setup of Amazon Redshift. The tutorial below will guide you through developing the Mule flow that will integrate with it. If you simply wish to try using the developed flow, you can visit Anypoint Exchange and search for “Redshift Demo 2021” to download the completed flow file.
Configure a Batch ETL Workflow in Anypoint Studio
In the following steps, we will
- Set up the project and extract CSV Data from an SFTP server.
- Convert the extracted data into a Java Object (POJO).
- Extract data from Amazon Redshift to enrich the data in step 2.
- Batch transform the data with DataWeave to produce the final data set.
- Finally, bulk upload the data using the batch process into the consuming service, in this case Amazon Redshift.
Step 1: Set up the project and extract CSV Data from SFTP
Unlike a service that needs to be exposed as an API, this project’s application runs strictly as an on-demand flow that transforms and uploads data from the CSV. As a result, you’ll create a new Mule project without using an API specification.
Open Anypoint Studio, and from within Studio
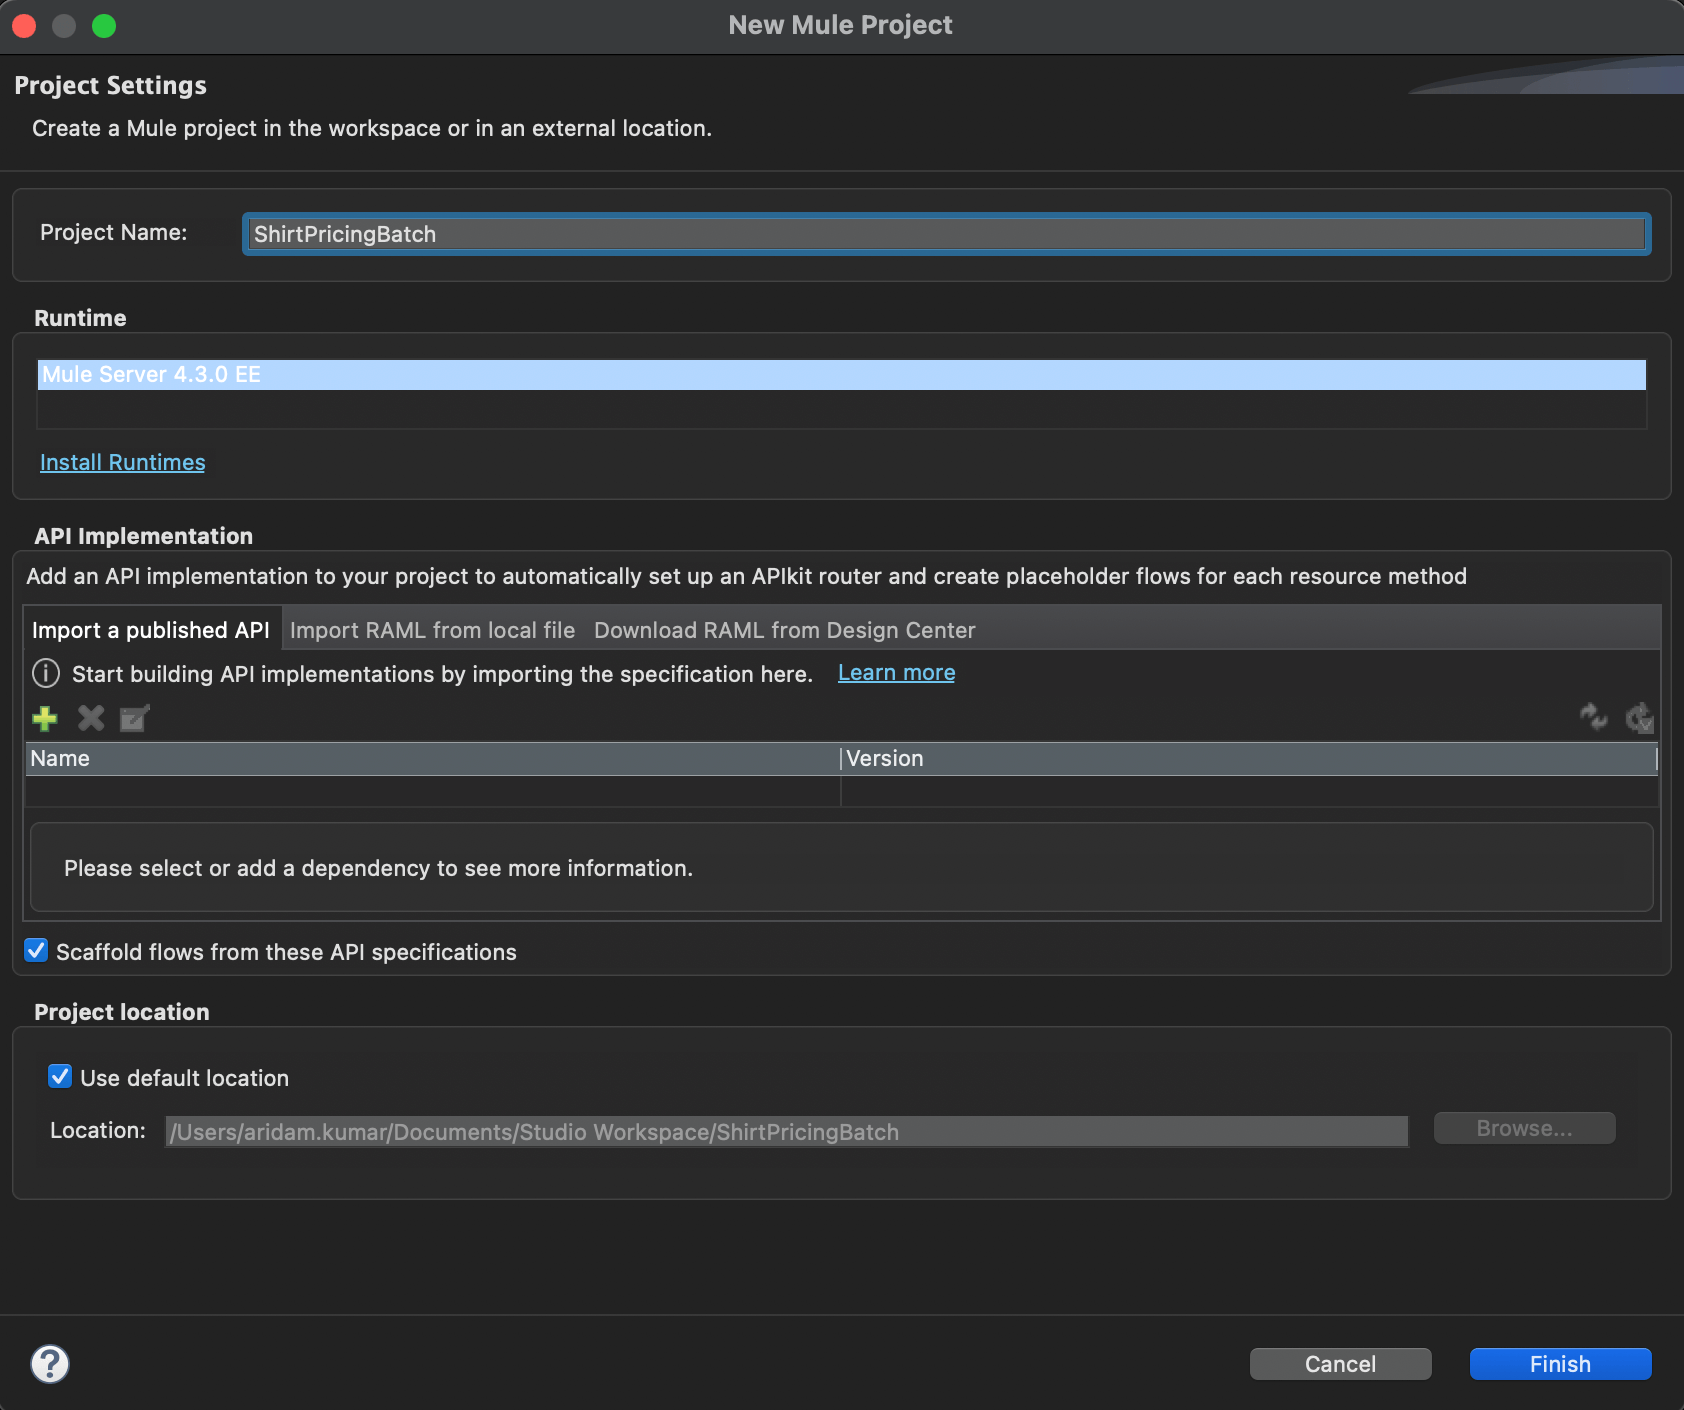
- Click File → New → Mule Project.
- Fill in the project name field with a name for your first project. (e.g. “ShirtPricingBatch”)
- Click Finish.
To detect if files in an SFTP location have been created or updated in a specific path, there is a connector available that polls for new or updated files on an SFTP server. To add the SFTP connector to your application canvas:
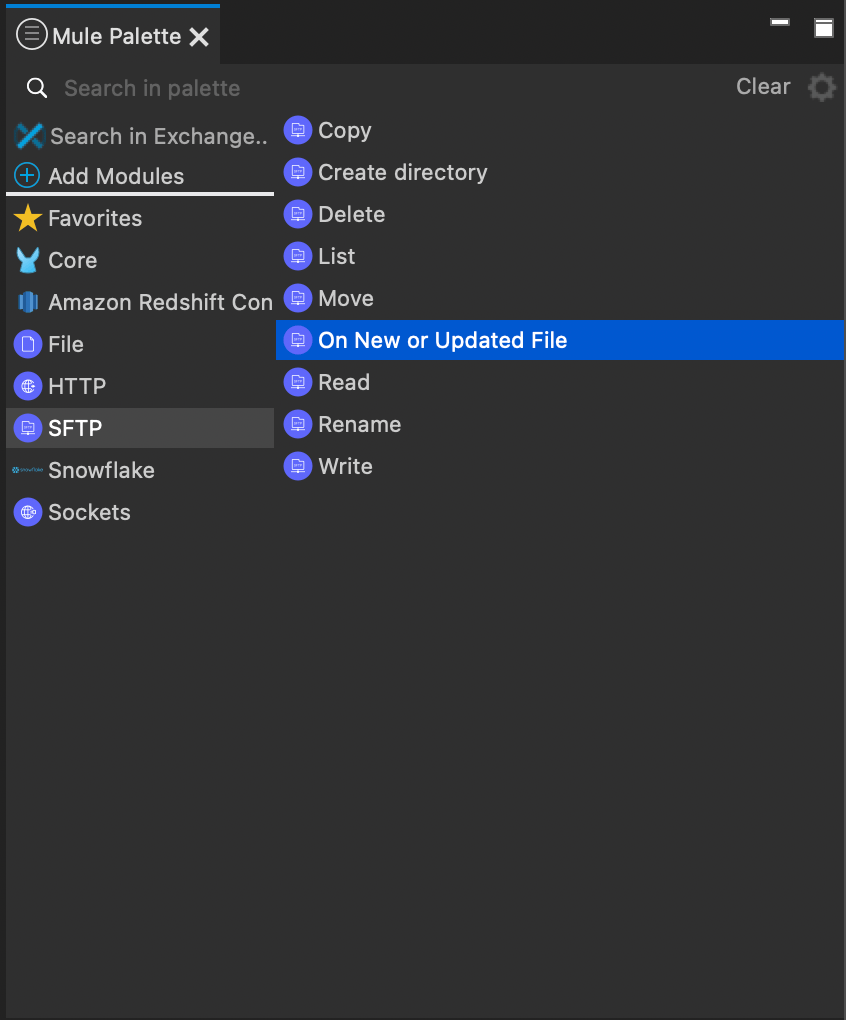
- MuleSoft Anypoint Exchange is the marketplace for connectors, templates, examples, and APIs. Click the “Search in Exchange” button in the Mule Palette (usually at the top right, but you can find it by navigating to the “Window” menu and selecting “Show View > Mule Palette”) and ensure that the new window shows your connected account at the top (login if it does not). Search for “SFTP.” and add the “SFTP Connector - Mule 4” to your selected modules and click “Finish”.
- From the newly available SFTP connector menu in the Mule Palette, drag and drop the “On New or Updated File” action onto the canvas.
- You will now see a configuration pane for the SFTP trigger. Click on the green “+” icon next to the “Connector configuration” drop down to begin connecting your flow to a sample SFTP server for this tutorial.

- At the bottom of the new window, you can fill in the following to connect to a test SFTP server.
- Host: sftp.devrel.mulesoft.com
- Port: 22
- Username: maxthemule
- Password: Mu!3S0fT@1234
- Working directory: /mule-etl-tutorial
- Click Test Connection… to verify that everything is working, then press OK
- Now that your connection has been configured, we can scroll down in the configuration pane for the SFTP trigger to set up the following:
- Directory: <leave blank>
- Matcher: Edit inline
- Not updated in the last: 1
- Time unit: MILLISECONDS (default)
- Filename pattern: regex:new_customer_shirts_small_\w*.csv
- Watermark enabled: checked
- Scheduling Strategy: Fixed Frequency
- Frequency: 5
- Time Unit: Minutes
You have now set up the SFTP connector to check for new/updated files on the server once every 5 minutes, and read the data from any file beginning with “new_customer_shirts_small”. In this case the sample file that is already on the SFTP server is called “new_customer_shirts_small_07Jul2021.csv”. This will be passed into the flow as part of the payload.
Step 2: Transform and reformat the data as a Java object
Next we will convert the data extracted from the CSV to a JAVA object (POJO). This makes it easy for us to reference later during the flow.
- Search the Mule Palette for “Transform Message” and drag and drop it into your canvas inside the “process” section of the flow you just created.
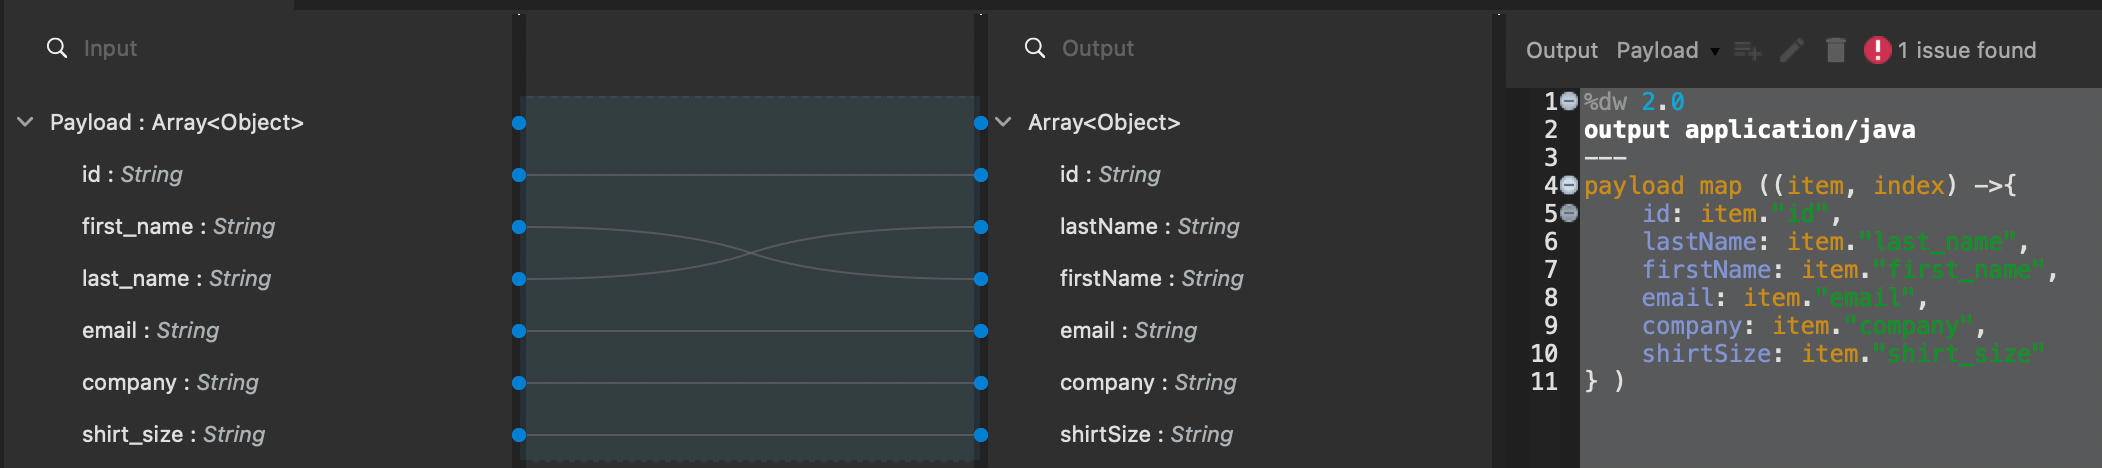
- You should now see a configuration pane for this action, where you can paste the following DataWeave code:
%dw 2.0
output application/java
---
payload map ((item, index) ->{
id: item."id",
lastName: item."last_name",
firstName: item."first_name",
email: item."email",
company: item."company",
shirtSize: item."shirt_size"
} )
The above will update the names of each of the columns from the CSV to a consistent format and convert the data set into a Java object.
Step 3: Extract shirt price information from Amazon Redshift
This section demonstrates how Anypoint Platform can read from an Amazon Redshift database to supply data to the Mule flow we are developing.
In order to provide Danny with the pricing of each shirt size, we must import the price table from Amazon Redshift into the Mule flow:
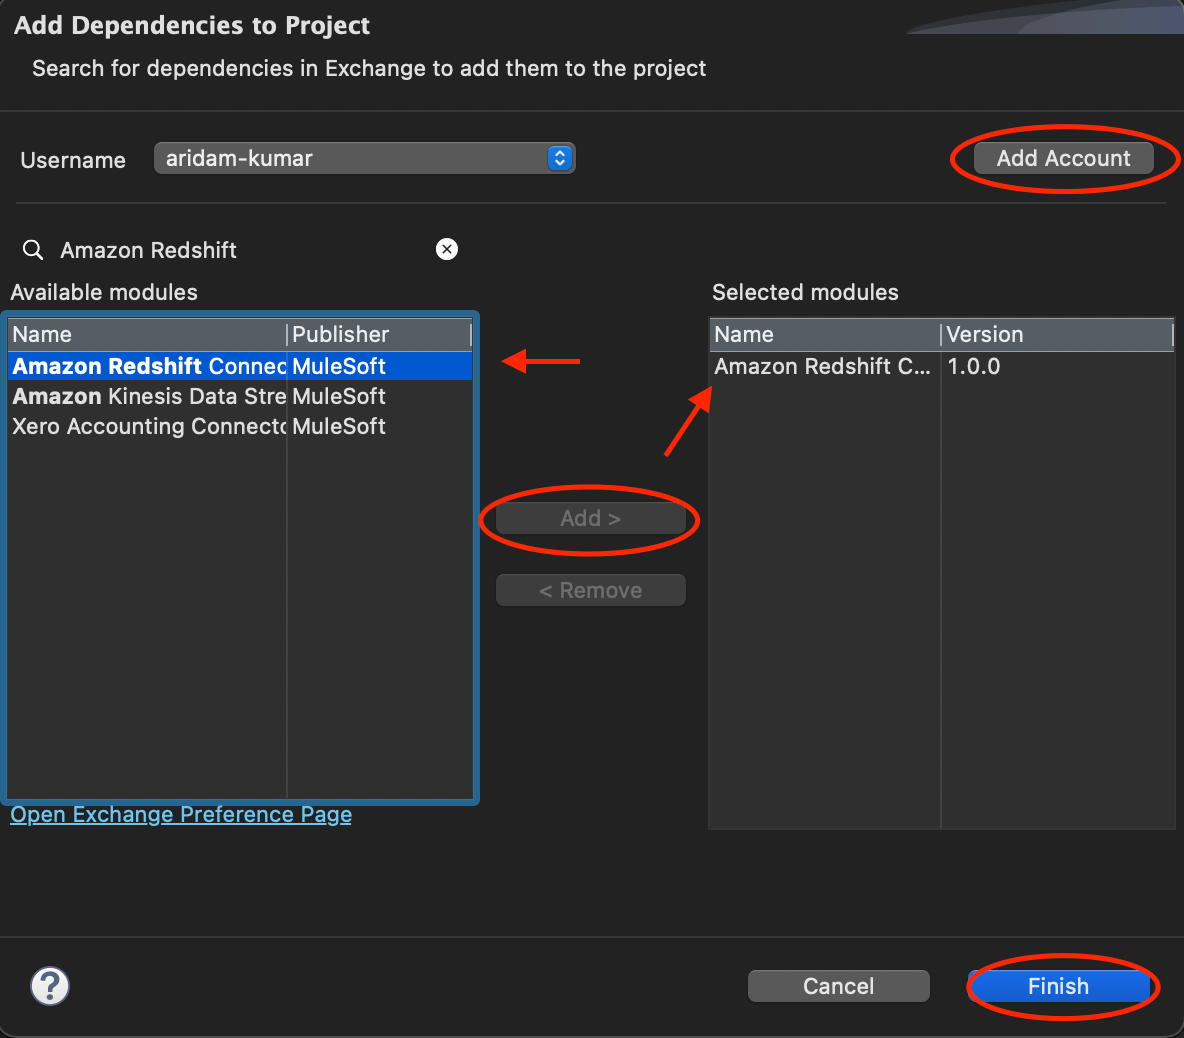
- From the top of the Mule Palette, select “Search in Exchange” to open a search tool from where you can install various connectors. Ensure that the new window shows your connected account at the top (login if it does not).
- Search for Amazon Redshift, and download the latest version of the connector by selecting it from the list, clicking “Add” and then clicking “Finish”.
3. From the Redshift connector now in your Palette, drag and drop the “Select” action onto the canvas and place it inside the process after the “Transform Message” that you set up earlier.
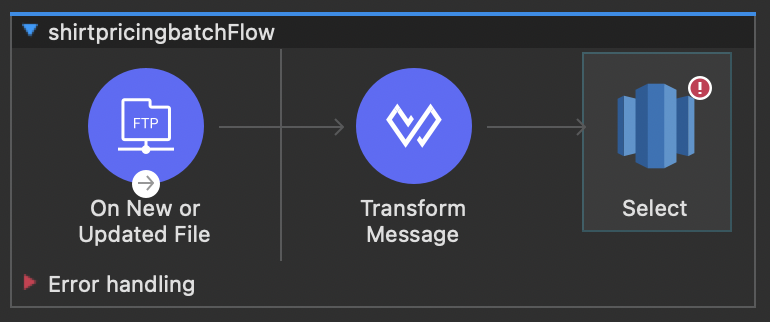
4. You should now see a configuration pane for the Select action at the bottom of your Studio screen. You can configure it with the following settings:
- Connector configuration: Select the green “+” icon as we did earlier with the SFTP setup in step 1, and connect the Redshift connector to your Amazon Redshift account.
- SQL Query Text:
SELECT * FROM shirt_prices- From the options at the left of the configuration pane, select the “Advanced” tab. Under the “Output” section, enter the following:
- Target Variable: shirt_prices_raw
- Target Value: payload
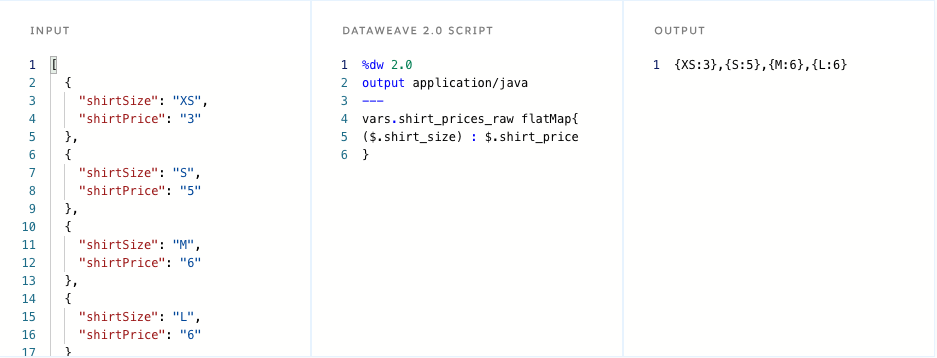
You have now configured the Redshift connector to retrieve the list of shirt prices and store it in the variable called shirt_prices_raw. Next we need to flatten the array that was returned by the select function to correctly map the key:value pairs as “shirt_size:shirt_price” as shown in the example below:
5. From the Mule palette, insert a “Set Variable” function after the Redshift Select action on your canvas. In the configuration pane, name the variable “shirt_prices_flattened”, and select the function key to enable DataWeave programming for the variable value.
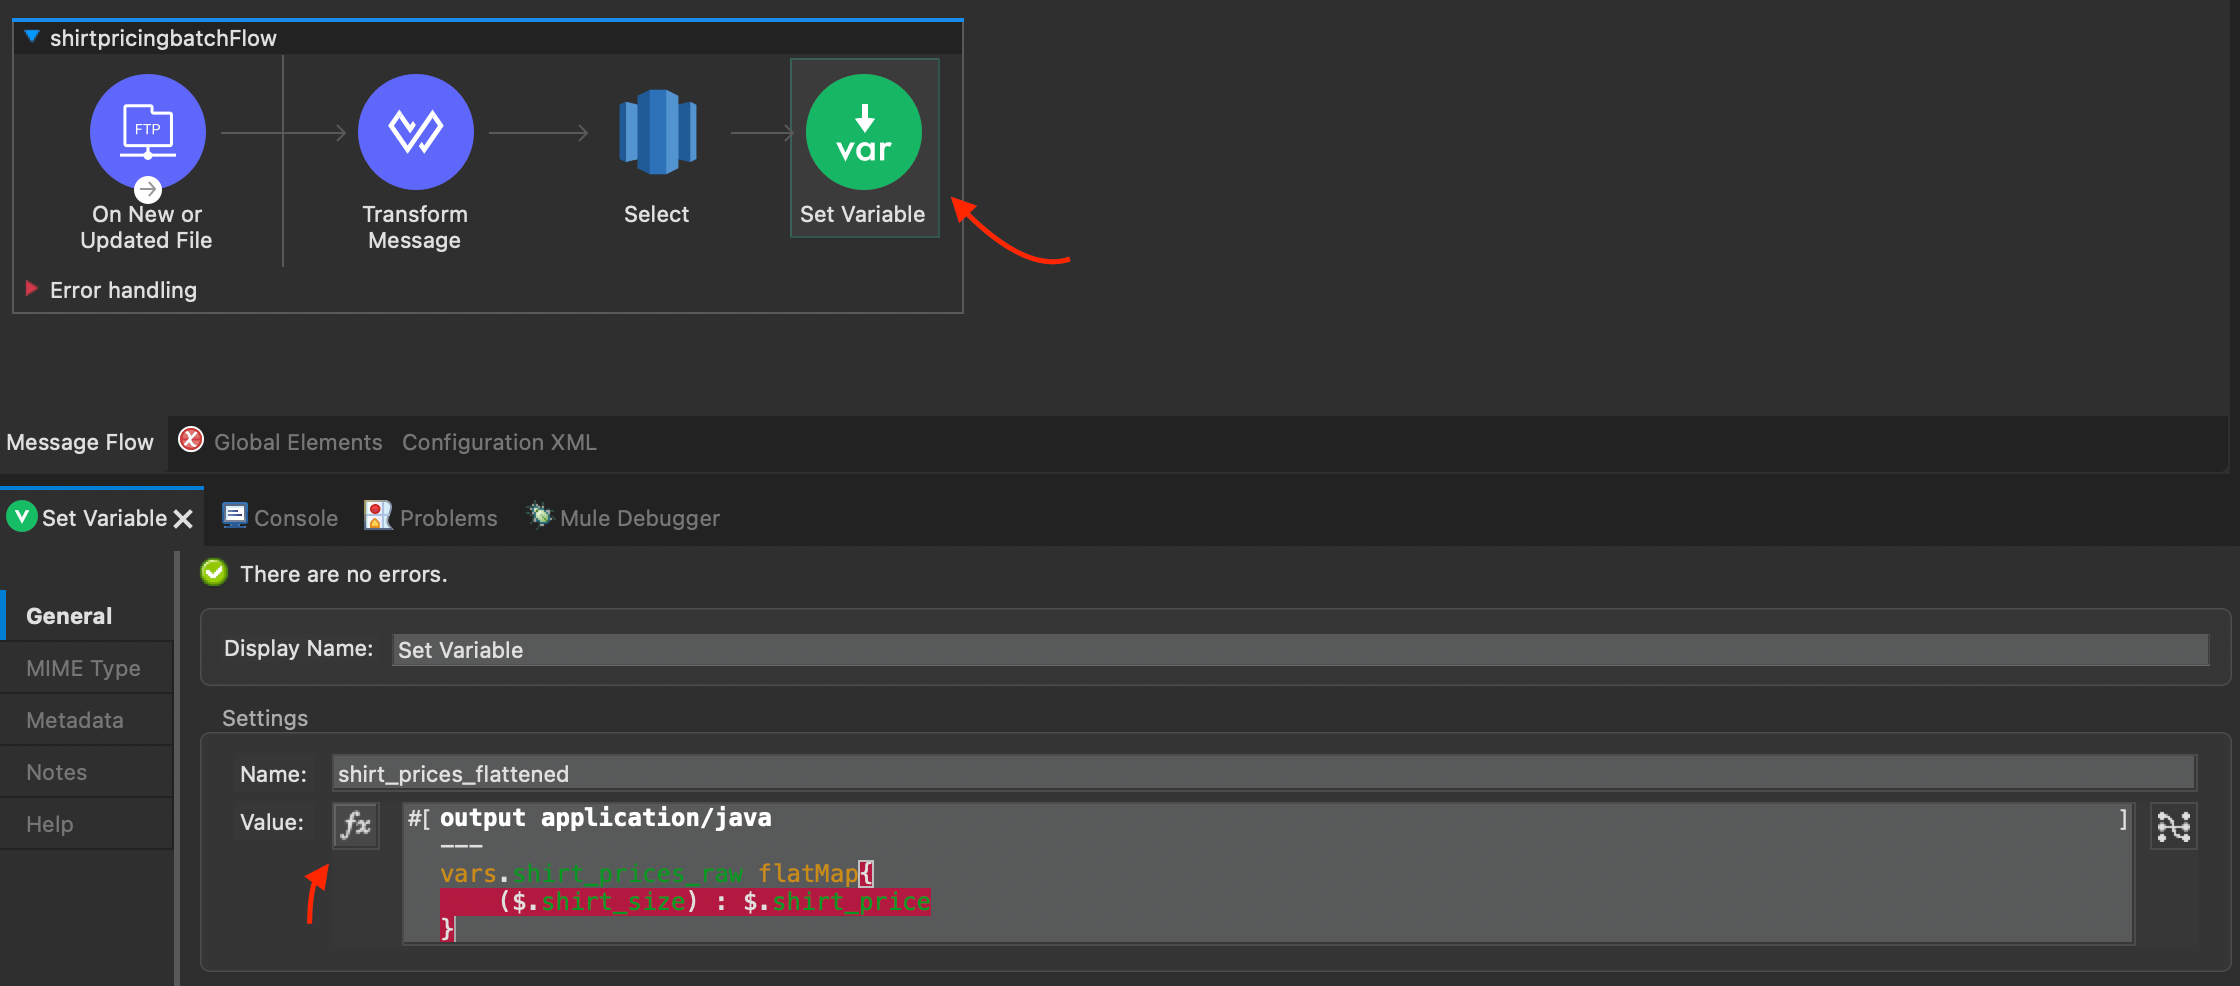
6. In the configuration pane for “Set Variable”, enter the following DataWeave code:
%dw 2.0
output application/java
---
vars.shirt_prices_raw flatMap{
($.shirt_size) : $.shirt_price
}
shirt_prices_flattened now contains the shirt price values from Redshift, organized as key:value pairs “shirt_size:shirt_price”. Next we can use this data in our batch processing to create the final list of customers with their shirt sizes and prices.
Step 4: Set up the Batch Job and Data Transformations
In order to efficiently process the large amount of data row-by-row and append the correct shirt size and price to each entry, we must use a batch job with various data transformations.
A batch job consists of a process section (the steps the job should take with the data provided), and an on-complete section (what the job should do when it has finished processing all of the data).
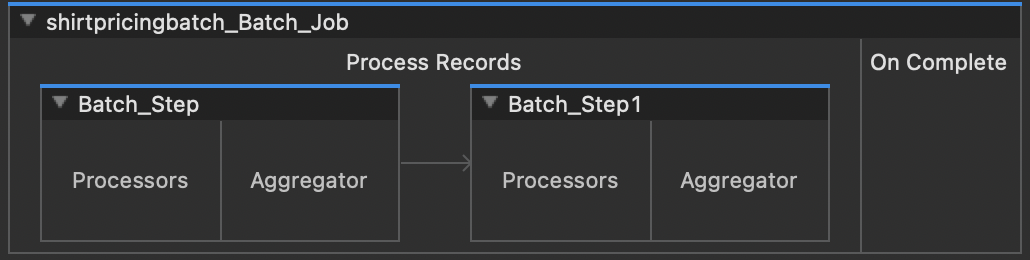
The process section can include multiple batch steps, each of which can have its own set of processors (the actions the batch step should carry out) or its own aggregator (where processed entries are collected before moving onto the next step, such as uploading to Amazon Redshift).
First let’s set up our batch job and configure the first batch step to update the ‘3XL’ shirt sizes to ‘2XL’:
- From the Mule palette, search for and insert a “Batch Job” action after the Set Variable step we just configured. It should look something like the batch job image above. In the configuration pane for this step, set the “Batch Block Size” to 500.
- There should already be a “Batch_Step” inside the Batch Job. Rename the Batch Step to “Update_3XL_to_2XL” so that it can be identified easily in later steps.
- Now insert a “Transform Message” step into the Processors section of the batch step. You can copy and paste the following DataWeave code into the configuration pane of the Transform Message:
%dw 2.0
output application/java
---
payload  update {
case shirtSize at .shirtSize if (shirtSize == "3XL") -> "2XL"
}
Next, let’s configure our batch job to append shirt prices to each row in the data set:
4. Search the Mule palette for a “Batch Step” action, and insert another one after the existing batch step. Rename it to “Append_shirtPrice_to_Payload”.
5. Insert a Transform Message into the processor for this batch step, and configure it with the following DataWeave code:
%dw 2.0
output application/java
---
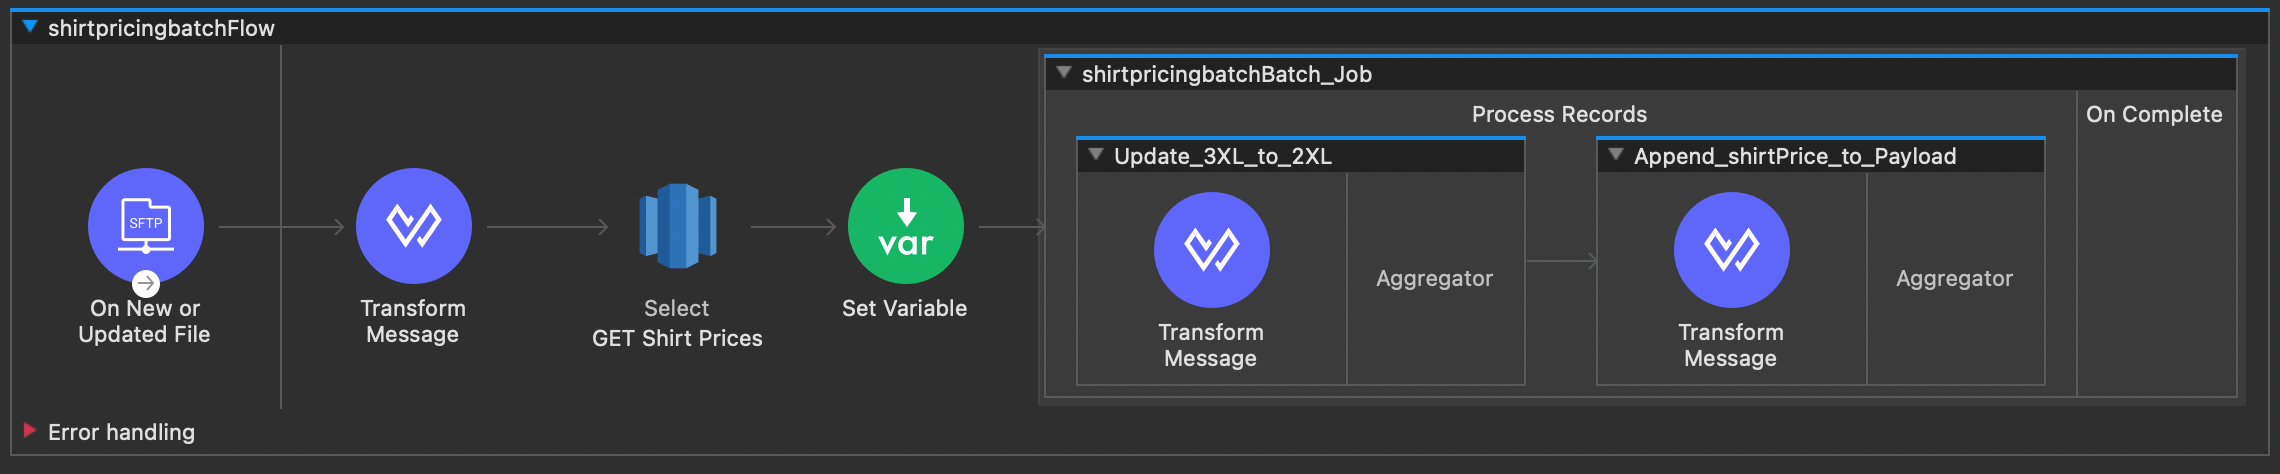
payload ++ {shirtPrice: vars.shirt_prices_flattened[payload.shirtSize][0]}Your flow should now look something like this:
Step 5: Configure the Upload to Amazon Redshift and On Complete
Lastly we must aggregate the updated records and bulk upload them to Amazon Redshift into a table of our choosing. Let’s begin by creating the table to which the records will be uploaded.
- Navigate back to the Redshift Query Editor as detailed in step 4 earlier. Run the following query:
CREATE TABLE customer_shirts (
id varchar(255),
lastName varchar(255),
firstName varchar(255),
email varchar(255),
company varchar(255),
shirtSize varchar(255),
shirtPrice varchar(255)
);
You now have a table in Redshift with the column headers given above.
2. Navigate back to Anypoint Studio. From the Mule palette, insert another “Batch Step” after the last one you configured. Name this step “Bulk_Load_Data_Redshift”
3. Search the Mule palette for a “Batch Aggregator” and drag it into the aggregator section of the last Batch Step you just added. Adjust the settings in the configuration pane for this step such that the “Aggregator Size” is 100.
4. Now search the Mule palette for the Amazon Redshift “Bulk Insert” action, and drag it into the Batch Aggregator. Ensure that the “input parameters” field says payload, and then insert the following query in to the “SQL Query Parameters” field:
INSERT INTO customer_shirts(id,lastname,firstname,email,company,shirtsize,shirtprice)
VALUES (:id,:lastName,:firstName,:email,:company,:shirtSize,:shirtPrice)
5. Lastly, we want the flow to tell us when it has finished processing. Search the Mule palette for a “Logger” action, and insert it into the On Complete section of the Batch Job.
Your flow should look like this:

Congratulations!
Your application is now ready to deploy and users can begin to query the data from Amazon Redshift for all their data warehousing use cases. This tutorial is available in video format, and more information on our Amazon Redshift connector can be found on Anypoint Exchange.

Try Anypoint Platform for free
Start your 30-day free trial of the #1 platform for integration, APIs, and automation. No credit card required. No software to install.
Questions? Ask an expert.
