We would like to thank Sue Han for their contribution to this developer tutorial.
Anypoint API Catalog CLI simplifies the discovery and cataloging of any APIs - regardless of where it’s built or deployed - into Anypoint Exchange. This enables you to build a single source of truth for APIs in your organization.
Instead of manually adding API specifications to Anypoint Exchange, with API Catalog CLI, you can automate API cataloging by
- Identifying all APIs in a project directory structure to create and update a descriptor file
- Setting up publish triggers and asset versioning
- Publishing cataloged APIs to Anypoint Exchange as part of your CI/CD pipelines or custom scripts
The CLI is part of a solution MuleSoft offers through Universal API Management. For more information on Universal API Management, check out the Understanding Universal API Management and Anypoint Flex Gateway tutorial.
In this tutorial, you’ll learn how to:
- Install Anypoint API Catalog CLI on your local machine
- Create a descriptor file of API assets using the CLI
- Edit the descriptor file manually for documentation
- Publish API assets to Anypoint Exchange
Prerequisites
- Anypoint Platform - You will need an Anypoint Platform account to catalog APIs to Anypoint Exchange. You can sign up for a free trial account here.
- API Catalog CLI permissions - Enable the API Catalog Contributor permission in Anypoint Platform. For detailed instructions, see Before You Begin.
- Acquire Organization ID - Log in to Anypoint Platform and go to API Manager. Click on the Environment Information button to retrieve your Business Group ID (or Organization ID).
- NodeJS and npm - You will need to install the latest LTS version. You can download both NodeJS and npm here.
- Code Editor - You will need to install Visual Studio Code (recommended as we will use this in part 2 of the tutorial) or other code editing software to edit the Descriptor file.
- Project files - Download the
Follow Tutorialfolder as a zip file from the API Catalog CLI example repository below and place the contents unzipped in an accessible location.
There are four ways to pass Anypoint Platform credentials while running API Catalog CLI. You can determine the best authentication method for you by going through the Authentication section of the documentation. In this tutorial, we will use Command Line Flags for simplicity.
Install Anypoint API Catalog CLI
From your terminal, run the following command:
1
npm install -g api-catalog-cli@latest
And…that’s it!
Create a descriptor file of API assets using the CLI
Before we can create a descriptor file that has the information Anypoint Exchange needs to catalog the APIs, we first need a repository with API specifications.
In your terminal, go to the project directory with the following command:
1
cd <project directory>
In this tutorial, you should be under the Follow Tutorial folder from the repository in the prerequisites section.
Let’s now create a descriptor file using the following command:
1
api-catalog create-descriptor
In the project directory, you should now see a file named catalog.yaml. If you want a different name for your descriptor file, you can use the -d <file name> flag.
The catalog.yaml file will have the following output:
1
2
3
4
5
6
7
8
9
10
#%Catalog Descriptor 1.0
projects:
  - main: payments-oas.yaml
    assetId: invoice-payment-system-api
    version: 1.1.0
    apiVersion: v1
  - main: shipping/shipping-api.yaml
    assetId: shipping-api
    version: 1.0.1
    apiVersion: v1
main shows the location of the file with relation to the descriptor file. assetId is a unique identifier that will be used in Anypoint Exchange. version and apiVersion are pulled from each API specification. If the specification does not have a version included, Catalog CLI will default to version 1.0.0.
Edit the descriptor file manually for documentation
Now, we can edit the descriptor file manually to add more context. In this section, we will add contact information, tags, and custom documentation to shipping-api. For a full list of options, see Create or Update Descriptor Files Manually.
We can apply contact information to all or individual APIs. If the developer differs from the catalog publisher (or if you use a service account), the internal team knows who to reach out to for questions and comments for a particular API on Anypoint Exchange.
Let’s add the contact information for shipping-api in catalog.yaml by specifying the name and email:
1
2
3
4
5
6
7
8
9
10
11
12
13
#%Catalog Descriptor 1.0
projects:
  - main: payments-oas.yaml
    assetId: invoice-payment-system-api
    version: 1.1.0
    apiVersion: v1
  - main: shipping/shipping-api.yaml
    assetId: shipping-api
    version: 1.0.1
    apiVersion: v1
    contact:
      name: 'Jane Doe'
      email: 'fake.email@org.com'
Tags are text strings that allow you to filter APIs once they are published to Anypoint Exchange. To add tags to the file, insert the following information into the catalog.yaml:
1
2
3
4
5
6
7
8
9
10
11
12
13
14
15
16
#%Catalog Descriptor 1.0
projects:
  - main: payments-oas.yaml
    assetId: invoice-payment-system-api
    version: 1.1.0
    apiVersion: v1
  - main: shipping/shipping-api.yaml
    assetId: shipping-api
    version: 1.0.1
    apiVersion: v1
    contact:
      name: 'Jane Doe'
      email: 'fake.email@org.com'
    tags:
      - logistics
      - commerce
Lastly, for shipping-api, we have a markdown file that has custom documentation. To ensure the information gets published to Anypoint Exchange, all we need to do is specify the file location relative to catalog.yaml as such:
1
2
3
4
5
6
7
8
9
10
11
12
13
14
15
16
17
18
#%Catalog Descriptor 1.0
projects:
  - main: payments-oas.yaml
    assetId: invoice-payment-system-api
    version: 1.1.0
    apiVersion: v1
  - main: shipping/shipping-api.yaml
    assetId: shipping-api
    version: 1.0.1
    apiVersion: v1
    contact:
      name: 'Jane Doe'
      email: 'fake.email@org.com'
    tags:
      - logistics
      - commerce
    documentation:
      Home: shipping/home.md
Now that we are ready with the descriptor file, let’s publish the two APIs to Anypoint Exchange.
Publish asset to Anypoint Exchange
To publish using your username and password, run the following command in your terminal:
1
api-catalog publish-asset --organization="$ANYPOINT_ORG_ID" --username="$ANYPOINT_USERNAME" --password="$ANYPOINT_PASSWORD"
Depending on the number of APIs and size of the API specification, publishing may take time. Once done, you should see a similar output:
1
2
3
4
5
6
7
8
9
10
11
12
13
14
15
16
Publishing to Exchange...
API successfully published... ✅
Group ID:     ***
Asset ID:     invoice-payment-system-api
Version:      1.2.0
Exchange URL: https://anypoint.mulesoft.com/exchange/***/invoice-payment-system-api

Publishing to Exchange...

API successfully published... ✅
Group ID:     ***
Asset ID:     shipping-api
Version:      1.0.0
Exchange URL: https://anypoint.mulesoft.com/exchange/***/shipping-api

Successfully cataloged 2 APIs
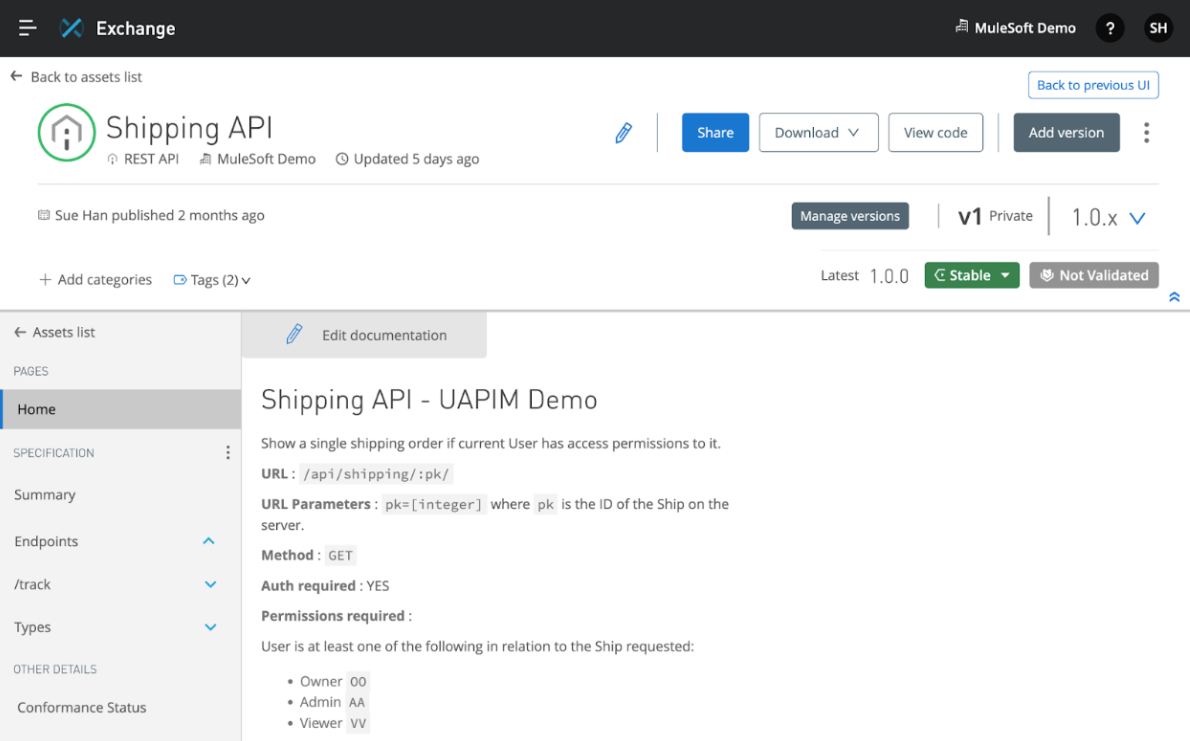
Congratulations, you should now see your APIs published to Anypoint Exchange! 🎉🎉🎉
If you go into the Shipping API, you should see the custom documentation page (Home) and the automatic documentation created from the API specification.
Next steps
In this tutorial, you learned how to:
- Install Anypoint API Catalog CLI on your local machine
- Create a descriptor file of API assets using the CLI
- Edit the descriptor file manually for documentation
- Publish API assets to Anypoint Exchange
If you want to take a look at the final code, check out the Completed Tutorial folder in the GitHub repository below.
To learn more about Anypoint API Catalog CLI, check out:
- Anypoint API Catalog CLI Product Spotlight Video (3 minutes)
- Anypoint API Catalog CLI Demonstration (13 minutes)
- Live stream: Exploring Anypoint API Catalog CLI with Alex! (1 hour)
- Documentation
In the next tutorial, you’ll learn how to set up Anypoint API Catalog CLI to automatically publish APIs to Anypoint Exchange in a CI/CD pipeline.
Click on the Next button below to continue to the next tutorial.


Try Anypoint Platform for free
Start your 30-day free trial of the #1 platform for integration, APIs, and automation. No credit card required. No software to install.
Questions? Ask an expert.
