Overview
The MuleSoft Maven plugin integrates the packaging and deployment of your mule application. When the maven commands are executed, your Anypoint Studio project is packaged into a deployable jar file which can then be deployed to any running mule runtime engine either in Cloudhub or OnPrem. For this tutorial, we will be covering how to set up your pom.xml and settings.xml file to deploy your first application on CloudHub using Maven.
Don’t forget to signup for a free trial by clicking the button below if you are new to MuleSoft!
Already have an account? Sign in.
Step 1: How to configure Maven on your computer
Make sure that you have all of the prerequisites before starting the tutorial:
- Make sure that your system has the most recent JDK installed
- Install Maven on your local machine
To check to see if Maven is installed on your local system, type the following command into the Terminal:
mvn -v
1
2
3
4
5
6
USERNAME-ltm:maven-tutorial USERNAME$ mvn -v
Apache Maven 3.6.3 (cecedd343002696d0abb50b32b541b8a6ba2883f)
Maven home: /usr/local/Cellar/maven/3.6.3_1/libexec
Java version: 1.8.0_201, vendor: Oracle Corporation, runtime: /Library/Java/JavaVirtualMachines/jdk1.8.0_201.jdk/Contents/Home/jre
Default locale: en_US, platform encoding: UTF-8
OS name: "mac os x", version: "10.14.6", arch: "x86_64", family: "mac"
If you don’t have Maven installed, you can install it using Homebrew. Simply type: brew install maven
When Maven is installed, run the command: mvn clean install
This command should create a local .m2 cellar folder that contains your settings.xml file which contains global settings for all Maven executions. This folder should be located at $USER_HOME/.m2/ and the folder called repository holds all of the local copies of various Maven artifacts, either caches of artifacts pulled down from remote repositories, such as Maven Central, or artifacts built by your local Maven builds. The artifacts are organized in there in folder structures that mirror the groupId’s of the artifacts.
In order to successfully build using Maven, you will have to create and/or modify your settings.xml file. To access that folder on Mac, go to Finder -> Go and type: ~/.m2
If the folder doesn’t appear for you, feel free to create it. You can manually create the file by typing and then pasting the code below:
touch ~/.m2/settings.xml
1
2
3
4
5
6
7
8
9
10
11
12
13
14
15
16
17
18
19
20
21
22
23
24
25
26
27
28
29
30
31
32
<?xml version="1.0" encoding="UTF-8" standalone="no"?>
<settings xmlns="http://maven.apache.org/SETTINGS/1.0.0" xmlns:xsi="http://www.w3.org/2001/XMLSchema-instance" xsi:schemaLocation="http://maven.apache.org/SETTINGS/1.0.0 https://maven.apache.org/xsd/settings-1.0.0.xsd">
    <servers>
        <server>
            <id>MuleRepository</id>
            <username>ANYPOINT-USERNAME-HERE</username>
            <password>ANYPOINT-PASSWORD-HERE</password>
        </server>
    </servers>
    <profiles>
        <profile>
            <id>mulesoft</id>
            <activation>
                <activeByDefault>true</activeByDefault>
            </activation>
            <repositories>
                 <repository>
                    <id>MuleRepository</id>
                    <name>MuleRepository</name>
                    <url>https://repository.mulesoft.org/nexus-ee/content/repositories/releases-ee/</url>
                    <layout>default</layout>
                    <releases>
                        <enabled>true</enabled>
                    </releases>
                    <snapshots>
                        <enabled>true</enabled>
                    </snapshots>
                </repository>
            </repositories>
        </profile>
    </profiles>
</settings>
Make sure to input your Anypoint Studio credentials in your settings.xml file then save the file.
You may get the below error when attempting to build your project using Maven if your JAVA_HOME environment variables aren’t configured correctly.
1
2
3
4
Execution default-deploy of goal org.mule.tools.maven:mule-maven-plugin:3.3.5:deploy failed:
MessageBodyReader not found for media type=application/json;charset=utf-8,
type=class org.mule.tools.client.arm.model.AuthorizationResponse,
genericType=class org.mule.tools.client.arm.model.AuthorizationResponse.
To configure your environment variables, type:
export JAVA_HOME=/Library/Java/JavaVirtualMachines/jdk1.8.0_201.jdk/Contents/Home
Make sure that you match up your JDK version with the one that is currently installed on your machine. To find the JDK version you have installed, simply navigate to that folder in your Finder by going to Finder -> GO.
For Windows users, your .m2 folder is expected to be located under ${user.home} and you would see it under <root>\Users\<username>. The create a folder with the . prefix on Windows, simply go to Start -> Run, type cmd then in the command prompt type: md c:\Users\YourUsername\.m2
Now that your machine is all set up, make sure to create an Anypoint Platform account below and download Anypoint Studio.
Step 2: How to configure Maven on Anypoint Studio
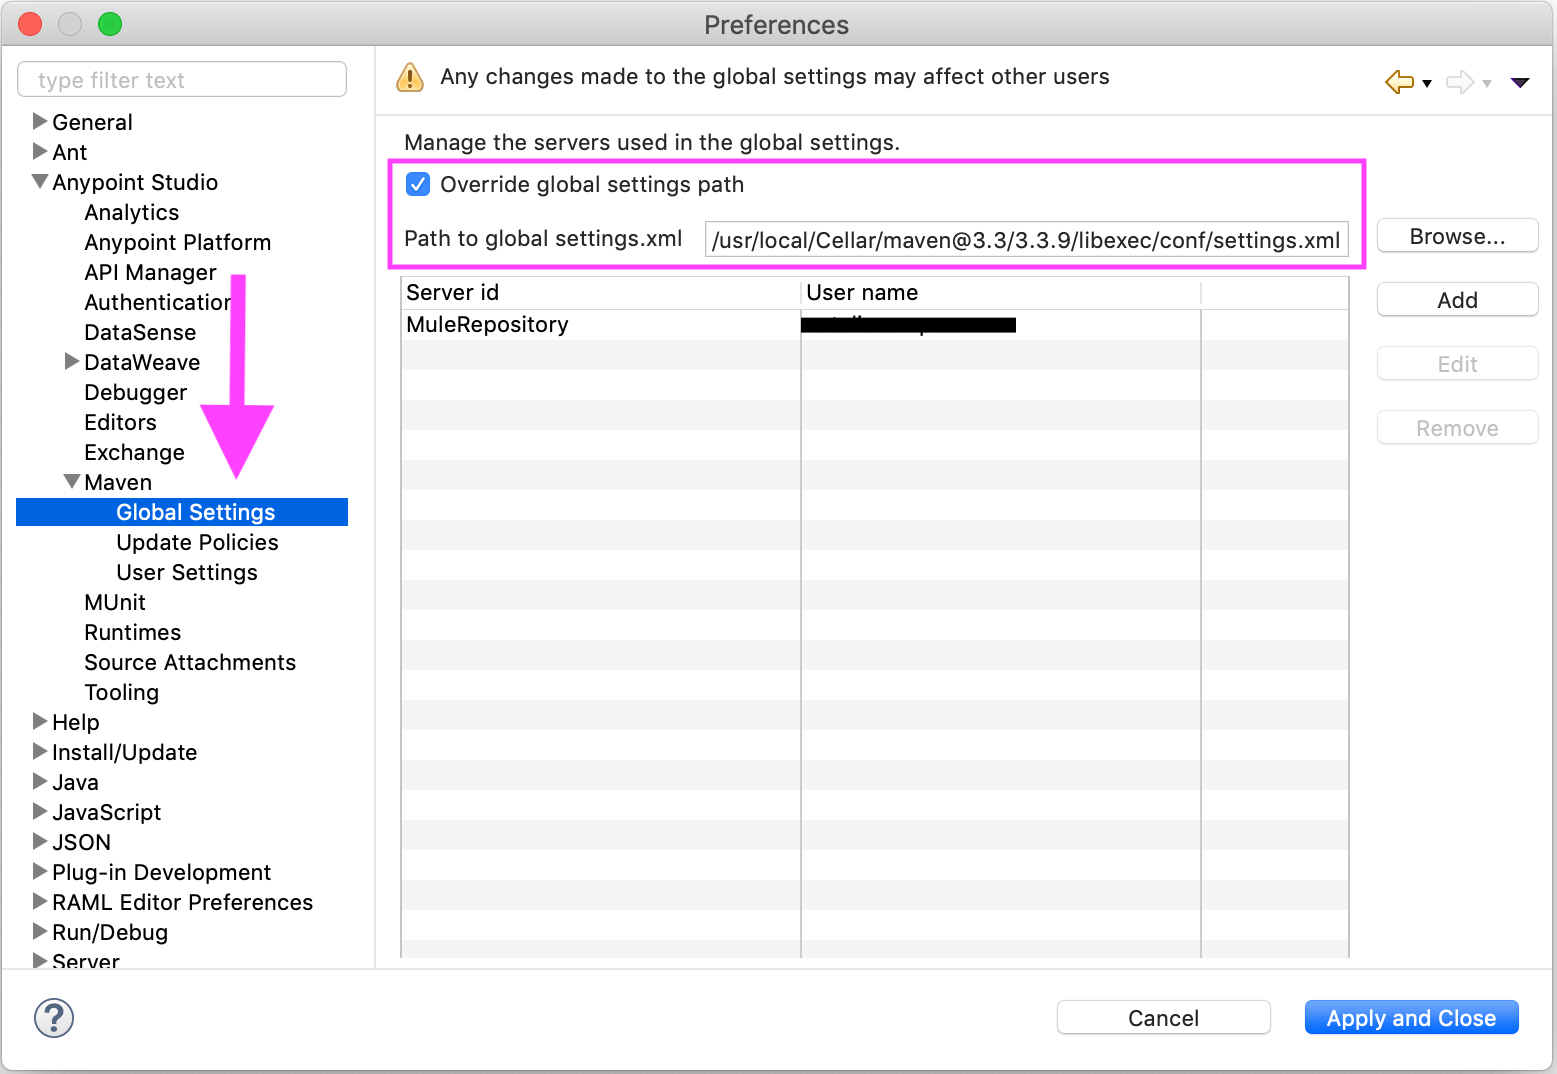
Next up, make sure to configure maven by overriding the user settings path. Go to Preferences -> Anypoint Studio -> Maven -> Global Settings and tick the “Override user settings path” then enter the path where the file is located that you just created. On the main Maven tab, make sure Use embedded Maven installation is checked. If you have a different version of Maven installed, you can define that by overriding the home directory path
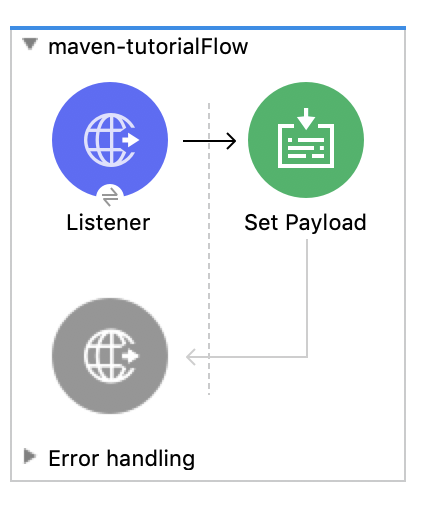
Go to File -> New Mule Project. Name the project whatever you wish then drag an HTTP Listener into the scene. Name the endpoint /submit then drag a Set Payload component into the flow. Add the string “Maven upload completed” to the Set Payload component then click save.
Step 3: Configuring your pom.xml file for Maven deployment
Go to your project folder, and look for the pom.xml file that is automatically generated when you create your project.
Your pom.xml file should look similar to the one below. Make sure the replace <username> and <password> with your own Anypoint Platform user credentials. Then make sure to name your <applicationName> something unique. Additionally, make sure all of your Maven versions and Anypoint Platform versions match with your project specifications
1
2
3
4
5
6
7
8
9
10
11
12
13
14
15
16
17
18
19
20
21
22
23
24
25
26
27
28
29
30
31
32
33
34
35
36
37
38
39
40
41
42
43
44
45
46
47
48
49
50
51
52
53
54
55
56
57
58
59
60
61
62
63
64
65
66
67
68
69
70
71
72
73
74
75
76
77
78
79
80
81
82
83
84
85
<?xml version="1.0" encoding="UTF-8"?>
<project xmlns="http://maven.apache.org/POM/4.0.0" xmlns:xsi="http://www.w3.org/2001/XMLSchema-instance"
xsi:schemaLocation="http://maven.apache.org/POM/4.0.0 http://maven.apache.org/maven-v4_0_0.xsd">
<modelVersion>4.0.0</modelVersion>
<groupId>org.mule.tools.maven</groupId>
<artifactId>maven-tutorial</artifactId>
<version>1.0.0-SNAPSHOT</version>
<packaging>mule-application</packaging>
<name>maven-tutorial</name>
<properties>
<project.build.sourceEncoding>UTF-8</project.build.sourceEncoding>
<project.reporting.outputEncoding>UTF-8</project.reporting.outputEncoding>
<app.runtime>4.3.0</app.runtime>
<mule.maven.plugin.version>3.3.5</mule.maven.plugin.version>
</properties>
<build>
<plugins>
<plugin>
<groupId>org.apache.maven.plugins</groupId>
<artifactId>maven-clean-plugin</artifactId>
<version>3.0.0</version>
</plugin>
<plugin>
<groupId>org.mule.tools.maven</groupId>
<artifactId>mule-maven-plugin</artifactId>
<version>3.3.5</version>
<extensions>true</extensions>
<configuration>
<cloudHubDeployment>
<muleVersion>4.3.0</muleVersion>
<username>ANYPOINT-PLATFORM-USERNAME-HERE</username>
<password>ANYPOINT-PLATFORM-PASSWORD-HERE</password>
<applicationName>mule-maven-project-tutorial</applicationName>
<environment>Sandbox</environment>
<workers>1</workers>
<workerType>MICRO</workerType>
<properties>
<maven.compiler.target>1.8</maven.compiler.target>
<maven.compiler.source>1.8</maven.compiler.source>
</properties>
</cloudHubDeployment>
</configuration>
</plugin>
</plugins>
</build>
<dependencies>
<dependency>
<groupId>org.mule.connectors</groupId>
<artifactId>mule-http-connector</artifactId>
<version>1.5.17</version>
<classifier>mule-plugin</classifier>
</dependency>
<dependency>
<groupId>org.mule.connectors</groupId>
<artifactId>mule-sockets-connector</artifactId>
<version>1.1.6</version>
<classifier>mule-plugin</classifier>
</dependency>
</dependencies>
	<repositories>
          <repository>
            <id>anypoint-exchange-v2</id>
            <name>Anypoint Exchange</name>
            <url>https://maven.anypoint.mulesoft.com/api/v2/maven</url>
            <layout>default</layout>
        </repository>
        <repository>
            <id>mulesoft-releases</id>
            <name>MuleSoft Releases Repository</name>
            <url>https://repository.mulesoft.org/releases/</url>
            <layout>default</layout>
        </repository>
    </repositories>
    <pluginRepositories>
        <pluginRepository>
            <id>mulesoft-releases</id>
            <name>mulesoft release repository</name>
            <layout>default</layout>
            <url>https://repository.mulesoft.org/releases/</url>
            <snapshots>
                <enabled>false</enabled>
            </snapshots>
        </pluginRepository>
    </pluginRepositories>
</project>
Now that you have successfully configured your project and Maven, right-click on your project folder and view it in the System Explorer to get the path.
Go into your Terminal and type cd into your Anypoint Studio project directory with your project components:
cd /Users/YOUR-USER-NAME/AnypointStudio/studio-workspace/maven-tutorial
Now type the command to deploy your application to CloudHub:
mvn clean package deploy -DmuleDeploy
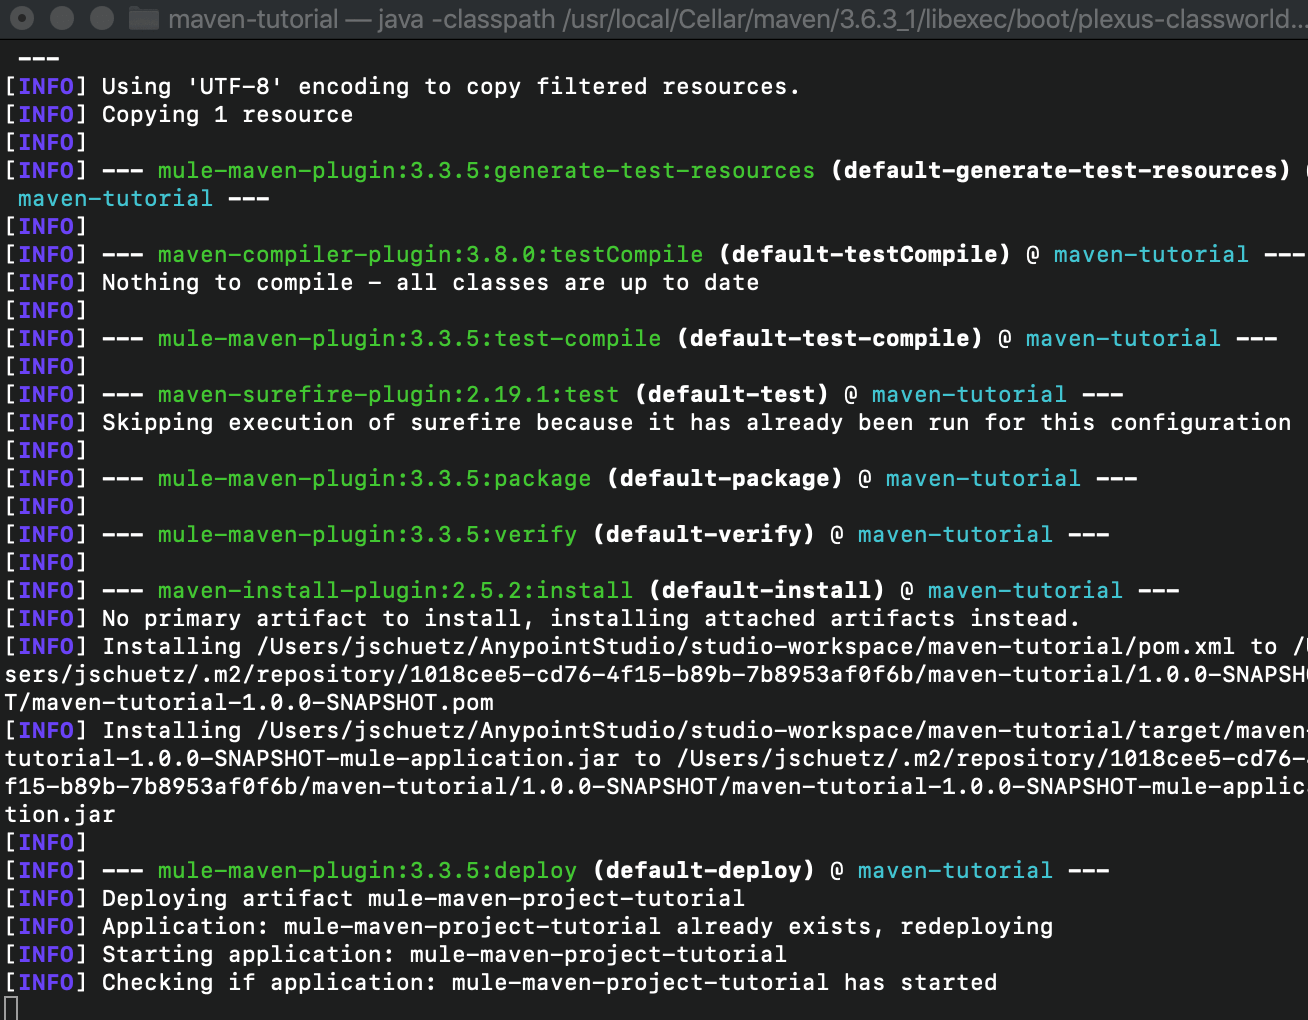
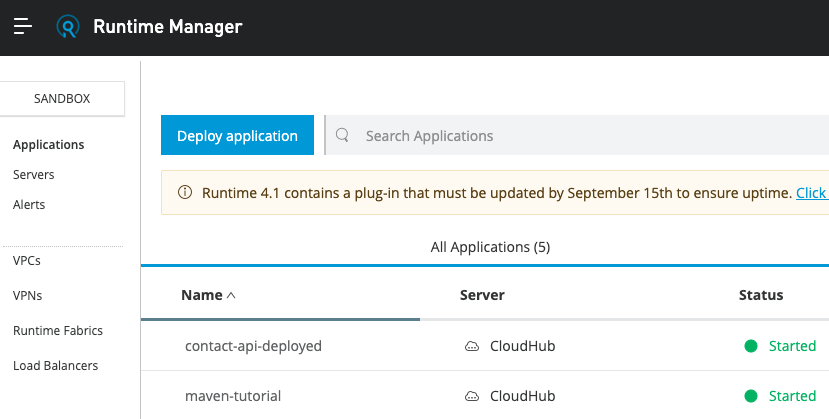
Once maven has completed the deployment to CloudHub, visit Runtime Manager and confirm that your application has been successfully deployed.
To test to see if your project works, go to the endpoint URL you defined and confirm to see if the string you entered on SetPayload is returned as the body response.

Conclusion
Thank you for reading our tutorial on how to deploy on Anypoint Studio using Maven. We hope that you found this content helpful and that it reduces your overall deploy times. If you have any questions or comments about the tutorial, please tweet us @MuleDev and visit our developer tutorials homepage for more tutorials.


Try Anypoint Platform for free
Start your 30-day free trial of the #1 platform for integration, APIs, and automation. No credit card required. No software to install.
Questions? Ask an expert.
