Welcome to MuleSoft, where you can deliver APIs and integrations at lightning speed. Do not worry if this is your first time using MuleSoft, this tutorial will walk you through step by step on how to develop, test, and deploy your first Mule Application in just a few minutes! Once your application is deployed, test your application using your favorite REST client by making a simple request to your hosted API on CloudHub.
Prerequisites
- REST Client - Download and install any REST Client of your choice. There are plenty of options out there for you to use, you can download MuleSoft’s Advanced REST Client, or you can use the popular REST Client Postman. We’ll be using Postman throughout these tutorials.
- Anypoint Platform - To deploy our first Mule Application, we are going to need an Anypoint Platform account to host our application on CloudHub. You can sign up for a free trial account here.
- Anypoint Studio - Click the button below to download Anypoint Studio (MuleSoft’s IDE!). Anypoint Studio enables you to start building APIs and integrations quickly with hundreds of pre-built connectors, templates, and examples. Download Anypoint Studio Download Anypoint Studio here.
Depending upon what system you are installing on, you may need to go through some troubleshooting steps to launch Anypoint Studio. Here you can find the specific instructions for your operating system: Windows Setup | Mac Setup | Linux Setup
Create a new project in Anypoint Studio
Upon opening Anypoint Studio, you will have to define your workspace. Your workspace is the location on your computer where your Anypoint Studio project files will be saved. Once you have defined your workspace and have launched Anypoint Studio, click on File then select New > Mule Project.
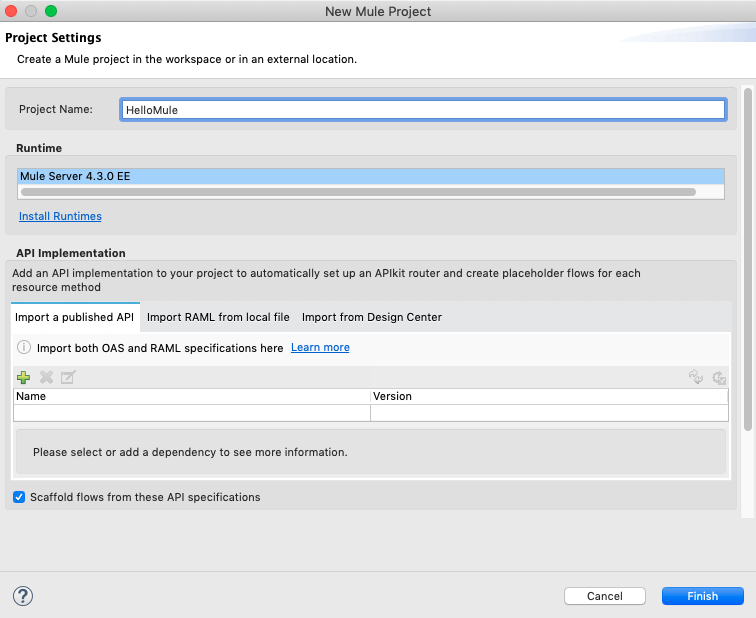
Anypoint Studio will open the New Mule Project wizard. In the Project Name field, enter the value HelloMule, then click Finish.
Anypoint Studio will open a new blank project. The following example below explains the different views you will use to build a Mule project:
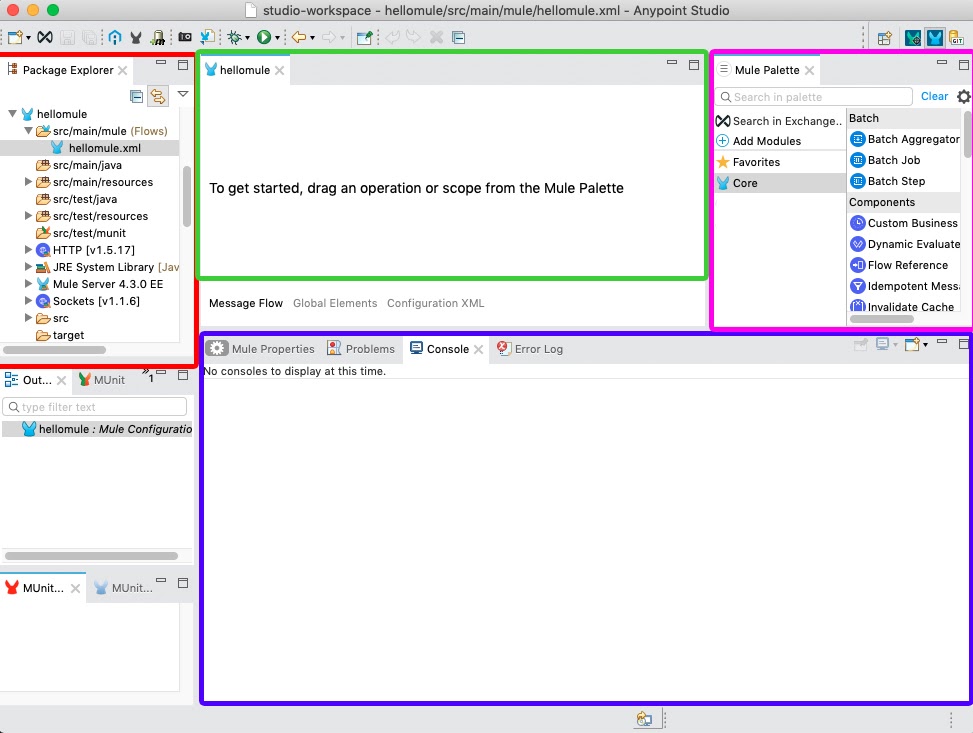
| Color | Area Name | Description |
|---|---|---|
| Red | Package Explorer | This is where you can view your project structure (files and folders). |
| Blue/Purple | Properties Editor and Console | This is where you can configure attributes of connectors and see the logs to catch any errors in your application. |
| Pink | Mule Palette | The Mule Palette allows you to select from hundreds of prebuilt Anypoint Connectors from Exchange or the Core Connector components to build your application. |
| Green | Canvas | This is where you can drag and drop Modules located in the Mule Palette to create a message flow. |
Add and configure the HTTP Listener connector
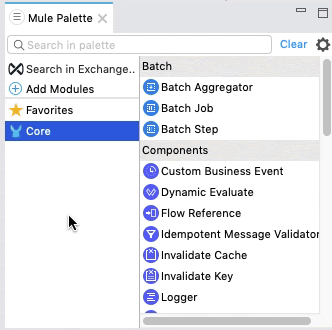
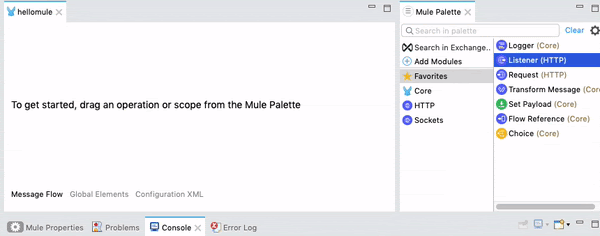
Your Mule Palette should already include the HTTP module. If it doesn’t, you can find the HTTP module by clicking on Add Modules, then dragging and dropping the HTTP module from the right side into the left side of the Mule Palette. This is how you add new modules/connectors to your Mule Project. If you click Search in Exchange, you can add any public asset available in the marketplace directly into your Mule Project.
Drag and drop an HTTP Listener from the Mule Palette to the canvas. Anypoint Studio will automatically wrap the connector with a flow once you drag and drop it on the canvas.
An HTTP Listener is an HTTP endpoint that listens for an HTTP request to come to the URL you define. When the Listener receives an HTTP request, the contents inside of the flow will execute in the order that you define. Yes, it’s really that simple to create an API in Anypoint Studio!
Next, click on the HTTP Listener connector, and in the Properties Editor below, click on the Green Plus (Add) button. The Green Plus button will create a configuration file under your Global Elements Configuration. Confirm the default values below and click the OK button.
| Host | 0.0.0.0 |
| Port | 8081 |
Then under General > Path type in: /hellomule
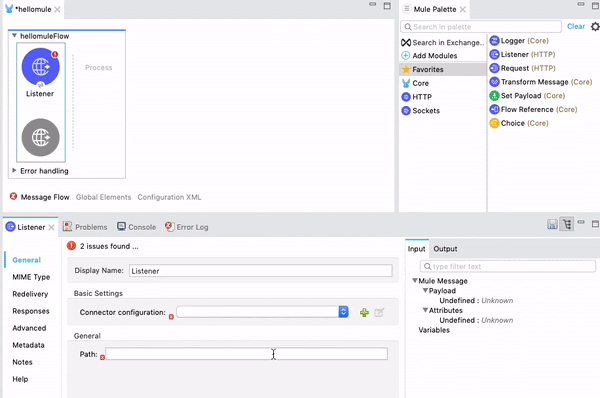
The Path you define is going to represent the endpoint that will execute your flow when an HTTP request is made to your HTTP Listener.
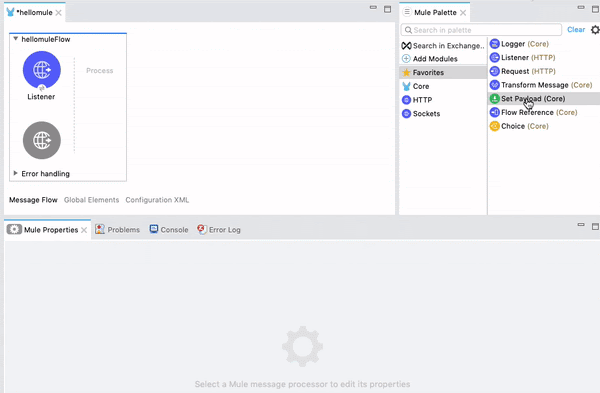
Now, drag the Set Payload connector into your flow, inside the Process section. You can find the Set Payload connector under the Core module in your Mule Palette. Uncheck the fx button and add the string: Hello Mule.
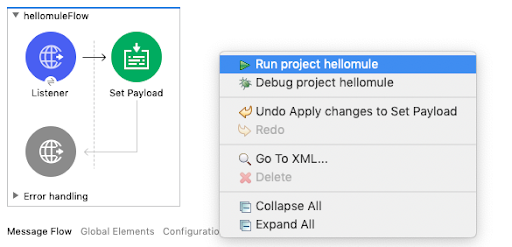
Now go to File > Save to save your project.
Run the Mule Application locally
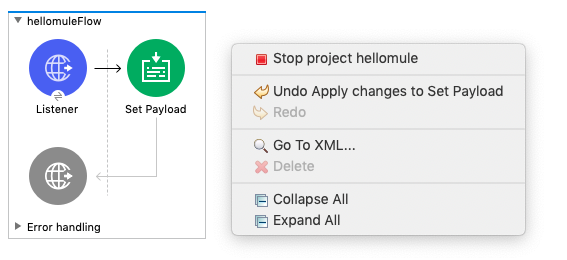
After saving, right-click on your canvas and click Run project hellomule to test it live from your local computer!
If you go into your Console view, you can check to see whether your application has been successfully deployed. If it says DEPLOYED at the bottom right, then you are ready to use a REST Client to test your first Mule Application.

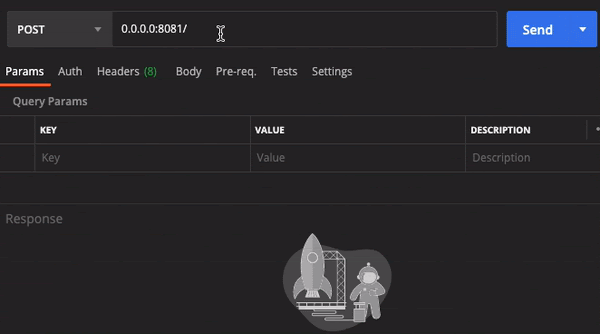
Open up your REST Client of choice. Type in the URL of your HTTP endpoint and path added after the URL. For this demo, you will use the address:
http://0.0.0.0:8081/hellomuleYou can replace 0.0.0.0 with localhost.
Click the Send button and you should get Hello Mule as a 200 OK Response.
Nice job! You have successfully deployed your first Mule Application locally and have gotten a response from your API. To stop the project from running locally, you can right-click again on the canvas and click Stop project hellomule.
Deploy the Mule Application to CloudHub
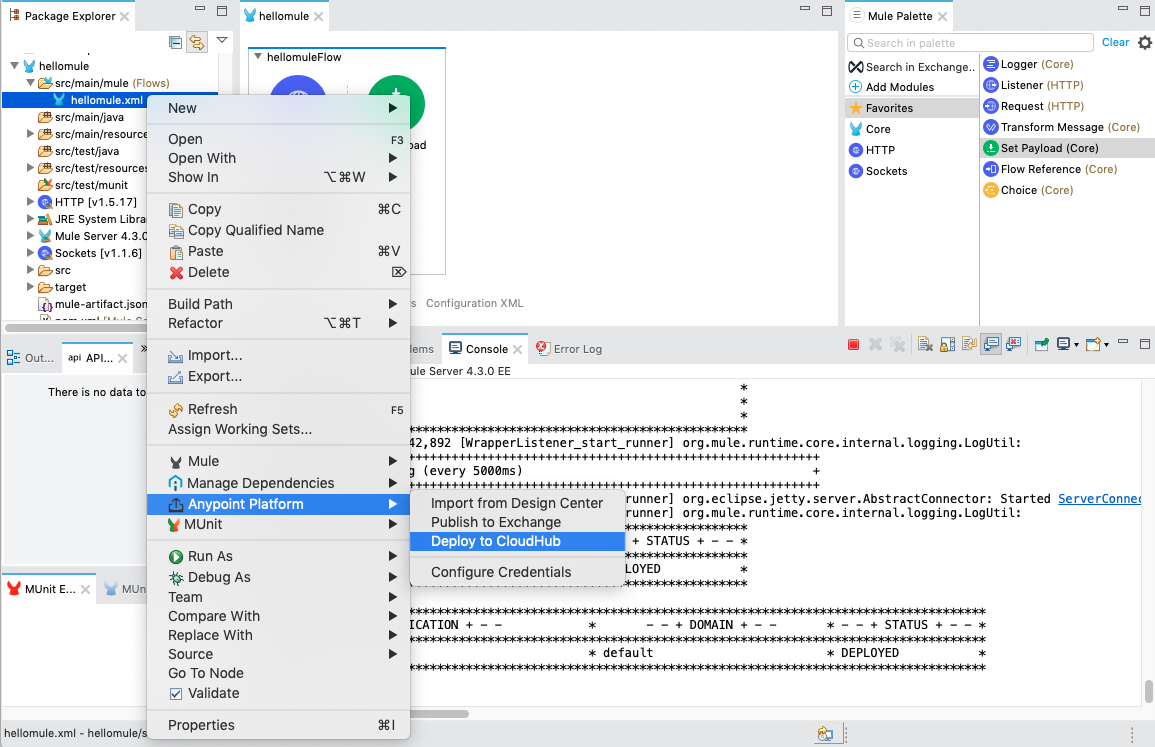
Now that you have learned how to deploy and test locally, let’s deploy our application to CloudHub. CloudHub will issue your application with a publicly accessible endpoint URL after you complete the deployment process. Right-click on your project in your Package Explorer, and click on Anypoint Platform > Deploy to CloudHub.
First, you will need to log in with your Anypoint Platform credentials. After that, choose the Sandbox environment then choose a unique name for your application. If your application has a red x next to it, it means someone else has deployed with that application name. You just have to give it a new unique name.
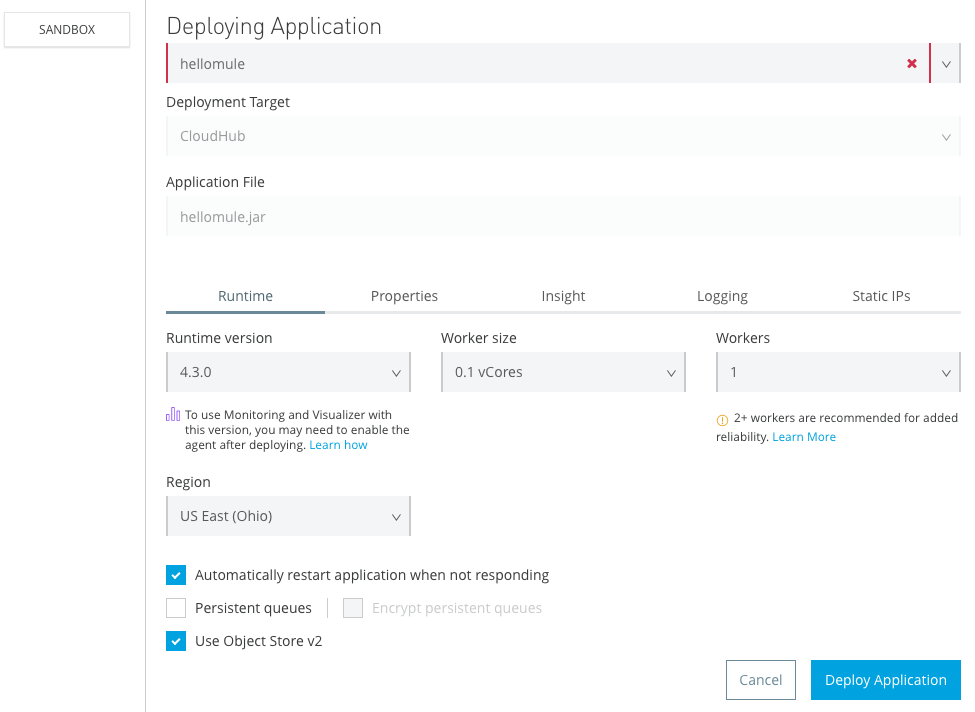
When your application name has a green check next to it, click the Deploy Application button. It may take a few minutes to fully deploy to CloudHub. After that, click on the following button to log in to Anypoint Platform.
Navigate to Runtime Manager and find your application. Click on your application’s name to open the Dashboard. Once your application is fully deployed, copy and paste your application’s URL highlighted in blue into your REST Client and add your Endpoint Path after the URL.
In this case, it would be hellomule.us-e2.cloudhub.io/hellomule.
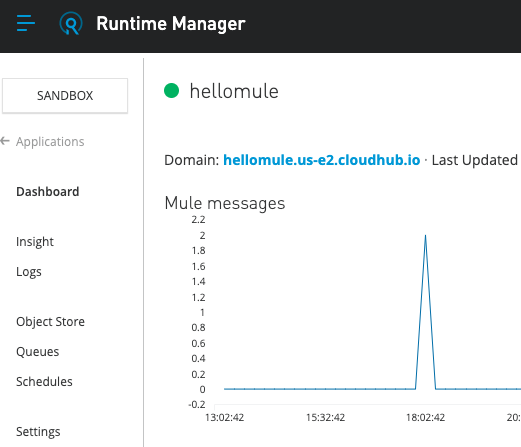
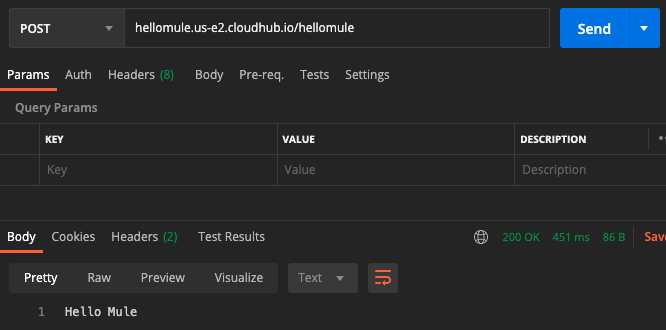
When you send a request to your CloudHub endpoint, you should get Hello Mule as a 200 OK Response.
Next Steps
Do you have any questions about the code? You can compare your Mule project with ours to make sure everything was set up correctly.
You did it! You built your very first Mule application and deployed it to CloudHub in only a few minutes. However, there are some best practices that need to be followed to ensure a better developer experience - especially when you start working on bigger projects. In the next tutorial, we’ll show you how to set up your Mule project to follow best practices with global and properties files.
Click on the Next button below to continue to the next tutorial.


Try Anypoint Platform for free
Start your 30-day free trial of the #1 platform for integration, APIs, and automation. No credit card required. No software to install.
Questions? Ask an expert.
