We would like to thank Sue Han for their contribution to this developer tutorial.
API Manager within Anypoint Platform comes with default policies you can apply to any APIs in your organization. In addition, you can also develop and apply custom policies in API Manager to extend existing functionalities.
Applying an API policy using API Manager would allow you to:
- Avoid direct changes to code or implementation
- Apply consistently across deployments
- Apply with zero downtime
In this tutorial, we will walk you through the basics of developing and implementing a custom policy. You will learn how to:
- Set up a custom policy project
- Package and deploy to Anypoint Exchange
- Apply the policy to the desired API
- Test the custom policy
Check out the existing default policies to see if a policy you would want to implement is already available.
We will be developing and implementing a Circuit Breaker custom policy. A circuit breaker policy allows you to put a fail-safe into your API-led design so that if there is a failure (i.e. Database is down), the connection is shut down to prevent the following:
- Unnecessary load on the system such as redundant requests that create new threads and may exhaust the database’s limits
- Cascading failures that affect downstream APIs and in turn cripple the whole system
For the purpose of this exercise, we will start with an empty project and add different portions of the code in the repository linked above to get a feel for the steps required from the beginning to the end.
Prerequisites
- Anypoint Platform - We’ll need an Anypoint Platform account to host our custom API policy from API Manager. You can sign up for a free trial account here.
- Acquire
Organization ID,Client ID, andClient Secret- You can get the necessary information via the following:- Log in to Anypoint Platform
- In the navigation bar or the main Anypoint Platform page, click Access Management
- Click the Organization tab
- Click the name of your organization
- Copy the UUID from the Organization ID box, Client ID box, and Client Secret box (click on Show), and save them somewhere accessible for the tutorial
- Exchange permissions - Assign your account to have the Exchange Contributors role. To do so you will need to:
- Log in to Anypoint Platform
- Navigate to Access Management on Anypoint Platform
- Click the Roles tab
- Click on the Exchange Contributors option
- Enter your username in the search box
- Select the user from the drop-down list of results, then click the blue plus sign on the right of the search box
- Your Name, Username, and Email should now be listed here
- Acquire Mule EE Nexus repository credentials - If you do not have the credentials, please reach out to your MuleSoft Admin or Account Manager.
- REST Client - Install Advanced Rest Client, Postman, or any app of your choice to make calls to the APIs.
- Code Editor - Install Visual Studio Code or other code editing software to edit the policy files.
- Install Java and Maven - Ensure your Maven and Java versions are compatible with the latest version of the Mule Maven Plugin by running
java -versionandmvn -v.
Set up sample Mule apps
For the purposes of the tutorial, we are using example APIs found in Anypoint Exchange: Hello World (we’ll call it HelloWorldAPI) and Tutorial: Implementing a Custom API Policy in API Manager (we’ll call it HelloCircuitBreakerAPI). The Hello Circuit Breaker API makes requests to the Hello World API. We will apply and test the custom policy on the Hello Circuit Breaker API.
- Log in to Anypoint Platform and navigate to API Manager (You can access it through the menu button on the top left of the screen)
- Click on Manage API > Create new API
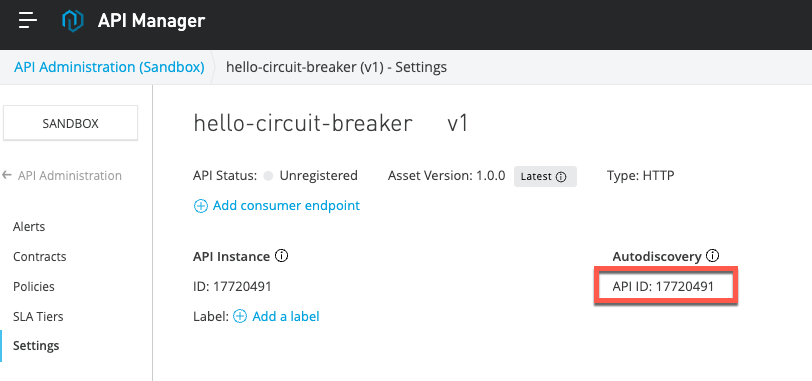
- Create an HTTP API called
hello-circuit-breaker - Select HTTP API as the asset type and click Continue
- Leave all the default configuration for the Endpoint configuration and click on Save
- Save the Autodiscovery API ID because you’ll use it later in the tutorial
Hello World API
- Go to Runtime Manager from the top-left menu and click Deploy Application (If you’re prompted for an Environment, select Sandbox)
- Choose the application name you desire. This name needs to be unique throughout CloudHub (i.e.
HelloWorldAPI-yourusername) - Under Application File, click on Choose file and select Import file from Exchange
- Choose Type Example and search asset Hello World and click Select
- Leave all the default options and click Deploy Application
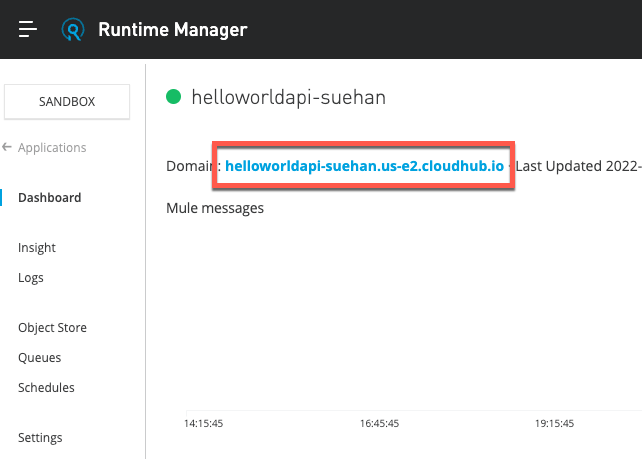
- Click on the Dashboard tab on the left and note the domain of this Hello World API. This is the CloudHub URL to call this Mule application
- Save this Domain/URL because you’ll use it later in the tutorial
Hello Circuit Breaker API
- Go to Runtime Manager and click Deploy Application
- Choose an application name you desire (i.e.
HelloCircuitBreakerAPI-yourusername). Remember it needs to be unique throughout CloudHub - Under Application File, click on Choose File and select Import file from Exchange
- Choose Type Example and search asset Tutorial: Implementing a Custom API Policy in API Manager and click Select
- Under the Properties tab, add the following keys and values (you can get the client ID and secret from the Prerequisites)
- Click Deploy Application
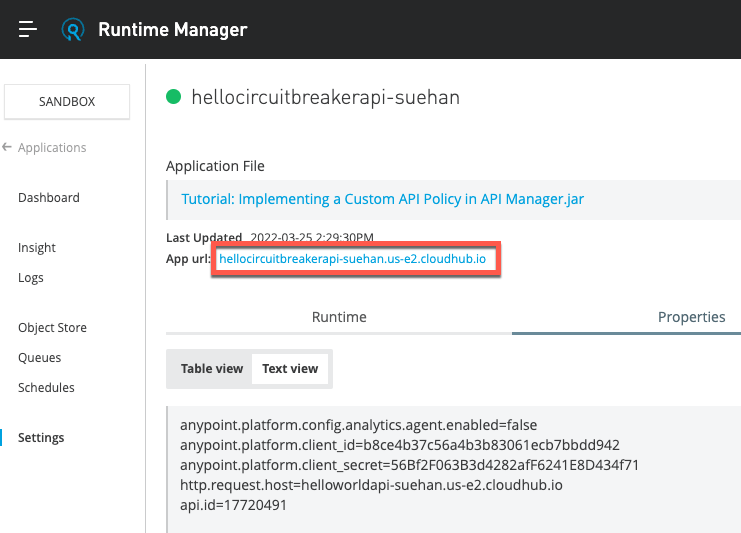
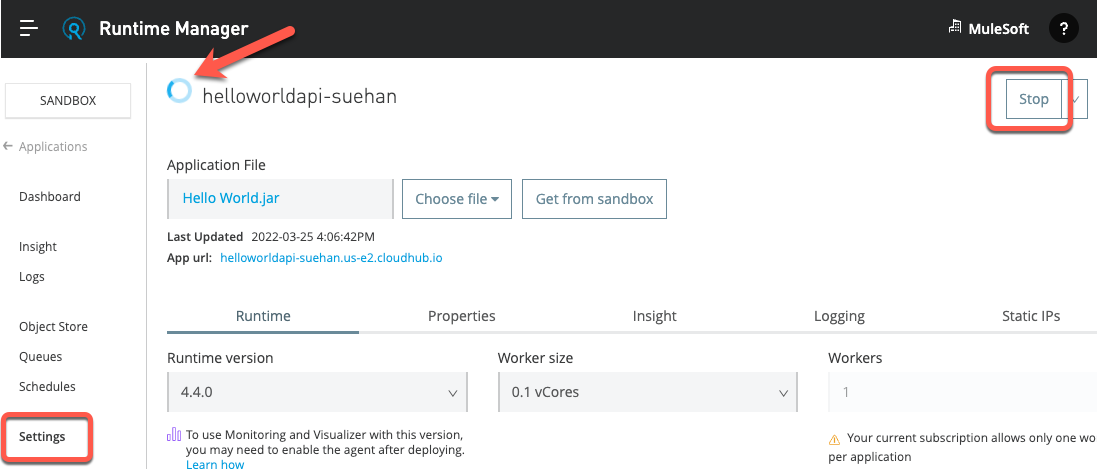
- Click on the Settings tab on the left and note the App url of this Hello Circuit Breaker API. This is the CloudHub URL to call this Mule application
You can change from Table view to Text view to just copy and paste the text instead of adding each property one by one.
1
2
3
4
anypoint.platform.client_id=<your-client-id>
anypoint.platform.client_secret=<your-client-secret>
api.id=<hello-circuit-breaker-autodiscovery-api-id>
http.request.host=<hello-world-api-url>
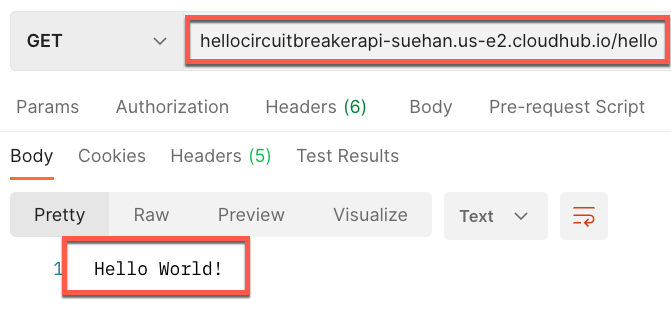
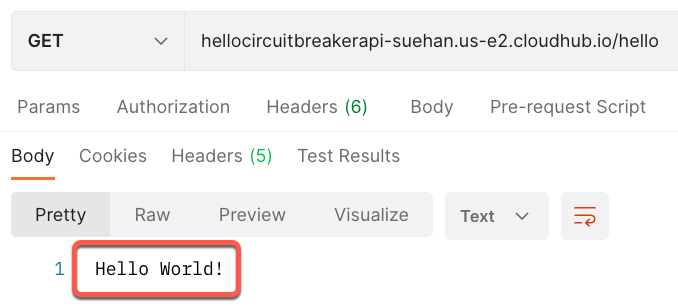
After both APIs in Runtime Manager are deployed, use a REST client to check that the API can be called. Use the URL you copied for this last API (HelloCircuitBreakerAPI) and add /hello to the end.
For example, if your CloudHub URL was hellocircuitbreakerapi.us-e2.cloudhub.io, then the URL you’d call would be hellocircuitbreakerapi.us-e2.cloudhub.io/hello. You should receive a Hello World! message in the response.
Your hello-circuit-breaker API from API Manager should now have an API Status of Active. We connected the HelloCircuitBreakerAPI from Runtime Manager to this API in API Manager by using the Autodiscovery API ID. To learn more about setting up Autodiscovery for your Mule applications, check out this developer tutorial.
Configure Maven’s settings.xml
We sill now configure Maven’s settings.xml to specify:
- Exchange credentials to deploy the policy
- The Mule project with the Maven archetype to create a custom policy
Open Maven’s settings.xml file which can be found in the .m2 directory.
- For Windows:
C:\Users\<user>\.m2 - For Mac:
${user.home}/.m2
If you don’t find this file in the .m2 folder, you can create it manually. You can take this settings.xml file as an example and just change the credentials.
Add the credentials you use to log in to Anypoint Platform to the servers section and the Nexus Enterprise Account. It should look similar to this:
1
2
3
4
5
6
7
8
9
10
<server>
  <id>MuleRepository</id>
  <username>your-nexus-username</username>
  <password>your-nexus-password</password>
</server>
<server>
  <id>exchange-server</id>
  <username>your-anypoint-platform-username</username>
  <password>your-anypoint-platform-password</password>
</server>
If you’re basing on your own settings.xml file, make sure you include the following profile configuration:
1
2
3
4
5
6
7
8
9
10
11
12
13
14
15
16
17
18
19
20
21
22
23
24
25
26
27
28
29
30
31
32
33
34
35
36
37
38
<profile>
  <id>archetype-repository</id>
  <repositories>
    <repository>
      <id>archetype</id>
      <name>Mule Repository</name>
      <url>https://repository-master.mulesoft.org/nexus/content/repositories/public</url>
      <releases>
        <enabled>true</enabled>
        <checksumPolicy>fail</checksumPolicy>
      </releases>
      <snapshots>
        <enabled>true</enabled>
        <checksumPolicy>warn</checksumPolicy>
      </snapshots>
    </repository>
  </repositories>
</profile>
<profile>
  <id>Mule</id>
  <activation>
    <activeByDefault>true</activeByDefault>
  </activation>
  <repositories>
    <repository>
      <id>MuleRepository</id>
      <name>MuleRepository</name>
      <url>https://repository.mulesoft.org/nexus-ee/content/repositories/releases-ee/</url>
      <layout>default</layout>
      <releases>
        <enabled>true</enabled>
      </releases>
      <snapshots>
        <enabled>true</enabled>
      </snapshots>
    </repository>
  </repositories>
</profile>
Save your settings.xml file.
Set up a Mule project with Maven archetype
To gather all the required files and set up the Mule project to create a custom policy, we will be using a Maven archetype provided by MuleSoft.
Create the Mule Project
- Create a new directory at an easily accessible location (i.e. documents) where the custom policy project will live
- Go to the directory in the command line
- Run the following command after replacing
${orgId}with the Anypoint Platform Organization Id we previously retrieved and${policyName}with the desired name for the custom policy. For example,circuitbreakerpolicy.
1
2
3
4
5
6
7
8
mvn -Parchetype-repository archetype:generate \
-DarchetypeGroupId=org.mule.tools \
-DarchetypeArtifactId=api-gateway-custom-policy-archetype \
-DarchetypeVersion=1.2.0 \
-DgroupId=${orgId} \
-DartifactId=${policyName} \
-Dversion=1.0.0-SNAPSHOT \
-Dpackage=mule-policy
Before finishing, Maven will ask you to define policyDescription and policyName which you can specify to describe and name your policy. For example, Circuit Breaker custom policy in MuleSoft and Circuit Breaker policy. Finally, just input Y to confirm the properties are correct. After running the command, the project’s directory will have the following file structure with four files:
1
2
3
4
5
6
7
8
<policyName>/
├── <policyName>.yaml
├── mule-artifact.json
├── pom.xml
└── src
   └── main
       └── mule
           └── template.xml
To learn more about this Mule project’s files, see Custom Policy Development Reference.
Update the project’s files
We will now update pom.xml, <policyName>.yaml, and template.xml files to create our circuit breaker custom policy.
1 - Open the pom.xml file
2 - Inside the properties field, add the following snippet to specify the Mule Object Store version. In this particular custom policy, we are using the Mule Object Store Connector to retrieve and store values - in this case, counters - for up to 30 days.
1
<os.version>1.2.1</os.version>
For more information on Object Store, see Caching in a Custom Policy for Mule 4.
3 - Replace the dependencies field with the following snippet:
1
2
3
4
5
6
7
8
9
10
11
12
13
14
<dependencies>
    <dependency>
        <groupId>org.mule.connectors</groupId>
        <artifactId>mule-objectstore-connector</artifactId>
        <version>${os.version}</version>
        <classifier>mule-plugin</classifier>
    </dependency>
    <dependency>
        <groupId>com.mulesoft.anypoint</groupId>
        <artifactId>mule-http-policy-transform-extension</artifactId>
        <version>${http.policy.transform.extension}</version>
        <classifier>mule-plugin</classifier>
    </dependency>
</dependencies>
4 - Replace the contents of template.xml (inside src/main/mule) in your project with this template.xml.
5 - Replace the contents of <policyName>.yaml in your project with this circuit-breaker-mule-4.yaml.
6 - Ensure all the files are saved before moving on to the next step.
Package and deploy to Anypoint Exchange
We will now package and deploy the custom policy to Anypoint Exchange, MuleSoft’s marketplace for connectors, templates, examples, and APIs, from where you can share and reuse this policy.
From the command line in your project’s root folder, run the package command.
1
mvn clean package
If the build is successful, publish the policy to Exchange from the command line in your project’s folder.
1
mvn clean deploy
Apply the policy to the desired API
Now, we will check that the policy is published to Exchange and import it into our Environment.
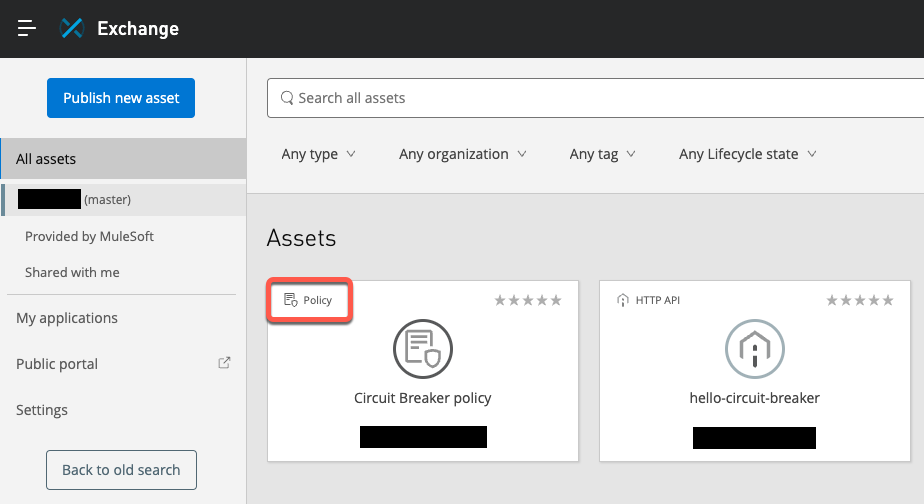
1 - On Anypoint Platform, go to Exchange and check that the policy is present. The type of the asset should be Policy and the name should be the policyName you previously provided when running the Maven archetype command.
2 - Go to API Manager and select the API that you want to apply the circuit breaker policy to. In this case, the hello-circuit-breaker API.

3 - Once on the API version page, go to Policies > Apply New Policy.
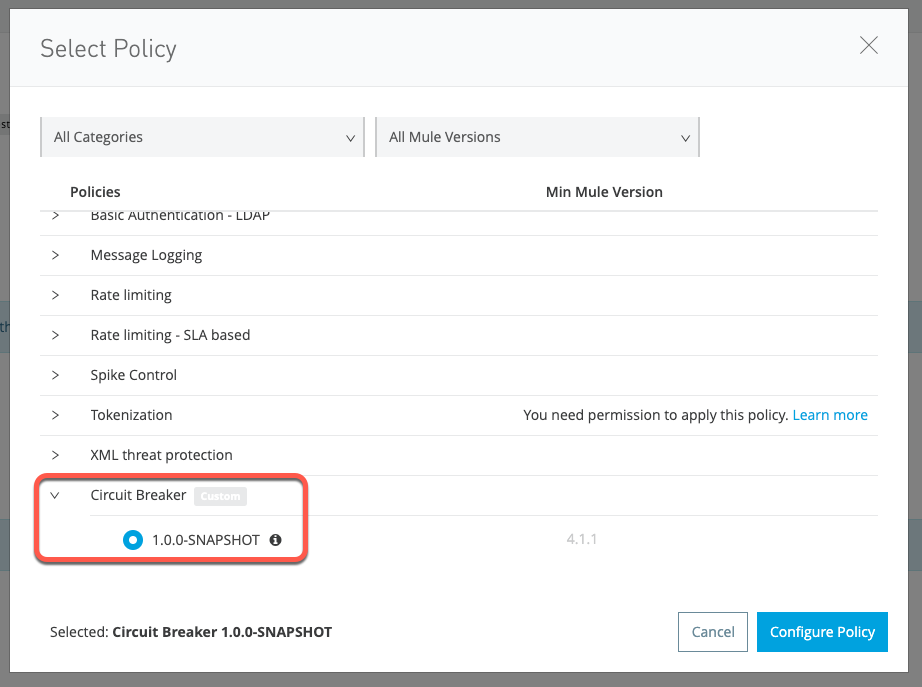
4 - In the pop-up, you should see your Circuit Breaker custom policy listed with the label Custom. Choose the latest version (1.0.0) and then click on the Configure Policy button.
5 - The configuration page for the policy should pop up. Here are some values you can use to test:
| Field | Value |
|---|---|
| Failure Threshold | 3 |
| Retry Period | 30 |
| Evaluate the error object to trigger the circuit? | TRUE |
| Exceptions Array | "HTTP:TIMEOUT" |
| Evaluate the HTTP response to trigger the circuit? | TRUE |
| HTTP Codes Array | "500" |

Now your API has the custom policy applied!
Test the custom policy
1 - To test if the custom policy is working as expected, first call the API in a REST client.
2 - Stop the Hello World API from Runtime Manager by going to Settings > Stop.
3 - Once it stops, call the Hello Circuit Breaker API from a REST client once more. Before the failure threshold is reached, the state will say CLOSED.
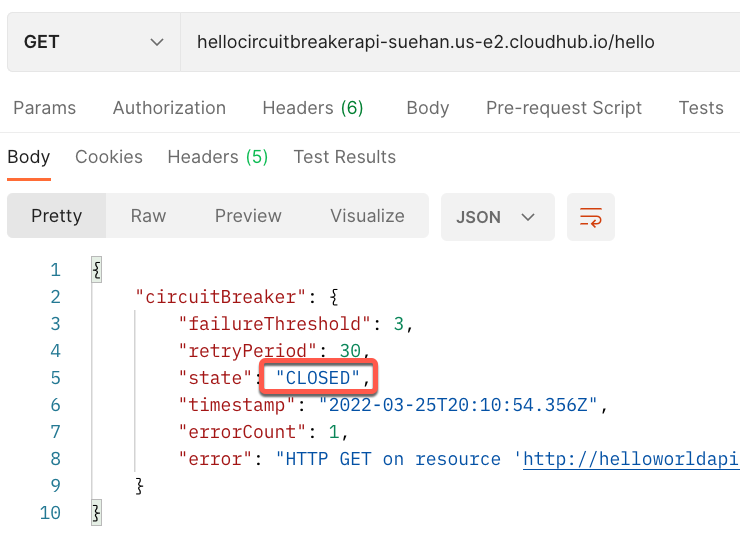
4 - Continue sending the same request until the threshold is reached. When the failure threshold is reached, the state will respond with OPEN which means that the API will no longer make calls to the Hello World API and is working as expected. If a new incoming request arrives, the policy will reject it immediately.

Once the Hello World API is turned back on, the “Hello World” string will be returned once again.
Next Steps
In this tutorial, we walked through the basics of developing and implementing a custom policy. You learned how to:
- Set up a custom policy project
- Package and deploy to Anypoint Exchange
- Apply the policy to the desired API
- Test the custom policy
You’ve now developed and implemented your first custom API policy on API Manager. For more information on Custom Policies, see API Manager - How to Create Custom Policies - Friends of Max Demonstration.
To learn more about this circuit breaker policy and other patterns like CQRS and event-sourcing, see Implementing modern architectural patterns with MuleSoft.
Do you have any questions about the Mule project generated using the Maven archetype? You can compare your Mule project with ours to make sure everything was set up correctly.
You can also compare our settings.xml file with yours in case you missed it earlier in the tutorial.


Try Anypoint Platform for free
Start your 30-day free trial of the #1 platform for integration, APIs, and automation. No credit card required. No software to install.
Questions? Ask an expert.
