Overview
This tutorial will demonstrate how to set up an on-prem mule cluster on Google Cloud Platform. The mule cluster will be installed on scalable VMs hosted on Google Cloud Platform. When you deploy applications on-premises, you have complete control over the Mule instance which enables you to take advantage of certain characteristics of the on-premises deployment model. The deployment consists of two main aspects, the Mule runtime engine instance, and the Mule applications deployed to that Mule instance. Normally when you deploy an application to CloudHub or Anypoint Runtime Fabric, these services take care of the Mule runtime engine instances needed to run applications. However, when you deploy applications on-premises, you are responsible for the installation, configuration, and management of the Mule runtime instances.
In order to complete this tutorial, you must first signup for a free Anypoint Platform account. Click the button below to continue:
Already have an account? Sign in.
Next, make sure you signup for a Google Cloud Platform account.
The installation of the Mule Cluster consists of 3 steps:
- Setup Mule on each VM node hosted on Google Cloud
- Configure the Mule Cluster in ARM
- Setup the front end Mule Cluster with a load balance
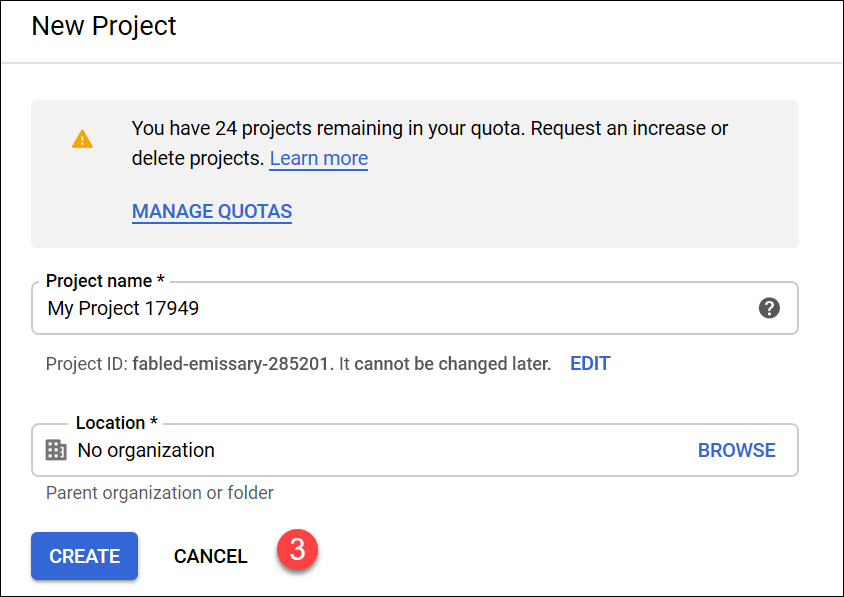
Step 1: Create a new project on Google Cloud Platform
Create a Google Project using the drop-down shown in the snapshots.

Step 2: Create 2 VM instances on Google Cloud Platform
Under the project in the previous step, create two VMs which will be used to install and host the Mule Runtime.
First, create a VM instance under Computer Engine.

Next, click the Create Instance button.
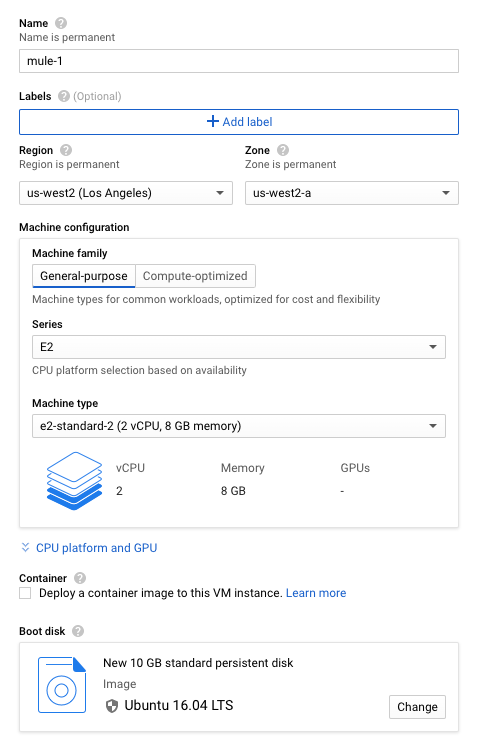
You must setup the instance with the following details or else your Mule runtime won’t have enough memory/computation power to run.
- Name: This is the instance name. For example: mule-1
- Region: Select a region where the VM/Compute resources will be hosted.
- Boot Disk: Select an OS, for this demo make sure to select Ubuntu as the OS
- Machine Configuration: Computational resources for the VM. Example: E2 instance (with 8gb memory)
Now that you have created one instance, go ahead and create another one and name it Mule-2. Once you have created both instances, go ahead and continue to step 3.
Step 3: Install the Mule Runtime
Next, we are going to install the Mule Runtime on our Google Cloud Platform VMs.
First, please download the the Mule Runtime on your local machine by clicking the button below:
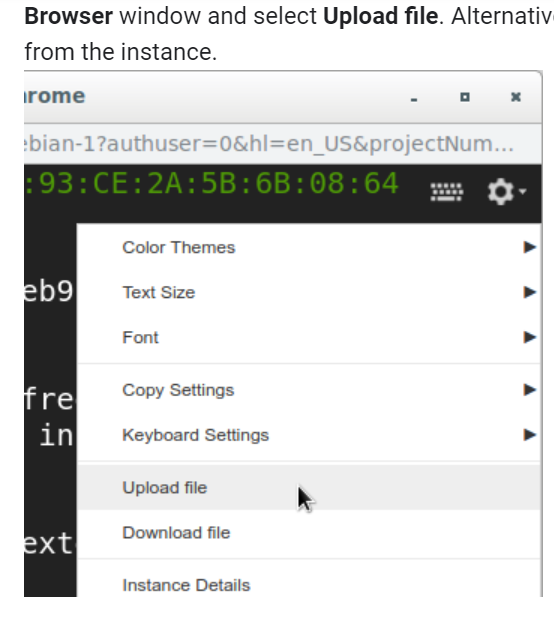
Next, upload the installer to the two VMs by clicking the dropdown on Google Cloud Platform to access SSH via the web-browser. (Feel free to use a separate SSH client if you wish).

When you open up the Google Cloud Platform SSH window, click on the settings button, and click Upload file. Upload the Mule Runtime zip folder that you just downloaded above. This may take 5 or 10 minutes to execute.
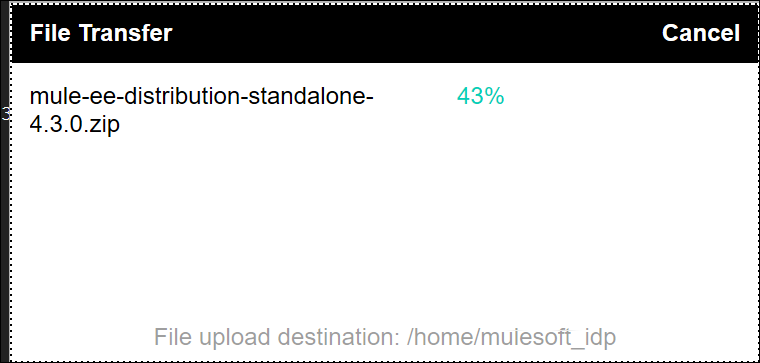
Once the file finishes uploading, type in sudo su - to install the JDK and Mule standalone on each VM. Type the following commands below in order and wait for each one to execute before typing the next one:
sudo apt update
sudo apt install default-jdk
Execute the following commands to extract the Mule distribution
sudo apt install unzip
unzip /home/<USER_ID>/mule-ee-distribution-standalone-4.3.0.zip. Update the USER_ID based on your gcp username
Step 4: Register the Mule Runtime with ARM
In order to manage the Mule Runtime through the Anypoint Platform UI, you need to register each runtime with the platform using Runtime Manager.
First, log into your Anypoint Platform account, then navigate to Servers under Anypoint Platform environment via Runtime Manager.

Click the Add Server button and copy the command. The command generates a temporary token that will be used to register the Mule Runtime with Anypoint Platform.
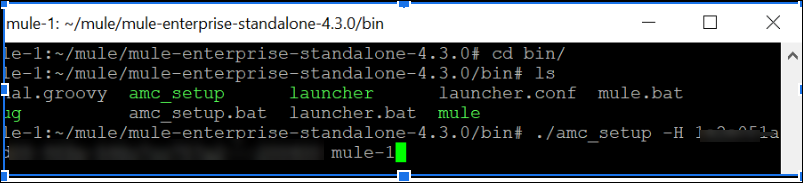
Next, navigate to the bin folder in the mule home directory in each VM instance and paste the above command. (you can use the ls and cd commands to navigate through the directories as seen in the screenshot below). Change the servername in the command to mule-1 or mule-2 so you can identify the instances in the Anypoint Platform UI.
Next, in the VM SSH window, you need to start the Mule Runtime for the Anypoint Platform UI to detect the VM instance.
In the mule_home/bin directory type:
/mule start
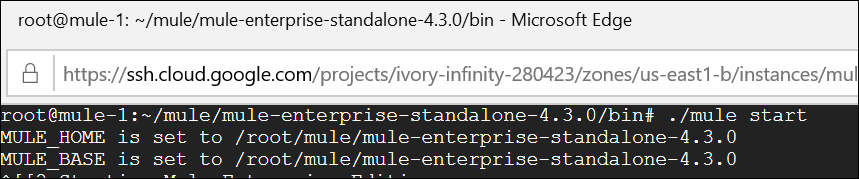
Now navigate back to Anypoint Platform. You should see that your server is registered within Anypoint Platform. Remember, you will have to run these commands on both VM instances! Go back and repeat these steps for your other mule instance.
Step 5: Create a Cluster in Anypoint Platform
Next, navigate to Servers under your Anypoint Platform and via Runtime Manager. Click on the Create Cluster button.

Specify the cluster name and select the two nodes. Then choose the IP address.
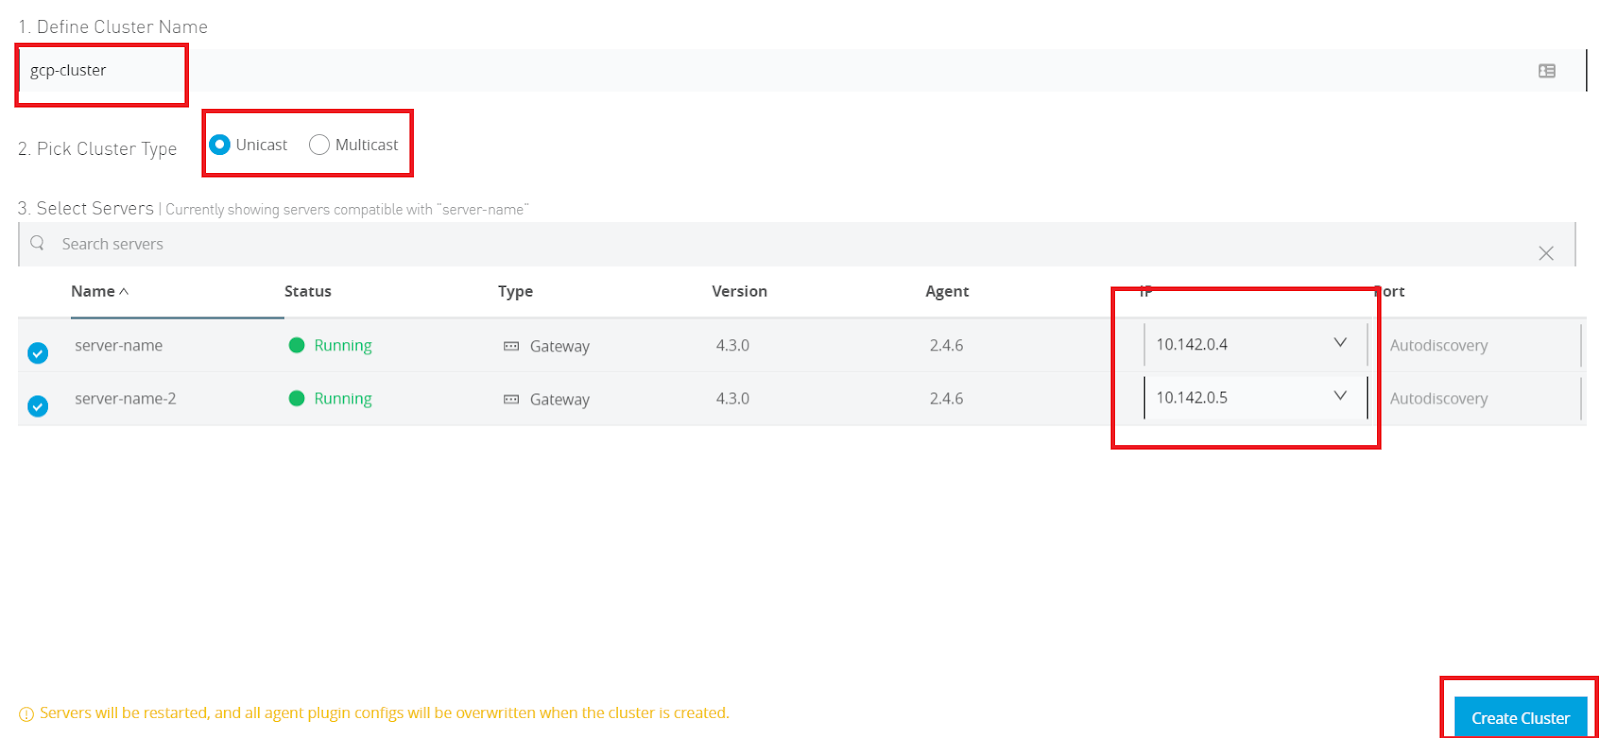
Finally, click the Create button to complete the process.
Step 6: Deploy a sample application
Using Runtime Manager, deploy a sample application to the cluster and verify that everything is working.
You can use a sample set payload expression in a simple flow which returns the server host processing the request.
<set-payload doc:id="2f10455b-395a-44cf-ae38-8fc807580f89" doc:name="Set Payload" value="#[server.host]"></set-payload>
To download a sample studio 7.5 project to test it out, click the download button below.
Step 7: How to configure the load balancer on Google Cloud Platform
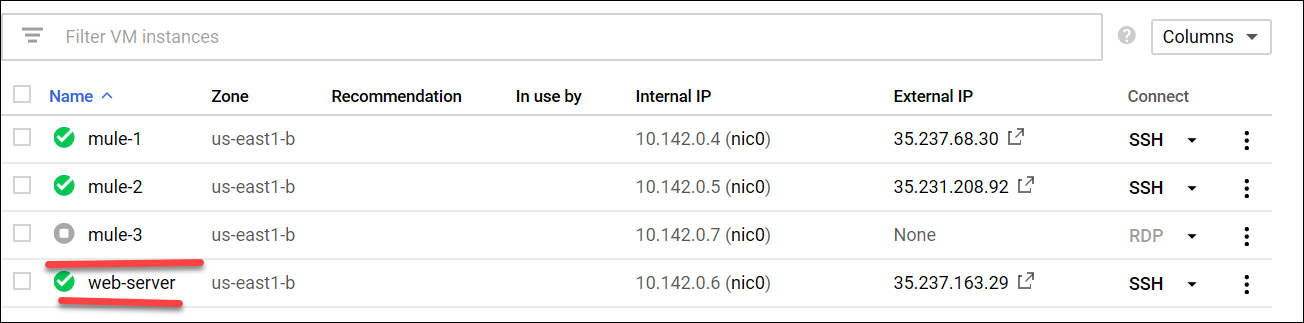
The MuleSoft server group or cluster can be front-ended either by software or hardware-based load balancer. For this use case, a single node Apache web server is deployed on Google Cloud Platform. To begin the configuration, first create a new VM on Google Cloud Platform.
- Name: This will be the instance name. Go ahead and name it apache-1, web-server or whatever you wish.
- Region: Select the region where the VM/Compute resources will be hosted.
- Boot Disk: Select the OS. Make sure to select Ubuntu as the OS for this tutorial.
- Machine Configuration: Computational resources for the VM. Choose an E2 instance with 8gb of RAM.
Click on the Connect to SSH via web browser on the newly created load balance and install an apache web server by executing each command listed below in the terminal SSH window:
sudo su -
sudo apt update && sudo apt -y install apache2
sudo a2enmod proxy
sudo a2enmod proxy_http
sudo a2enmod proxy_http
sudo a2enmod proxy_balancer
sudo a2enmod lbmethod_byrequests
Next, configure the apache web server as a reverse proxy/load balancer.
vi [/etc/apache2/sites-available/000-default.conf]
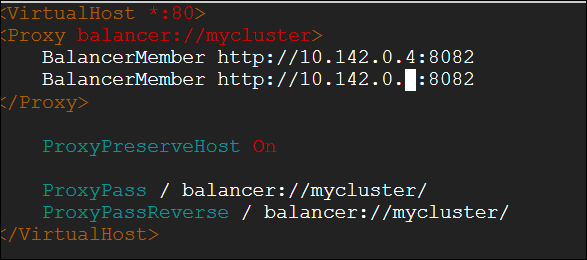
This will open up the vi editor, press i to enable the edit mode, and edit the file to match with the below configuration. Make sure to update the IP address and port number; specify the GCP Mule VM IP (internal) address and port number with the values listed on your VMs. This will be the HTTP listener port (In this case, mule domain HTTP listener runs on 8082).

1
2
3
4
5
6
7
8
9
<VirtualHost *:80>
<Proxy balancer://mycluster>
BalancerMember http://10.142.0.4:8082
BalancerMember http://10.142.0.5:8082
</Proxy>
ProxyPreserveHost On
ProxyPass / balancer://mycluster/
ProxyPassReverse / balancer://mycluster/
</VirtualHost>
Press ESC and then type :wq to save and close the file.
Restart apache by running the following command: sudo systemctl restart apache2
Test out the load balancer
Next, execute the sample application using web-server VMs IP address and port 80
http://<<IP Address of Web Server>>:<<PORT>>/application-context
In this case the application-context is the path defined in the http listener (/cluster)

The web server will round-robin the request to the backend mule-servers. Checkout the gif below to see how it routes traffic:
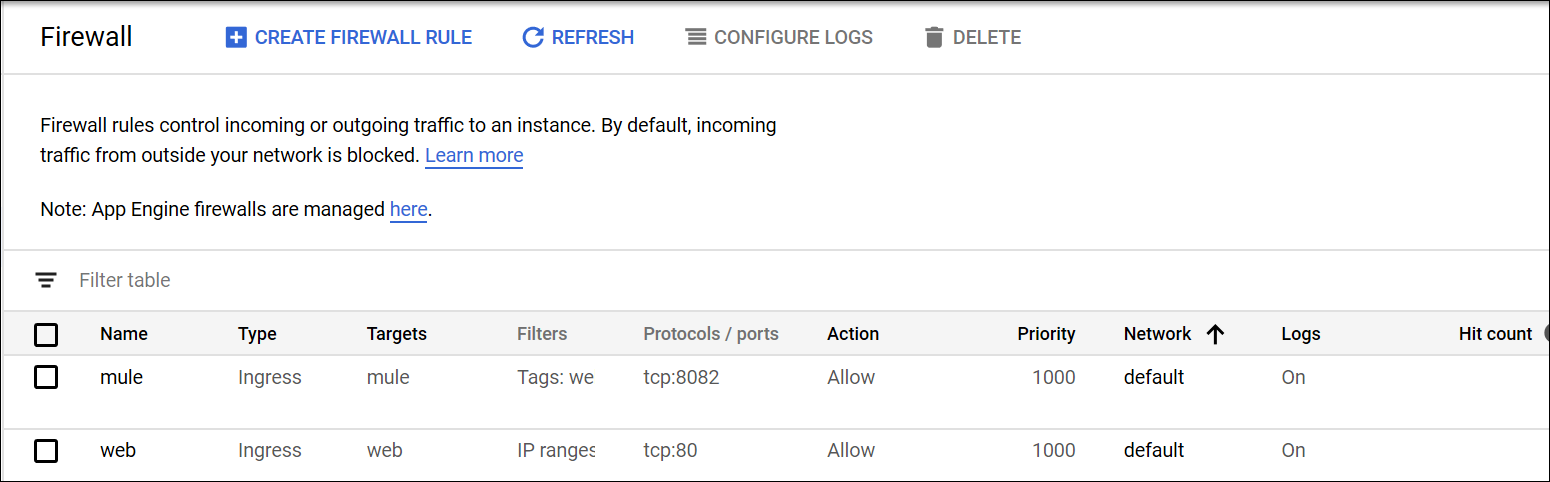
Control traffic on Mule VMs - Optional
You can use VPC firewall rules to restrict incoming traffic on Mule VMs originating from web-server only. The custom firewall rules are based on network tags, which are specific on each machine or vm. Make sure to follow the Google Documentation for information on firewall rules.
Conclusion
Thank you so much for reading this tutorial and walking through the setup process on how to deploy a Mule instance on-prem. We hope that you found this tutorial helpful. Please rate it below and let us know what you think by tweeting us @MuleDev on Twitter. If you want to read more developer tutorials, please visit our developer tutorials homepage.


Try Anypoint Platform for free
Start your 30-day free trial of the #1 platform for integration, APIs, and automation. No credit card required. No software to install.
Questions? Ask an expert.
