Overview
Modern-day web applications need to have reactive components that can dynamically change and update in realtime when new data is received. The end consumer expects a web page to automatically update in realtime with new information or real-time updates instead of having to manually refresh the page. One solution to this problem is to implement Javascript polling in the browser. While this is one solution, it’s not optimum at scale. However, with WebSockets, developers can implement bi-directional communication on top of the HTTP protocol to create real-time experiences for their applications. It’s more efficient in terms of communication and works great at scale.
MuleSoft supports WebSockets out of the box, and there’s even a free connector available on Exchange to try out and implement into your projects. In the tutorial below, we will cover how to create a simple WebSockets Mule Application using HTML5 and an open-source charting library called Chart.js. This tutorial will also cover the WebSockets deployment process to CloudHub.
Getting Started
In this tutorial, we will be creating a graph that will update in real-time when a new number is send via an HTTP POST request.
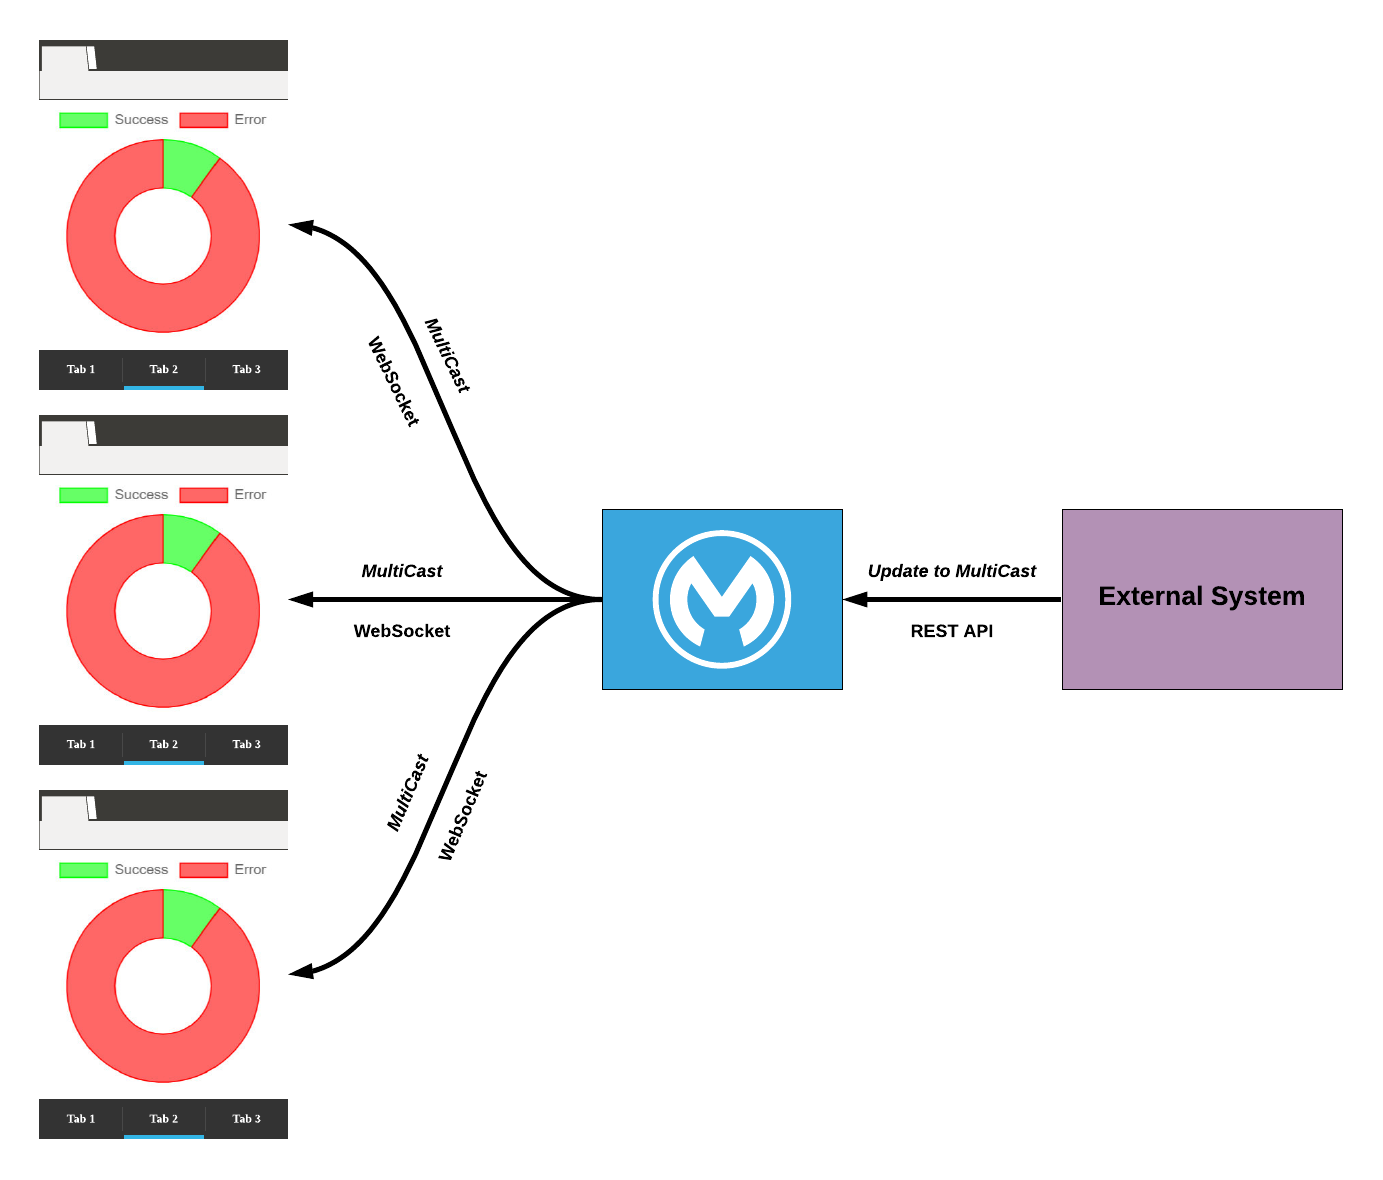
The architecture diagram can be broken up into four parts:
- The display: an HTML page containing JavaScript that waits for WebSocket message
- Application part 1: Websockets Manager: accept the connection and multicast messages
- Application part 2: REST API to multicast the message
- An external system that can do REST call (for example Advanced Rest Client)
Coding the HTML Page
The HTML page is broken up into two important parts:
- The usage of the javascript chart library
- The Websocket section
1
2
3
4
5
6
7
8
9
10
11
12
13
14
15
16
17
18
19
20
21
22
23
24
25
26
27
28
29
30
31
32
33
34
35
36
37
38
39
40
41
42
<!DOCTYPE HTML>
<html>
  <head>
      <script src="https://cdn.jsdelivr.net/npm/chart.js@2.9.3/dist/Chart.min.js"></script>
  </head>

  <body>
    <div width="400" height="400">
    <canvas id="myChart"></canvas>
    </div>
      <script type = "text/javascript">
        data = {
          datasets: [{
            data: [100,0],
            backgroundColor: [ 'rgba(0, 255, 0, 0.6)', 'rgba(255, 0, 0, 0.6)' ],
            borderColor: [ 'rgba(0, 255, 0, 1.0)', 'rgba(255, 0, 0, 1.0)' ],
            borderWidth: 1
          }],
          labels: [ 'Success', 'Error' ]
        };

        if ("WebSocket" in window) {
          var ws = new WebSocket("ws://localhost:8091/log");

          ws.onopen = function() { ws.send("Hello WebSocket"); };

          ws.onmessage = function (evt) {
            var received_msg = evt.data;
            var percent = parseInt(received_msg);
            data.datasets[0].data=[percent,100-percent]
            var ctx = document.getElementById('myChart');
            var myDoughnutChart = new Chart(ctx, {
              type: 'doughnut',
              data: data
            });
          };

          ws.onclose = function() { alert("Connection is closed...");  };
            } else { alert("WebSocket NOT supported by your Browser!"); }
      </script>
   </body>
</html>
If you navigate to the script section in the HTML code, the javascript opens a WebSocket connection when the page is loaded and opens the connection to the URL: ws://localhost:8091/log
Once the connection is created, the application waits for a new message which is defined in the onmessage function. Whenever a new message is received, the chart is updated in real-time for all users that have the page open in their web browser.
Project creation and configuration
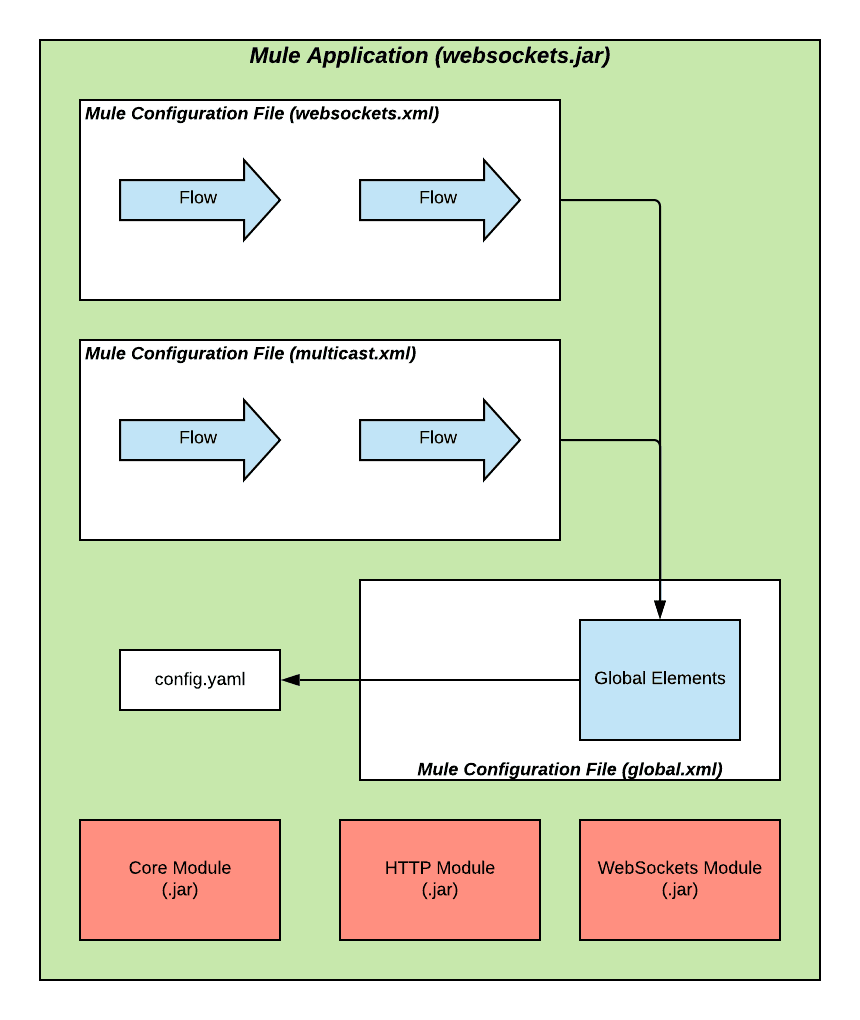
The diagram explains the different files and components involved in the Mule Application that will be created.
The first thing to do is to create a configuration file. Create a new config.yaml file in the src/main/resources directory. Our goal is to be able to deploy our application to CloudHub, so there are some naming conventions to respect. The classical HTTP port must have the name http.port and on CloudHub the port must be 8081. Another HTTP listener is needed for the Websockets, it port must have the name ws.port and on CloudHub the port must be set to 8091.
1
2
3
4
5
# config.yaml
http:
port: "8081"
ws:
port: "8091"
A Mulesoft best practice is to create all the Global Elements in a centralized file. Create a global.xml mule configuration file.
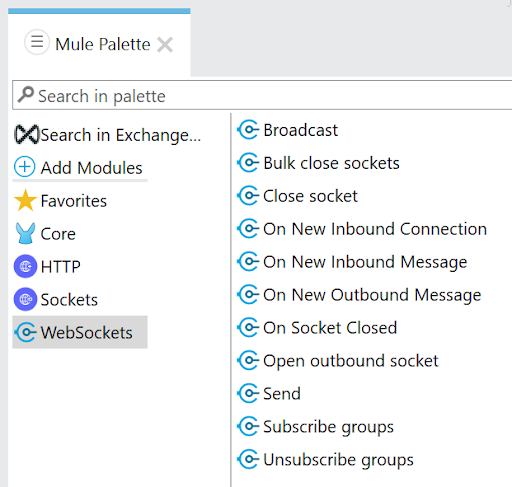
Before configuring elements you have to add the module WebSockets in the Mule Palette.
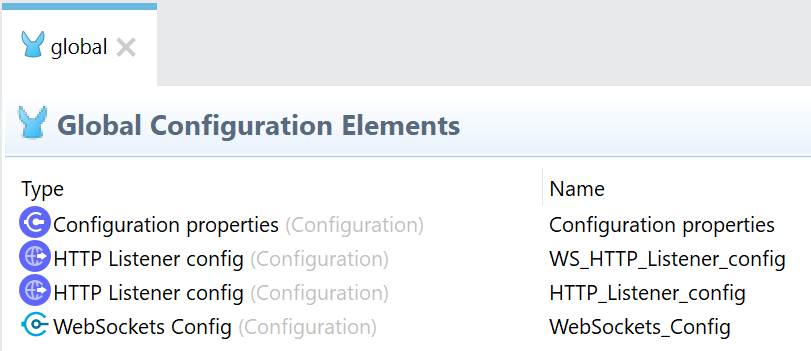
Your Global Configuration Elements needs to have the the following elements:
- The Configuration properties to use the config.yaml file
- The HTTP listener Config for the classical traffic that will use the value of ${http.port}
- The HTTP listener Config for the Websockets that will use the value of ${ws.port}
- The WebSockets Config that will use the previously created HTTP listener
Note: In the global elements when you use ${http.port} it references the http.port value into the config.yaml file.
Here in what your XML should look like:
1
2
3
4
5
6
7
8
9
10
11
12
13
14
15
16
17
18
19
20
21
22
23
24
25
26
27
28
29
<?xml version="1.0" encoding="UTF-8"?>
<!-- global.xml -->
<mule xmlns:http="http://www.mulesoft.org/schema/mule/http"
xmlns="http://www.mulesoft.org/schema/mule/core"
xmlns:websocket="http://www.mulesoft.org/schema/mule/websocket"
xmlns:doc="http://www.mulesoft.org/schema/mule/documentation"
xmlns:xsi="http://www.w3.org/2001/XMLSchema-instance"
xsi:schemaLocation="
http://www.mulesoft.org/schema/mule/http
http://www.mulesoft.org/schema/mule/http/current/mule-http.xsd
http://www.mulesoft.org/schema/mule/websocket
http://www.mulesoft.org/schema/mule/websocket/current/mule-websocket.xsd
http://www.mulesoft.org/schema/mule/http
http://www.mulesoft.org/schema/mule/http/current/mule-http.xsd
http://www.mulesoft.org/schema/mule/core
http://www.mulesoft.org/schema/mule/core/current/mule.xsd">
<configuration-properties doc:name="Configuration properties" file="config.yaml" />
<http:listener-config name="WS_HTTP_Listener_config" doc:name="HTTP Listener config" >
<http:listener-connection host="0.0.0.0" port="${ws.port}" />
</http:listener-config>
<http:listener-config name="HTTP_Listener_config" doc:name="HTTP Listener config" >
<http:listener-connection host="0.0.0.0" port="${http.port}" />
</http:listener-config>
<websocket:config name="WebSockets_Config" doc:name="WebSockets Config">
<websocket:connection >
<websocket:server-settings listenerConfig="WS_HTTP_Listener_config" />
</websocket:connection>
</websocket:config>
</mule>
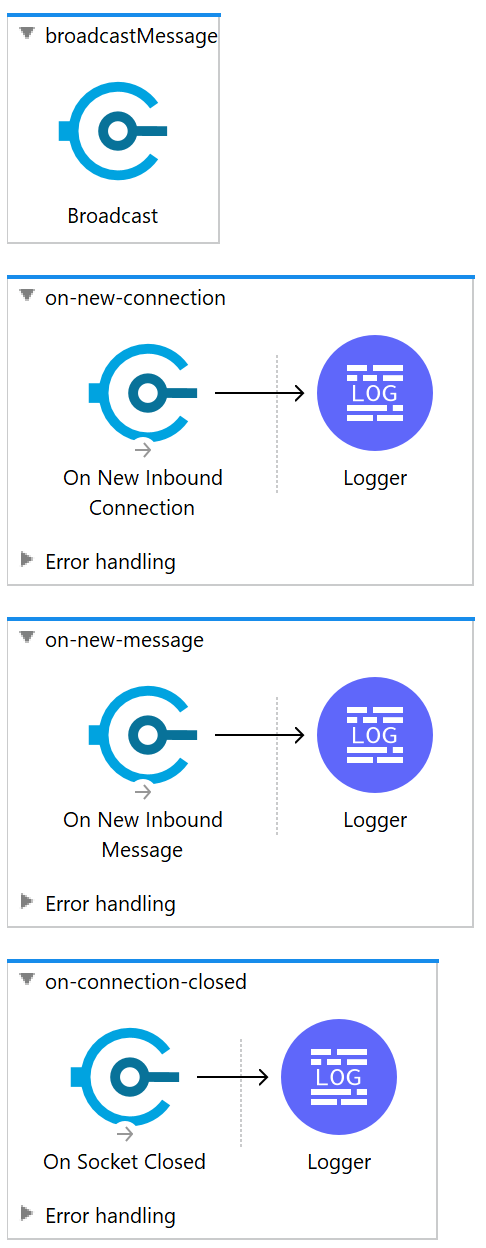
Websockets Flows
Your mule application will be split up into a few flows that your application will need to accept new requests. For the broadcastMessage flow, drag and drop a subflow into your scene in order to drag and drop the WebSocket Broadcast connector into the flow. You can also just navigate further down the page and copy and paste the XML directly into your project instead of manually creating the flows.
1
2
3
4
5
6
7
8
9
10
11
12
13
14
15
16
17
18
19
20
21
22
23
24
25
26
27
28
29
30
31
32
33
34
35
36
37
38
<?xml version="1.0" encoding="UTF-8"?>
<!-- websockets.xml -->
<mule
xmlns:java="http://www.mulesoft.org/schema/mule/java"
xmlns:scripting="http://www.mulesoft.org/schema/mule/scripting"
xmlns:websocket="http://www.mulesoft.org/schema/mule/websocket"
xmlns:http="http://www.mulesoft.org/schema/mule/http"
xmlns="http://www.mulesoft.org/schema/mule/core"
xmlns:doc="http://www.mulesoft.org/schema/mule/documentation"
xmlns:xsi="http://www.w3.org/2001/XMLSchema-instance"
xsi:schemaLocation="
http://www.mulesoft.org/schema/mule/core
http://www.mulesoft.org/schema/mule/core/current/mule.xsd
http://www.mulesoft.org/schema/mule/http
http://www.mulesoft.org/schema/mule/http/current/mule-http.xsd
http://www.mulesoft.org/schema/mule/websocket
http://www.mulesoft.org/schema/mule/websocket/current/mule-websocket.xsd
http://www.mulesoft.org/schema/mule/scripting
http://www.mulesoft.org/schema/mule/scripting/current/mule-scripting.xsd">

  <sub-flow name="broadcastMessage" >
    <websocket:broadcast doc:name="Broadcast" config-ref="WebSockets_Config" path="/log">
      <websocket:content><![CDATA[#[output text/plain --- payload]]]></websocket:content>
    </websocket:broadcast>
  </sub-flow>
  <flow name="on-new-connection"  >
    <websocket:on-inbound-connection doc:name="On New Inbound Connection" config-ref="WebSockets_Config" path="/log"/>
    <logger level="INFO" doc:name="Logger" message='#["New Web Socket " ++ attributes.socketId]' />
  </flow>
  <flow name="on-new-message">
    <websocket:inbound-listener doc:name="On New Inbound Message" config-ref="WebSockets_Config" path="/log"/>
    <logger level="INFO" doc:name="Logger" message='#[output text/plain --- "Web Socket " ++ attributes.socketId ++ " message: " ++ payload]' />
  </flow>
  <flow name="on-connection-closed" >
    <websocket:on-socket-closed doc:name="On Socket Closed" config-ref="WebSockets_Config" path="/log"/>
    <logger level="INFO" doc:name="Logger" message='#["Web Socket " ++ attributes.socketId ++ " closed"]'/>
  </flow>
</mule>
Multicast Rest API Flow
Now that you have created your WebSocket Flows, and have configured your Global Configuration Elements, the last step is to create your REST API that will multicast a message to all the WebSocket clients. Copy and paste the XML code below into your Mule Configuration. When you send an HTTP post request, You can now create a very simple flow that listens to requests like http://localhost:8081/multicast?value=10
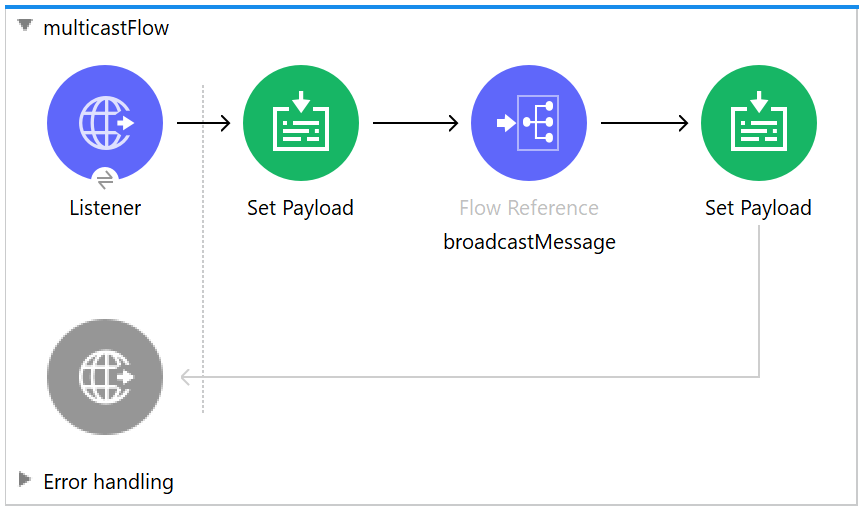
Make sure that when you send a POST Request to your localhost, you input a value between 0 and 100. You can also add an error handler if you want to handle exceptions.
1
2
3
4
5
6
7
8
9
10
11
12
13
14
15
16
17
18
<?xml version="1.0" encoding="UTF-8"?>

<mule xmlns:http="http://www.mulesoft.org/schema/mule/http"
xmlns="http://www.mulesoft.org/schema/mule/core" xmlns:doc="http://www.mulesoft.org/schema/mule/documentation"
xmlns:xsi="http://www.w3.org/2001/XMLSchema-instance"
xsi:schemaLocation="
http://www.mulesoft.org/schema/mule/http
http://www.mulesoft.org/schema/mule/http/current/mule-http.xsd
http://www.mulesoft.org/schema/mule/core
http://www.mulesoft.org/schema/mule/core/current/mule.xsd">

  <flow name="multicastFlow">
    <http:listener doc:name="Listener" config-ref="HTTP_Listener_config" path="/multicast"/>
    <set-payload value="#[max([min([attributes.queryParams.value as Number,100]),0])]" doc:name="Set Payload" />
    <flow-ref doc:name="broadcastMessage" name="broadcastMessage"/>
    <set-payload value='#["Message broadcasted !!!"]' doc:name="Set Payload" />
  </flow>
</mule>
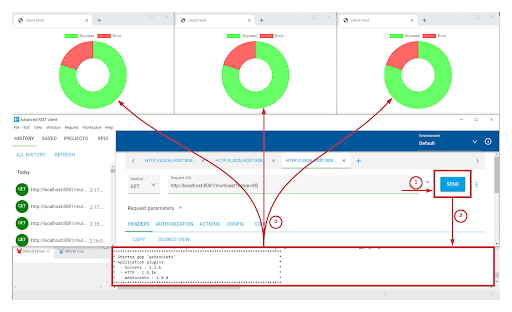
Testing the Mule Application
Once you have built out your flows, run your project locally and open up multiple browsers on the previously created HTML page. You are now ready to launch a REST request: GET on http://localhost:8081/multicast?value=80
If you send a GET or POST request, all the browser charts will be updated with 80% of success (green).
Deploy the Mule Websocket Application to CloudHub
To deploy your application that contains WebSockets on CloudHub there are some requirements:
- HTTP Listener for Websocket must listen on 0.0.0.0:8091
- Your application must be deployed in VPC
- A DLB (Dedicated Load Balancer) is mandatory to dispatch WebSocket network traffic
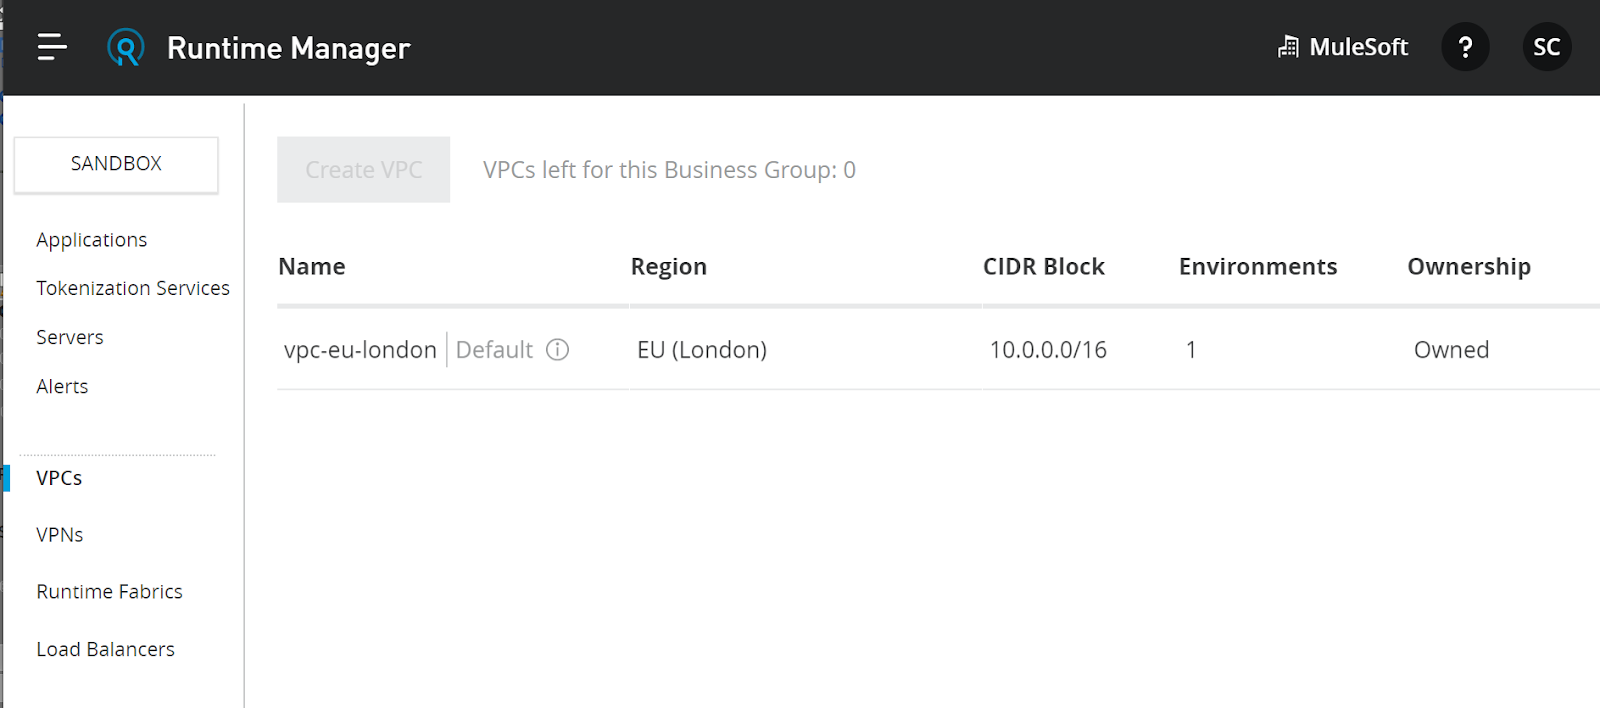
CloudHub VPC
To create a VPC you need the following information:
- The region in which you want to create your VPC (in the example: EU 1 London)
- Set the VPC as Default
- The CIDR Block (for example: 10.0.0.0/24)
- The Mulesoft runtime environment (in the example: Sandbox)
- Because the application is using the port 8091 for WebSockets you don’t need to modify the firewall Rules
- You don’t need to configure the Internal DNS because you will use MuleSoft worker DNS names
CloudHub DLB
You are now able to create a Dedicated Load Balancer (DLB) attached to your previously created VPC. In order to create it, you need to generate a certificate (it can also be a self-sign certificate).
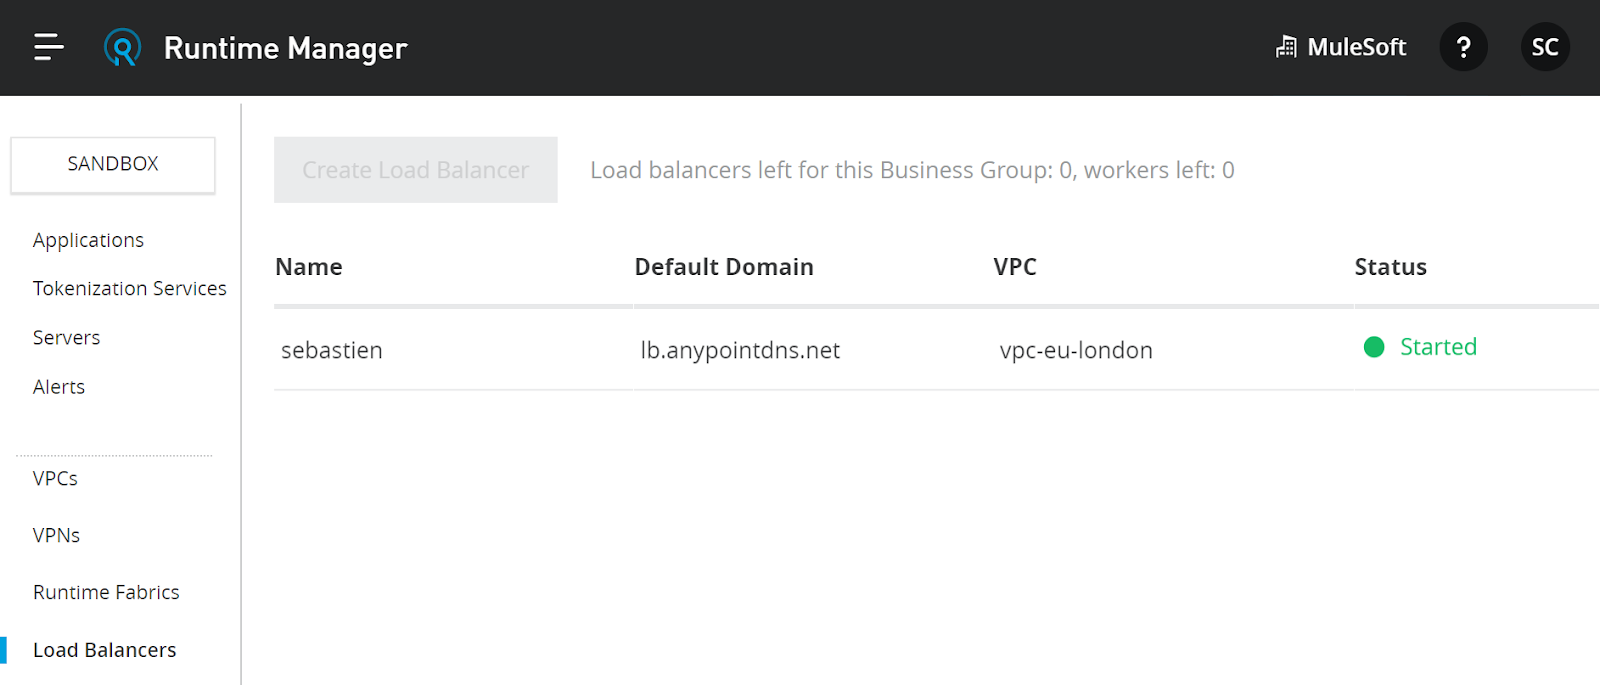
By default the CloudHub DLB is configured to only listen on HTTPS and WSS. To enable HTTP and WS for our Mule Application do not forget to set to “on” the “Inbound HTTP Mode”.

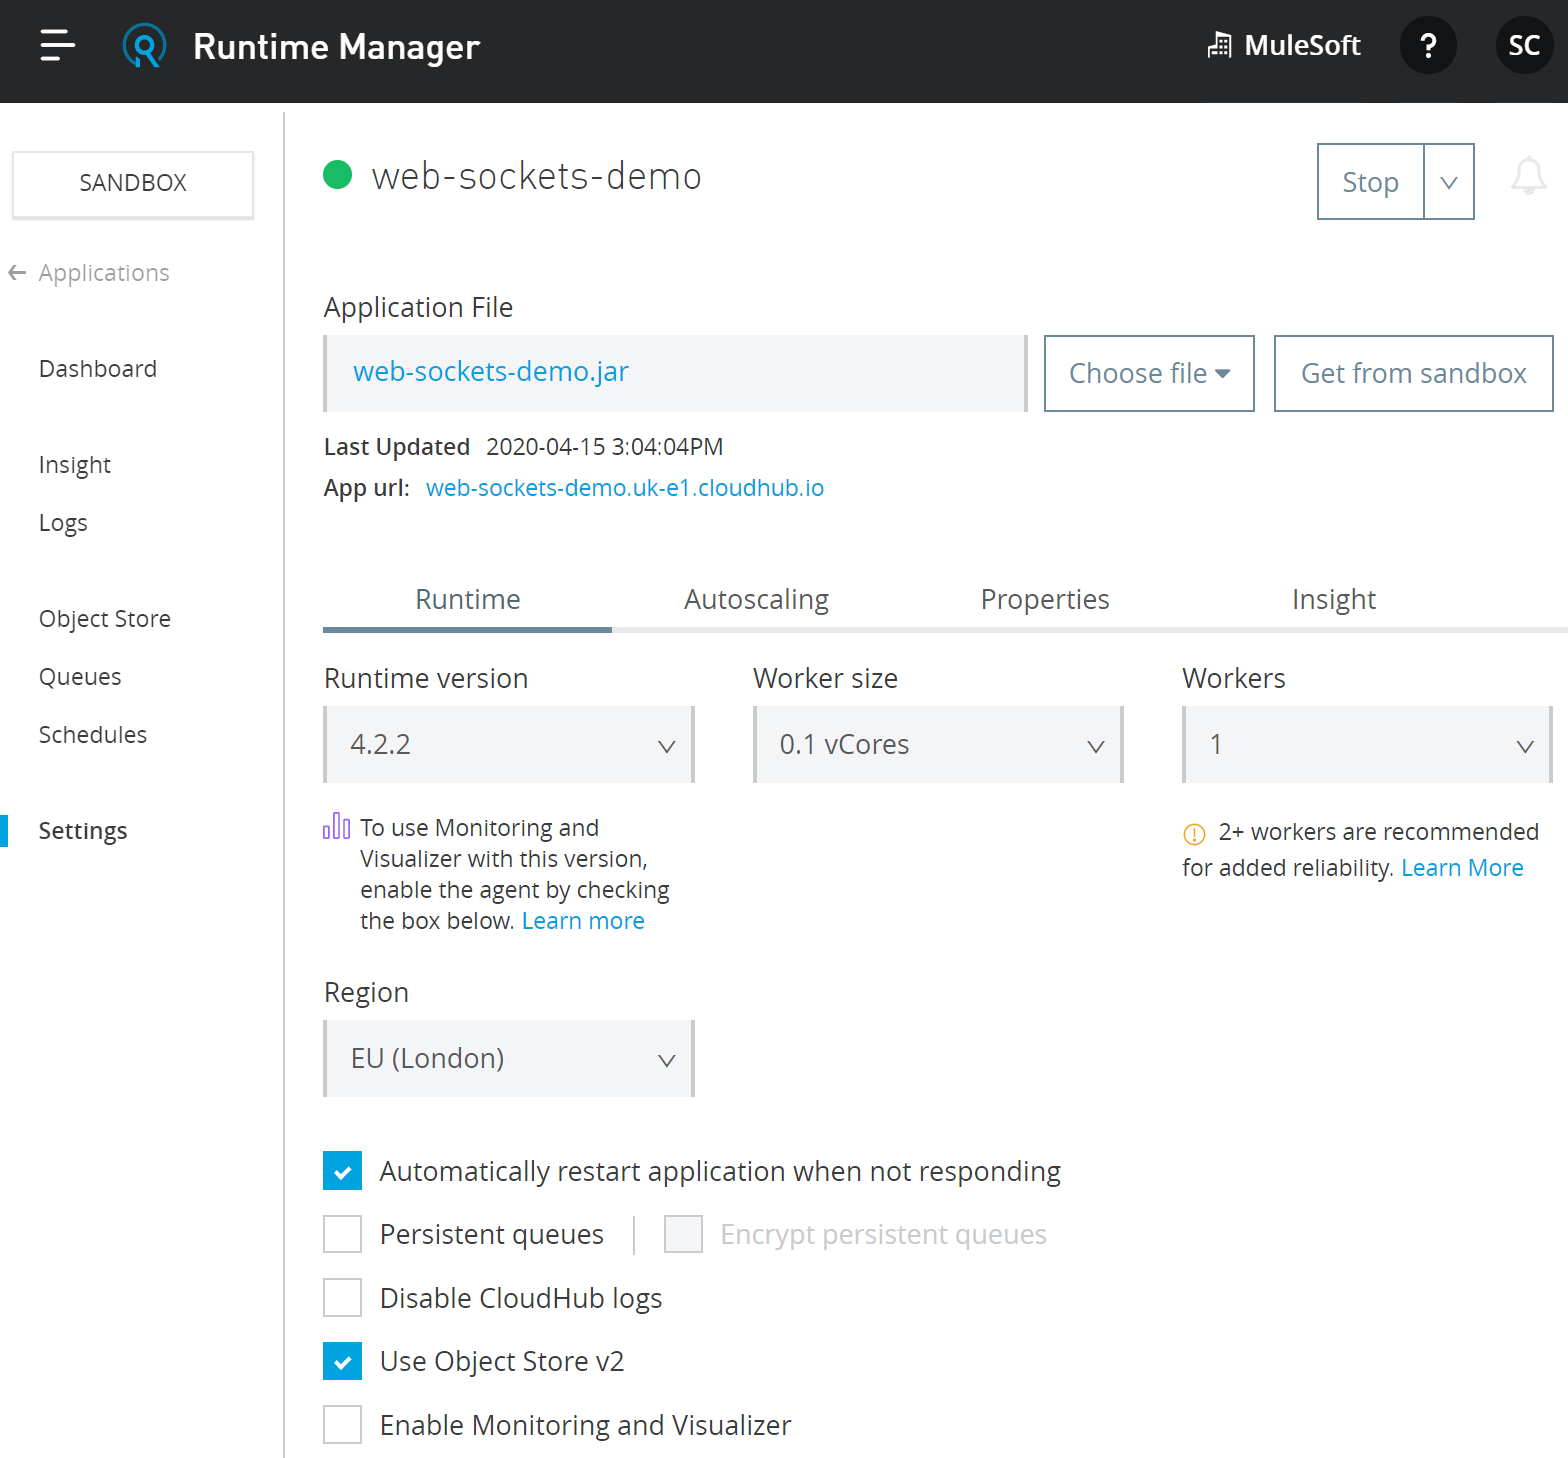
Deploy the application
Now you can deploy your application. Select the region you created your VPC (in the example: EU 1 London).
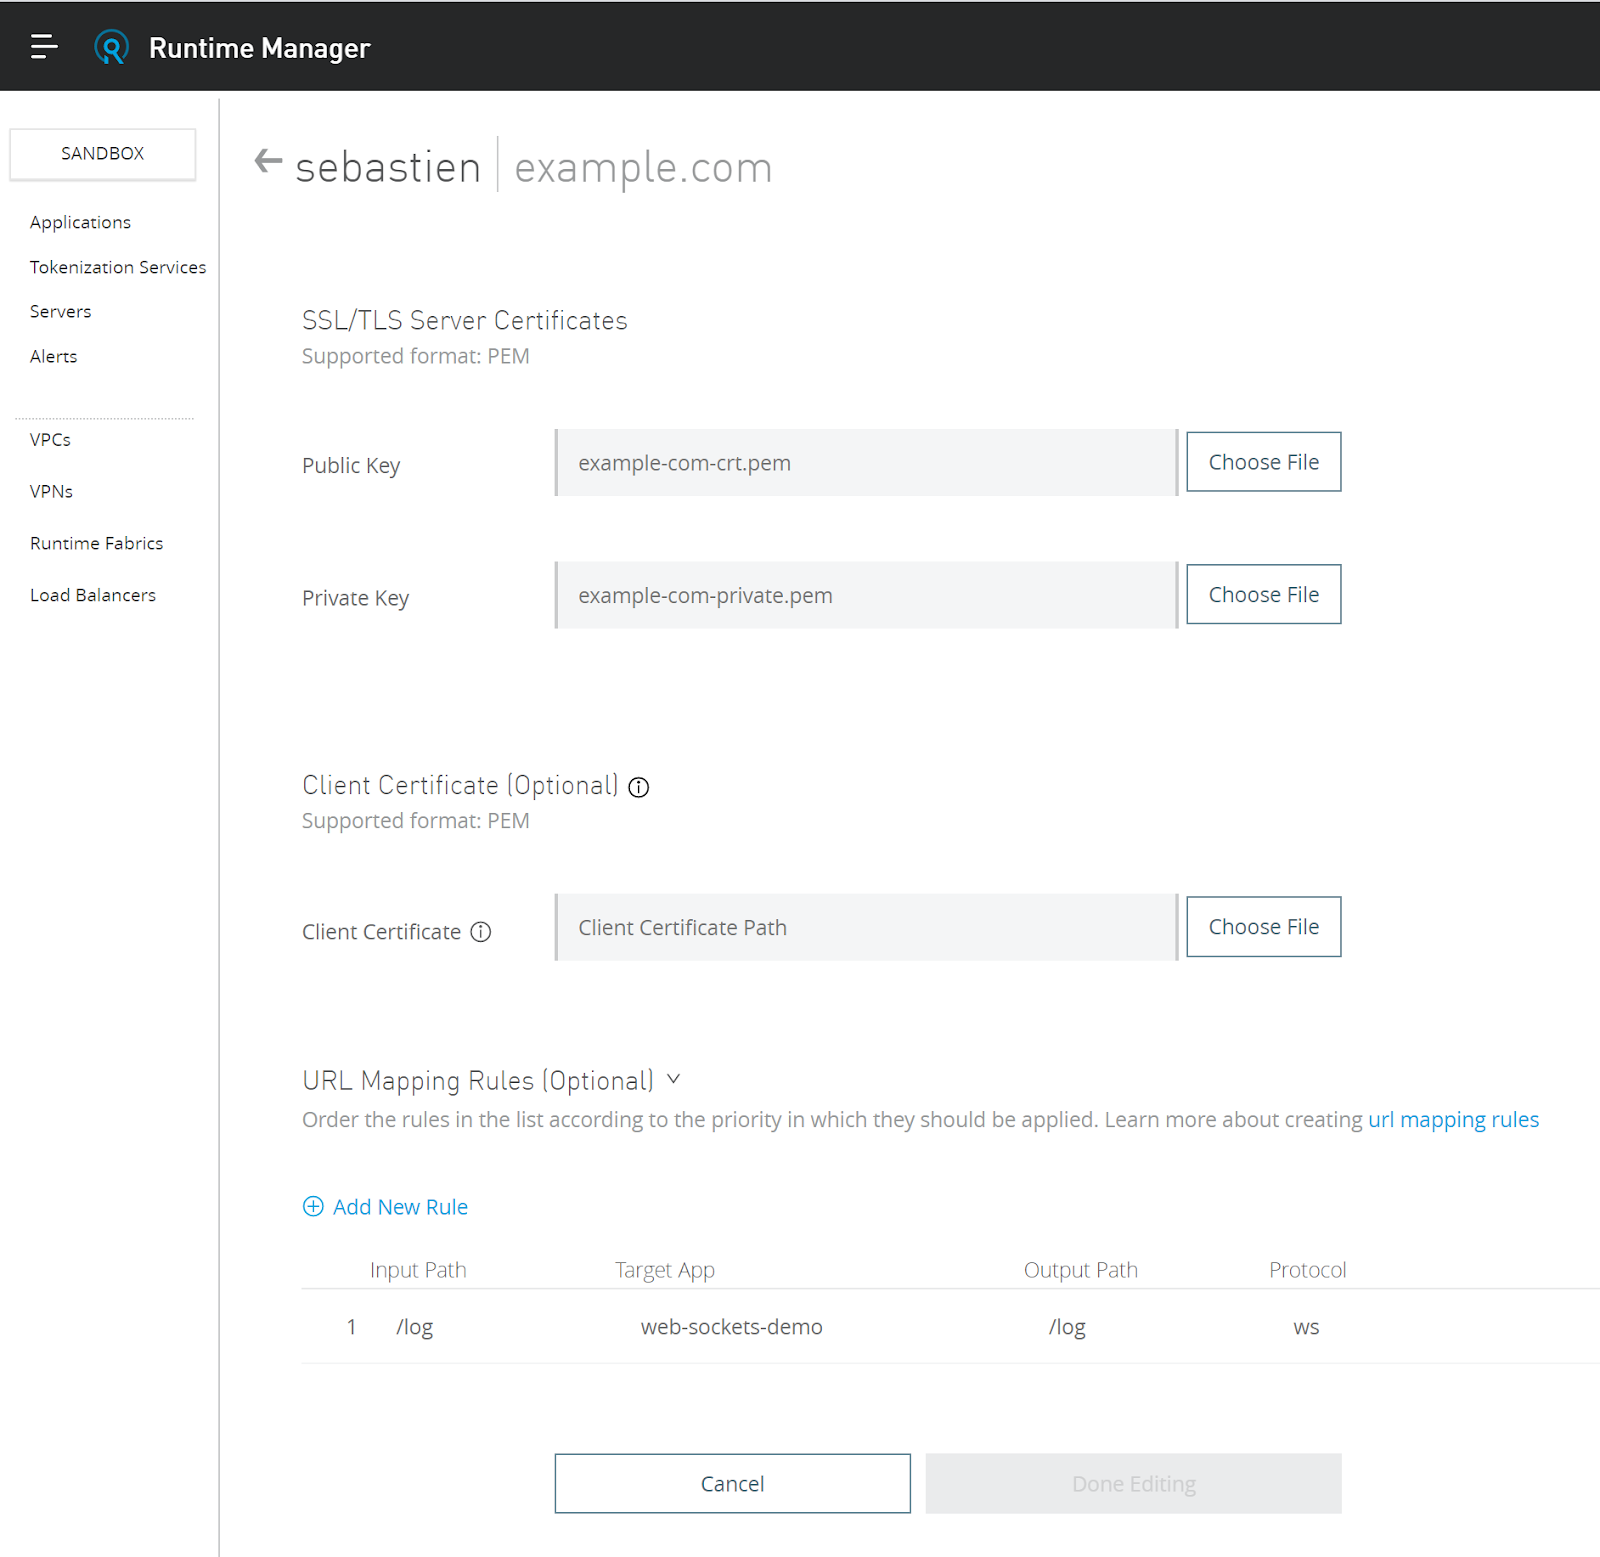
Configure the DLB for the WebSocket incoming traffic
On the Dedicated Load Balancer (DLB) you need to add a rule to route the traffic to the WebSocket application:
- Input Path: /log
- Target App: web-socket-demo
- Output Path: /log
- Protocol: ws
Modify the HTML page
The last thing to do is to update the HTML page with the URL of DLB. You have to replace:
var ws = new WebSocket("ws://localhost:8091/log");with:
var ws = new WebSocket("ws://training-london.lb.anypointdns.net:80/log");Test your application
To finish, do the same as before but now the URL of the REST API is the one provided by CloudHub: GET http://websocket-demo.uk-e1.cloudhub.io/multicast?value=20
This url will update the chat to Success 20%.

Conclusion
In this article, you learned how to create a simple mule application with the Websockets Connecter and learned how to deploy the application to CloudHub. You can test the application running on CloudHub by visiting: http://websocket-demo.uk-e1.cloudhub.io/
You can download the source code by clicking here. Clone the repo and follow the tutorial found here. If you want to learn more about CloudHub and Mule Development you can follow the courses:

Try Anypoint Platform for free
Start your 30-day free trial of the #1 platform for integration, APIs, and automation. No credit card required. No software to install.
Questions? Ask an expert.
