We would like to thank Aridam Kumar for their contribution to this developer tutorial.
In the previous tutorial, we learned what is an API and an API Specification. We also reviewed some of the best practices around designing your first API. In this tutorial, we will design our first API Specification in Anypoint Design Center’s API Designer.
Many developers have experience consuming APIs in their daily development work but have never designed a REST API from the ground up. If you have ever wanted to learn how to develop an API, this tutorial will walk you through how easy it is to create your own, fully functional API with MuleSoft’s Anypoint Platform. Even with no API Design experience, this tutorial will teach you how to publish your first API Specification (also known as an API Contract).
The first step in the API development process is to brainstorm how we want our API to operate. Do we want our API to return a 200 valid response on POST requests and return a 405 method not allowed on GET requests? Do we want to design a RESTful API or a SOAP API? Do we want our API to be HTTP, HTTPS or both? What data types do we want to accept in our API request? All of these questions are parameters that we can set while building our API with MuleSoft’s API Designer.
Prerequisites
- Anypoint Platform - We’ll need an Anypoint Platform account to create our API Specification. You can sign up for a free trial account here.
The problem
Danny works for Northern Trail Outfitters (NTO), a retailer of sports apparel, gear, and nutrition products. NTO has an old customer database that requires special drivers and permissions to access. Danny wants to make this data widely and easily accessible across NTO. To make this possible, Danny decides to build a REST API on top of the database.
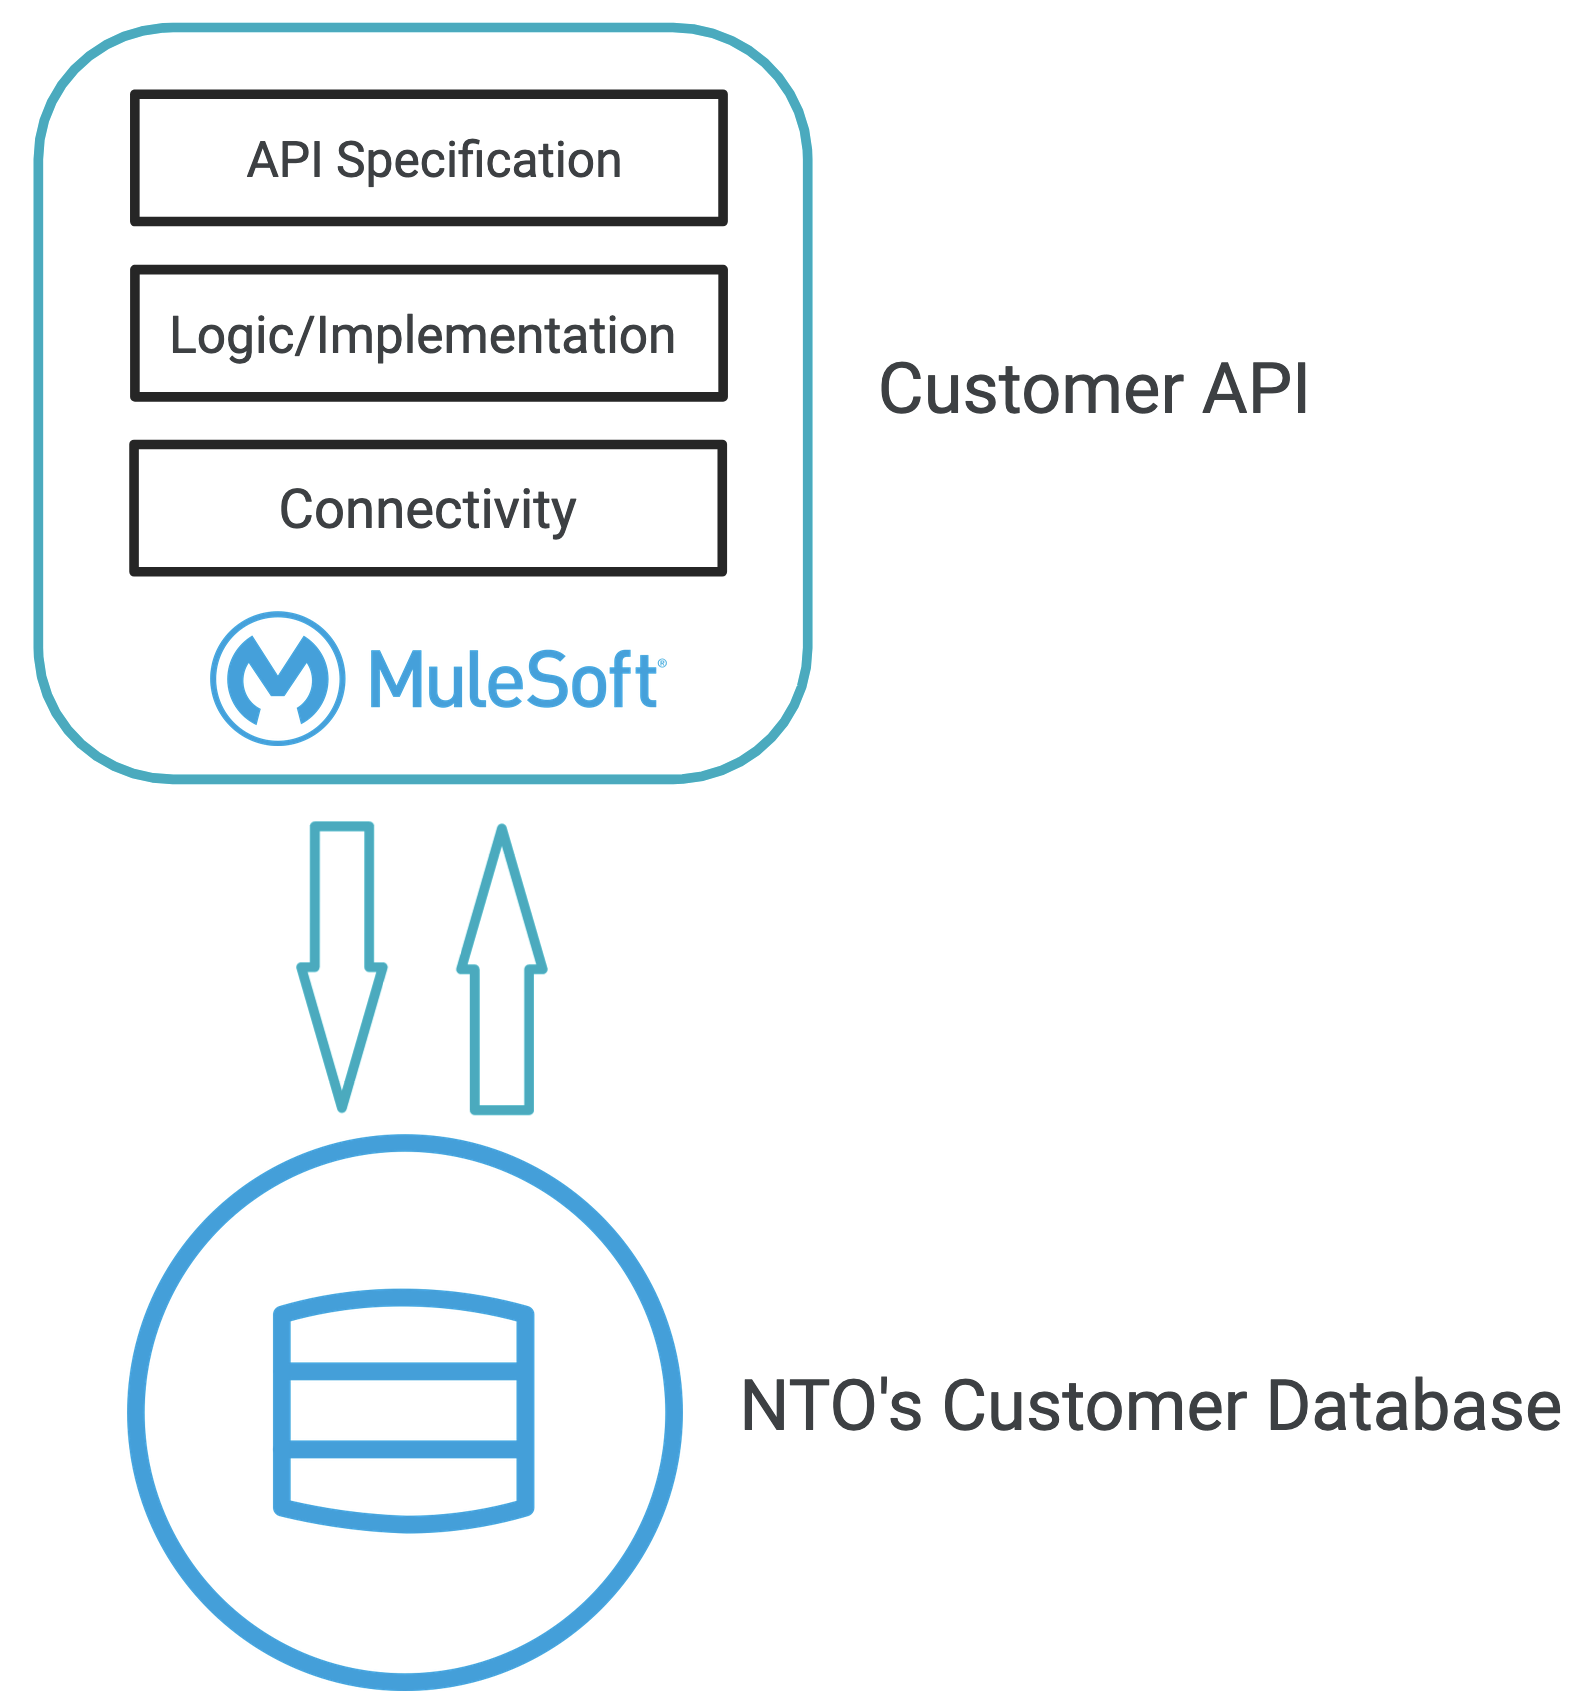
To start, Danny must first design the API and document it in an API Specification. Next, Danny can build the implementation (logic and connectivity) of the API. MuleSoft’s Anypoint Platform can support Danny’s end to end process, providing both design and implementation tools.
Create the API Specification
Let’s help Danny build this API so that they can retrieve contacts from the database. To get started, log in or sign up for a free Anypoint Platform account. Once you are logged in to Anypoint Platform, navigate to Design Center. Click the Create new button, and select New API Spec. You will see a pop-up like the one shown below.
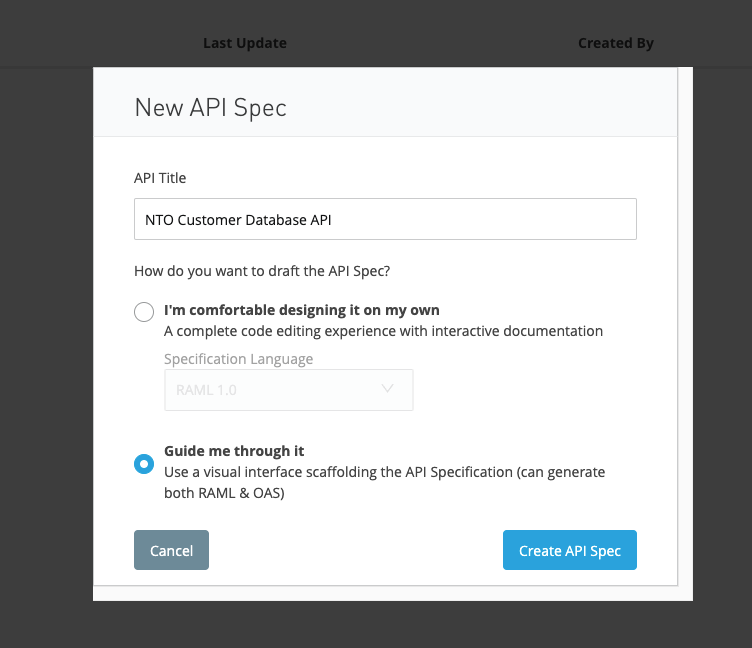
Here you have a few different options that you can use to set up the specification. First, you must give your API a title, and in this example, we will use NTO Customer Database API.
Now you can select whether you would like to use an API specification language to build your specification or the guided visual editor that will scaffold the API for you. The editor currently supports OAS and RAML, but for the purpose of this tutorial, we will use the visual editor which will develop both specifications for you in real-time. Go ahead and select Guide me through it and continue to Create API Spec.
Define the specification summary and data types
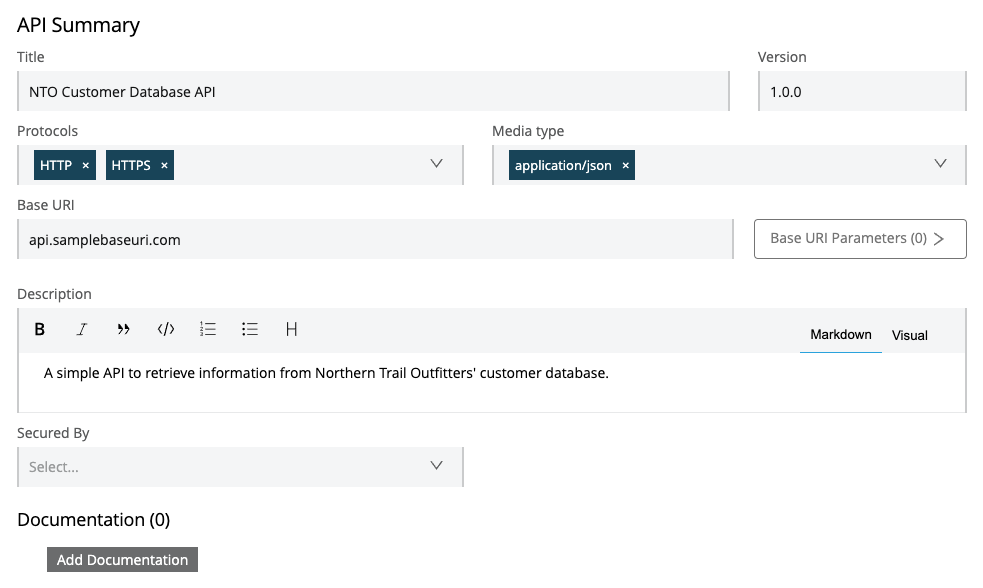
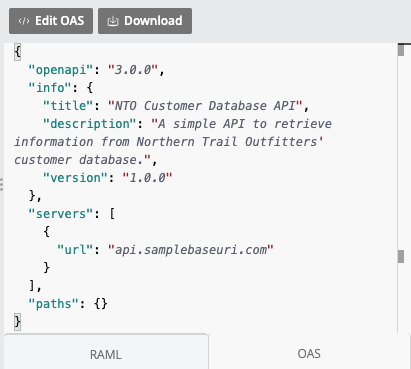
Now that you have entered API Designer, you will see the modules dedicated to the various specification components we discussed earlier. The first page you land on is the API Summary module, which is where you can configure the API Specification’s title, the communication methods (protocol and media type), the base URI, and the description. At this point, you can manually configure your API per the instructions below, or you can import an existing API specification from Exchange (we will publish this specification to Exchange so you can import it in the future). We will use the following details:
| Field | Value(s) |
|---|---|
| Title | NTO Customer Database API |
| Version | 1.0.0 |
| Protocols | HTTP, HTTPS |
| Media type | application/json |
| Base URI | api.samplebaseuri.com |
| Description | A simple API to retrieve information from Northern Trail Outfitters’ customer database. |
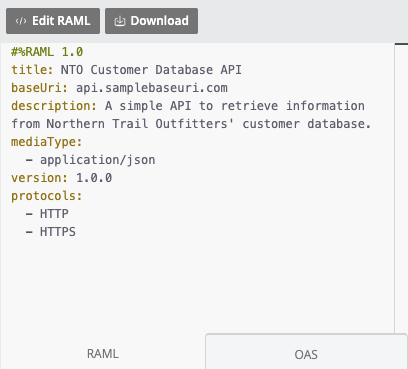
Along the right, you will notice that RAML and OAS code is automatically generated as you update the specification in the visual editor.
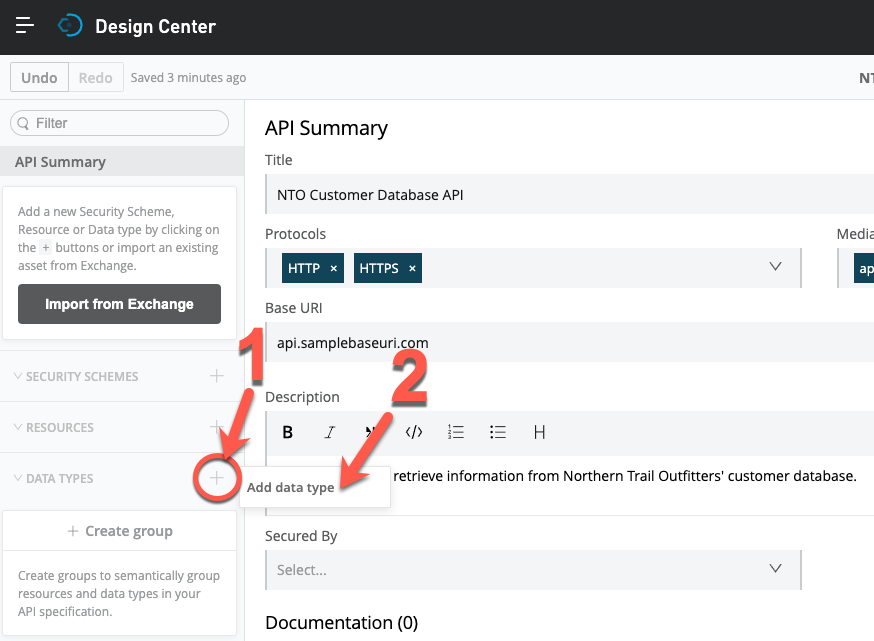
Along the left pane, you will see options to configure security schemes, resources, and data types. Let’s add some of the data types and resources that your API will need. Select the + icon next to the data types tab on the left and click on Add data type.
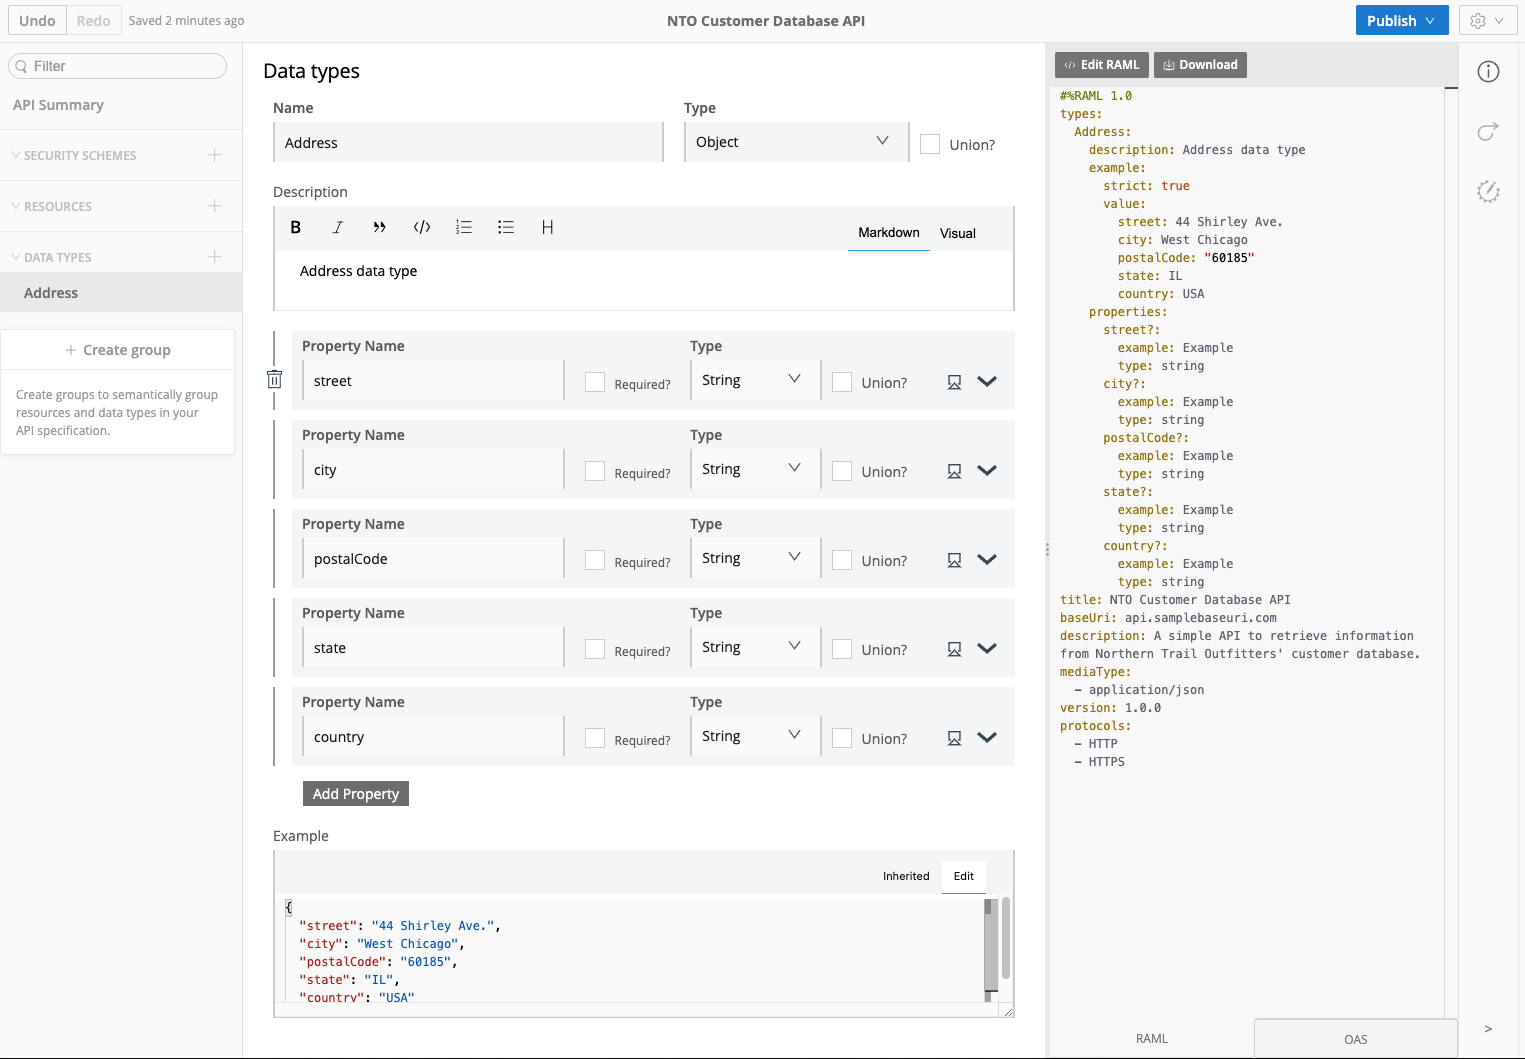
Data type 1: Address
Fill out the following values on the corresponding fields for our first data type.
| Field | Value(s) |
|---|---|
| Name | Address |
| Type | Object |
| Description | Address data type |
Click on the Add Property button for each one of these properties:
| Property Name | Required? | Type | Union? |
|---|---|---|---|
street |
no | String | no |
city |
no | String | no |
postalCode |
no | String | no |
state |
no | String | no |
country |
no | String | no |
Finally, copy the following example and paste it on the Example field at the bottom of the page. Click on the Edit button to be able to modify the pre-populated data.
1
2
3
4
5
6
7
{
  "street": "44 Shirley Ave.",
  "city": "West Chicago",
  "postalCode": "60185",
  "state": "IL",
  "country": "USA"
}
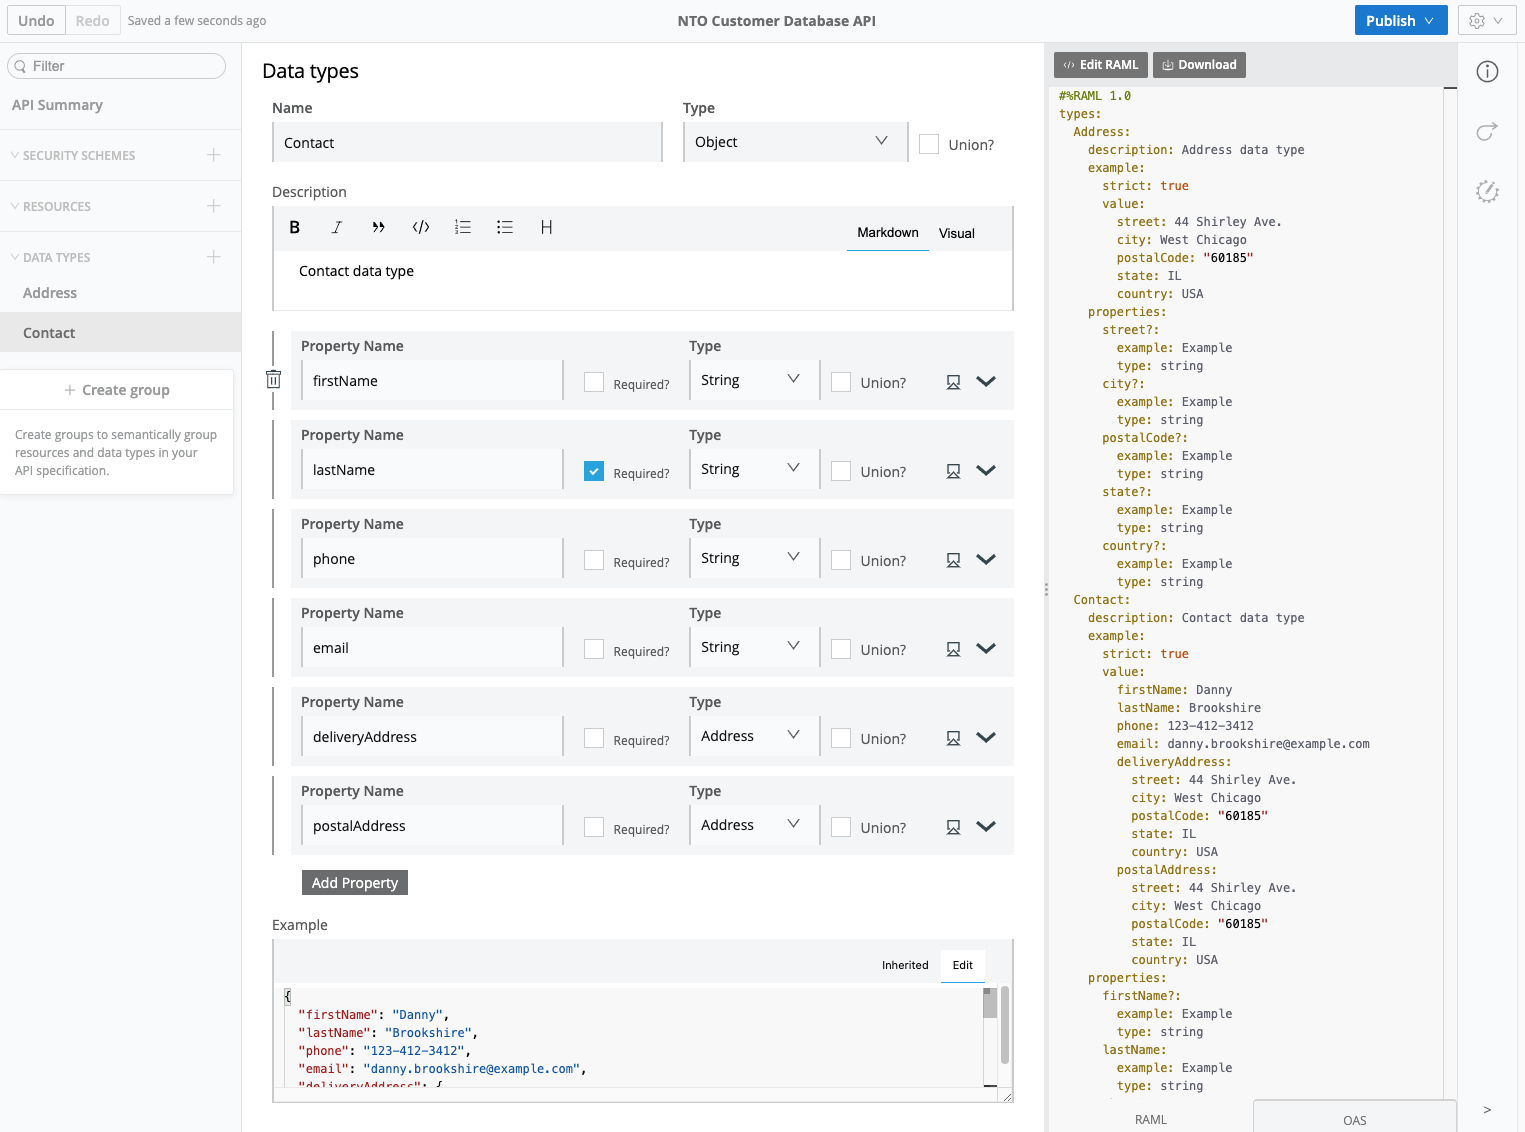
Data type 2: Contact
Once more, select the + icon next to the data types tab on the left and click on Add data type. Fill out the following values on the corresponding fields for our second data type.
| Field | Value(s) |
|---|---|
| Name | Contact |
| Type | Object |
| Description | Contact data type |
Click on the Add Property button for each one of these properties:
| Property Name | Required? | Type | Union? |
|---|---|---|---|
firstName |
no | String | no |
lastName |
yes | String | no |
phone |
no | String | no |
email |
no | String | no |
deliveryAddress |
no | Address | no |
postalAddress |
no | Address | no |
Finally, copy the following example and paste it on the Example field at the bottom of the page. Click on the Edit button to be able to modify the pre-populated data.
1
2
3
4
5
6
7
8
9
10
11
12
13
14
15
16
17
18
19
20
{
  "firstName": "Danny",
  "lastName": "Brookshire",
  "phone": "123-412-3412",
  "email": "danny.brookshire@example.com",
  "deliveryAddress": {
    "street": "44 Shirley Ave.",
    "city": "West Chicago",
    "postalCode": "60185",
    "state": "IL",
    "country": "USA"
  },
  "postalAddress": {
    "street": "44 Shirley Ave.",
    "city": "West Chicago",
    "postalCode": "60185",
    "state": "IL",
    "country": "USA"
  }
}
Define the specification resources
Next, select the + icon next to the resources tab on the left and select Add resource. Configure two resources as follows:
/customers
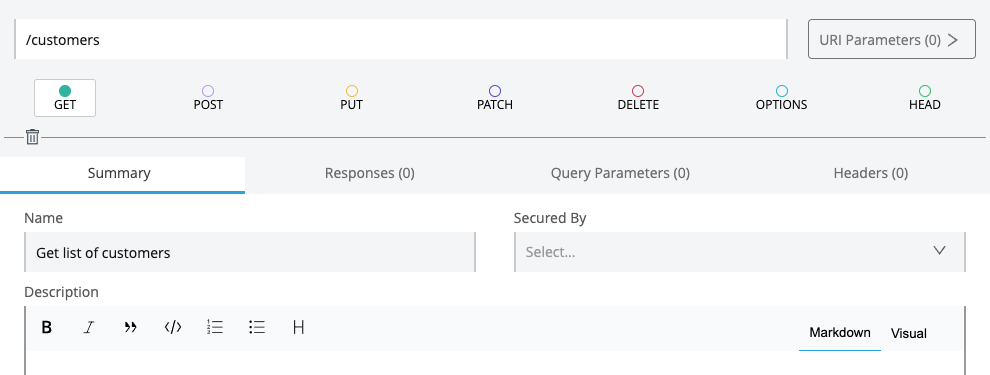
| Resource path | /customers |
| Resource method | GET |
| Name | Get list of customers |
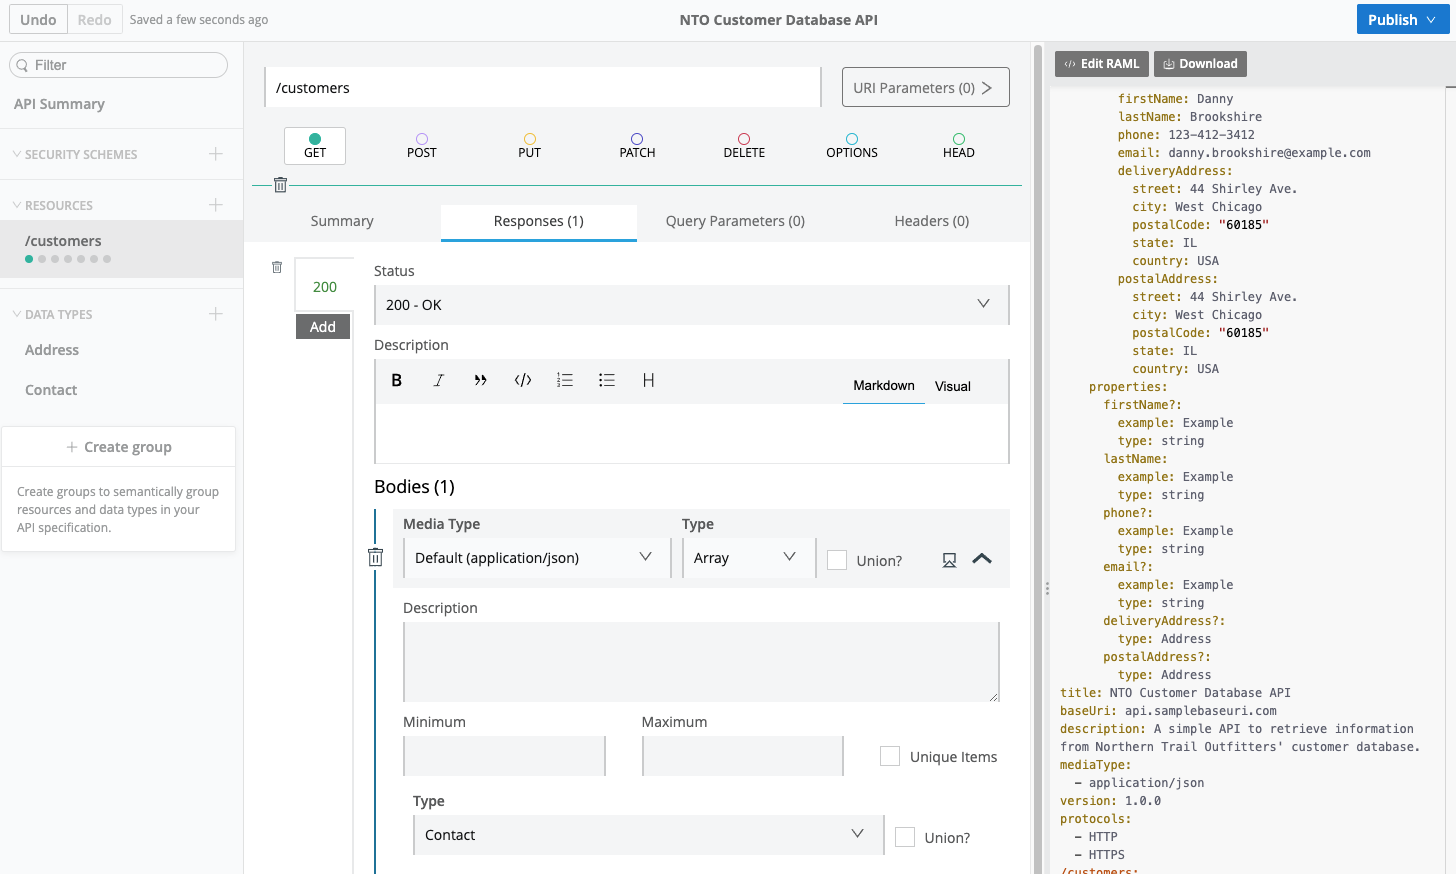
Configure the response for the /customers resource:
- Select the Responses tab next to Summary and click on Add New Response.
- Ensure the status code is 200 OK and then click Add Body.
- Ensure the Media Type contains application/json and set the type to Array.
- Expand the body from the arrow at the right (Details). Select the type Contact you just created.
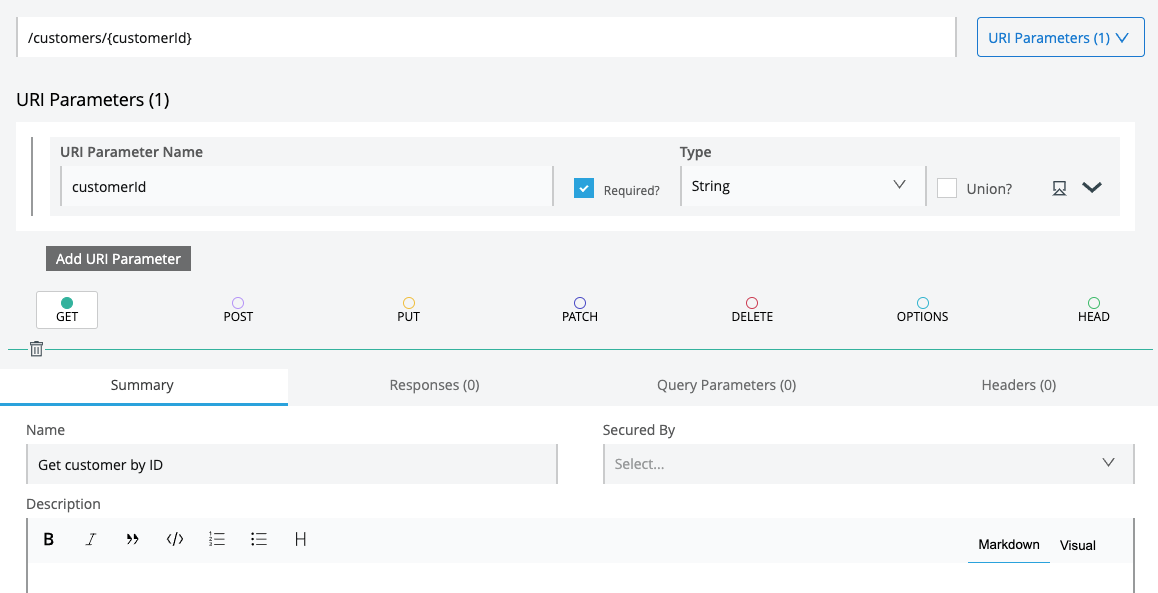
/customers/{customerId}
Once more, click on the + icon next to the resources tab on the left and select Add resource.
| Resource path | /customers/{customerId} |
| Resource method | GET |
| Name | Get customer by ID |
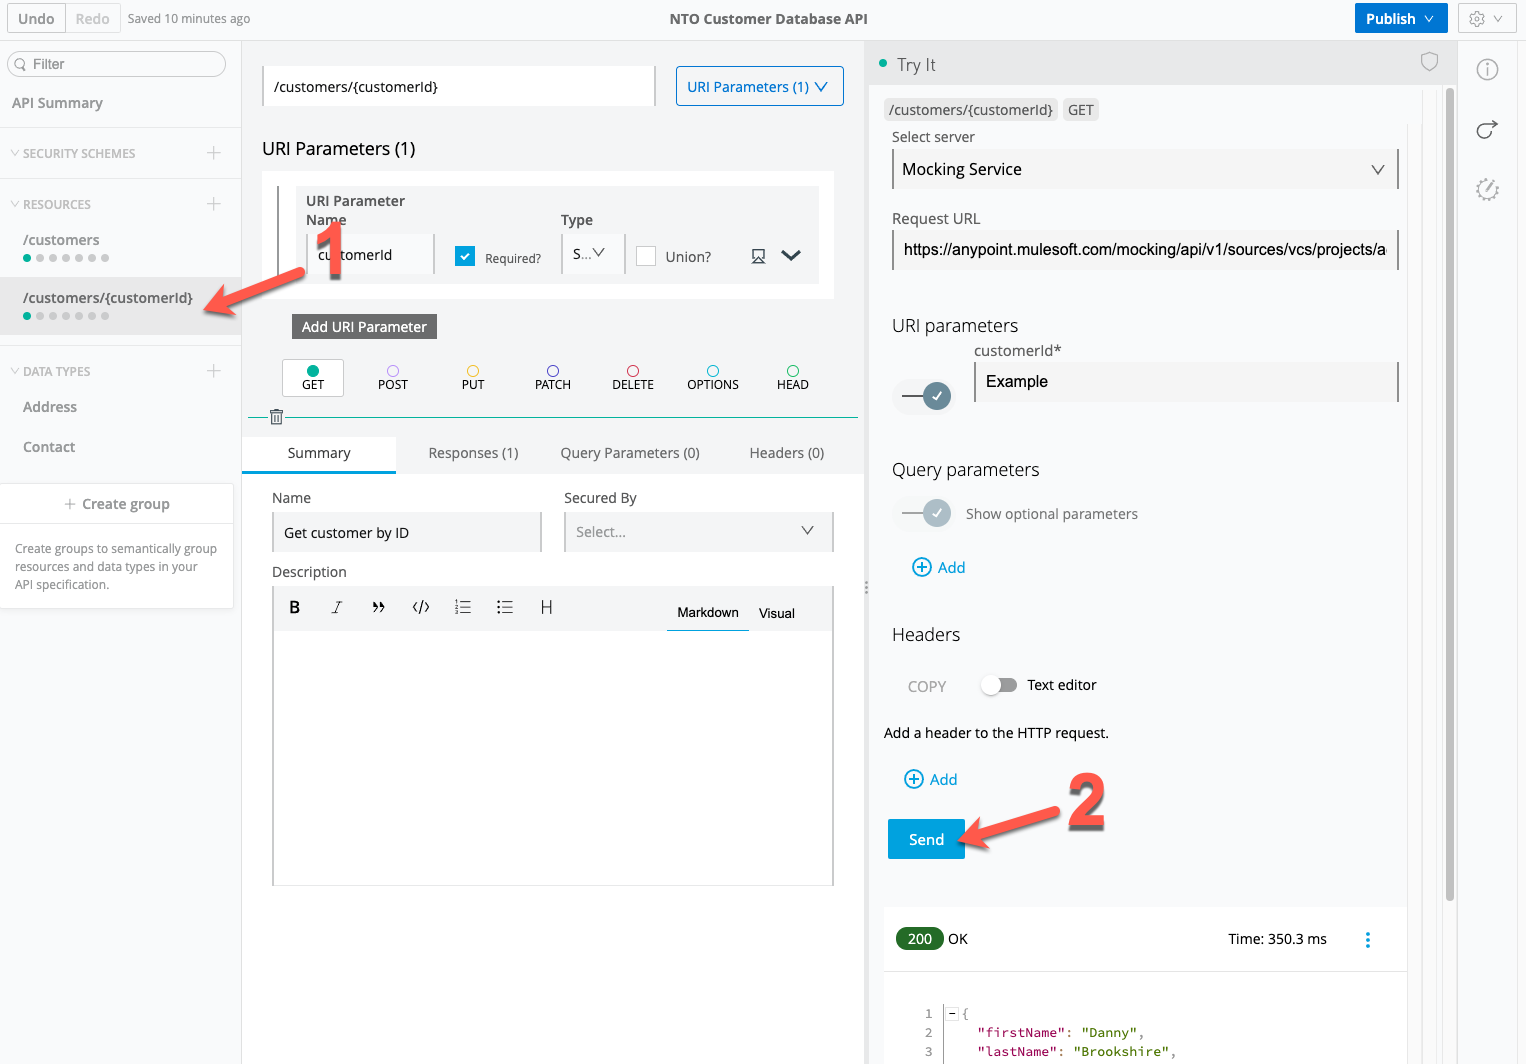
Click on the URI Parameters button next to the resource path /customers/{customerId}. Select Add URI Parameter. Set up the following values:
| URI Parameter Name | Required? | Type | Union? |
|---|---|---|---|
customerId |
yes | String | no |
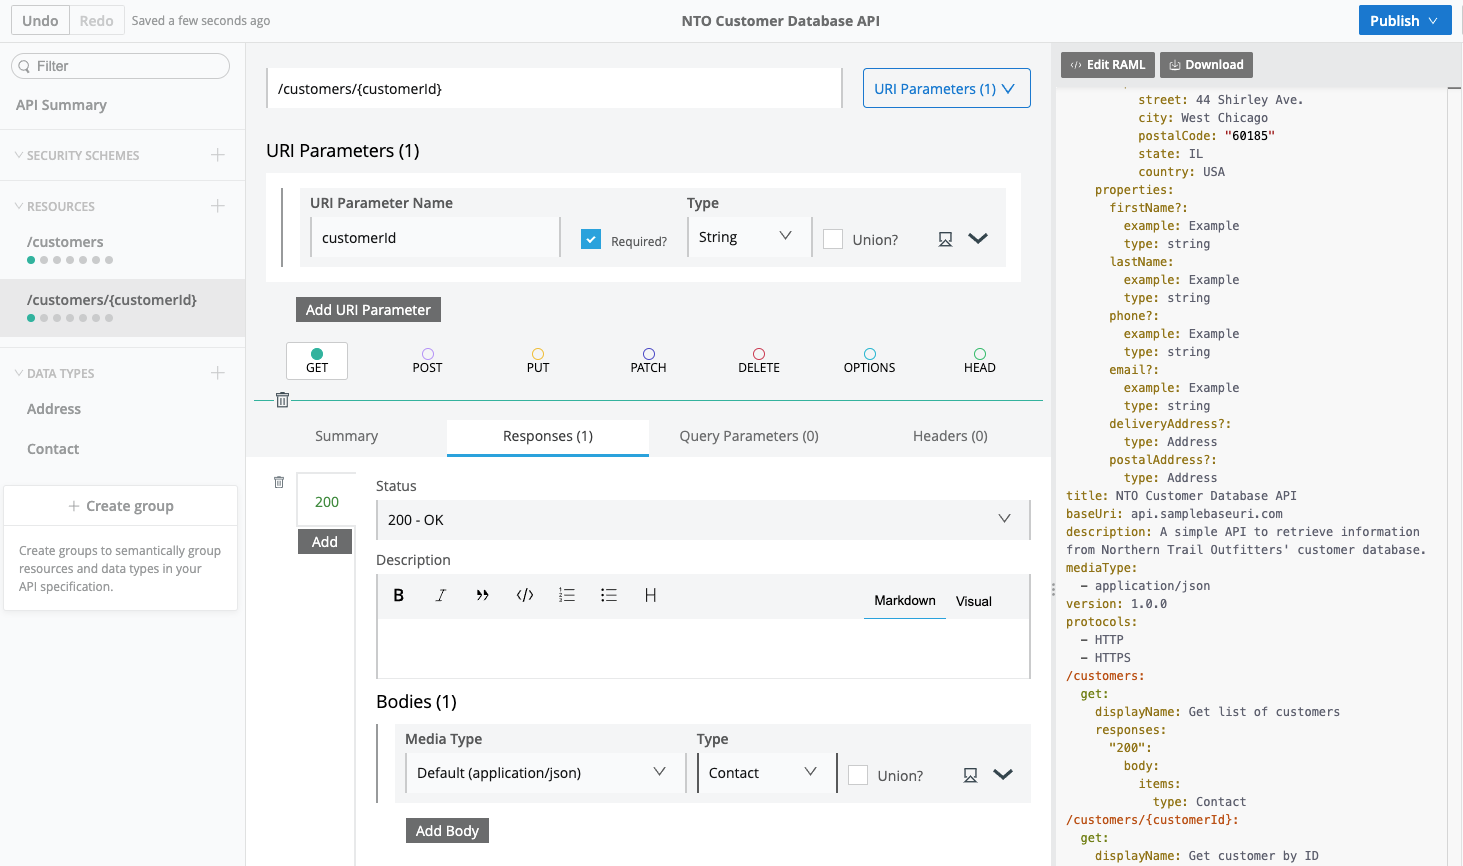
Configure the response for the /customers/{customerId} resource:
- Select the Responses tab next to Summary and click on Add New Response.
- Ensure the status code is 200 OK and then click Add Body.
- Ensure the Media Type contains application/json and set the type to Contact.
Test your API using the mocking service
Now it is time to test the API. The API Designer offers a mocking service, which enables you to simulate the behavior of an API Specification. The mocking service provides a test link to an API and returns the responses (both HTTP status codes and example payloads) that are defined in your API Specification.
By default, the mocking service is limited to users within your Anypoint Platform account. You can also enable a public link that can be shared with users outside of Anypoint Platform, which is useful when collaborating with other team members or customers and soliciting feedback.
If you specify a base URI, API Designer enables you to use either the base URI or the mocking service when simulating an API call. Let’s use the mocking service to test the API. Navigate to the /customers resource in the left navigation pane. At the far right of your screen, you will see a few icons, and hovering over them will indicate what each does. Select the one that indicates Try It, which will take you to the API testing panel.

Under Select Server select Mocking Service. This creates a dummy API request and displays the example response as it would appear if the API was live and returning data. Press Send to view the example response.
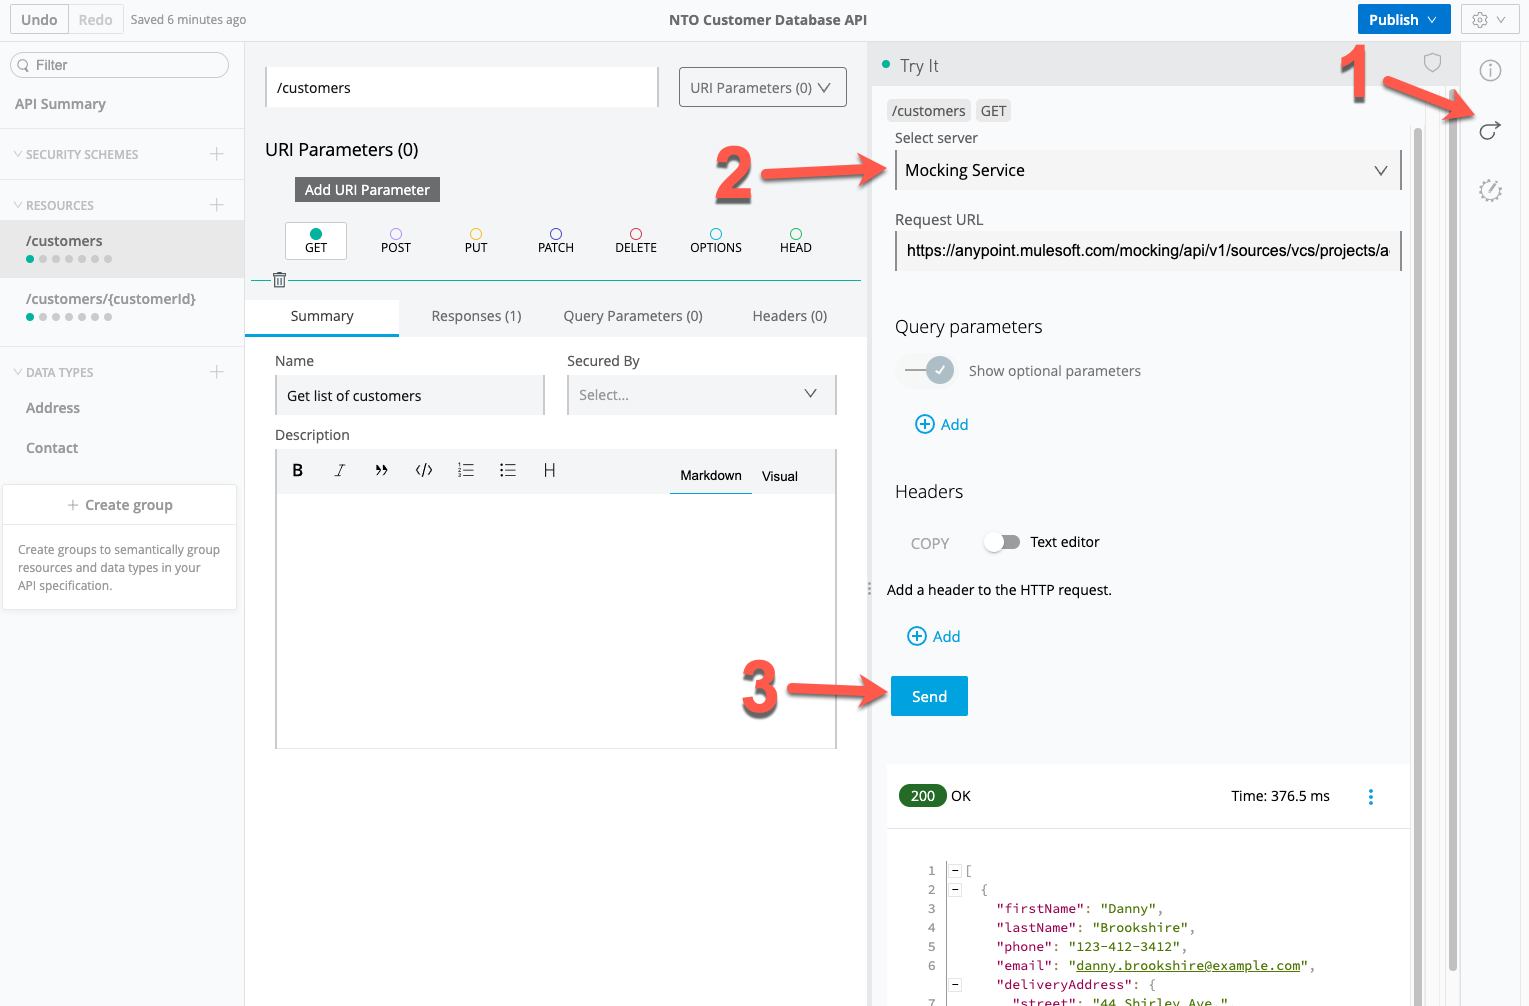
Select the /customers/{customerId} resource and click Send to see a similar response for a single customer. Note how the first /customers endpoint returns an array of contact objects and the second /customers/{customerId} endpoint returns a single contact object.
If you wish to create a public link that you can share with other users for testing purposes, you can do so from the Mocking Service Configuration button on the right. You will need to add the resource at the end of the URL. For example:
https://anypoint.mulesoft.com/mocking/api/v1/links/57cfc5fb-3d1f-4e84-b56d-199b7ef5697f/customers/1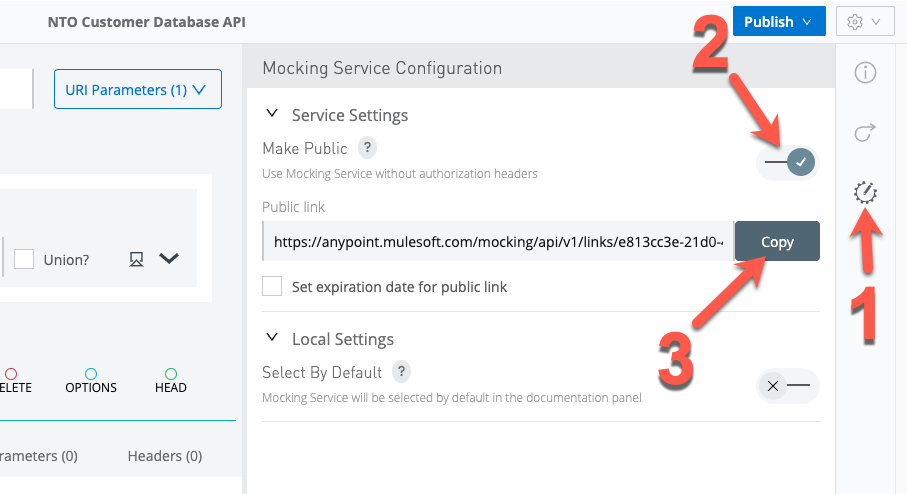
Publish your API to Anypoint Exchange
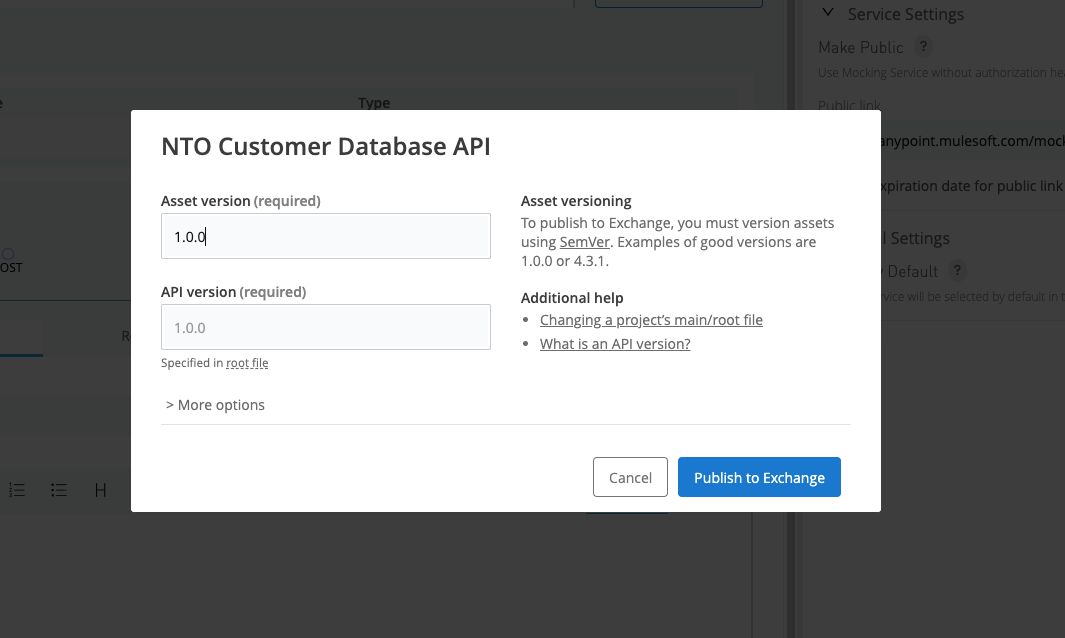
Now that you have put all this effort into building the API for NTO, we want to ensure that Danny and other team members can take advantage of your work by reusing this API Specification rather than reinventing the wheel. Let’s publish the API to Exchange so other users can download and work with it. Select the Publish blue button at the top right and select Publish to Exchange.
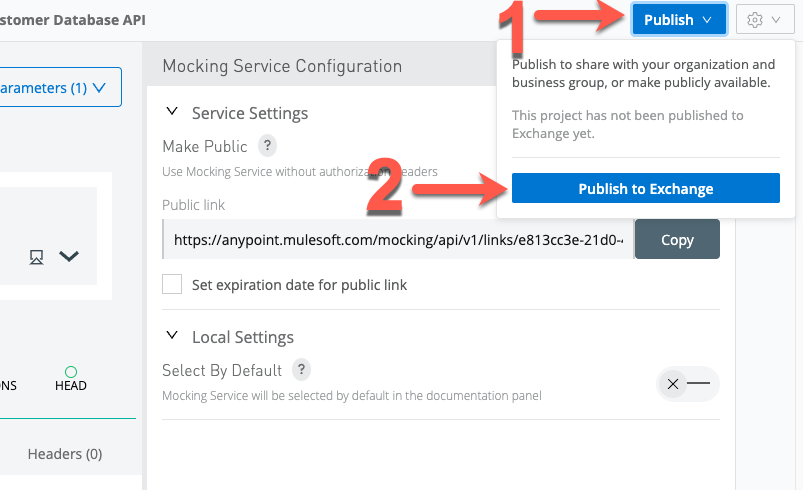
In the new window, enter an asset version number that will help you and others identify the version of this particular publication (separate from the API version). Note that API Designer and Anypoint Exchange are closely linked together to make API and asset versioning easier. Over time, you can make changes to the API specification and update the asset version without affecting the API version, or you can update API functionality and release a new version altogether. For more information about API and asset versioning on Exchange, including best practices, check out the official MuleSoft documentation.
The API version is inherited from the root file which we just configured using the visual editor. Set the asset version to 1.0.0 and click on Publish to Exchange.
Users can now visit Exchange from the Anypoint Platform homepage to view your API Specification as shown below. It can be imported via Exchange into Anypoint Studio to continue development and connect the customer database with other cloud applications.

Next Steps
Anypoint Design Center provides a seamless, integrated way to design and develop APIs. The API Designer guides users through the API Specification writing process. Users can either write RAML/OAS directly or use a visual editor that builds the RAML/OAS specification automatically. Once the API specification has been built, it can be tested using the mocking service and can be published to Anypoint Exchange to be shared with other developers.


Try Anypoint Platform for free
Start your 30-day free trial of the #1 platform for integration, APIs, and automation. No credit card required. No software to install.
Questions? Ask an expert.
