Many developers have experience consuming APIs in their daily development work but have never designed a REST API from the ground up. If you have ever wanted to learn how to develop an API, this tutorial will walk you through how easy it is to create your own, fully functional API with MuleSoft’s Anypoint Platform. Even with no API Design experience, this tutorial will teach you how to publish your first API Specification (also known as an API Contract) in around 5 minutes! This is part one of a four-part quick-start tutorial series that will instruct you on the best practices to build a production-ready, scalable API and integration.
The first step in the API development process is to brainstorm how we want our API to operate. Do we want our API to return a 200 valid response on POST requests and return a 405 method not allowed on GET requests? Do we want to design a RESTful API or a SOAP API? Do we want our API to be HTTP, HTTPS, or both? What data types do we want to accept in our API request? All of these questions are parameters that we can set while building our API within MuleSoft’s API Designer.
Prerequisites
- Anypoint Platform - We’ll need an Anypoint Platform account to design our first API. You can sign up for a free trial account here.
- REST Client - Download and install any REST Client of your choice. There are plenty of options out there for you to use, you can download MuleSoft’s Advanced REST Client, or you can use the popular REST Client Postman. We’ll be using Postman throughout these tutorials.
Create your API specification
An API specification is used to tell developers how an API behaves and how an API integrates with external systems or other external APIs. Two examples of common API specification languages are RAML and OpenAPI (formerly Swagger), which are used to describe and visualize the rules of how to interface with the API. In this tutorial, we are going to be using API Designer to generate a RAML specification that we will publish to Exchange.
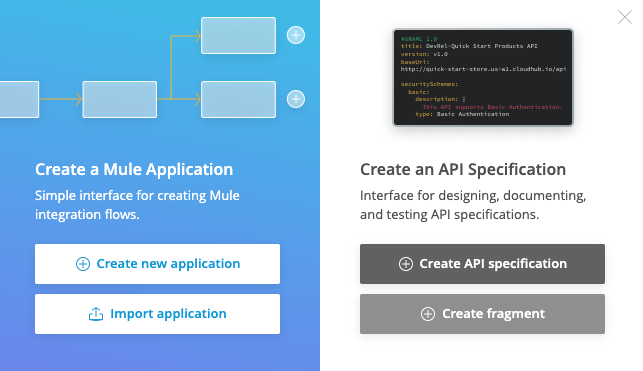
For our first API, let’s create an integration that fetches a list of contacts from our internal database, and uploads them as leads into Salesforce. Once you are logged in to Anypoint Platform, navigate to Design Center. Click the Create button, and select Create API Specification as shown below.
After you click the Create API specification button, fill out the name of your New Specification. For this tutorial, we are going to name our API Contact API. Select the Visual Editor. The Visual Editor is an intuitive visual interface for creating your API specification scaffolding without needing to code anything!
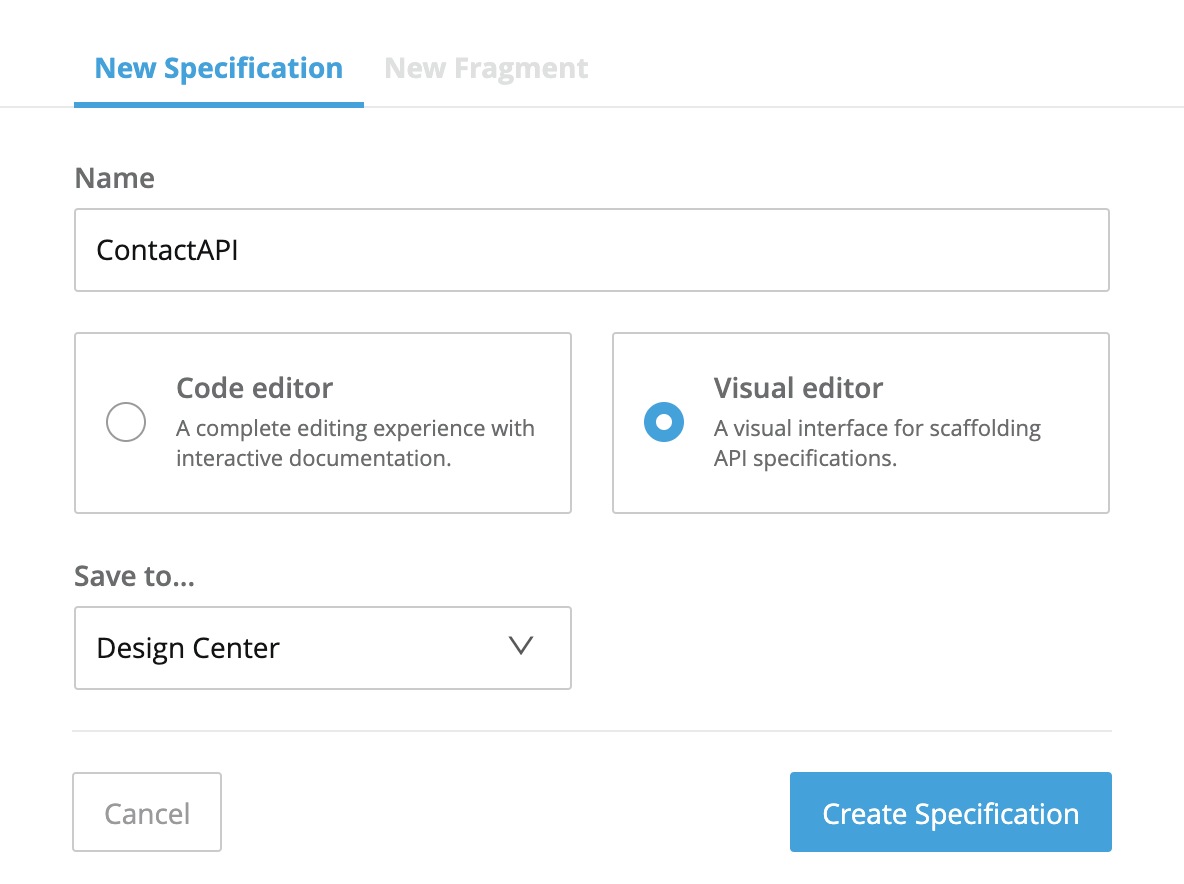
When you click the Create Specification button, you will be taken to the Design Center which will display the API Summary page. The API specification scaffolding, which is exported in a language called RAML, is located on the right-hand side of the screen.
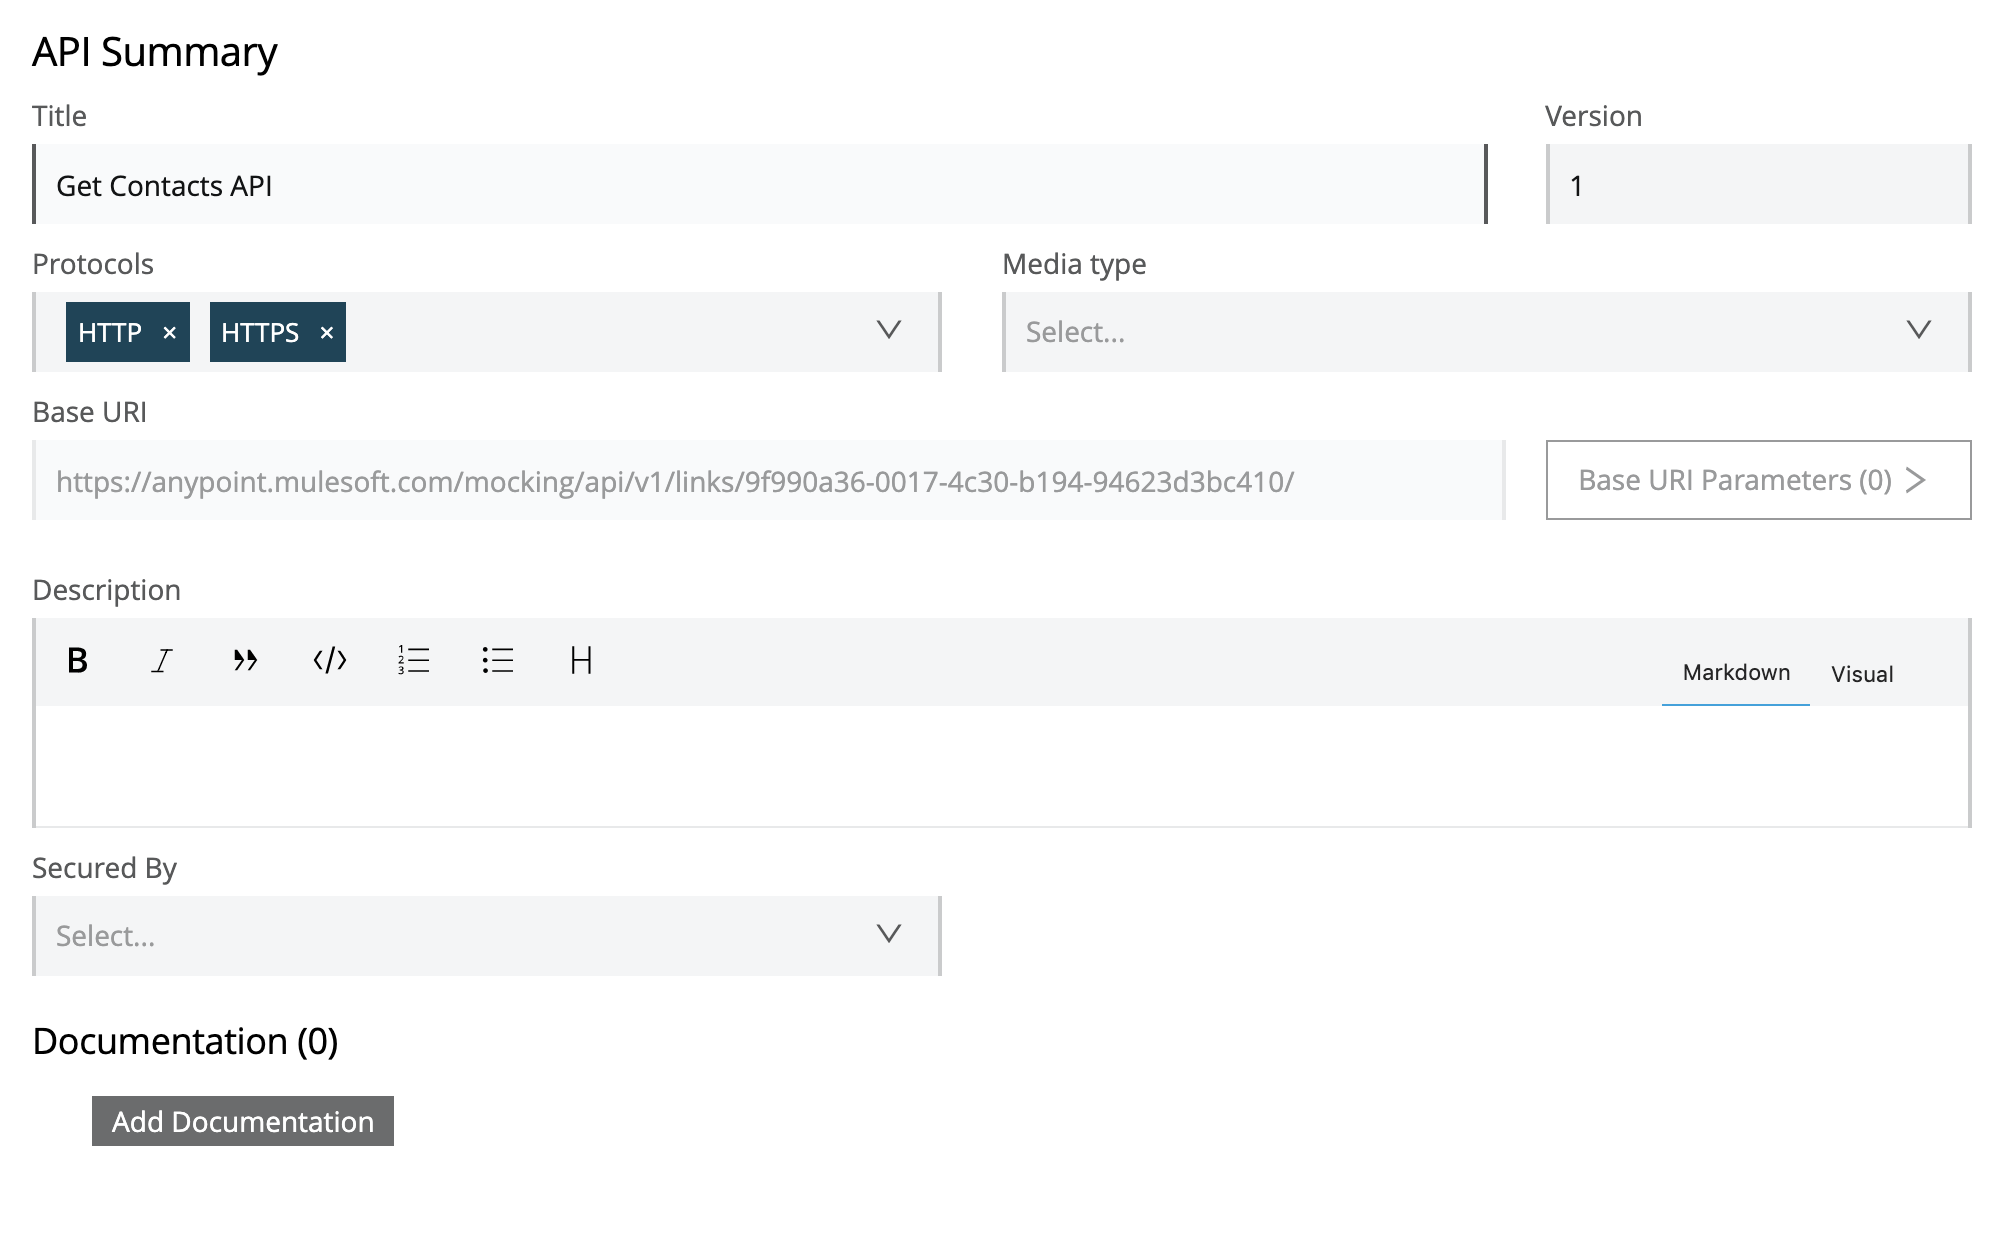
For our first API, insert a Title, Version, Protocols, and Description. Make sure to accept both HTTP and HTTPS requests and set our API to version 1.
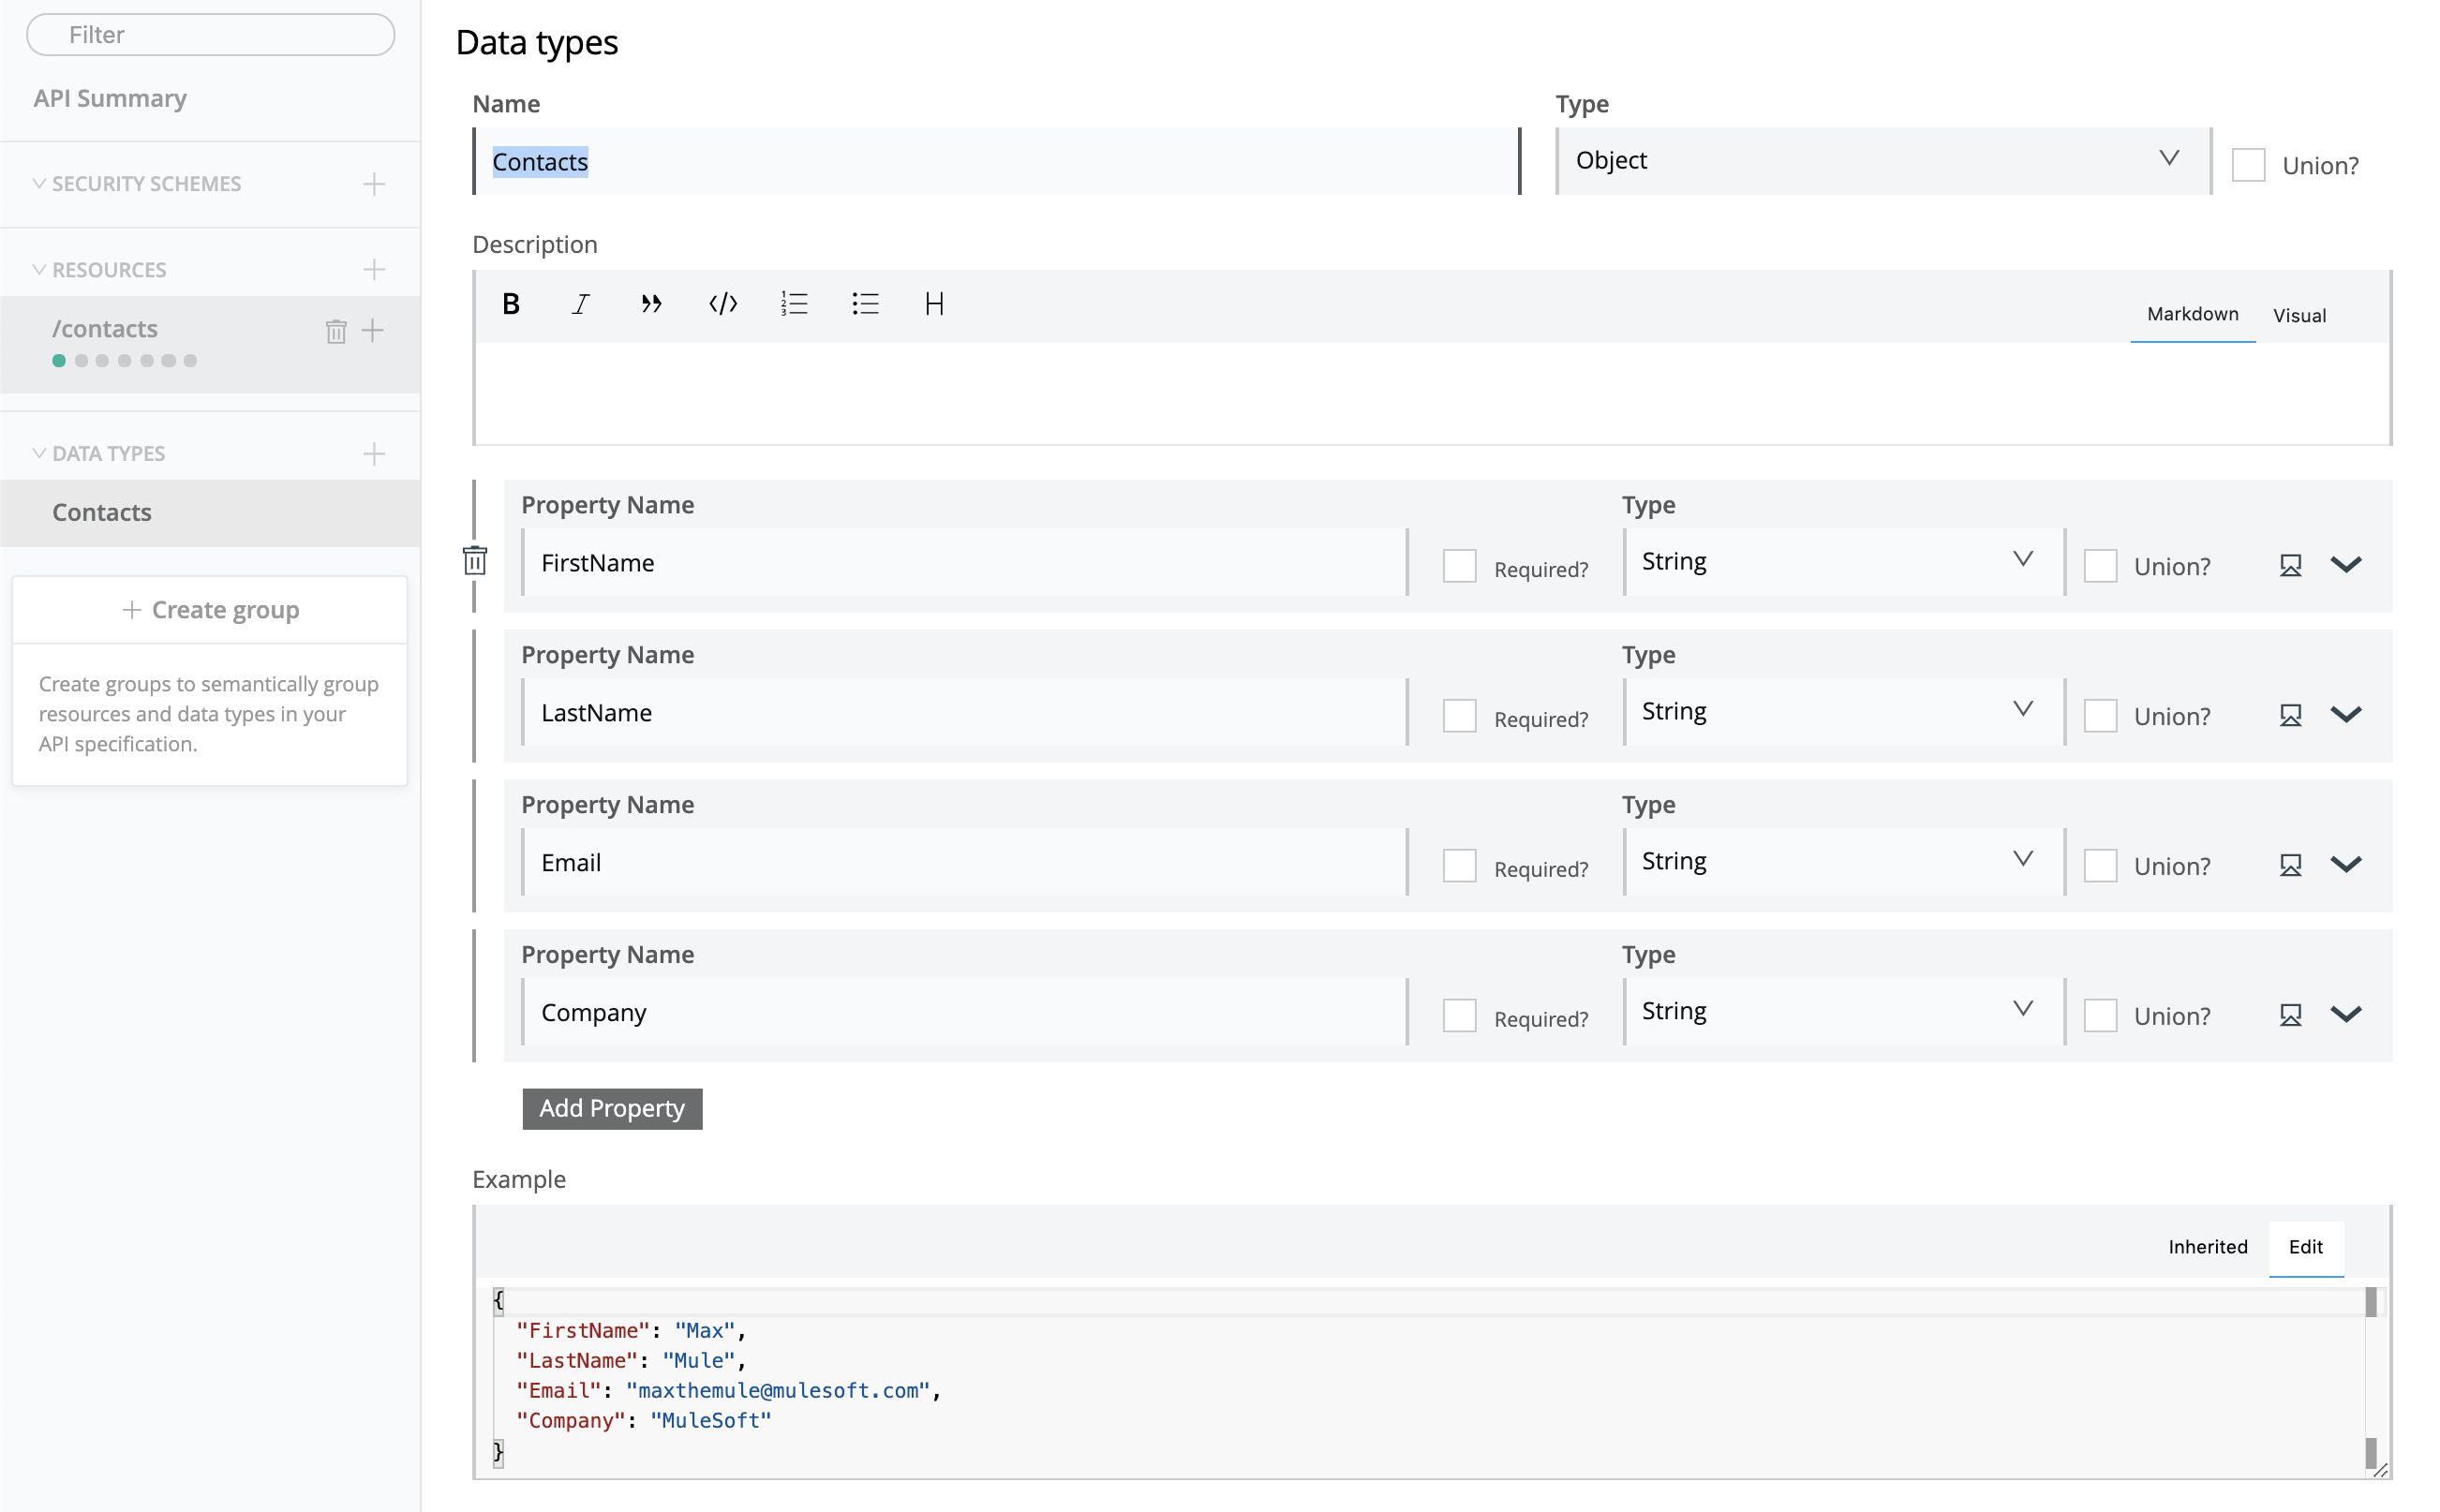
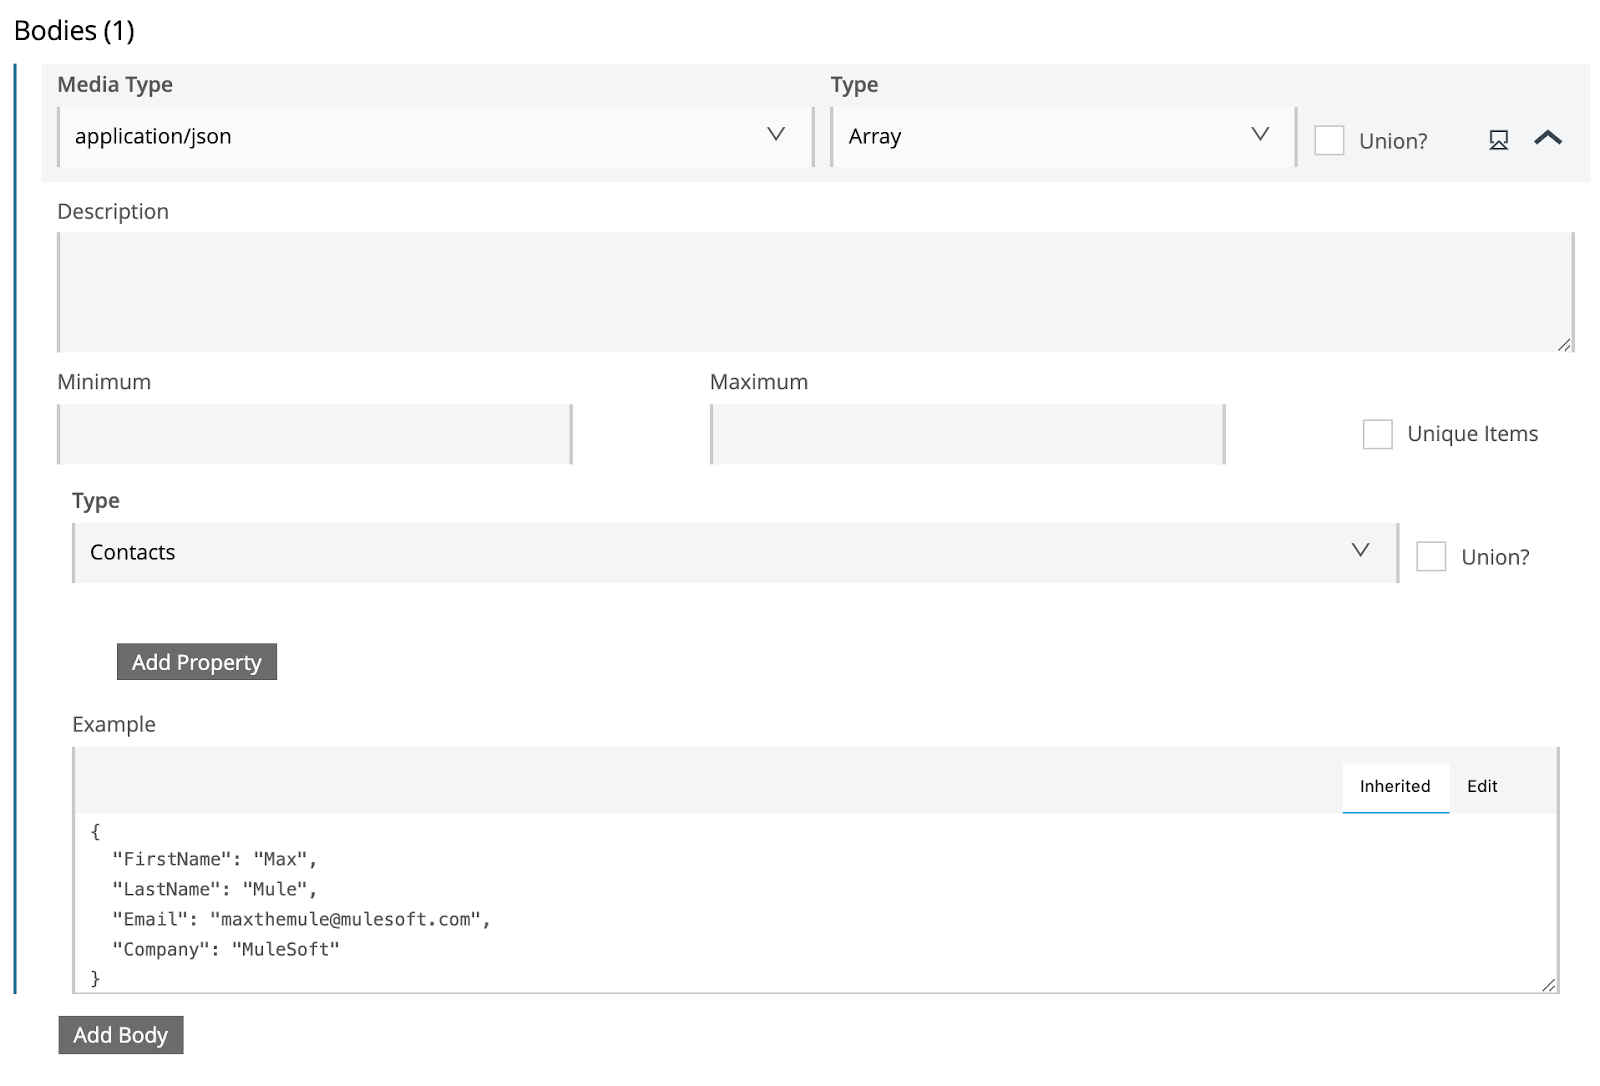
Next, let’s create a data type by going to the left-hand side of the screen and clicking the + and name the Data Types: Contacts. When specifying a data-type, the information is added and referenced in your API’s RAML file. Creating a data type is helpful when creating flows since each card in the flow will automatically detect the formats and structures of the data that are in the inputs and outputs.
Once we have created our data type, follow the screenshot below and add four properties to our data type: FirstName, LastName, Email, and Company. Make sure each attribute is defined as a string, then go to the Example window and define the JSON payload with some sample data as shown below.
Now that we have created a mock Data type, we need to create a new resource (also known as an API Endpoint) to accept HTTP requests to our API. Click the Resources tab on the left-hand side of the API Summary page, and click the plus button to create a new resource. Name our new resource /contacts which will define our endpoint URL for our application to send HTTP requests too.
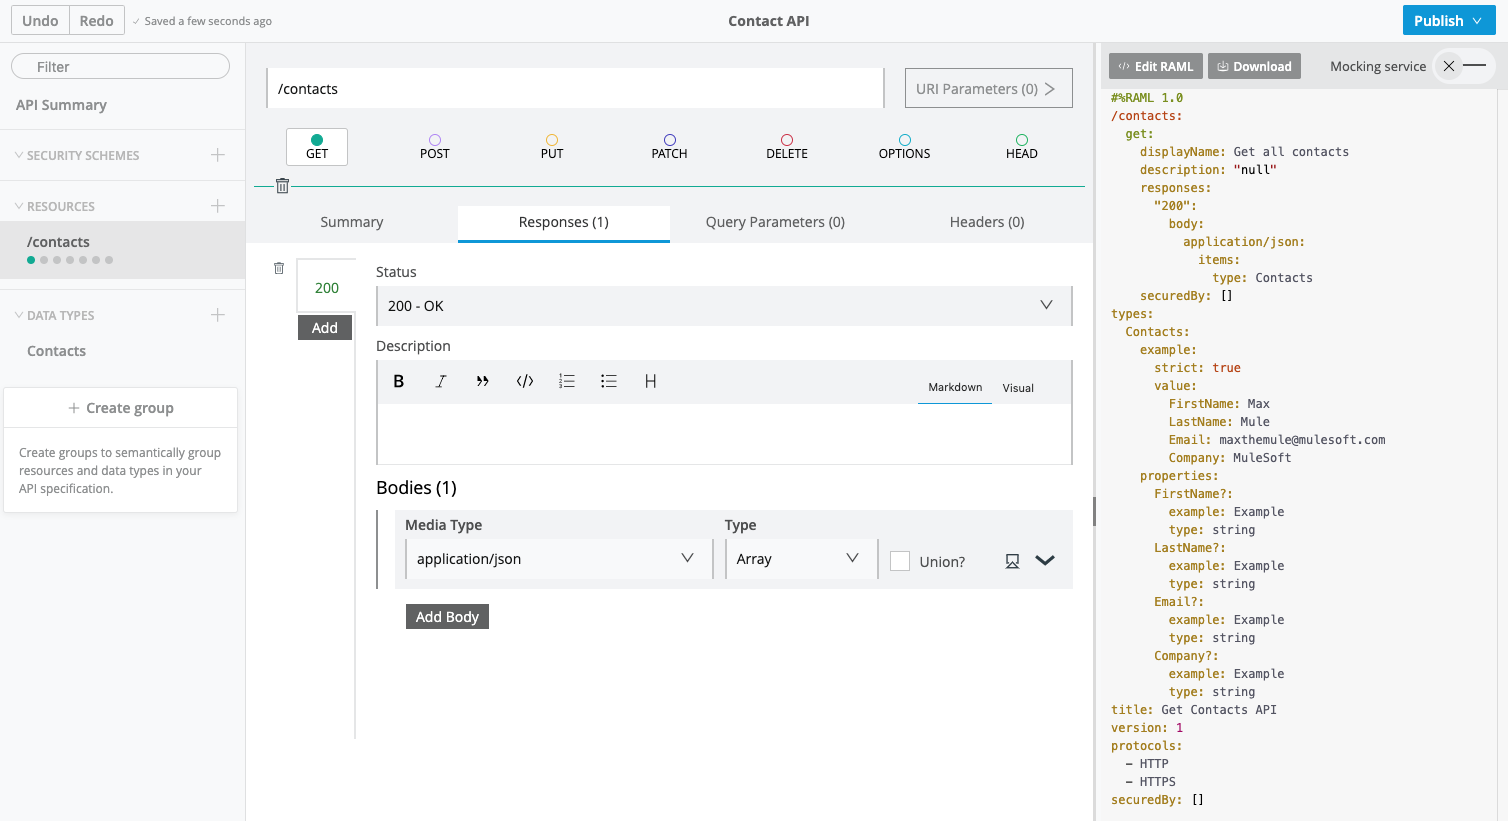
For this specific API, we only want to allow HTTP GET requests to be accepted by our endpoint. To achieve this, simply click on the GET button below the endpoint name you just specified and add some specifications (you can think of them as rules) that our API will follow:
In the Summary tab, add the Name and Description of the API.
In the Responses tab, click Add Responses add the HTTP Status code 200 - OK. Click the Add Body button, and specify that the media type is application/json and the Type is Array. Then click the expand icon, and select the type as the Data Type we just created called Contacts.
Test your API with the Mocking Service
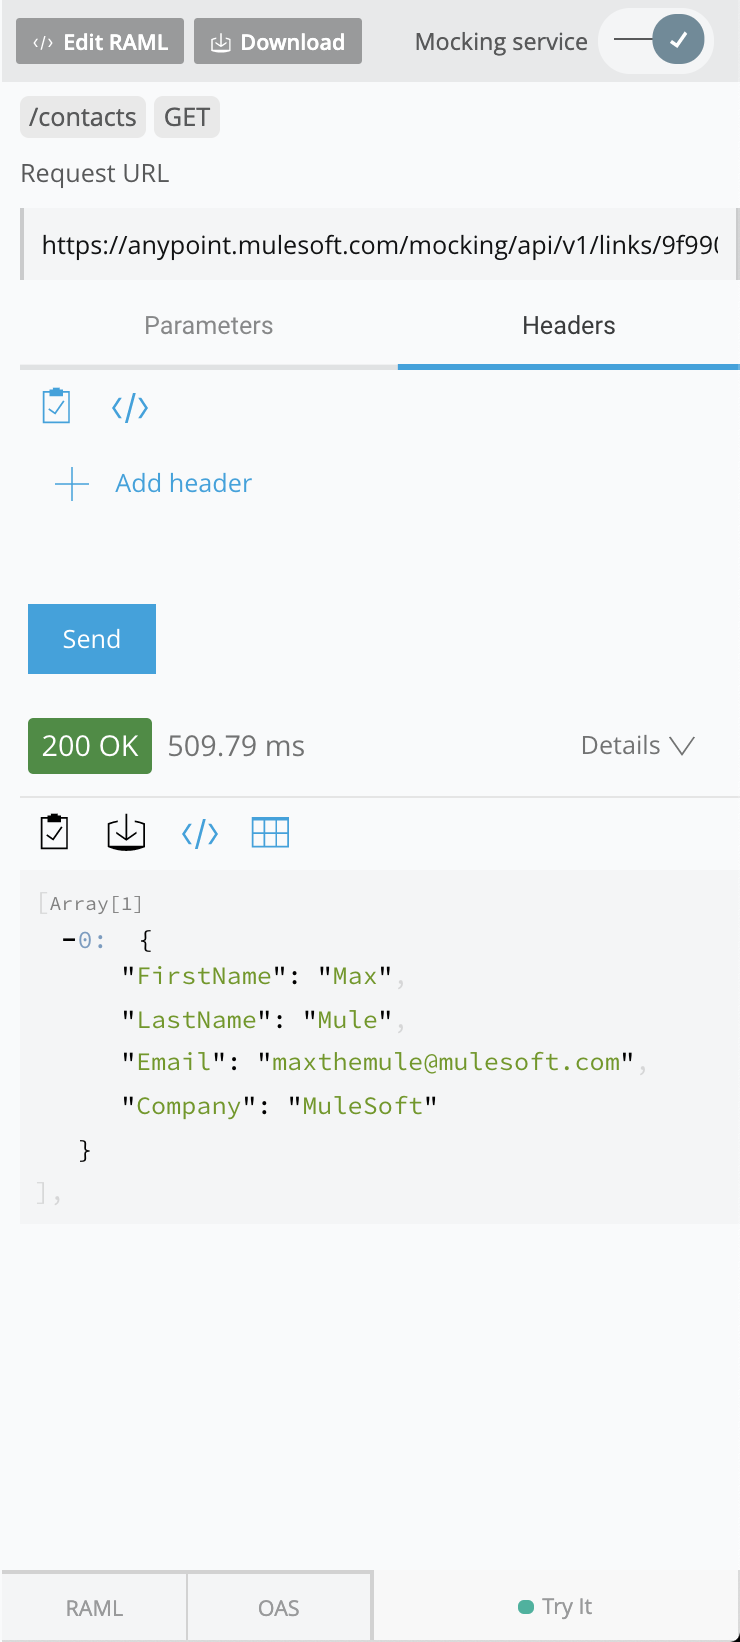
Now that we have successfully created our API Specification, let’s test the API to make sure it’s functioning the way we expect. On the top right, there is a slider called Mocking service, which you will have to enable to generate a mocking service URL. Anypoint Platform has options to test different input parameters, headers, and body messages in your mocking service window. This feature allows you to test how your API will handle different types of requests before deploying.
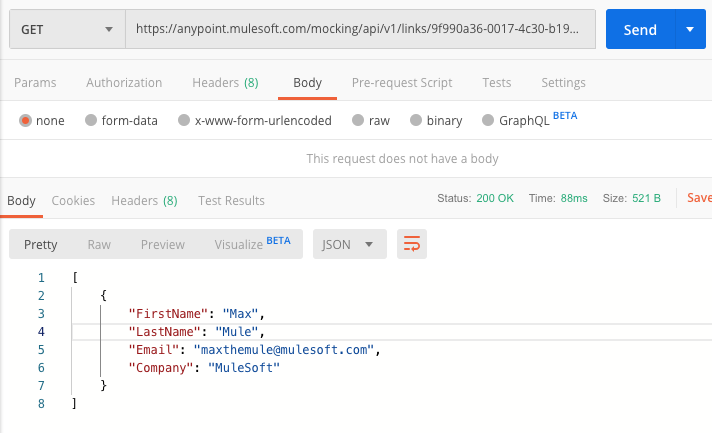
To test out your API, enable the Mocking service, and click the Send button. In your response field, you should see that one entry has been returned in the response. We can also download and use the application called Postman and send a GET request to our mocking service URL to see the same response.
Now we are ready to publish our Contact API to Exchange. Exchange is a marketplace for connectors, APIs and templates that can be reused and shared across your organization. When you publish your API to Exchange, you can define whether you want your API to be private, public to anyone within your business organization, or public. Additionally, your API can be downloaded and reused in any of your future integrations or projects. To publish your API, simply click Publish at the top right of the screen in Design Center and select Publish to Exchange. After publishing, you will see your API listed in the Exchange which means you can now import your API into your Anypoint Studio project to build your first integration.
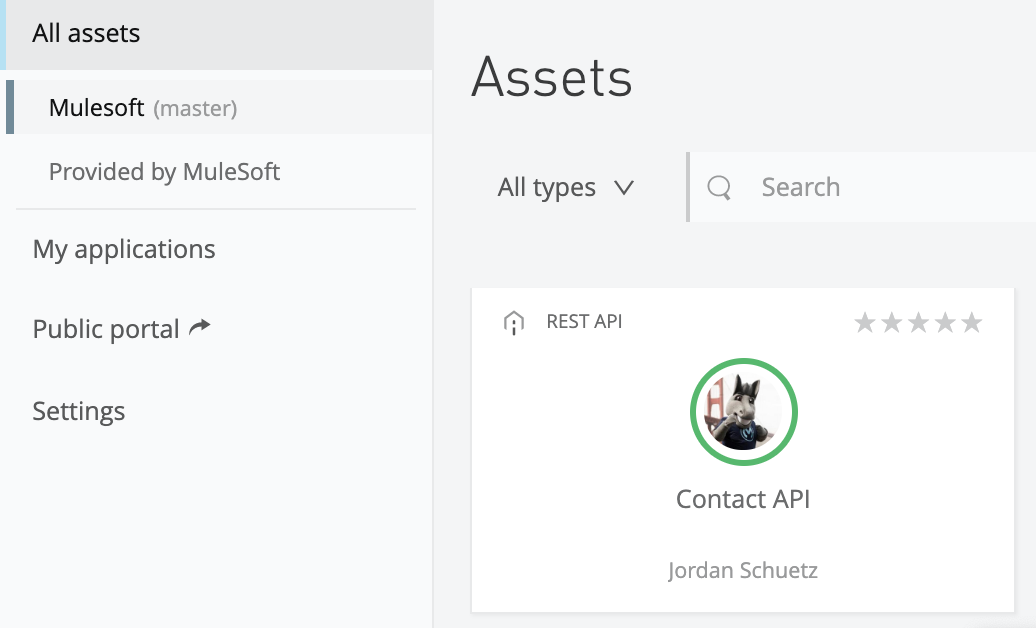
In Exchange, you can add a photo, edit the title, description and even rate and comment on your published API. If you got lost on any part of this tutorial, we actually created a public version of this API that is available to download directly into your Anypoint Studio project in the next tutorial. To check out our public Contact API, click the button below.
Next steps
Congratulations on building and deploying your first API using MuleSoft’s Anypoint Platform. In our next tutorial, we will walk through importing your API into Anypoint Studio and building a simple integration that returns data from our database in a JSON format.
Click on the Next button below to continue to the next tutorial.


Try Anypoint Platform for free
Start your 30-day free trial of the #1 platform for integration, APIs, and automation. No credit card required. No software to install.
Questions? Ask an expert.
