Building your first API
Do you love POSTing memes? Have you ever wondered what it would take to create your very own meme generator? Well if so, you are in luck! In todays tutorial, we are going to walk through how to design and build your first API using MuleSoft’s Anypoint Studio. Anypoint Studio makes it incredibly easy to build and deploy scalable APIs to the cloud. This tutorial will cover how to build a proxy API with MuleSoft which generates top text and bottom text on an image using the cloud-based image managment provider Cloudinary. In this demo, Cloudinary handles all of the image maniuplation and cloud hosting, while MuleSoft handles the integration between the web form and endpoint, along with error handling for the endpoint. Additionally this tutorial will cover how to format and send multipart form-data using DataWeave and HTTP requests. Don’t PUT your laptop down now, you will want to GET all the knowledge you can because MuleSoft makes API development easier than ever before.
Meme generator
The most common internet meme format is an image of a person or animal with a funny or witty caption. Usually memes are separated into top and bottom text, and different memes follow different caption formats. In our API, we want our meme to be user generated. This means that the user can define the top and bottom text, and upload their desired asset to generate a custom meme image automatically that they can download and share with friends. In order to generate the custom image file, we chose to go with the cloud-based asset processing and hosting service called Cloudinary. The API we will develop with MuleSoft’s Anypoint Studio will accept an HTTP POST request that includes the following data in the body of the message:
Request Body Content Type: form-data
- top_text : value (string)
- bottom_text : value (string)
- file : file upload, .jpg .png etc (optional value)
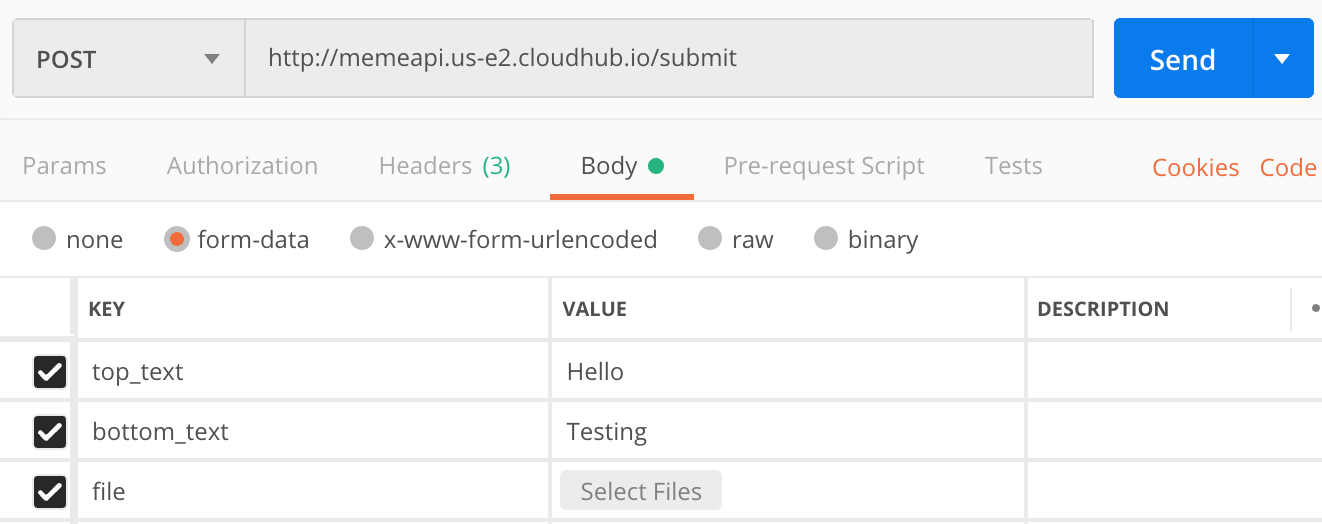
If no file is included in the API call, the API will automatically assign a default asset to include the top text and bottom text. Both the top text and bottom text fields are required according to the API specifications we define. Try out our API for yourself below (you can also use Postman or another RESTful client to send a request).
Hosting an HTML file on CloudHub
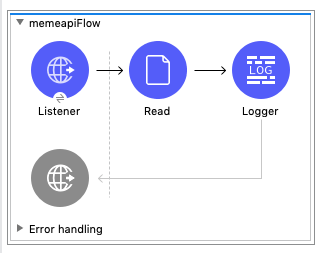
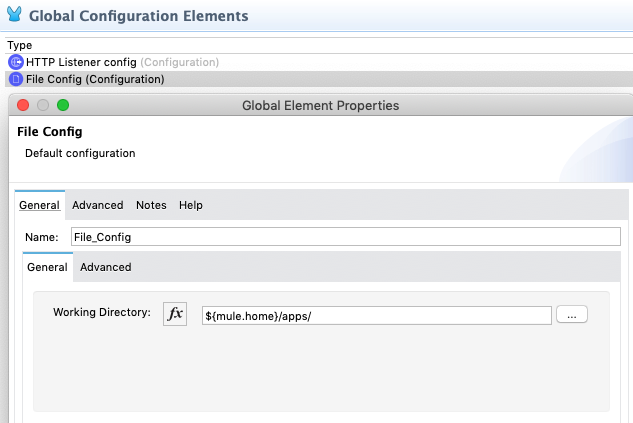
The flow to build this meme generator API is relatively straightforward, and we’ve broken it down into two parts to make it easier to follow. The first flow named memeapiflow is called when a client lands on the root URL which is hosted on CloudHub. The HTTP listener listens for a request to be made on the CloudHub URL, and then Read’s the index.html file stored in the src/main/resources folder in Anypoint Studio. The CloudHub deployment needs to read the index.html file, but cannot do so without the proper pathing. In Anypoint Studio before deploying your application, make sure to name the file path in the Read connector to memeapi/index.html where the first value is the project name in your Package Explorer. In the Global Elements tab on the canvas, click on the File Config element and assign the Working Directory to ${mule.home}/apps/ which will enable the HTML file to be displayed when the endpoint is hit once deployed to CloudHub.
The HTML file that is hosted on CloudHub contains a front-end web form where users can input top text and bottom text without the need of a RESTful client. When the form is submitted, the request sends a multipart form-data POST request to the HTTP endpoint /submit. This endpoint triggers the submit flow which is defined under the memeapiflow. Here’s an example below of what the entire flow should look like once complete.
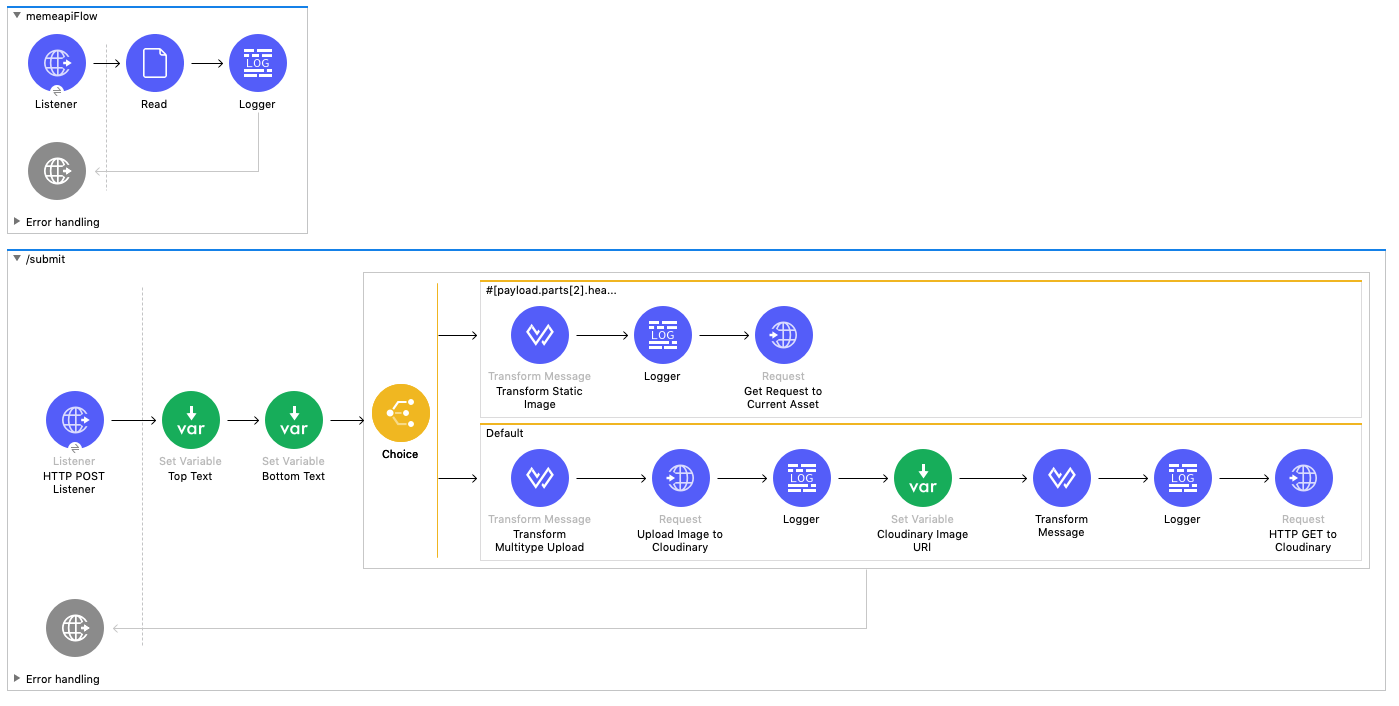
Next, let’s dive deep into how the submit flow was built and to code multipart form data using DataWeave.
Multipart form-data with DataWeave
The first step to building the /submit flow is to add an HTTP POST listener that listens on the endpoint path /submit. In the advanced tab on the HTTP Listener, make sure to set Allowed methods to POST. Next, we set two variables, one for the top text and bottom text. For the Top Text variable, press the fx button and set the Value to: payload.parts[0].content. For the Bottom Text variable, similarly, press the fx button and set the Value to: payload.parts[1].content.
Next, let’s set up the Choice Connector which allows you to handle if/then statements in your Mule flow. For this example, let’s set up a conditional that runs one flow if there is NO image asset file included in the form-data submitted, and the other flow if there is an image asset file attached. Let’s start out by creating the Default Choice flow which formats a custom multipart form message to submit to Cloudinary.
Next, drag a Transform Connector into the Default flow. Next, let’s format our HTTP request using the Transform Connector so our multipart form-data is in the correct format for Cloudinary to accept our image upload. If we add a Logger component before the Transform, the Logger will return a log file to your browser that includes the multipart form-data information.
In the below screenshot, you can see an example of how the form submission looks on the backend and what the Logger component will return you upon form submission. You can see that the multipart request includes the top text in the first part (payload.parts[0]), bottom text in the second part (payload.parts[1]), and the image data in the third part (payload.parts[2]). The form submission includes headers, such as Content-Disposition, Content-Type, filename and the field name.
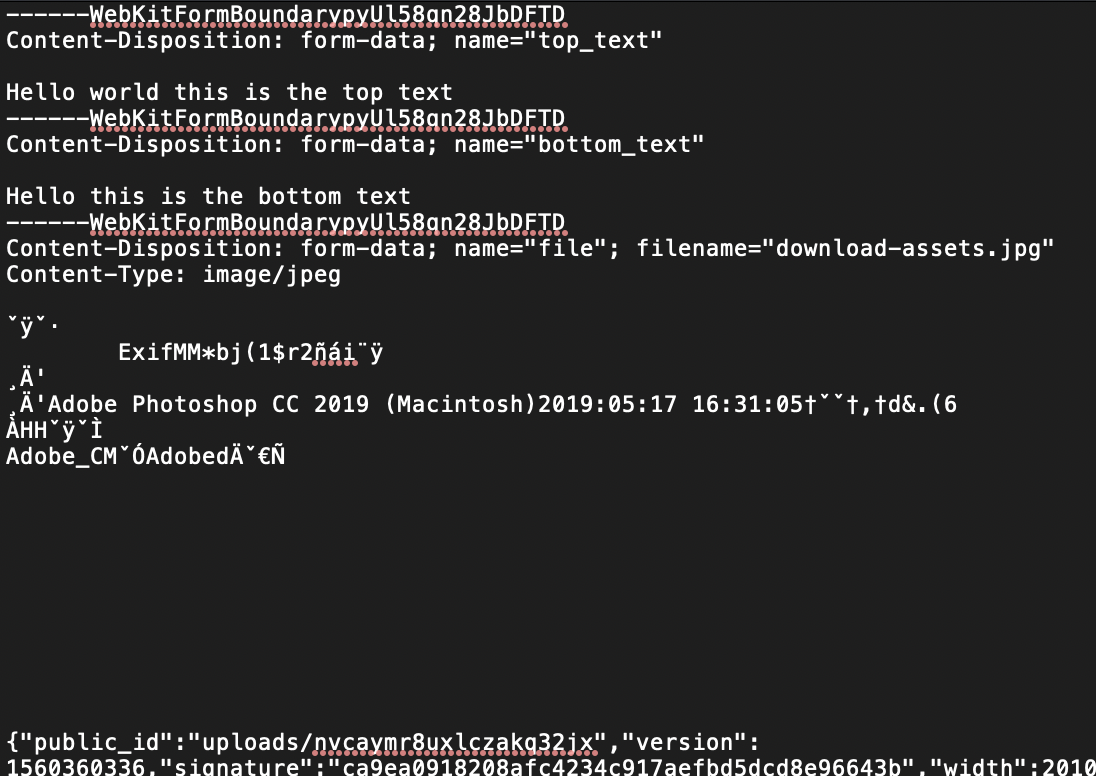
We can access the first piece of content in the form-data by calling payload.parts[0].content in DataWeave. If we placed a Logger component down, the response would return “Hello world this is the top text”, based on the above reference image.
There is a problem with this form structure. If we were to take this request, and try to send it over to Cloudinary, they would return with a 400 error since this isn’t the correct format to upload an asset to their cloud hosting service. In order to upload the image, we need to reformat the request while keeping the form and file content the same. We can restructure this form-data using the language called DataWeave, and create the request in the correct format that Cloudinary is looking for. According to Cloudinary’s API, they require an “upload_preset” header which identifies which Cloud Environment the asset will be stored. Additionally, they require a file to be uploaded along with a corresponding filename. If the top_text and bottom_text parts were included in the request to Cloudinary, the service would throw a 400 error since it isn’t in the correct format.
The DataWeave code listed below is the format that Cloudinary requires to submit a valid HTTP request for a file upload. The first part is named “upload_preset”, and includes the headers, “Content-Disposition”, which includes the “name” of the upload preset. The second part of the request is named “file” and this part will include all of the headers and image data submitted on the web form. In the header “Content-Type”, we set the content to whatever was submitted in the form which could be a .jpg, .png, .ai etc. In the “Content-Disposition” header, include the “name” which is named “file” because Cloudinary requires that field in their API. Additionally, include the filename in the header which was given when the end user submitted the form. Below the header section, create another section called “content” which includes the actual file which is included in payload.parts[2].content. The code below is how you would structure this request in DataWeave.
1
2
3
4
5
6
7
8
9
10
11
12
13
14
15
16
17
18
19
20
21
22
23
24
25
26
27
28
29
30
%dw 2.0
import dw::module::Multipart
import * from dw::core::Binaries
output multipart/form-data
var file = payload.parts[2].content
var upload_preset = "YOUR-CLOUDINARY-UPLOAD-PRESET-HERE"
var filename = payload.parts[2].headers.'Content-Disposition'.filename
---
{
parts:{
"upload_preset": {
"headers" : {
"Content-Disposition": {
"name": "upload_preset",
}
},
content: upload_preset
},
"file" : {
"headers" : {
"Content-Type": payload.parts[2].headers.'Content-Type',
"Content-Disposition" : {
"name": "file",
"filename": filename
}
},
content: file
}
}
}
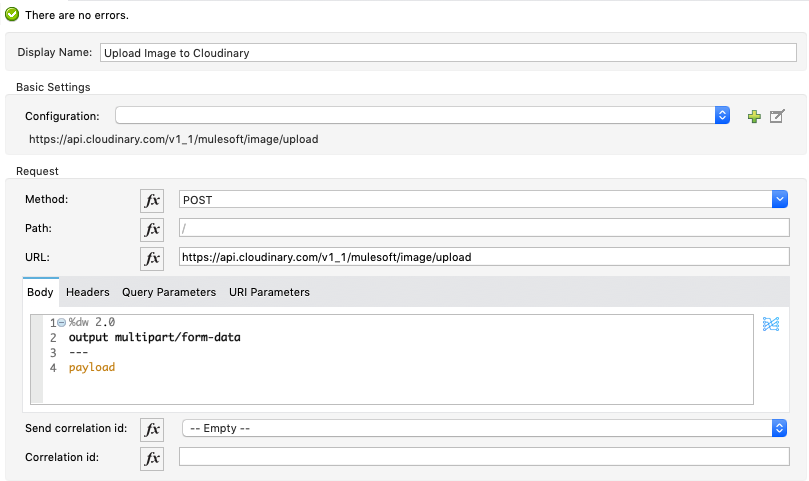
Once the multipart form-data has been formatted, let’s send an HTTP POST request to Cloudinary to upload the image. Drag an HTTP request onto the canvas and format the request as shown below.
DataWeave array splitBy and joinBy
Now that our Mule Flow has sent an HTTP request to Cloudinary to upload the image asset, Cloudinary will return the flow with a payload/response that includes the upload URL, and other information about the asset. Next, create a new variable and call it url_var and for the Value, press the fx button and type in: payload.secure_url (since this is the upload URL that Cloudinary returns once the upload is successful).
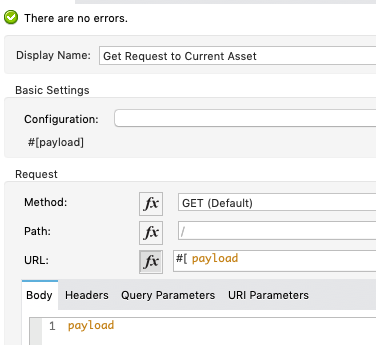
The next step is to make a GET request to fetch the uploaded image with the desired top text and bottom text edits that we defined earlier. In order to add these edits, Cloudinary requires us to create a custom URL with the text data inside of the query parameters. In order to create this custom URL, we have to split the URL that we got in the response by “/”. Next we create a few variables which contain all of the custom text code such as stroke, line spacing, font size, font color and placement. The actual text that will be on the top and bottom needs to use the encodeURI command since the text that is input in the HTML fields could contain spaces or other special characters that the request can’t understand. We then split each part of the string up into different array elements, and concatenate the values in the right spot of the URL. Then we merge the array into one single string by using the joinBy call. Lastly, insert an HTTP request connector into the flow and have it send the URL as the payload (which is the custom string we just created). The response that we recieve will be the edited image that we defined in the transform message.
1
2
3
4
5
6
7
8
9
10
11
12
13
14
15
16
17
18
%dw 2.0
output application/json
import * from dw::core::URL
var url = vars.url_var splitBy("/")
var top_text = "l_text:impact_55_stroke_center_line_spacing_-10:"++ encodeURI(vars.top_text) ++",co_white,bo_5px_solid_black,g_north,y_10,w_480,c_fit/"
var bottom_text = "l_text:impact_55_stroke_center_line_spacing_-10:"++ encodeURI(vars.bottom_text) ++",co_white,bo_5px_solid_black,g_south,y_10,w_480,c_fit"
---
[
url[0],
url[1],
url[2],
url[3],
url[4],
url[5] ++ "/" ++ "w_500/" ++ top_text ++ bottom_text,
url[6],
url[7],
url[8],
] joinBy "/"

Here is what the final flow looks like when the client uploads their own file in the file upload form.

However, if the user doesn’t choose to upload their own image file, let’s change the URL to include a predetermined asset. If you wanted, you could add an array of different choices and randomize it, however for this example I chose Max the Mule as the default asset.

In the transform card add the following code (see how the baseurl is now predefined).
1
2
3
4
5
6
7
8
9
10
11
12
13
14
15
16
17
18
%dw 2.0
output application/json
import * from dw::core::URL
var baseurl = "https://res.cloudinary.com/mulesoft/image/upload/v1560204264/max_the_mule.jpg"
var url = baseurl splitBy("/")
var top_text = "l_text:impact_55_stroke_center_line_spacing_-10:"++ encodeURI(vars.top_text) ++",co_white,bo_5px_solid_black,g_north,y_10,w_480,c_fit/"
var bottom_text = "l_text:impact_55_stroke_center_line_spacing_-10:"++ encodeURI(vars.bottom_text) ++",co_white,bo_5px_solid_black,g_south,y_10,w_480,c_fit"
---
[
url[0],
url[1],
url[2],
url[3],
url[4],
url[5] ++ "/" ++ "w_500,h_500/" ++ top_text ++ bottom_text,
url[6],
url[7],
] joinBy "/"
Lastly, add the HTTP request connector and create a GET request to Cloudinary. The response that we receive will be the edited image that we defined in the transform message.
Next Steps
Got lost? Make sure to watch our YouTube tutorial at the top of this page for the full walkthrough. Now that we have created our meme generator, go check out some more of our awesome developer tutorials. Visit the tutorials page to view more developer tutorials.


Try Anypoint Platform for free
Start your 30-day free trial of the #1 platform for integration, APIs, and automation. No credit card required. No software to install.
Questions? Ask an expert.
