Step 1: Project setup
In this project, you will:
- Setup PushTopics for capturing real-time updates from Salesforce
- Create basic integration flows within MuleSoft Design Center
- Connect to 3rd party systems using the following connectors - Salesforce, Database, Request and Twilio
- Learn how to transform data using visual tools and light scripting
- Build a working end to end order to cash workflow for a fictional retailer
Before you begin
- Sign up for Anypoint Platform - 30 day trial
- Sign up(link is external) or login to a Salesforce Account
- Sign up(link is external) for a Twilio developer account
- Once on your dashboard, get a free trial number
- Take note of your Account SID and Auth token. We will use them later.
Introduction
You are the Sales Cloud connectivity lead at an exciting company, Northern Trail Outfitters (NTO for short). NTO makes stylish and comfortable outerwear, apparel and gear retailer for outdoor recreation and fitness. Your company’s custom apparel is hit with celebrities, professional athletes, and people who attend a certain popular tech conference in San Francisco.
The integration problem
NTO leverages Sales Cloud to track the opportunities in the pipeline for swag and bulk orders. When opportunities are won, their sales reps need to manually go into the order management system and place the orders when they close business. Also, their customers often call the NTO offices to check on their orders.
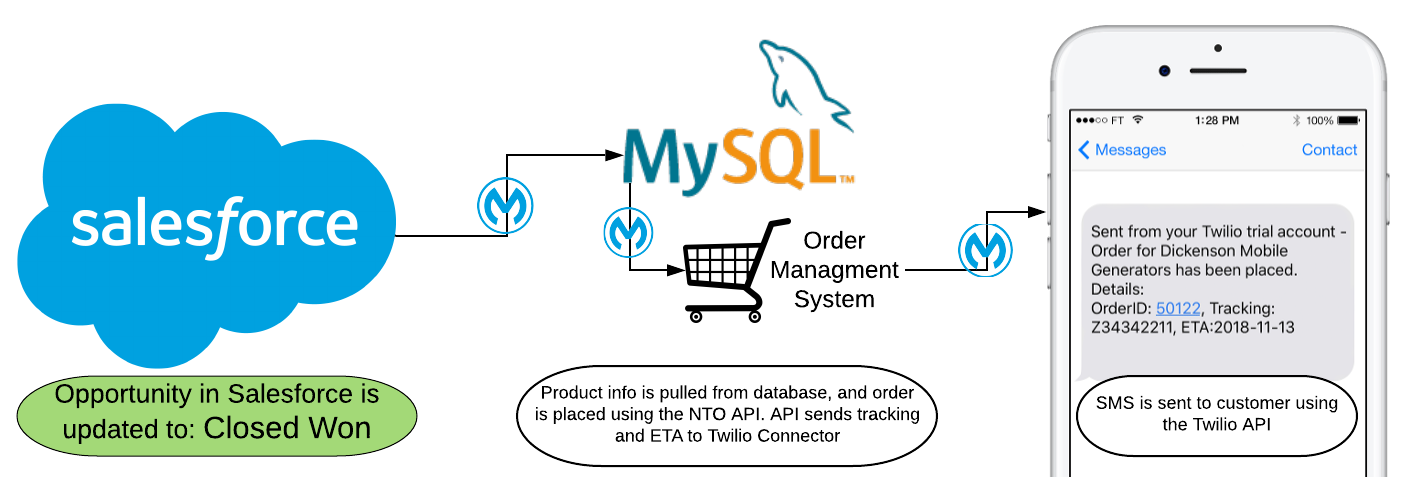
NTO is planning to leverage MuleSoft to automatically place orders when opportunities are closed, and to notify customers via SMS about their order status and ETA, as soon as these are available. It is critical for the NTO systems to be integrated with each other for this to work seamlessly.
The below table gives an overview of different systems within NTO’s IT infrastructure:
| System | Business Value |
|---|---|
| Salesforce Sales Cloud | Opportunity managment |
| MySQL Database | Stores product information and SKUs |
| NTO Order API | Internal API that can place orders and return tracking information + order ETA |
| Twilio | Notifications system |
You have been tasked to develop this integration within a tight deadline. You are aware of MuleSoft’s flow designer offering that lets you build these integrations in a low code environment. This sounds like the perfect tool for this use-case as your experience with integration is limited. You start by crafting a plan about how the data is going to flow across these systems to place an order, notify the customer and update Salesforce.
Proposing the integration solution
To automate this process, you will have to overcome a few integration challenges. Let’s list what needs to happen in order to automate this order to cash cycle.
- We need Salesforce to trigger a message to tell you every time an opportunity is marked as “Closed Won” as the Opportunity status
- For a given opportunity that is closed, we need to retrieve the appropriate product information from the products database (MySQL)
- Once we have all the information, we can leverage the NTO Orders API to place the order Order API will return the order number, tracking information and ETA for delivery
- This information needs to be translated into human-readable text and sent to yourself as an SMS for testing
Visually, our flow should look something like this:

Step 2: Setup PushTopics for real-time updates
We need to trigger our integration as soon as an Opportunity is marked with the ‘Closed Won’ status within Salesforce. To do this, we are going to leverage the Salesforce Streaming API which can trigger events to invoke our integration in near realtime.
First, we need to tell Salesforce what fields to send and our criteria for the trigger. This can be easily done using a SOQL query. Once we have the query built, we can set up a PushTopic which our integration can subscribe too. Here is how to set it up:
- Navigate to workbench SOQL query builder (you can login with your Salesforce credentials)
- Select ‘Opportunity’ as the Object. Select Amount, CloseDate, Id, and Name from the fields menu. (use cmd + click on macs)
- In the ‘Filter results by’ dropdown, add Stage Name = ‘Closed Won’. This is your criteria.
- Test using the ‘Query’ button. You should get a list of all closed Opportunities. Copy the query to your clipboard. Your query should look like this: SELECT Amount,CloseDate,Id,Name FROM Opportunity WHERE StageName = ‘Closed Won’
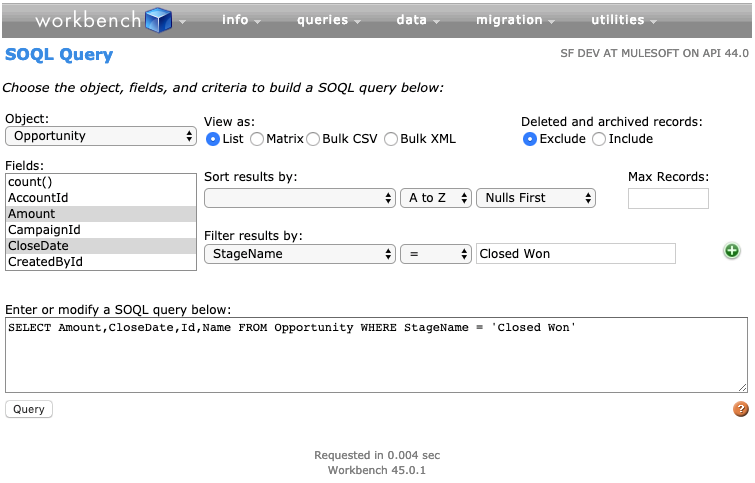
- Copy the query to your clipboard.
- Navigate to the Streaming Push topics page from the queries drop down on the top of the workbench logo
- Create a new PushTopic using the dropdown option. Name it “ClosedOpps” and paste the query you built in the query section. Save the PushTopic.

- Now every time the query criteria is met, Salesforce will push an event into the ClosedOpps PushTopic
Our next step is to use this PushTopic for triggering our integration. Let’s head to the Anypoint Platform to start working on our integration flow.
Resources:
Step 3: Create integration flow skeleton
Once you login to Anypoint Platform, you will be redirected to the homepage. The platform lets you design, build and manage both APIs and integrations. For our project, we know that we will be leveraging Flow Designer which is a low code, web-based IDE to build our integration flow. Let’s get started:
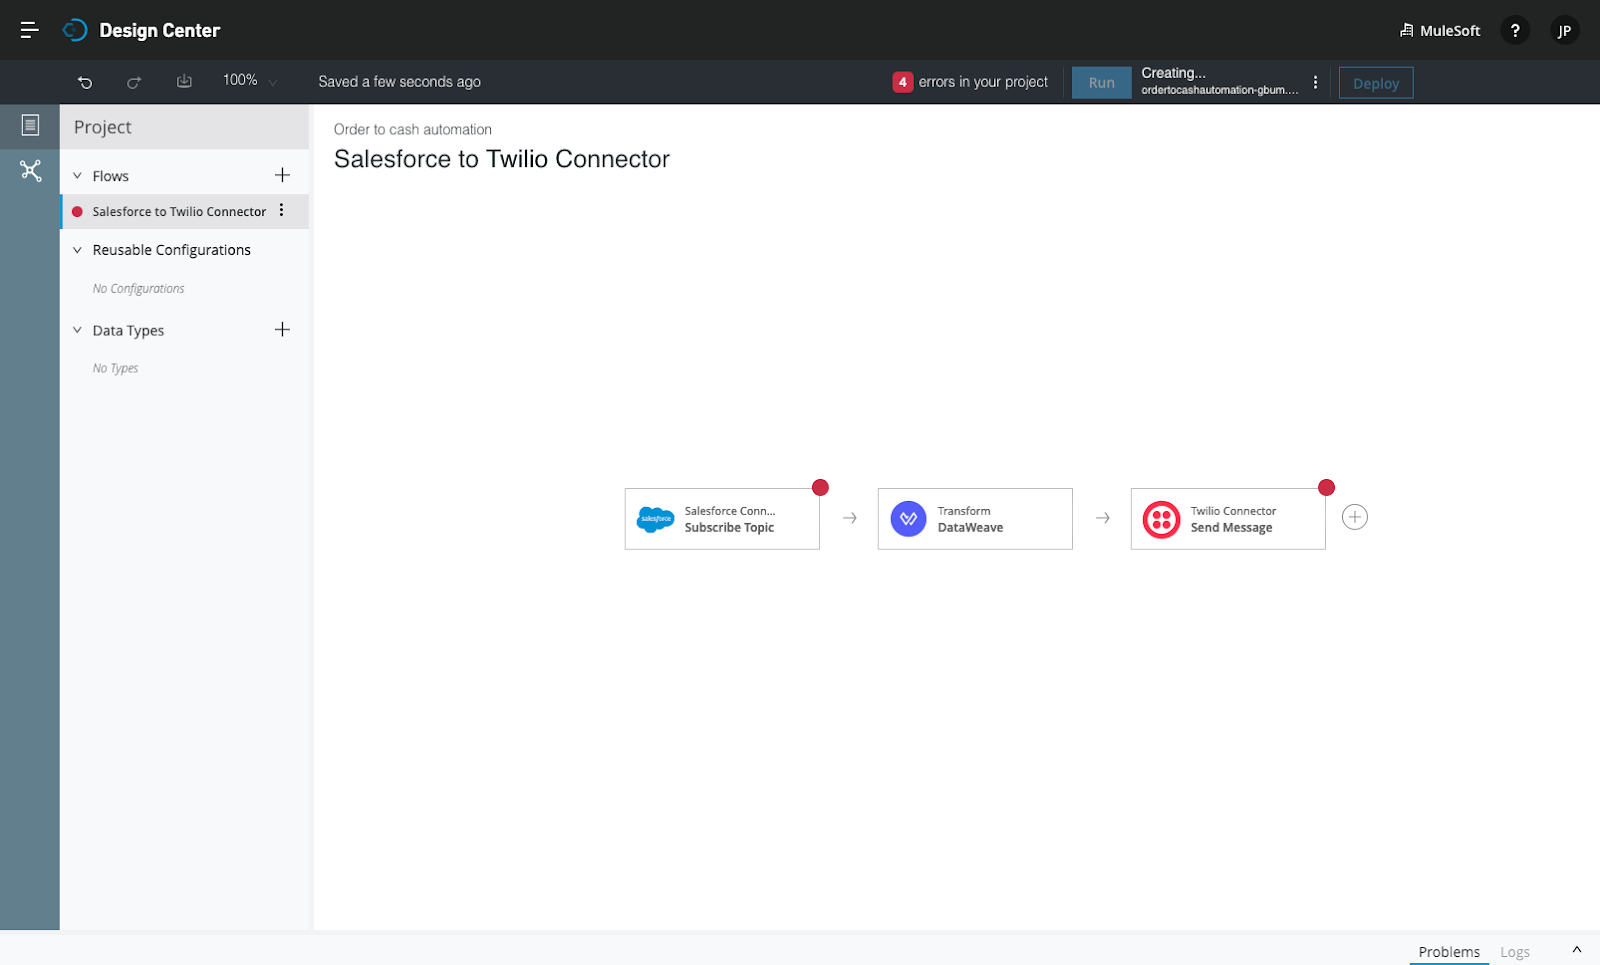
- From the homepage, navigate to Design Center and create a new Mule Application using the ‘Create’ button on the top. Let’s call our project ‘Order to cash automation’
- You will be prompted to select a trigger that defines what will invoke the flow. For our use case, it is the Salesforce Connector. Since we are leveraging PushTopics, we will choose ‘Subscribe Topic’ as the operation
- Next, we will be prompted to choose a target. Since we want to notify the customer with an SMS, we will choose the Twilio connector with the ‘Send Message’ operation
- Once you hit done and close the Salesforce card, you have a canvas with three cards and a few errors like below. Don’t worry about the errors, we will get them fixed soon
- Open the Salesforce card and click the link in the error message to setup the Salesforce configuration. Use the following parameters:
- Connection Type: Basic Username Password
- Username: your Salesforce username
- Password: your Salesforce password
- Security Token: your Salesforce security token (follow these steps to reset your security token)
- Press the test button to check if the connection is successful. If it fails, double-check your credentials and token. Save the configuration once complete.
- Let’s add our PushTopic to the connector. Add Topic = ‘ClosedOpps’ and close the card.
- Similarly, let’s add the Twilio connector configuration. Open the card and click the link in the error message to setup the configuration with the following values
- Username: Your Account SID (not your account username)
- Password: Your Auth token (not your account password)
- Test the connection using the ‘Test’ button and save once you see the success message. Add the account SID in the connector configuration as well and close out the card.
Create Data Types
Different systems use different formats and fields to represent data. Since we are going to pass our data through various NTO systems, let’s create all the data types required for our project. Let’s see how we can add a data type to our project:
- In the Project sidebar, click the ‘+’ icon below Data Types section
- Our first data type is what Salesforce is going to send us. Let’s call it ‘Salesforce Opportunity’. We are going to use an example to define the data type. In the example, add the following JSON text:
{
 "Amount": 15000,
 "Id": "0061U0000079dWXQAY",
 "CloseDate": "2019-01-25T00:00:00.000Z",
 "Name": "Dickenson Mobile Generators"
}
3.Notice that DataSense automatically parsed the fields from the example in the right sidebar. Hit Save.
So this for the Salesforce opportunity. We need to add a few more. Repeat the above steps for the following names and examples:
Order Information: We need to send data to the Orders API in this format.
Example:
{
         "OppId": "fsjf3439d993",
         "OrderAmount": 500000,
         "orderdate": "2018-11-13T11:15:45",
         "productInfo": {
         "productID": "CK111274",
         "category": "Small",
         "SKU": "CKS0",
         "productName": "Old School Classic Kicks",
         "inventory": 9999
    }
}
Order Tracking: Orders API will return this information once the order is placed
Example:
{
"OrderID": 50122,
"TrackingNo": "Z34342211",
"ETA": "2018-11-13T11:15:45"
}
Product Information: This is the information stored in the products database (MySQL)
Example:
[
    {
    "productID": "CK989603",
    "category": "Medium",
    "SKU": "CKS50",
    "productName": "Air Fly High Quality Sneakers",
    "inventory": 22333
    }
]
Resources
Step 4: Use Database connector to get product information
NTO has different SKUs (stock keeping units) for its enterprise customers, small business customers, and retail customers. You need to add the appropriate product information to the opportunity based on the deal size. Below table explains how products are segmented:
| Deal Size (Opportunity Amount) | Product Category |
|---|---|
| Above $100k | Enterprise |
| Above $50k | Small Business |
| All others | Retail |
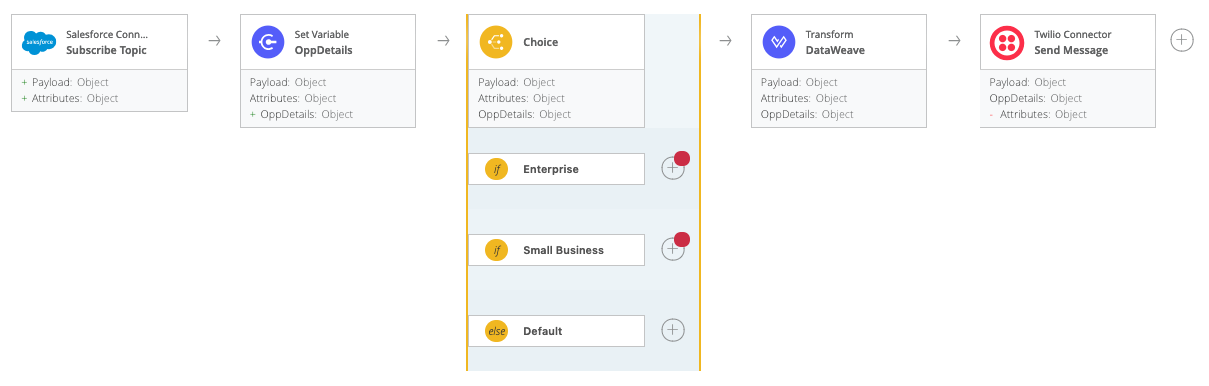
We will leverage the choice router component to achieve this branching if-else logic. But first, we need to store the opportunity data we get from Salesforce into a variable. Let’s store the opportunity details and create the branching logic. Follow the steps below:
- Click the ‘→’ between the Salesforce card and the transform card to add a new component. Search and select the ‘Set Variable’ component
- For the name, let’s call it ‘OppDetails’. For the value, press the f(x) button on the side to enable script mode. Once in script mode, set the value to payload. Close the card. Your flow should look like this:

- Now, let’s add the choice router for getting product information. Click on the ‘→’ between the Set Variable and transform cards and add a new ‘Choice’ component.
- Open the Choice card. Click on the “⋮” next to expression and select add below. If the window closes, re-open the choice component. Now you should see two if expressions and one else.
- Below are both expressions and names based on the product categories
- Expression: payload.Amount > 100000, Name: Enterprise
- Expression: payload.Amount > 50000, Name: Small Business
- All remaining ones go to default. So we do not need an expression for that
- Next, we need to query the products database to get the product information. You will see 2 errors for the choice router. Click on the ‘+’ sign on the first error and find the Database connector. Use ‘Select’ as the operation when prompted
- At first, you will see the error on the card as we have not set up the database configuration. Click on the link in the error bar to set up the config based on the details below:
- Connection Type: MySQL Connection
- Host: ntoproducts.c3w6upfzlwwe.us-west-1.rds.amazonaws.com
- Port: 3306
- User: mulesoft
- Password: mulesoft
- Database: nto_products
- Test the connection and save when successful. Paste the following query that gets the first record it finds with the ‘Enterprise’ category from the products database: select * from products where category = “Enterprise” and inventory > 1 limit 1
- Close out the Database card. Repeat the process for the Small Business choice using the following query: select * from products where category = “Small Business” and inventory > 1 limit 1 (note: you do not need to set up the database configuration this time)
- For the default choice, add the Set Payload card. Click the f(x) button for script mode and add the following JSON:
[
 {
  "productID": "CK111274",
  "category": "Retail",
  "SKU": "CKS0",
  "productName": "Old School Classic Kicks",
  "inventory": 9999
 }
]
11. Your flow should look something like this:
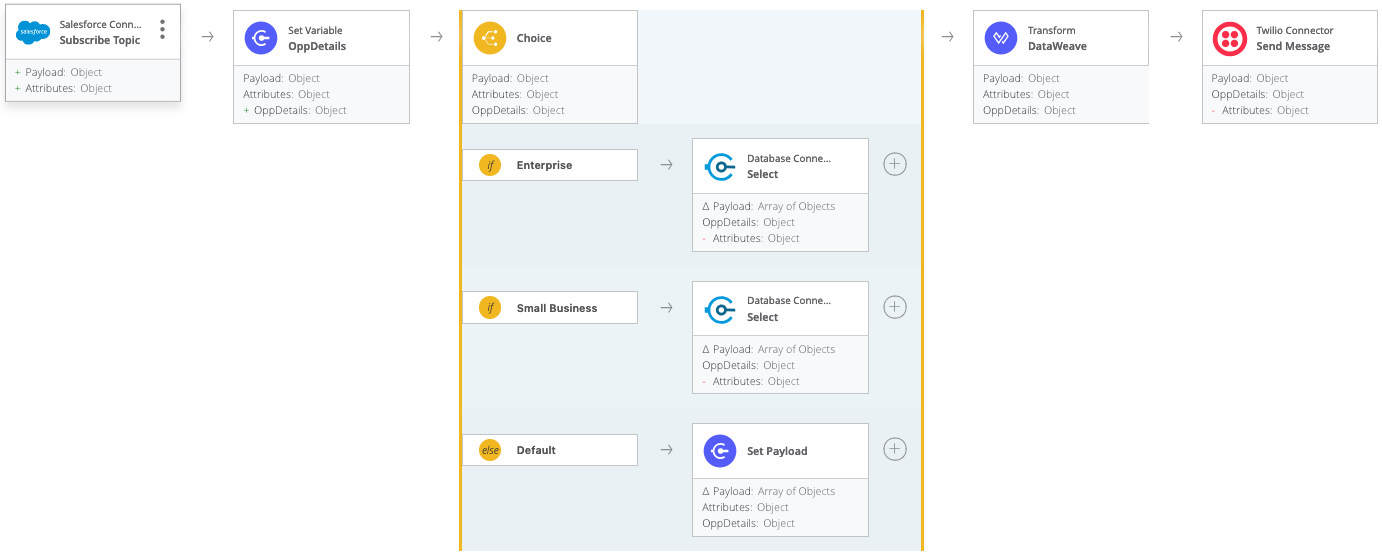
At this point, we have configured the flow to trigger on opportunity wins and also gathered product information based on the deal size. We have everything we need to call the NTO Orders API and place an order. We will do that in the next section.
Step 5: Leverage orders API for submitting orders
We have obtained the opportunity information from the Salesforce and product information from the database. Before we use this information to place an order, it needs to be formatted in a way that the API is expecting. Once the data is in the correct format, we can make a POST request to the API, which will return the OrderID, TrackingNo and ETA for the order that was placed.
Let’s see how we can leverage the transform component to format the payload and make the API call using the request module:
- Click on the ‘→’ to the right of the choice router block and add a transform component.
- Add another card on the right side of the transform card you just added. This time, select the HTTP Request module. Add the following details:
- Method: POST
- URL (this is the URL for NTO’s Order API): https://anypoint.mulesoft.com/mocking/api/v1/sources/exchange/assets/org.mule.examples/quick-start-nto-orders-api/1.0.0/m/orders
- Now, let’s format the payload. Close the request card and open the transform card that is to the left.
- Let’s set the data types for the values on the left side.
- Click on the ‘⋮’ next to payload
- Select ‘Set’
- Select the ‘Product Information’ data type that we created earlier
- Repeat steps for ‘OppDetails’ under vars and set the data type to ‘Salesforce Opportunity’
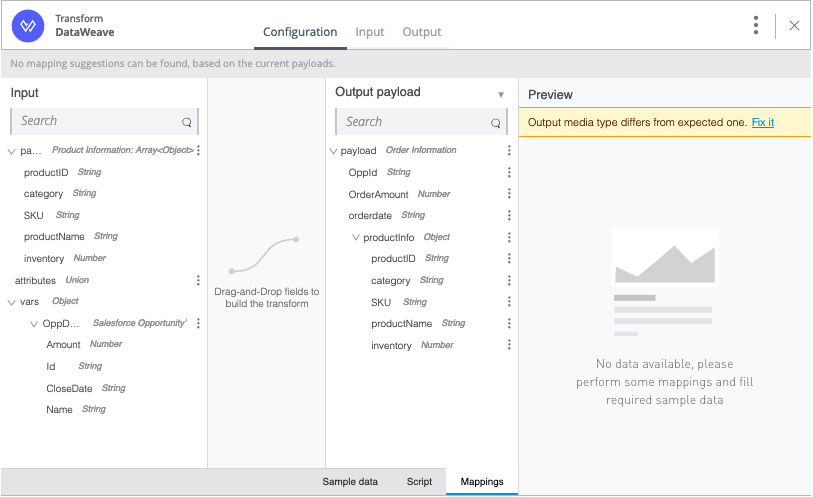
- Repeat steps for payload on the right-hand side and set the data type to ‘Order Information’. The transform card should look like below:
- Drag and drop elements from the left side to right side based on the mappings below:
productID -> productID
category -> category
SKU -> SKU
productName -> productName
inventory -> inventory
Amount -> OrderAmount
Id -> OppId
CloseDate -> orderdate
8. If you see ‘Output media type differs from expected one’ error, press the fix it button to resolve. Final transform card should look like this:
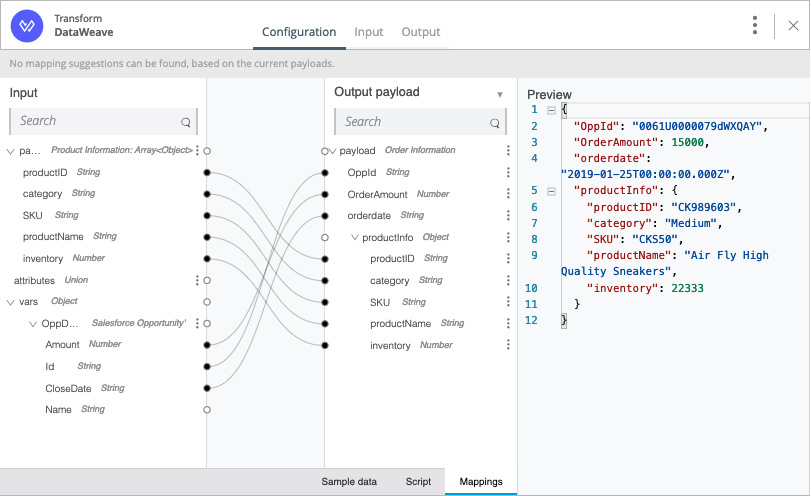
Now we are ready to place orders!! The payload shown in the preview will be posted onto the API. The API will return the order details in return. Our last step is to send an SMS using the opportunity, order and product data.
Step 6: Trigger SMS using the Twilio connector
So far, we have gathered the opportunity, product and order information. Our last step is to send an SMS with the details to notify the customer. For testing purposes, we will use our own phone # to send the SMS. For this, we will need to format the message and pass it on to the Twilio connector in the format it prefers. Let’s do that:
- Open the transform card to the left of the Twilio connector
- In the right side (input section), click the ‘⋮’ next to payload, and set the data type to ‘Order Tracking’
- Similarly, set the data type for OppDetails to ‘Salesforce Opportunity’ as you did earlier.
- On the right side (output section), double click on the ‘To’ field and add your phone number with the country prefix (eg USA phone would look like ‘16667778888’)
- Similarly, double click the ‘From’ field and use the free phone number that you obtained initially.
- Next, drag the ‘OrderID’ field from the input to the ‘body’ field in the output section
- In the bottom bar, switch to the ‘Script’ mode to see the transformation script. MuleSoft uses a powerful data transformation language called DataWeave. What you see in the script tab is the Dataweave code that was written while you drag and drop
- Replace the Body: payload.OrderID with the following code:
Body: "Order for " ++ vars.OppDetails.Name ++ " has been placed. Details:
" ++ "OrderID: " ++ payload.OrderID as String ++ ", Tracking: " ++ payload.TrackingNo ++ ", ETA:" ++ payload.ETA as Date- In the preview, you will notice we are constructing a message with dynamic variables and also converting the ETA from a timestamp (2019-01-25T00:00:00.000Z) to date (2019-01-25). With DataWeave, you transform your data between formats like XML, JSON, CSV, etc and perform lookups and functions within your data.
Now we are all set to receive SMS notifications when an order is placed. Lastly, we also need to make sure the opportunity details are available for the Sales rep within Salesforce for reference. This can easily be done with the Salesforce connector. In the next step, we will update the opportunity record within Salesforce with the OrderID for the order that was just placed.
Resources
- Learn more about Dataweave here.
Step 7: Update opportunity with order details
Looks like you have enjoyed building your project thus far. In this section, we will also update Salesforce with the OrderID. This way, the sales rep directly has insight into the order that was placed right there from Salesforce. With a few clicks, we will be able to add this functionality to our application. Here is how:
- We need to store the order information before sending it to Twilio. So we will click the ‘+’ sign on the left of Twilio and add a ‘Set Variable’ module
- Let’s call it ‘OrderDetails’. For the value, click the f(x) button and type payload
- Now that we have the details, add a new transform card to your flow at the end. Collapse the payload in the input section (right side). You will see OrderDetails and OppDetails.
- Click the ‘⋮’ next to OrderDetails, and set the type to Order Tracking
- Click the ‘⋮’ next to OppDetails, and set the type to Salesforce Opportunity
- Close the card and add a new Salesforce connector to your flow. Select the update operation.
- Click on ‘⋮’ from the top right of the box and select refresh. This will cause DataSense to fetch data from Salesforce.
- After it is done, you will see a dropdown show up for the Type. Select Opportunity and go back to the transform card
- If you do not see fields in the Output section, refresh this card similar to above. You will see input and output fields both populated
- Drag and drop the ID from OppDetails in the input to ID on the output. Similarly, drag the OrderID from input to OrderNumber__c on the output
- Test your flow again, once the opportunity is closed, you will get an SMS, as well as the opportunity details, will have an order number
Step 8: Testing your integration
You made it to the last step! Time to take our mule application for a spin. Here is how you can test your application:
- Make sure there are no outstanding errors. If there are errors, read the description and verify your steps from the guide. You can also open the logs from the taskbar at the bottom to investigate your errors
- Verify you have entered your phone number on the “To” field in the transform card before the Twilio connector
- If there are no errors, and the ‘Run’ button is available, run the application. Once it is running, you will see a green checkmark saying ‘Latest changes applied’
- Login to your Salesforce instance using the credentials you used in the connector. Open the Sales app from the app switcher.
- Go to Opportunities and change the view to ‘All Opportunities’ instead of ‘Recently Viewed’ using the dropdown.
- Find an opportunity which does not have the ‘Closed Won’ stage
- Open and edit the opportunity using the dropdown from the top right. Change ‘Stage’ to ‘Closed Won’. Update the Amount to be greater than $100,000. Notice OrderID field is empty. Save.
- Go back to your flow, if you can see the green lines below the cards flowing through all the way until the last connector, your flow has been triggered and you should have received a text message with the order details.
- Switch back to Salesforce and refresh the opportunity page. You should see the OrderID populated with the value from the SMS
Next steps
You did it! You built your first flow using the Anypoint Platform! Congrats. To learn more about the Anypoint Platform, and to learn how to create your first API, click the link below to go to the next tutorial.


Try Anypoint Platform for free
Start your 30-day free trial of the #1 platform for integration, APIs, and automation. No credit card required. No software to install.
Questions? Ask an expert.
