In the previous tutorial, we learned the best practices to set up a global.xml file and externalize the properties in Anypoint Studio. In this tutorial, we are going to learn how to create secure properties files. These properties files are where you will want to insert information such as private keys, client enforcement tokens, or other bits of information that you will want to reuse in multiple places in your project. When your Mule flows start to become long and robust, having all of your variables in a properties file will allow you to only change values in one place without having to modify every instance of that value throughout your project.
Prerequisites
- Anypoint Platform - We’ll need an Anypoint Platform account to host our application on CloudHub. You can sign up for a free trial account here.
- Anypoint Studio - This is MuleSoft’s IDE! Anypoint Studio enables you to start building APIs and integrations quickly with hundreds of pre-built connectors, templates, and examples. Download Anypoint Studio here.
- REST Client - Download and install any REST Client of your choice. There are plenty of options out there for you to use, you can download MuleSoft’s Advanced REST Client, or you can use the popular REST Client Postman. We’ll be using Postman throughout these tutorials.
- Base code - There are two options for gathering the base code we will use for this tutorial: 1) Start from the first tutorial of this series to generate the base code on your own. 2) Download the base code here:
Create your environments’ secure properties files
Whenever you are storing global variables, unique tokens or keys, or login credentials, you should always store them in a properties file. Storing all of your variables in a single file will help keep your project organized, and if you ever need to make a change to an existing system or migrate the integration, you won’t have to make any manual modifications to your existing code.
In order to have a better organization of your properties, it is a best practice to separate your secure properties in files per environment. You can create a local.secure.properties file for your local settings, a dev.secure.properties for your dev environment, a qa.secure.properties for your testing environment, etc.
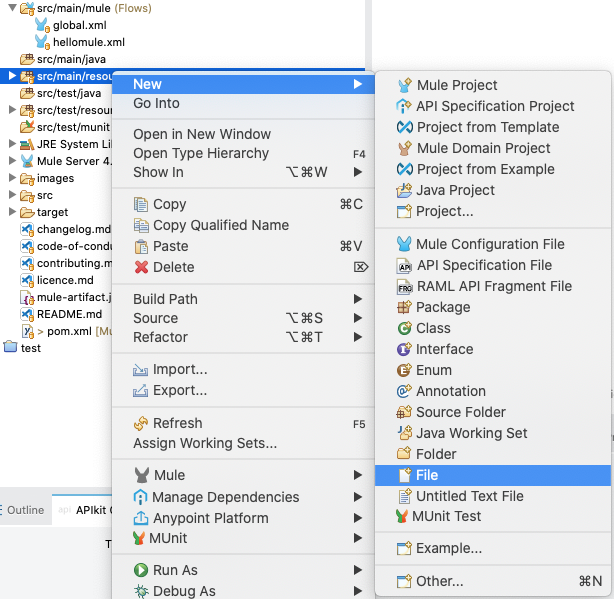
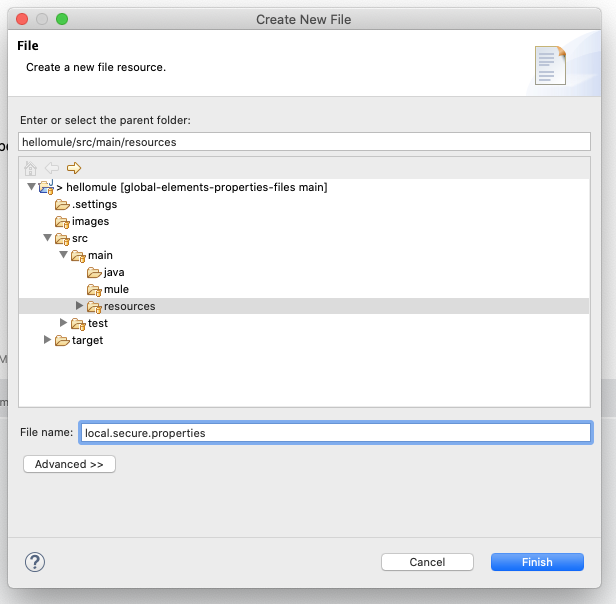
To create a local.secure.properties file, right-click on src/main/resources and click on New > File and name the file local.secure.properties.
Now that you have successfully created the file, double click on your local.secure.properties file to add a new entry.
Add the properties:
1
2
example.username=myUsernameLocal
example.password=myPasswordLocal
After you have entered your private credentials into the local.secure.properties file, repeat the same steps for a dev.secure.properties file.
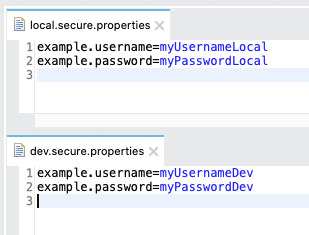
For the dev.secure.properties, we changed both values from Local to Dev to show the difference at runtime.
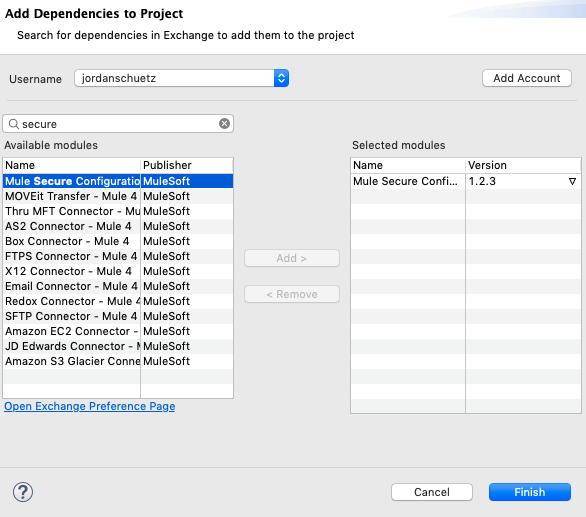
The next step is to search Exchange for the Mule Secure Configuration Properties module. In your global.xml file, select the Search in Exchange option from the Mule Palette. Search for the module and click on Add >.
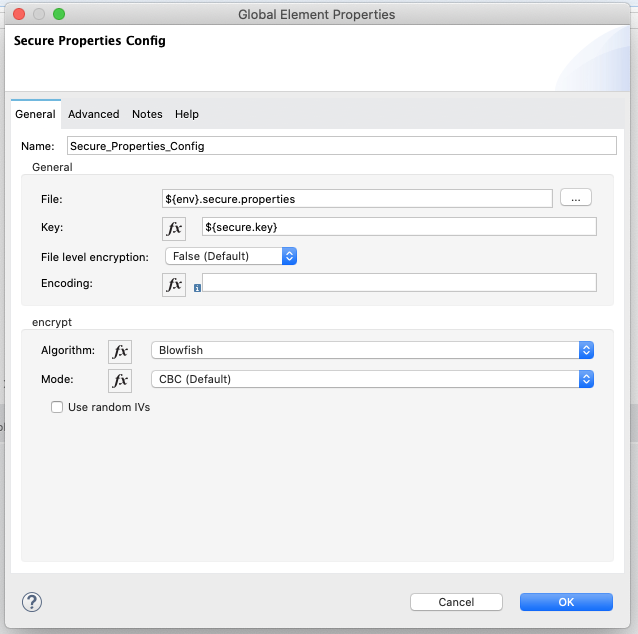
Once you import your Secure Properties module, go to the Global Elements view. Click the Create button and create a Secure Properties Config. Under File, type ${env}.secure.properties. This is a dynamic file. The Mule App will read the env property first and then the appropriate file based on it. In this case, local.secure.properties.
Under Key, type ${secure.key} and select Blowfish as the Algorithm. The secure.key value will also be a property, but we don’t want to add this property in our code directly because that is a possible security breach. We will be passing the key every time we start the application, either from our local computer or from CloudHub. We’ll learn how to pass this key later in this tutorial.
Save changes in all your files.
Set up a logger to read your secure credentials
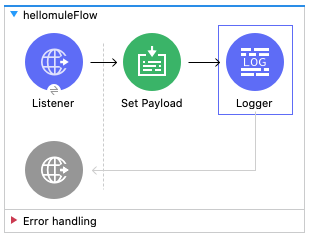
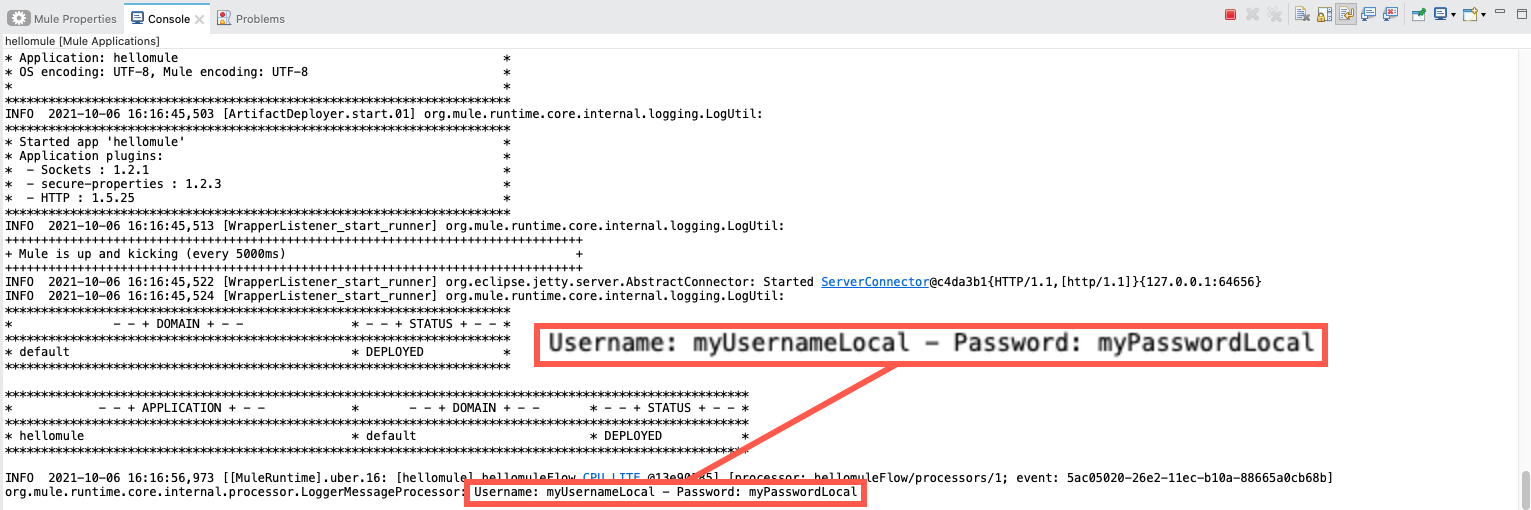
We’ll set up a logger component to output the credentials into the console. Go to the hellomule.xml file and add a Logger component from the Mule Palette - you can find it under the Core module.
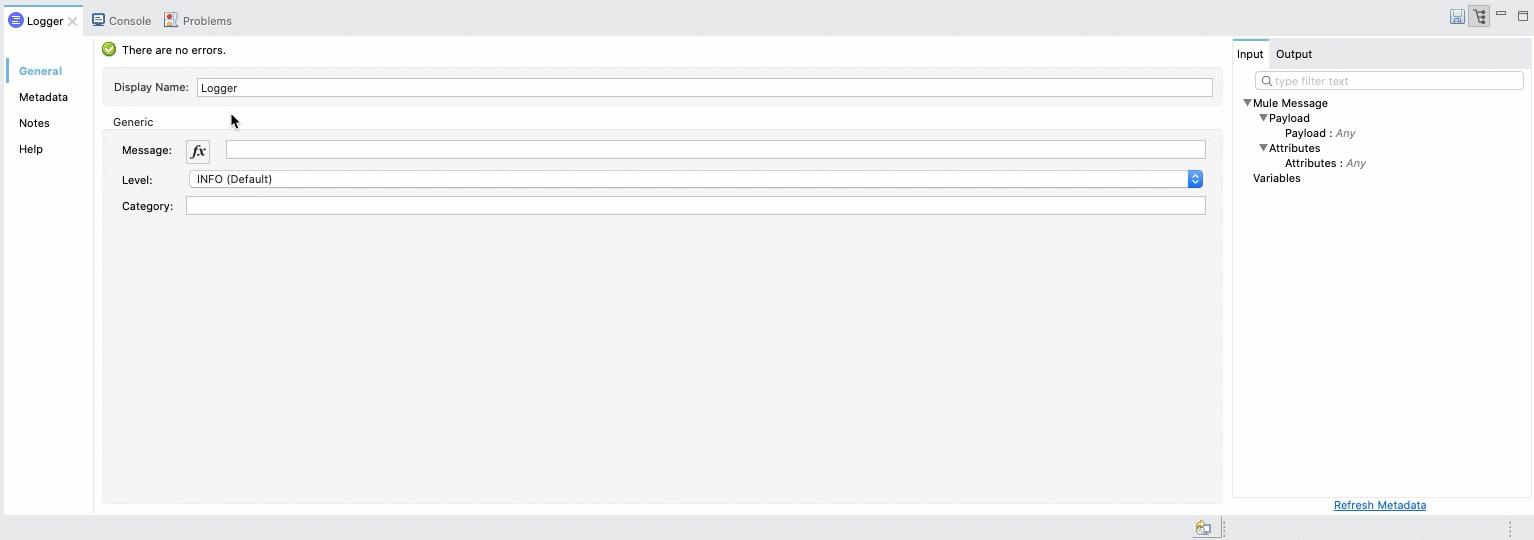
In the configuration, click on the fx button and then on the Show Graphical View button to the right. This will open a bigger view to add your DataWeave code. You can use the buttons next to the blue Done button to switch between the different views available.
Add this code to output a String with the two secured properties:
1
2
3
4
5
output application/java
---
"Username: " ++ Mule::p("secure::example.username")
++ " - " ++
"Password: " ++ Mule::p("secure::example.password")
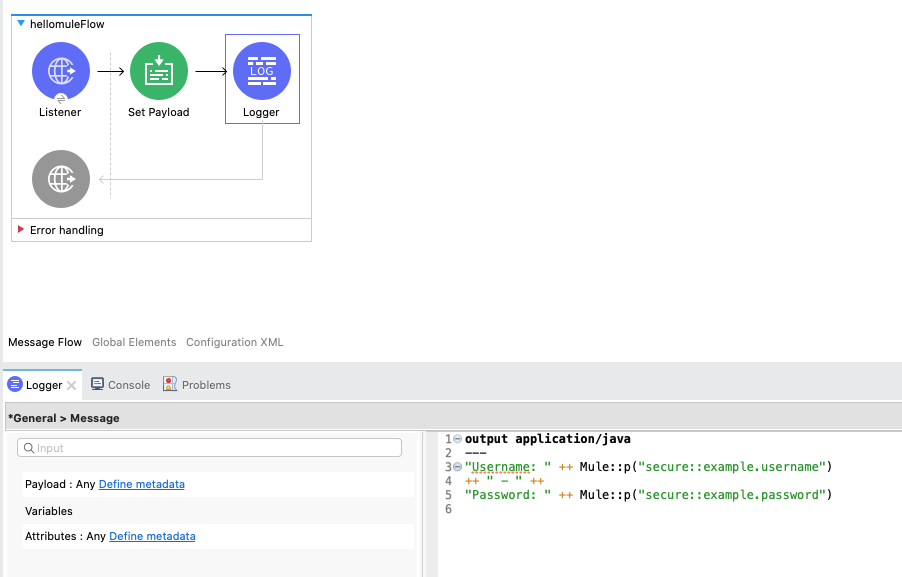
Note the secure:: that we added before the property name. This tells the application it needs to decrypt these values before using them. Save all files.
Encrypt your properties files’ values
Download the Secure Properties Tool Jar file from the official MuleSoft documentation. Open a terminal or command line prompt in the directory where this Jar file is located and run the following:
1
2
3
4
5
6
7
java -cp secure-properties-tool.jar com.mulesoft.tools.SecurePropertiesTool \
string \
encrypt \
Blowfish \
CBC \
MyMuleSoftKey \
"myUsernameLocal"
This will return the encrypted value of myUsernameLocal, which is the property we are using as an example. Note that the key we’re using to encrypt the property is MyMuleSoftKey. We will be using this value as the secure.key property to decrypt the values at runtime.

After you get the encrypted value, you need to add the following syntax in the properties files:
![encryptedValue]If your encrypted value was HbsuWJRjiubchmzQREGdsA==, then your property should be ![HbsuWJRjiubchmzQREGdsA==]. Repeat for each property in local.secure.properties and dev.secure.properties. You should end up with something like this:

Test your application on your local computer
Right-click on your Mule project and select Run As > Run Configurations.

Go to the Environment tab and click on Add. Input the following and click OK:
| Name | secure.key |
| Value | MyMuleSoftKey |
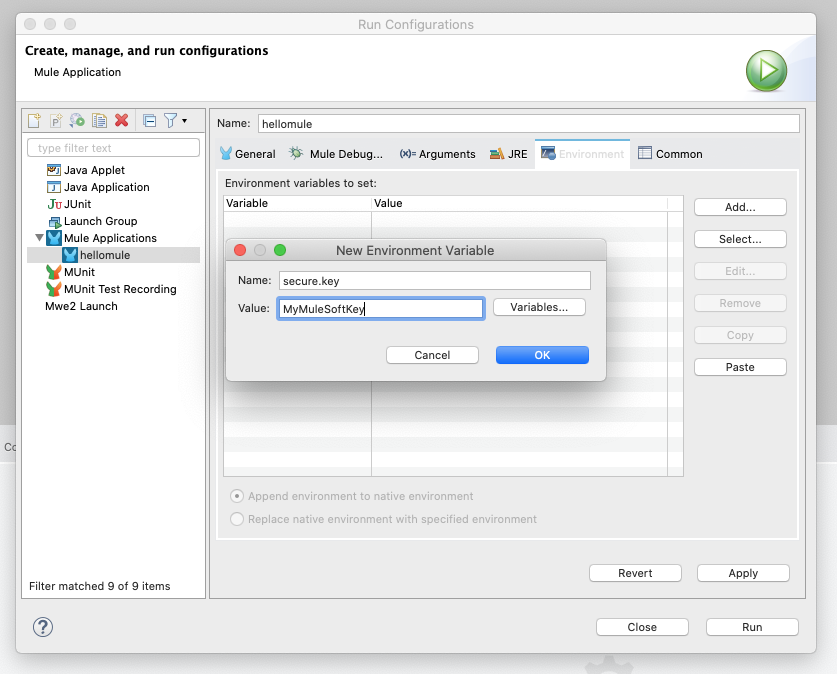
Once that’s set, click on Apply and Run. This will send the secure.key property at runtime and it will not be saved in your code. We do this to prevent security breaches if someone has access to the source code of our application. After you get the DEPLOYED status, go back to your REST client (in this case we’ll be using Postman). Send a request to localhost:8081/hellomule. You should see the decrypted values in your Console.
Stop your application.
Deploy to CloudHub with your secure credentials
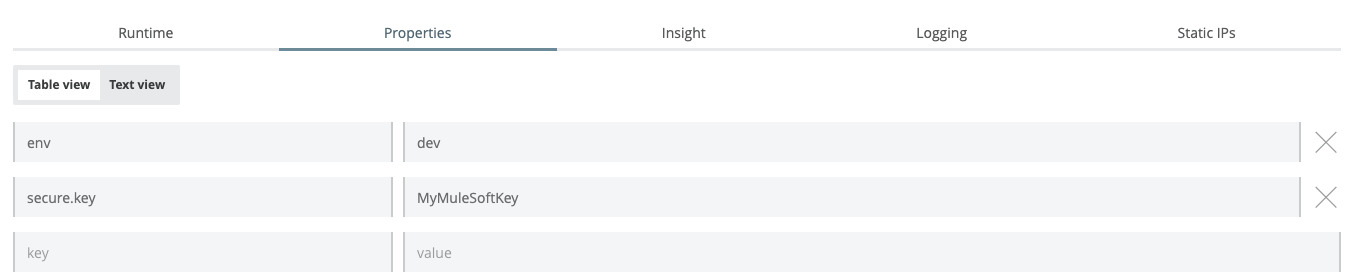
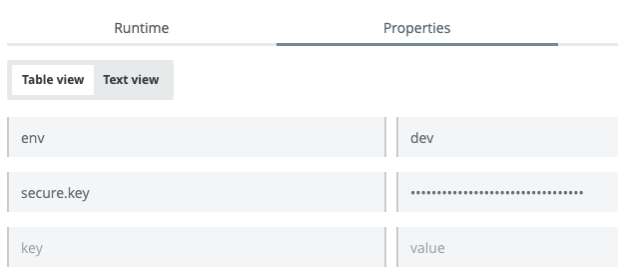
It’s important that before you deploy your application to CloudHub, that you add your secure.key and your env values to your deployment properties. Sign in to Anypoint Platform and go to Runtime Manager. Select your Sandbox environment and click on your previously deployed application. Now, go to the Properties tab and add the two properties. This time the env property should be set to dev. Click on Apply Changes.
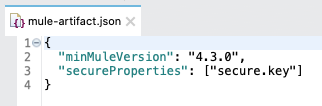
Notice how the secure.key value is not currently hidden. To hide it, go to your mule-artifact.json file in Anypoint Studio and add this line before the closing brackets (don’t forget to add a comma at the end of the minMuleVersion line):
1
"secureProperties": ["secure.key"]
Save all your files and deploy your Mule App to CloudHub by selecting Anypoint Platform > Deploy to CloudHub.
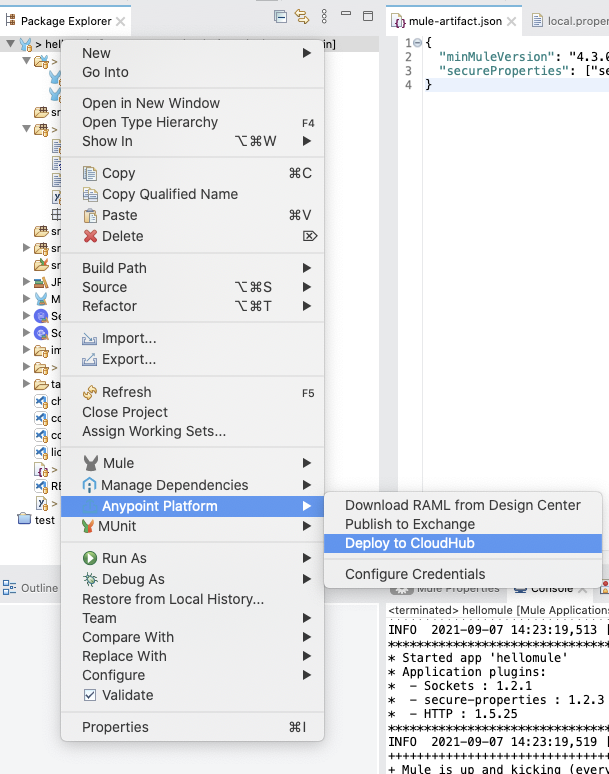
Make sure you select the previously deployed application as the Deploying Application. After it finishes deploying, refresh the page, and your secure.key property should now be hidden in Runtime Manager.
You should see the decrypted values in the Logs tab after calling your CloudHub application. Remember you can call your CloudHub app by using the App url ending in .cloudhub.io.

Next Steps
Do you have any questions about the code? You can compare your Mule project with ours to make sure everything was set up correctly.
Nice job completing this tutorial and learning how to create secure properties files that you can use to reference important values in your Mule application. In the next tutorial, we’ll show you how to set up API Autodiscovery to sync API Manager and Runtime Manager.
Click on the Next button below to continue to the next tutorial.


Try Anypoint Platform for free
Start your 30-day free trial of the #1 platform for integration, APIs, and automation. No credit card required. No software to install.
Questions? Ask an expert.
