Overview
The Salesforce Connector enables developers to create applications that react to common Salesforce events such as adding, changing, or deleting objects. With the Salesforce Connector, you can connect directly to the Salesforce APIs without needing to write any code. The only credentials you will need for the Salesforce connector is a Salesforce developer account and a Salesforce security token. In many business applications, you will need to connect Salesforce to existing databases, ERP systems, and custom applications. These integrations can be easily built and executed using MuleSoft’s Anypoint Studio.
As a developer, there are five common Salesforce integration patterns that you should be familiar with when attempting to integrate Salesforce with MuleSoft. You can read more about these integration patterns by clicking the link to read the Top 5 Salesforce Integration whitepaper. In this tutorial, we will be covering the five common Salesforce integration patterns:
- Migration
- Broadcast
- Aggregation
- Bidirectional synchronization
- Correlation
Signup for free to build your first Salesforce integration
The first step is to Sign up for Anypoint Platform for free. Click the button below to create a free account.
Already have an account? Sign in.
Migration
Data migration is when you move a specific set of data from one system to another. This migration pattern applies to numerous Salesforce integration use cases, such as migrating data from a legacy ERP system to Salesforce, or consolidating CRM systems for example. This pattern is intended to handle large volumes of data, and you can process records in batches using the Batch Connector.
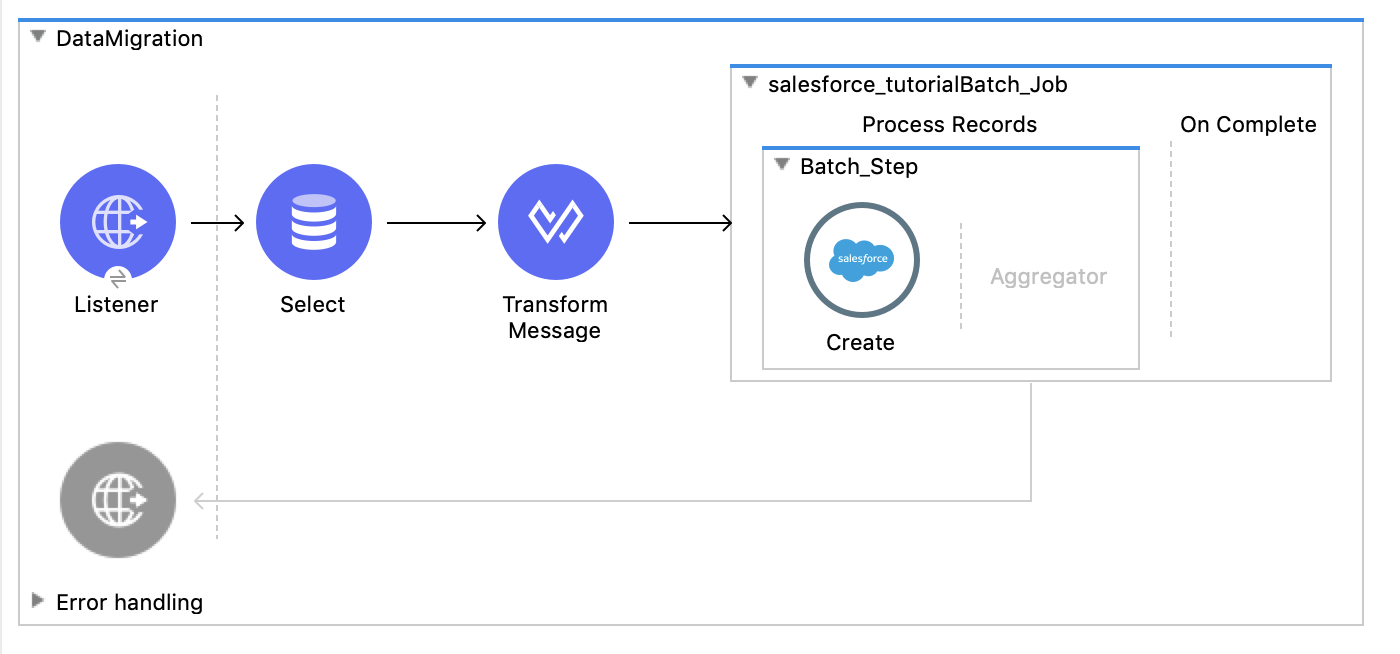
In the above scenario, we have set up a flow that listens for a successful request to our HTTP endpoint. Once the HTTP endpoint is hit, it will select values from a database, and insert each of those values as a new lead in Salesforce. Let’s walk through how this was made and how you can build this same integration in your own Anypoint Studio project.
First, go to File -> New -> Mule Project then go to the Mule Palette. Add the HTTP module to your project, and drag the HTTP Listener into your flow. Set the port to 8081, the path to: /salesforce. Next, go to the Mule Palette, and add the Database Module to your project. Drag the Select connector into your flow.
Click on the Database connector, and set up your connector configuration by clicking the green plus. Select MySQL Connection at the top Connection dropdown field. Then, click the Configure button and select Add recommended libraries to automatically assign drivers to your connector.

Once you add the JDBC Driver, add the following database credentials:
- Host: congo.c3w6upfzlwwe.us-west-1.rds.amazonaws.com
- Port: 3306
- User: mulesoft
- Password: mulesoft
- Database: congo
Next, click the Test Connection button to verify that the connector is able to successfully connect to the database. Click OK then, in the Query field, add the following MySQL Query Text:
- SELECT * FROM contacts;
Next, add the Transform Message Connector to your flow and copy and paste the following DataWeave code:
1
2
3
4
5
6
7
8
9
%dw 2.0
output application/json
---
payload map(item, index) ->{
FirstName: item.FirstName,
LastName: item.LastName,
Email: item.Email,
Company: item.Company
}
Next, add the For Each Connector to your flow. This will iterate through every value in the database and add a new lead for each database entry.
Next, go back to your Mule Palette and add the module called Salesforce to your project. Drag the Create Salesforce Connector so it’s located inside of the For Each scope. Set up your Salesforce Config and include your username, password, and security token. Once you Test Connection to verify everything is working, click OK. Under Type, select Lead, and under Records type: [payload]
Next, add a Batch Job connector to the scene, and drag the Create Connector under the Batch Step scope. This will process all process the records asynchronously limiting API calls to Salesforce.
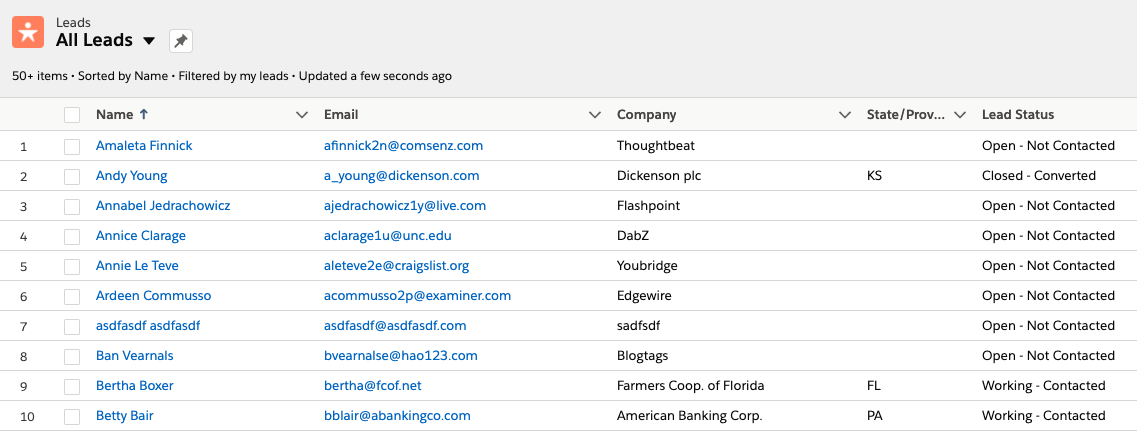
Nice job! You have just finished your first flow. When you right-click and run your project, and make a POST request to http://0.0.0.0:8081/salesforce using Postman, it will input each entry in your Database as a new lead. Login to SFDC, in the main navigation, go to Sales, then go to Leads to view all of the lead’s input from the Database.
Broadcast
The broadcast pattern moves data from a single source system to multiple destination systems in real-time. This is considered to be a “one-way sync” and is optimized for processing records as quickly as possible. Broadcast patterns are also used to keep data up to date between multiple systems.
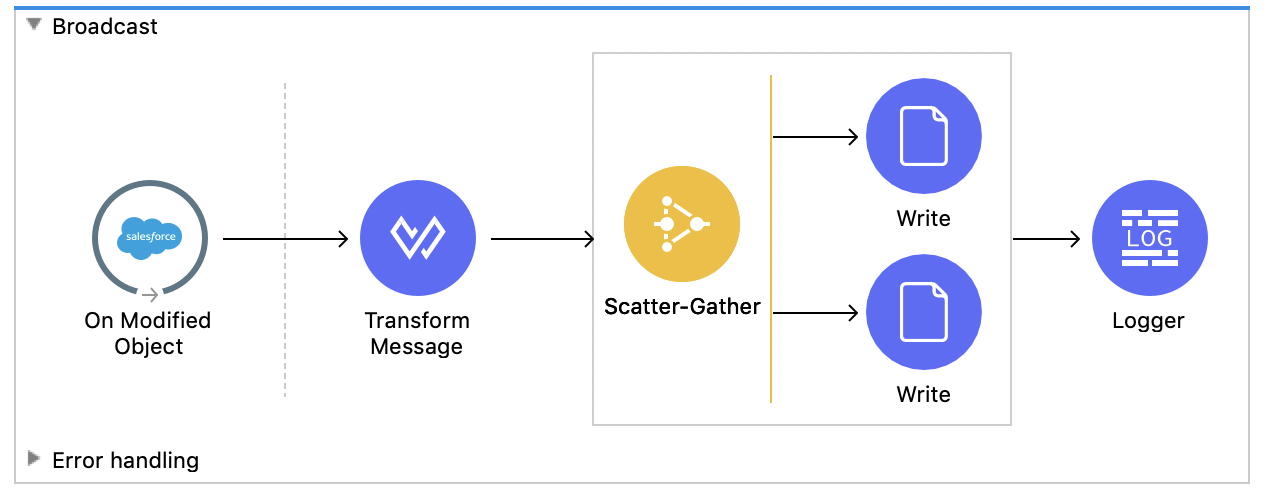
In the above screenshot, we have a flow that executes when Salesforce detects a new Lead has been added to Salesforce. When a new lead has been added, the flow will transform the message payload, and write that message to two local CSV documents. Once both of those actions execute, it will print out in the console that the flow has been successfully executed.
The Scatter-Gather Connector will require both actions to be performed until it moves to the next step in the flow. This is very powerful if you need to write to different ERP systems, databases, etc and then continue the flow execution once the data has been sent to all existing systems. Let’s walk through how we created this integration:
To start, drag the On Modified Object Connector from the Mule Palette on the canvas. This will create a new flow. Click on the On Modified Object Connector and select Lead under Object type. Next, add a Transform Message Connector to your flow.
1
2
3
4
5
6
7
8
9
%dw 2.0
output application/json
---
[payload] map {
"FirstName": payload.FirstName,
"LastName": payload.LastName,
"Company": payload.Company,
"Email": payload.Email
}
Next, in the Mule Palette, under Core, select the Scatter-Gather Connector. The Scatter-Gather component sends the same message to multiple message processors in parallel. This means that the flow will wait to execute until both of the operations have been successfully executed. In this case, we are going to add two File Write Connectors to the Scatter-Gather. For each File Write, add the following DataWeave code under Content:
1
2
3
4
5
6
7
8
9
%dw 2.0
output application/csv header = false, headerLineNumber = 0
---
payload map ( payload01 , indexOfPayload01 ) -> {
FirstName: payload01.FirstName as String,
LastName: payload01.LastName as String,
Company: payload01.Company as String,
Email: payload01.Email as String
}
Under Path, the folder location you would like these files to be created in. End the expression with Accounts.csv and for the second Write add Accounts2.csv. Make sure under Write Mode you select APPEND.
That’s it! Now when you add a new Lead to Salesforce, this flow will execute and will create two matching CSV files on your machine with the lead information inserted. You can use similar logic to broadcast this data to other systems in parallel using Scatter Gather.
Aggregation
Aggregation is the simplest way to extract and process data from multiple systems into one application. With the aggregation pattern, developers can easily query multiple systems and merge data to output to their target system. Common use cases for aggregation include merging CSV files together and sending the desired output to Salesforce.
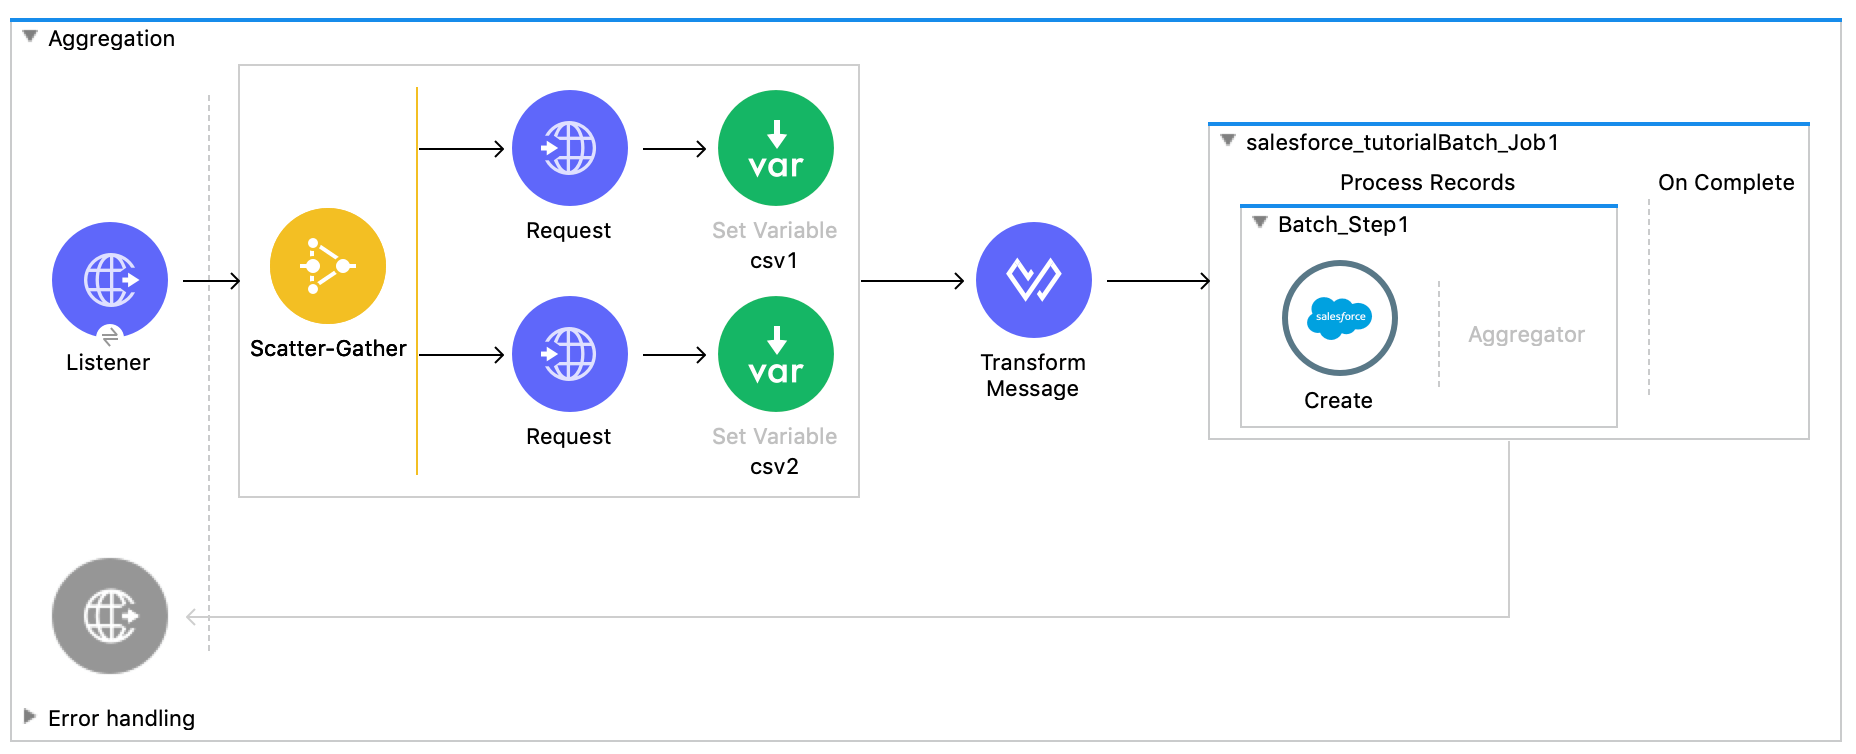
In the above screenshot, we have a flow that will execute when our HTTP endpoint is hit with a POST request. When the flow executes, it will query two CSV files located on different servers, merge the data together, and upload those entries as a new lead in Salesforce. The first CSV file contains fname, lname, company, email and uuid. The second CSV file includes uuid, annualrevenue, and phone. The above data transformation will use UUID as a key, and add Phone and AnnualRevenue to the proper JSON objects in the first CSV document. Essentially, we are merging the data together to create one single output.
To develop this integration, we first drag an HTTP listener into the scene. Then we drag the Scatter-Gather Connector and then drag two HTTP requests into the flow. Each HTTP request is going to be set to the Method GET and the URLs will be:
https://mulesoft.s3-us-west-1.amazonaws.com/userdata.csv
https://mulesoft.s3-us-west-1.amazonaws.com/moreuserdata.csv
Then drag two Set Variable Connectors into the scene, and set each one equal to payload and name them csv1 and csv2.
Next, drag a Transform Message as the next component in the flow. Add the following DataWeave code to the Transform Message:
1
2
3
4
5
6
7
8
9
10
11
12
%dw 2.0
import * from dw::core::Arrays
output application/json
---
vars.csv1 map(item, index) ->{
FirstName: item.fname,
LastName: item.lname,
Email: item.email,
Company: item.company,
AnnualRevenue: vars.csv2.AnnualRevenue[indexOf(vars.csv2.uuid, item.uuid)],
Phone: vars.csv2.Phone[indexOf(vars.csv2.uuid, item.uuid)]
}
This code takes the index of the UUID, and adds AnnualRevenue and Phone to the correct entries in the other CSV document. We are essentially matching up the indexes, then inserting the corresponding values where appropriate.
Finally, add a For Each Connector, and inside of the For Each add the Salesforce Create Connector. Under type, select Lead and under records type: [payload]
Add a Batch Job connector to the scene, and drag the Create Connector under the Batch Step scope.
Nice job! You have now successfully created an aggregation integration between multiple systems and Salesforce.
Bidirectional synchronization
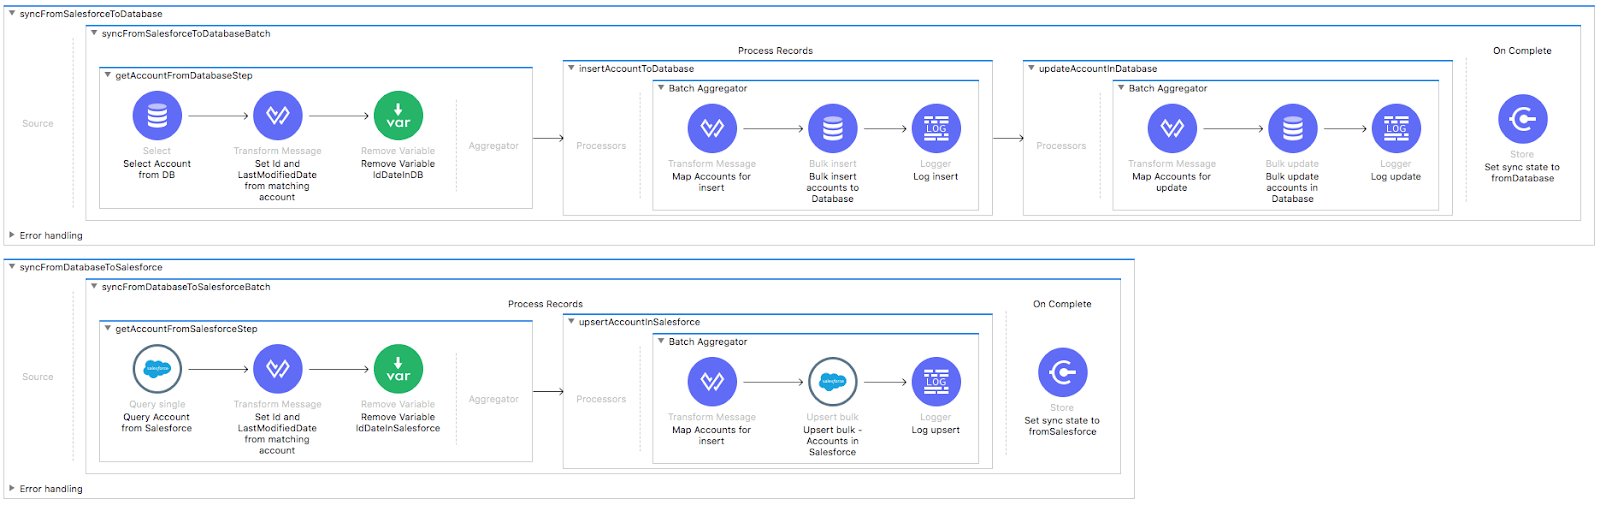
Bidirectional sync is the act of uniting two or more data sets from two or more different systems to behave as one single system that recognizes the existence of different data sets. This type of integration is useful when different tools or different systems, which are needed in their own right and for their own specific purposes, must accomplish different functions on the same data set. When you apply bidirectional sync to Salesforce, you can use Salesforce as the primary system of record and then synchronize that with a secondary system such as a database, ERP system etc. Bidirectional sync integration enables each system to perform optimally while maintaining data integrity across both synchronized systems. This provides flexibility to modularly add and remove systems without the worry of losing data.
In the above screenshot, the flow is bidirectionally syncing accounts between Salesforce and database instances. The flow will fetch data from new or modified accounts that have been added in either Salesforce or the database instances. For the accounts that were identified as not present in the target instance, the integration triggers an insert or update operation on the existence of the object in the target instance taking the last modification of the object as the one that should be applied.
To try this template out yourself, check out the file hosted on Exchange which you can download and try out right in your Anypoint Studio project.
Correlation
Correlation and bidirectional sync are very similar but the patterns have one critical difference. Whereas bidirectional synchronization aims to replicate the same data elements in two locations, correlation is used to associate disparate data records without copying the data itself. Bidirectional synchronization will create new records if they are found in one system and not the other. The correlation pattern is not discerning in terms of the origination of objects. It will agnostically synchronize objects as long as they are found in both systems.
Correlation is useful for cases in which two groups or systems only want to share data, but only if they both have records representing the same items or contacts in reality. The correlation pattern is most useful when extra data is more costly than beneficial as it scopes out the “unnecessary” data. For example, hospitals in the same health care network may want to correlate patient data for shared patients across hospitals, but it would be a privacy violation to share patient data with a hospital that has never admitted or treated the patient.
With the correlation pattern, the most important consideration is the definition of the term “same’ across records. This definition can vary by industry and consequences for unclear definitions also vary. For example, in targeting offers to customers, the same name may be close enough; however, in a hospital, relying on a name could have serious consequences if two patients have the same name and different courses of treatment. The table below illustrates what can occur when the definition of “same” is too strict, too lax, or accurate across correlation and bidirectional sync.
Conclusion
Thank you so much for reading this tutorial on how to build integrations to connect to Salesforce. We hope that covering each integration pattern with a working example helps paint the picture of how powerful the MuleSoft platform is, and how easy it is to integrate with the Salesforce platform using MuleSoft. Please rate the tutorial below, and if you want to read more introductory developer content on MuleSoft, please visit the developer tutorials homepage.


Try Anypoint Platform for free
Start your 30-day free trial of the #1 platform for integration, APIs, and automation. No credit card required. No software to install.
Questions? Ask an expert.
