This tutorial was updated in January 2022 and is based on Runtime Fabric v1.10 release.
In this tutorial, we’ll walk you through deploying a hello world Mule app to an Azure Kubernetes Service (AKS) cluster using Runtime Fabric. You’ll learn how to:
- Create an Azure Kubernetes Service (AKS) cluster using the
Azure CLI - Use
kubectlto create an ingress controller - Install Runtime Fabric using
rtfctl - Deploy and test a simple Hello World Mule app to run on your new cluster
To get started as simply and quickly as possible, this tutorial includes steps to create an AKS cluster, nodes and a Runtime Fabric instance with default settings. Before creating a cluster, nodes and a Runtime Fabric instance for production use, we recommend that you familiarize yourself with all settings and deploy settings that meet your requirements. For more information, see Azure Kubernetes Service documentation. For detailed Runtime Fabric documentation see Anypoint Runtime Fabric Overview.
Prerequisites
Anypoint Platform- We’ll need an Anypoint Platform account to create our Runtime Fabric service. You can sign up for a free trial account here.Azure CLI- A cross-platform command-line tool to connect to Azure and execute administrative commands on Azure resources. See installing Azure CLI. This tutorial requires that you use version 2.1 or above.kubectl- A command line tool for working with Kubernetes clusters. This tutorial requires that you use version 1.21 or later. For more information, see installing kubectl.rtfctl- A command line tool to locally manage Runtime Fabrics. This tutorial requires that you use version 0.3.135 or later. See installing rtfctl.curl- A command line tool for transferring data using various network protocols. See installing curl.
In order to successfully deploy Mule applications to Runtime Fabric you also need:
- A valid enterprise licence – Your MuleSoft account representative will help you acquire an Enterprise licence in the form of a licence.lic file.
- A supported version of Kubernetes. This tutorial creates an AKS cluster using v1.20. For an up to date list of supported versions see Runtime Fabric on Self-Managed Kubernetes.
- The identity you are using to create your cluster has the appropriate minimum permissions. For more details on access and identity for AKS, see access and identity options for Azure Kubernetes Service (AKS).
Create a resource group
An Azure resource group is a logical group in which Azure resources are deployed and managed. The following example creates a resource group named my-mule-resource-gp. Replace example values with your own.
1 - Login to the Azure CLI.
1
az login
To finish the authentication process, follow the steps displayed in your terminal. After logging in you will see output similar to the lines below.
Output
1
2
3
4
5
6
7
8
9
10
11
12
"cloudName": "AzureCloud",
    "homeTenantId": "<tenant-id>",
    "id": "<id>;",
    "isDefault": true,
    "managedByTenants": [],
    "name": "<subscription>",
    "state": "Enabled",
    "tenantId": "<tenant-id>",
    "user": {
        "name": "<username>",
        "type": "user"
    }
2 - Create a resource group.
1
az group create --name my-mule-resource-gp --location australiaeast
Output
1
2
3
4
5
6
7
8
9
10
11
{
  "id": "/subscriptions/<id>/resourceGroups/my-mule-resource-gp",
  "location": "australiaeast",
  "managedBy": null,
  "name": "my-mule-resource-gp",
  "properties": {
    "provisioningState": "Succeeded"
  },
  "tags": null,
  "type": "Microsoft.Resources/resourceGroups"
}
Create AKS cluster
1 - Create a new AKS cluster. The following creates a cluster named my-mule-aks with one node.
1
2
3
4
5
az aks create --resource-group my-mule-resource-gp --name my-mule-aks \
    --node-count 2 \
    --generate-ssh-keys \
    --kubernetes-version 1.20.9 \
    --node-vm-size Standard_DS2_v2
After a few minutes, the command completes and returns JSON-formatted information about the cluster. The last few lines of which are shown below.
Output
1
2
3
4
5
6
7
8
9
10
11
12
13
14
Registration succeeded
...
  "provisioningState": "Succeeded",
  "resourceGroup": "my-mule-resource-gp",
  "securityProfile": null,
  "servicePrincipalProfile": {
    "clientId": "msi",
    "secret": null
  },
 ...
  "tags": null,
  "type": "Microsoft.ContainerService/ManagedClusters",
  "windowsProfile": null
}
2 - Configure kubectl to connect to your Kubernetes cluster.
1
az aks get-credentials --resource-group my-mule-resource-gp --name my-mule-aks
3 - Verify the connection to your cluster using the kubectl get command.
1
kubectl get nodes
When you create a cluster using az aks create, an entry is automatically added to the kubeconfig in your environment, and the current context changes to that cluster.
Output
1
2
3
NAME                                STATUS   ROLES   AGE     VERSION
aks-nodepool1-40975485-vmss000000   Ready    agent   2m41s   v1.20.9
aks-nodepool1-40975485-vmss000001   Ready    agent   2m41s   v1.20.9
Output shows nodes created in the previous steps. Make sure the node status is Ready.
Create Runtime Fabric
1 - Navigate to Anypoint Platform and login.
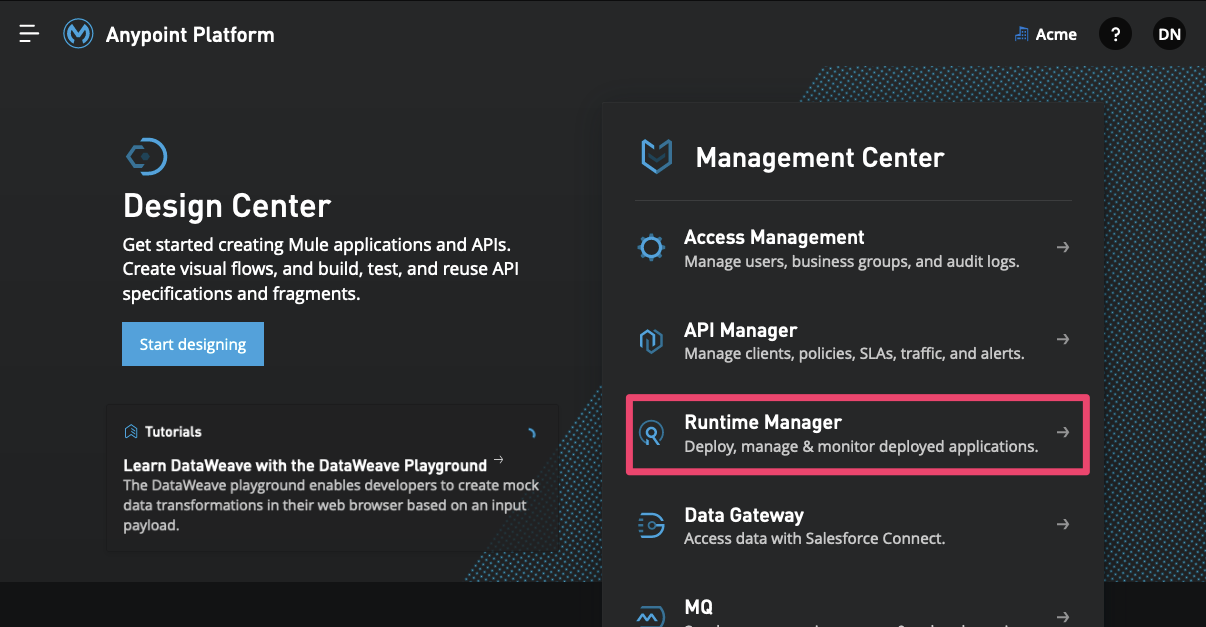
2 - From the home page navigate to Runtime manager.
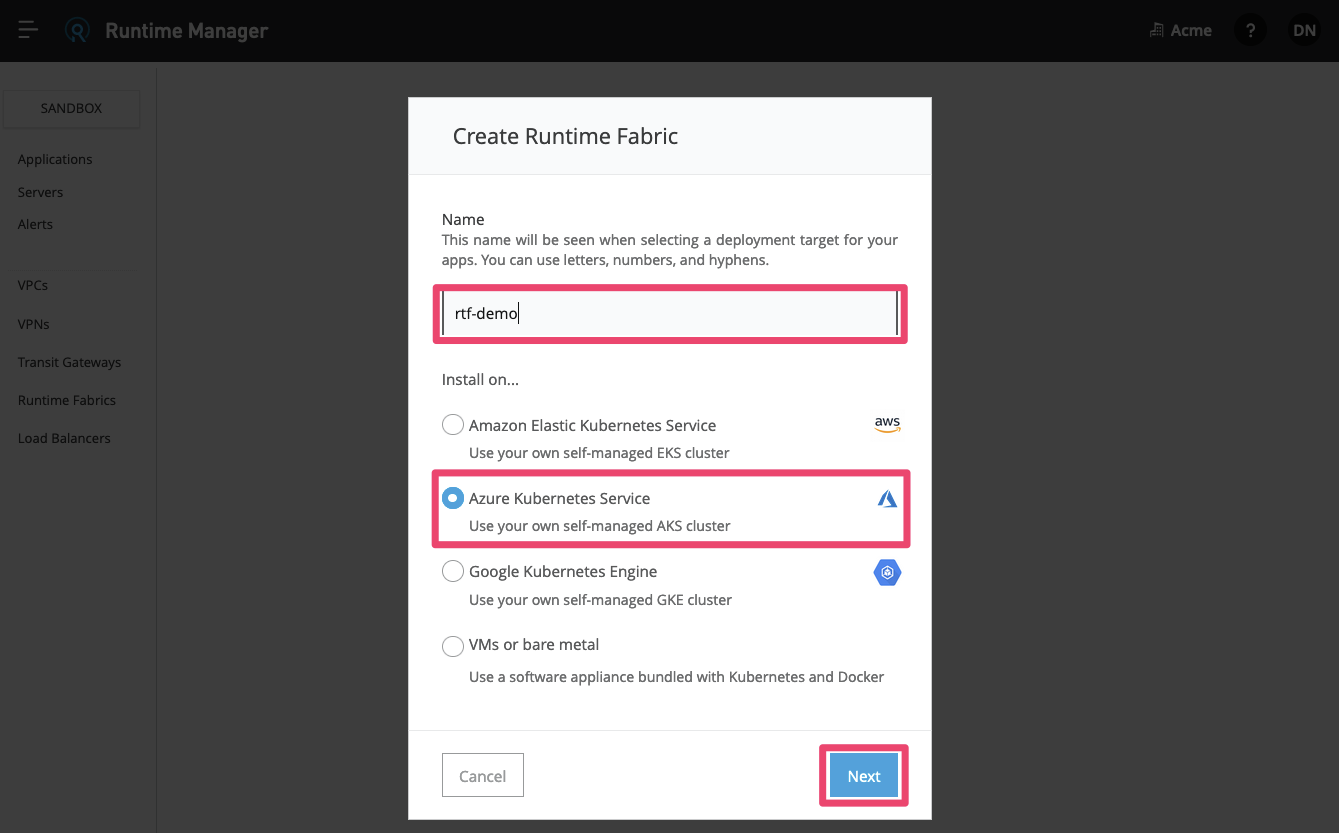
3 - Clicking Runtime Fabrics then Create Runtime Fabric.

4 - Create a deployment target for Mule apps you want to deploy. In this case we’re using the name rtf-demo. Select Azure Kubernetes Service and click Next.
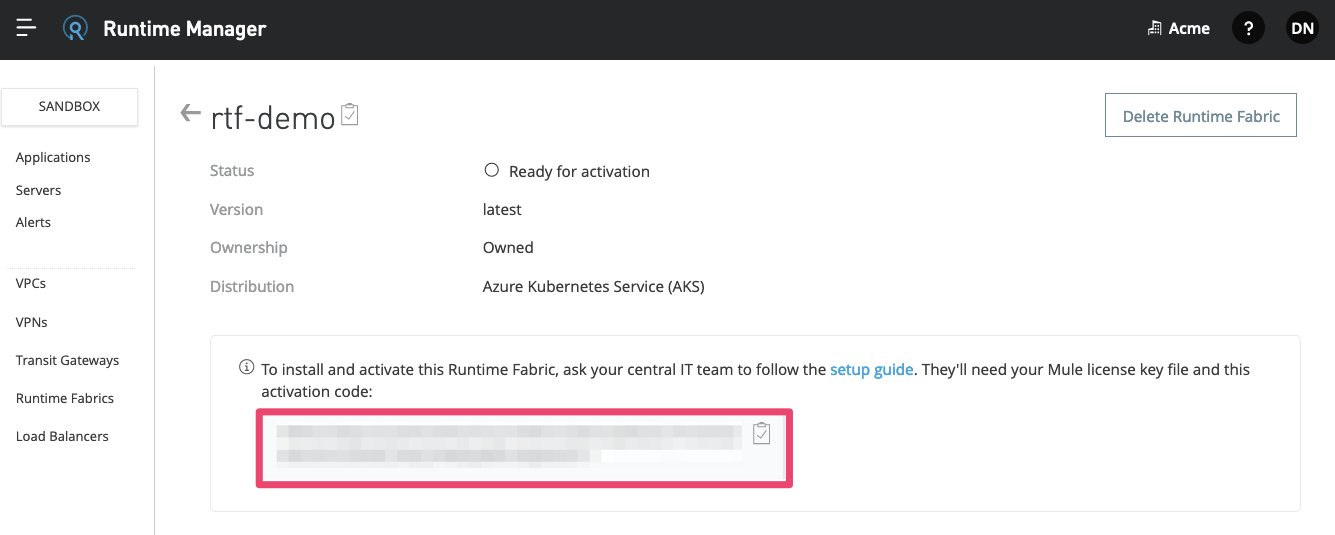
5 - Review the Support responsibility disclaimer, then if you agree click Accept.
6 - This page displays the activation data used to install Runtime Fabric on a Kubernetes service. Copy the activation code to your clipboard for use later on in this tutorial.
Install Runtime Fabric
1 - Validate MuleSoft setup by running the following command. You will need to replace
1
./rtfctl validate <activation-code>
The validate option verifies that:
- The Kubernetes environment is running.
- All required components exist.
- All required services are available.
- The rtfctl command-line utility outputs any incompatibilities with the Kubernetes environment.
Output
1
2
3
4
5
6
7
Clearing validate operation resources.
Waiting for rtf-validate namespace to be removed...
Checking Authorization ..
...
All validations successful. Proceed with installation  ✔
Clearing validate operation resources.
Waiting for rtf-validate namespace to be removed...
2 - Continue to install Runtime Fabric. You will need to replace
1
./rtfctl install <activation-code>
Output
The first lines and last lines of output are similar to the following example line.
1
2
3
4
5
6
7
Installing Runtime Fabric components
Upserting Namespace/rtf...
Upserting PodSecurityPolicy/rtf-install...
…
61s: Waiting for Runtime Fabric to become ready: [mule-clusterip-service]
66s: Waiting for Runtime Fabric to become ready: [mule-clusterip-service]
Runtime Fabric is ready.
3 - Verify the status of the Runtime Fabric installation.
1
./rtfctl status
Output
The first lines and last lines of output are similar to the following example lines.
1
2
3
4
5
6
7
8
9
10
11
12
Upserting Job/rtfctl-cluster-status...
Kubernetes Version:   1.20.9
…
Runtime Fabric Information:

COMPONENTS               HEALTHY   REASON
agent                    true
mule-clusterip-service   true
resource-cache           true
…
CERTIFICATE   HEALTHY   REASON
client-cert   true      client certificate expires at 2022-03-12 02:08:39 +0000 UTC
Configure Runtime Fabric
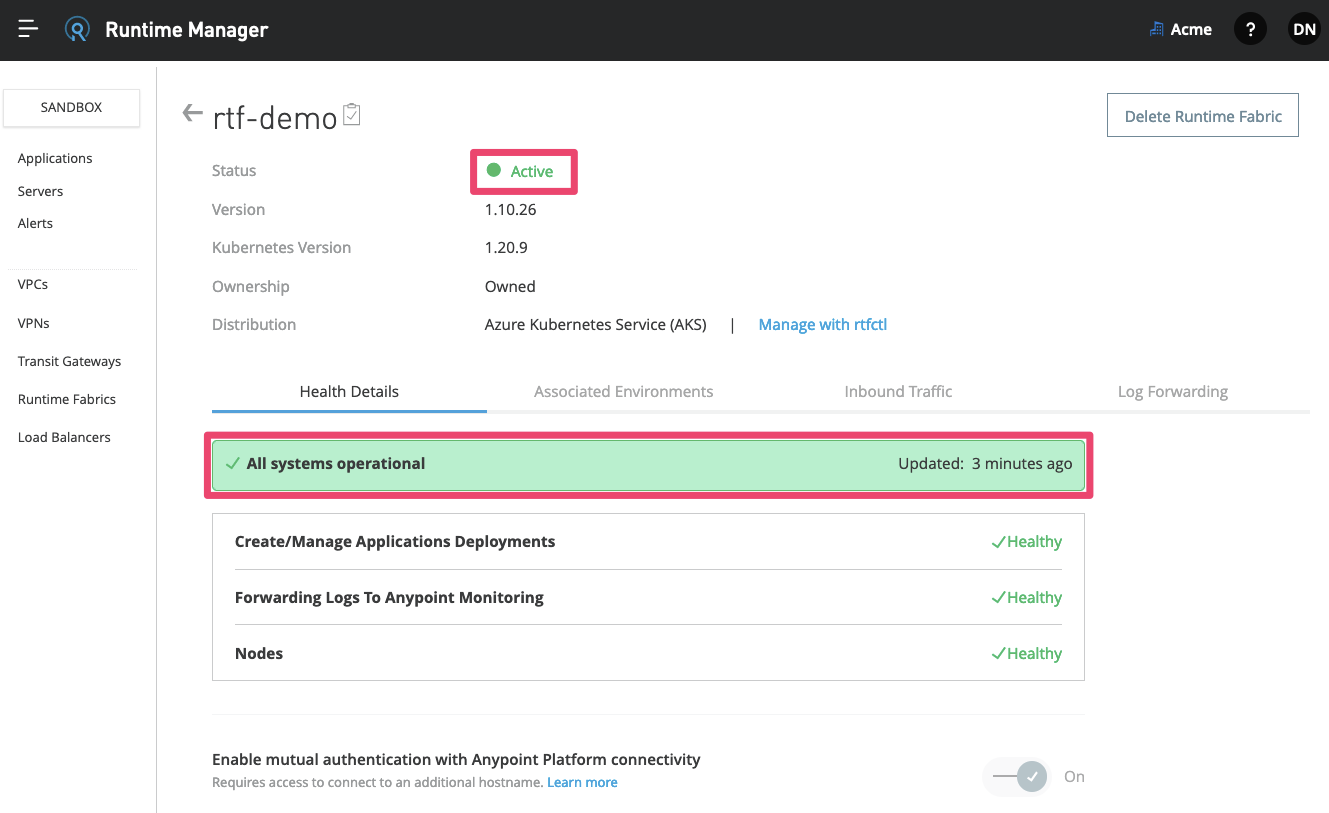
1 - In Anypoint Platform verify that all systems are operational by checking the status and health of your Runtime Fabric. The status attribute should show as active and all systems should be operational.
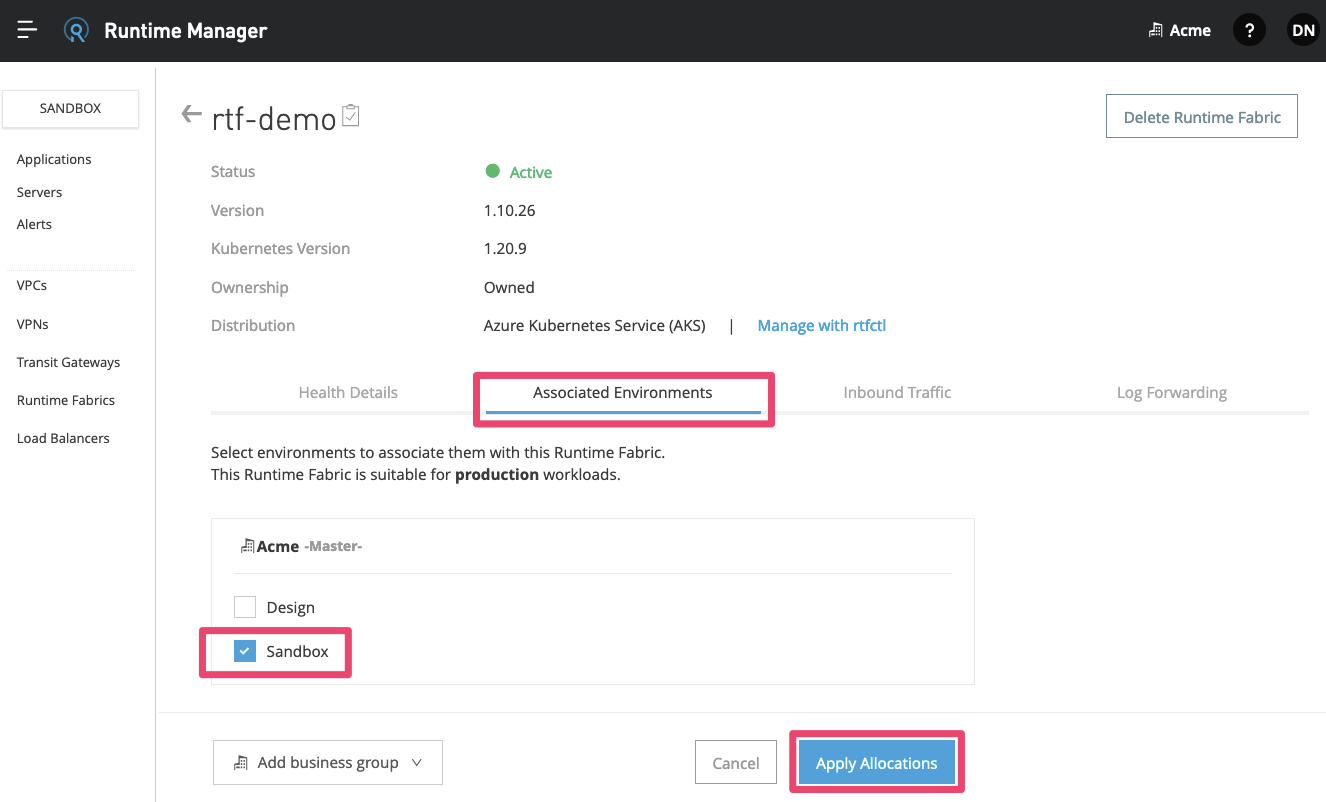
2 - Associate environments to be used with the Runtime Fabric by navigating to the Associated Environments tab - clicking Sandbox and then Apply Allocations.
3 - Update Runtime Fabric with a valid MuleSoft licence key. Replace the path and licence name where necessary.
- To access your license key file. See Download your License Key File.
- Make sure to base64 encode the license. See Base64 Encode your Mule License Key.
1
./rtfctl apply mule-license <icence-key-information>
Output
1
Updating rtf namespace... OK
Create ingress controller
For the purposes of this tutorial we will be using an NGINX controller. Other options are available.
1 - Create a NGINX ingress controller. For full complete installation instructions review the NGINX Installation Guide.
1
kubectl apply -f https://raw.githubusercontent.com/kubernetes/ingress-nginx/controller-v1.1.0/deploy/static/provider/cloud/deploy.yaml
Output
1
2
3
4
5
namespace/ingress-nginx created
serviceaccount/ingress-nginx created
…
job.batch/ingress-nginx-admission-create created
job.batch/ingress-nginx-admission-patch created
Configure ingress controller
Anypoint Runtime Fabric on Self-Managed Kubernetes enables you to specify custom Ingress configurations using an ingress resource template. In a template, similar to a Kubernetes ingress spec, you can specify annotations, ingress class name, and HTTP and HTTPS rules. If you do not apply an ingress resource template for an application, you can’t add ingress endpoints when you deploy it. For complete details please refer to the documentation.
We want to use path-based routing where the application name is part of the path. On NGINX, we add the configuration-snippet annotation to remove this part of the path before forwarding it on to the Mule application.
1 - Create a custom Ingress configuration by creating a file from the markdown below and name it ingress-template.yaml.
1
2
3
4
5
6
7
8
9
10
11
12
13
14
15
16
17
18
19
20
21
apiVersion: networking.k8s.io/v1
kind: Ingress
metadata:
  annotations:
    nginx.ingress.kubernetes.io/configuration-snippet: |
      rewrite ^/app-name(/|$)(.*) /$2 break;
  name: rtf-ingress-template
  namespace: rtf
spec:
  ingressClassName: rtf-nginx
  rules:
  - host: rtf.example.com
    http:
      paths:
      - path: /app-name
        pathType: ImplementationSpecific
        backend:
          service:
            name: service
            port:
              number: 8081
2 - Apply the configuration to the rtf namespace using the following command. Update the path and name where appropriate.
1
kubectl apply -f path\ingress-template.yaml
Output
1
ingress.networking.k8s.io/rtf-ingress-template created
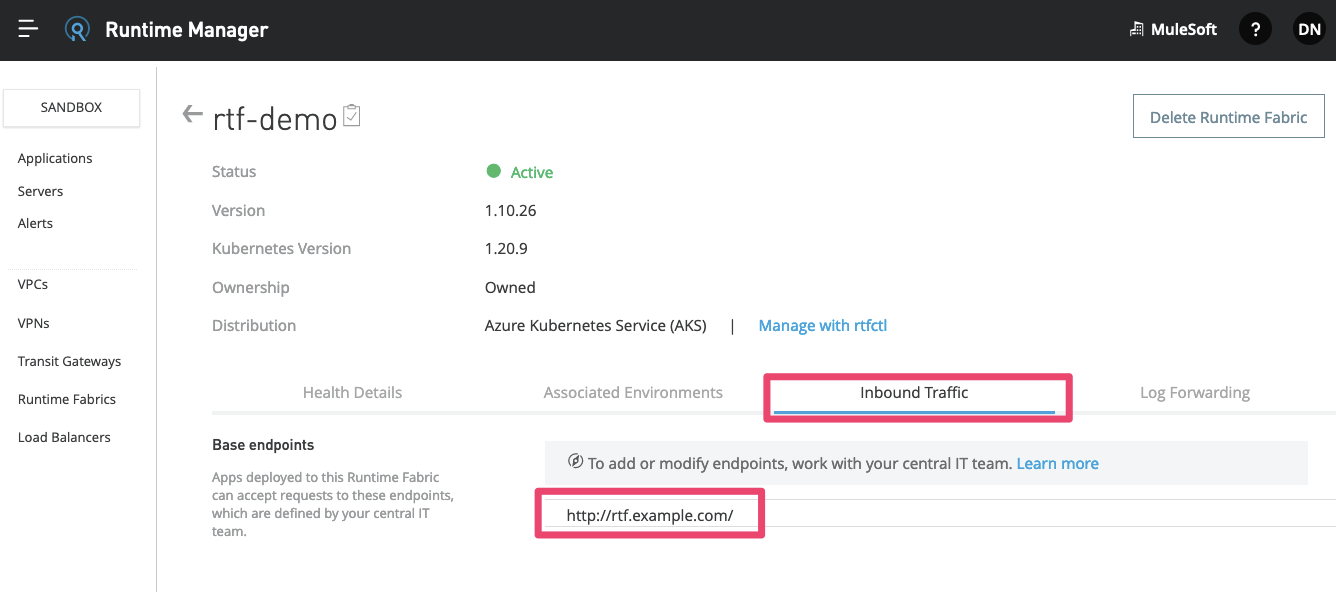
3 - Navigate back to Anypoint Runtime Manager and verify that your ingress template has been applied by checking the Inbound Traffic tab in Runtime Fabrics.
Deploy Mule application
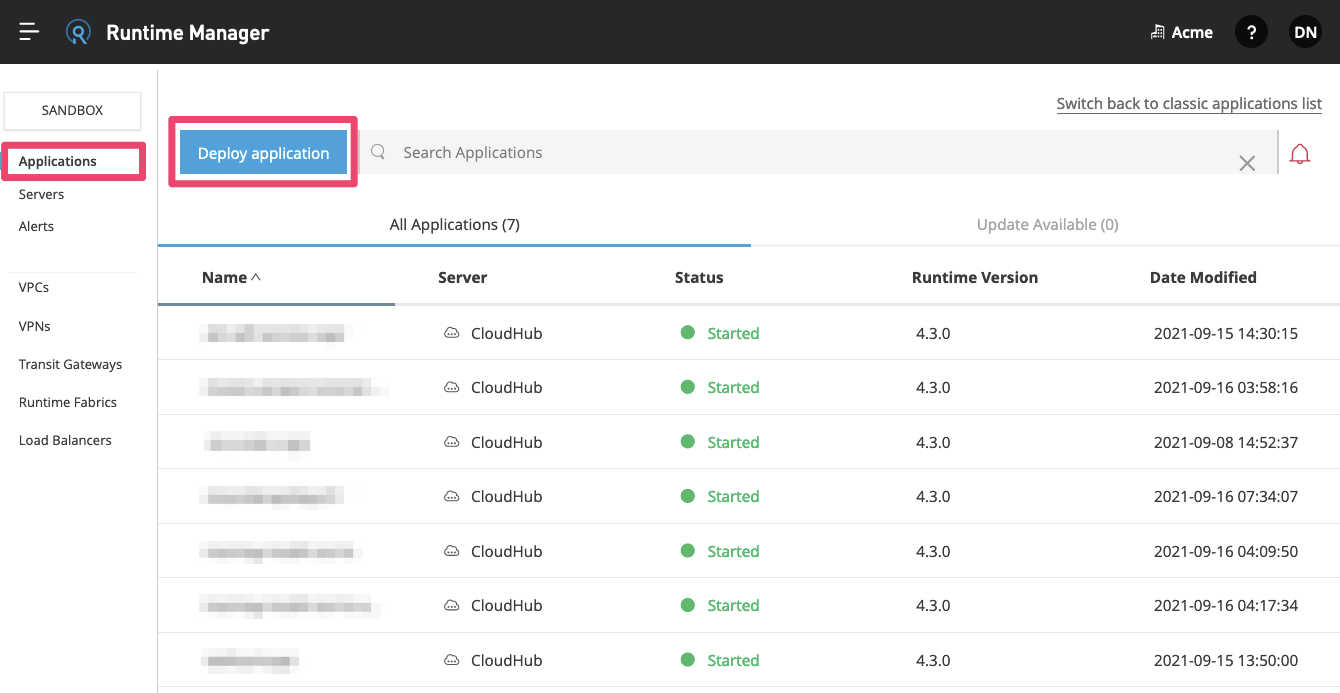
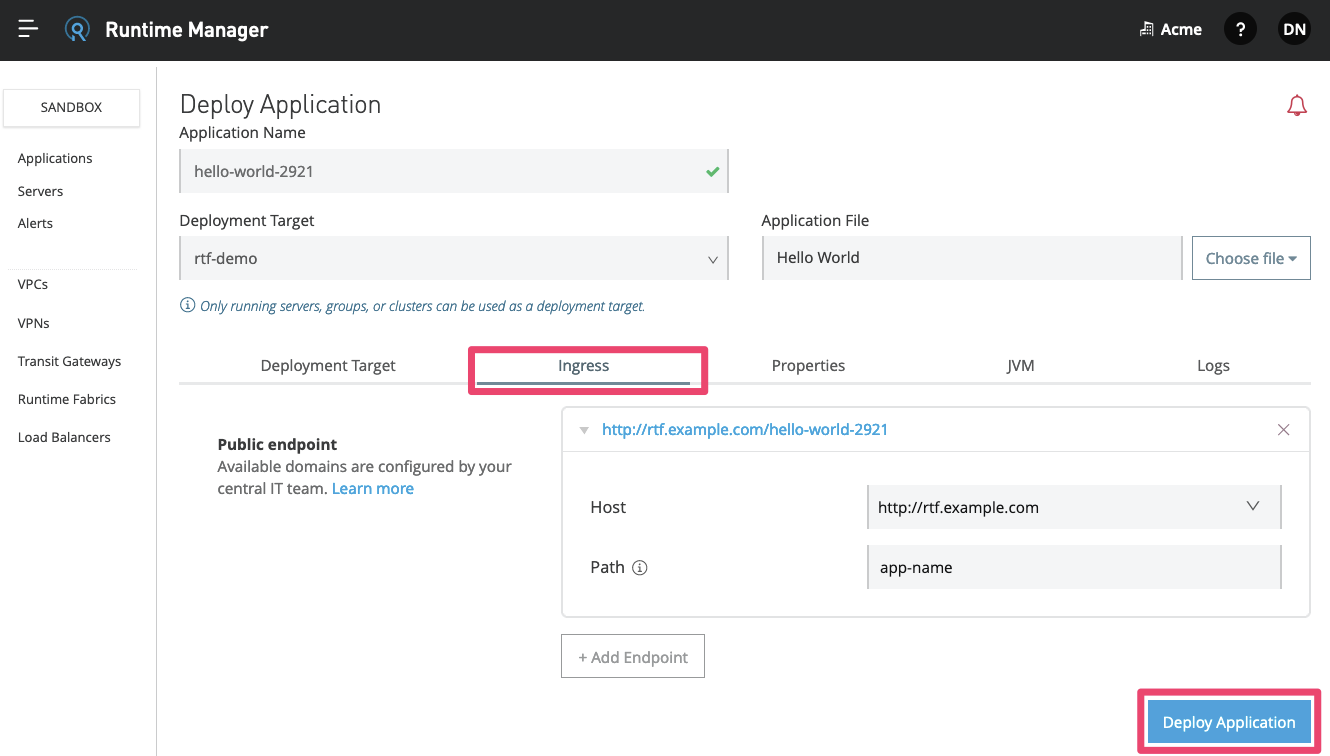
1 - Deploy the sample Hello World application. In Anypoint Platform click Applications then Deploy Application.
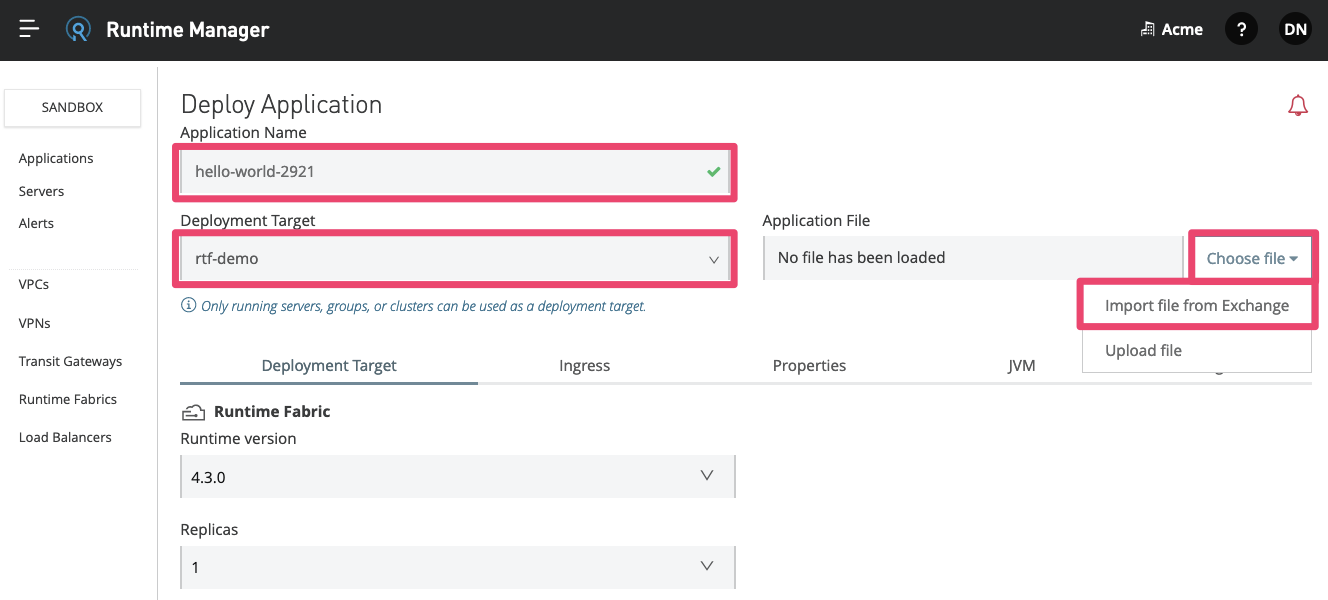
2 - Enter a unique name hello-world-2921 as the Application Name, select the rtf-demo as our Deployment Target then click Import File from Exchange to select the Application File.
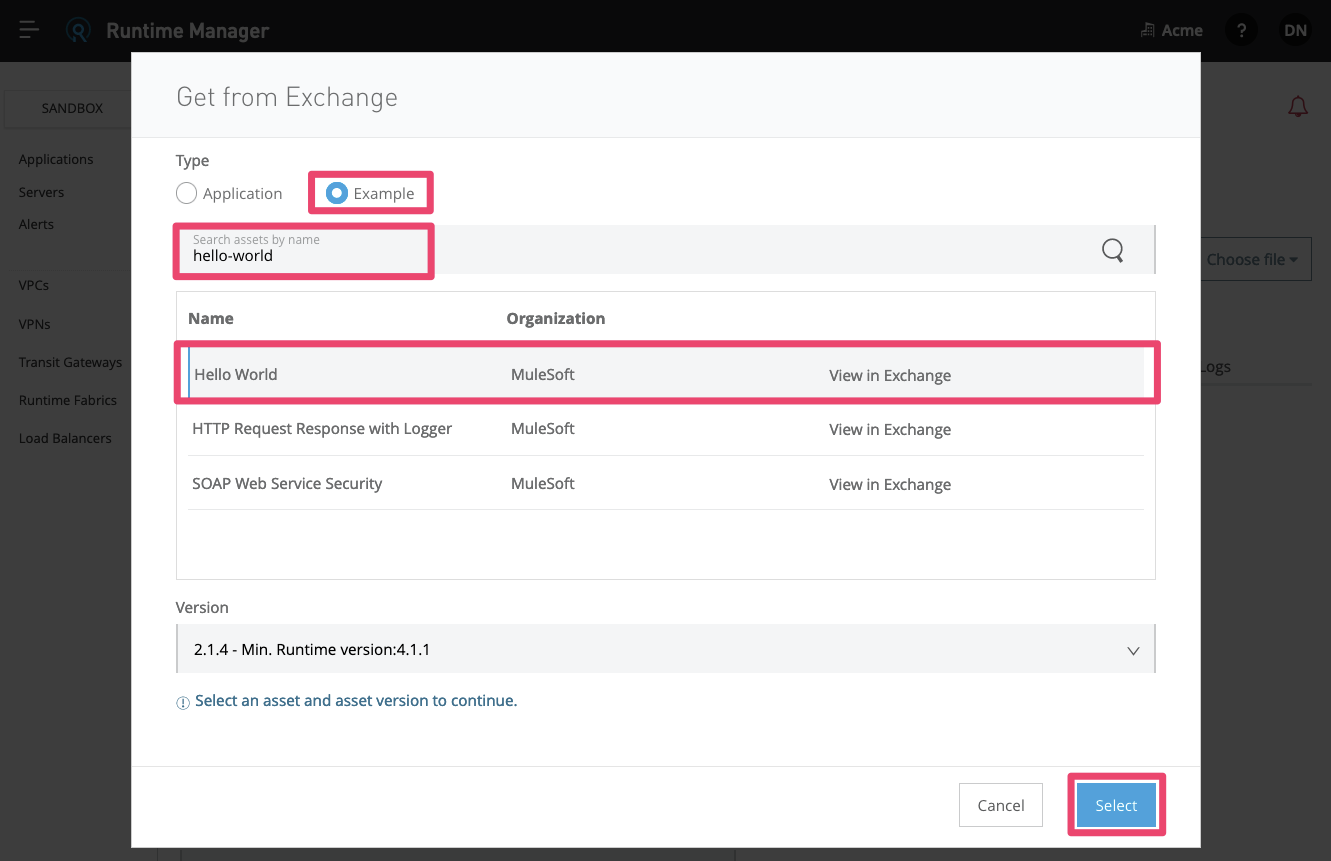
3 - Select Type - Example then enter hello-world into the Search assets by name input box. Then select Hello World from the available matches and click Select.
4 - Clicking Deploy Application will deploy the hello-world Mule application to your Runtime Fabric environment.
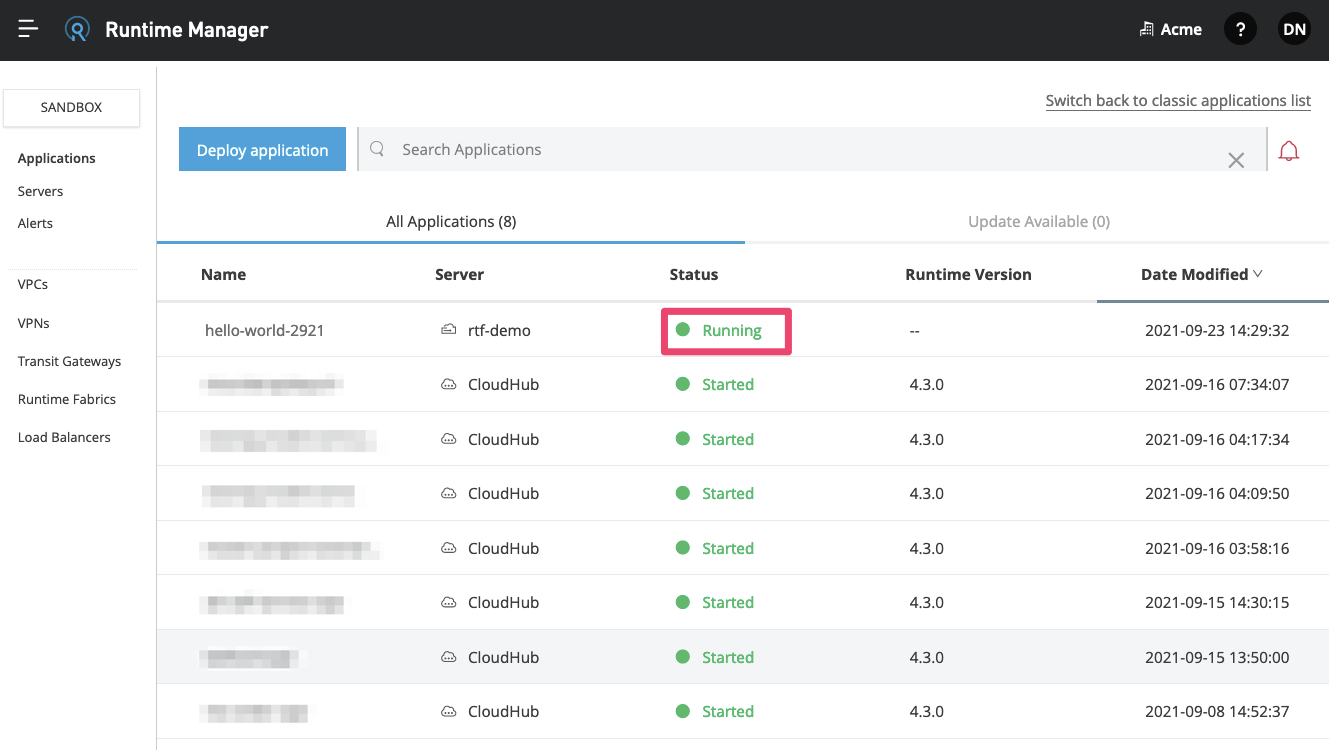
5 - Once the status of the deployed application changes to Running you can navigate to the application detail page to see the application url.
6 - Get external IP address of the NGINX server.
1
kubectl get services -n ingress-nginx
Note that you may have to run the command more than once since the external IP may not be available immediately.
The IP address of your NGINX server will appear in the EXTERNAL-IP column in the output.
Output
1
2
3
NAME TYPE CLUSTER-IP EXTERNAL-IP PORT(S) AGE
ingress-nginx-controller LoadBalancer 10.0.204.159 <code class="replace-text">20.53.191.218</code> 80:31011/TCP,443:32553/TCP 12m
ingress-nginx-controller-admission ClusterIP 10.0.118.154 <none> 443/TCP 12m
7 - Call the hello-world endpoint. Using the output above to replace the ingress controller IP address. Replace
To access the endpoint for the hello-world we need to resolve the domain name rtf.example.com. For this tutorial we will not create a domain address or use a local file - instead we’ll use the resolve switch to pass the hostname IP mapping on the command line pointing to the external IP address of the NGINX ingress controller above.
1
curl http://rtf.example.com/hello-world-2921/helloWorld --resolve rtf.example.com:80:20.53.191.218
Output
1
Hello World!
The deployed application should return the string ‘Hello World!’ proving that the application received and processed your request.
Next Steps
In this tutorial, we walked you through deploying a hello world Mule app to an Azure Kubernetes Service (AKS) cluster using Runtime Fabric. You learned how to:
- Create an Azure Kubernetes Service (AKS) cluster using the
Azure CLI - Use
kubectlto create an ingress controller - Install Runtime Fabric using
rtfctl - Deploy and test a simple Hello World Mule app
Click on the Next button below to continue to the next tutorial in this series that configures TLS and last-mile security.
Runtime Fabric also runs as a service on Amazon Elastic Kubernetes Service (Amazon EKS), Red Hat OpenShift and Google Kubernetes Engine (GKE). Check out their tutorials below.
Try Anypoint Platform for free
Start your 30-day free trial of the #1 platform for integration, APIs, and automation. No credit card required. No software to install.
Questions? Ask an expert.
