In this tutorial, we’ll walk you through subscribing to a Salesforce Change Data Capture (CDC) event and viewing the inbound payload. You’ll learn how to:
- Publish a change data capture event in Salesforce on the Contact object
- Setup the Salesforce Connector
Replay Channel Listenerto subscribe to a Contact change event - View the structure of a change data capture event in Anypoint Studio
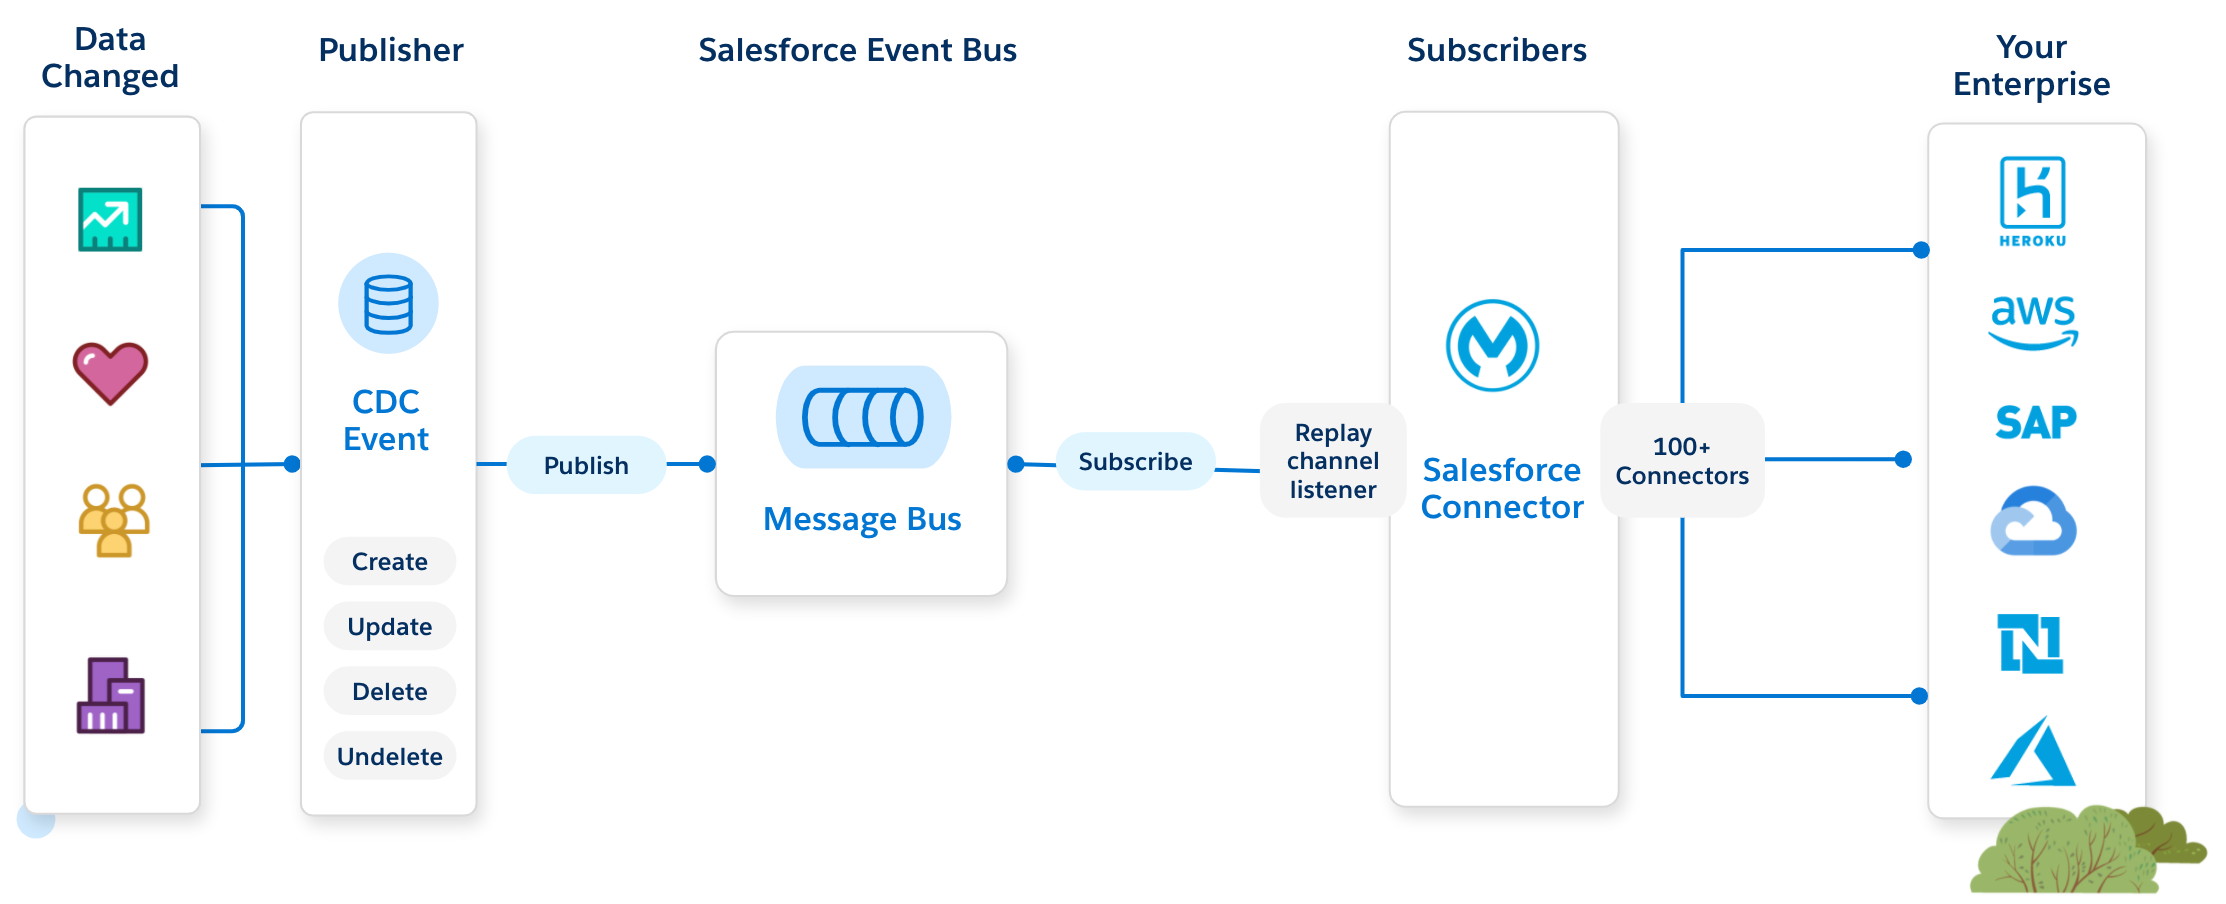
Use the Salesforce Connector and Change Data Capture to update data in an external system instead of doing periodic exports or API polling. Capturing changes with Change Data Capture event notifications ensures that your external data can be updated in real time and stays fresh whenever data in your Salesforce Org changes.
Prerequisites
Anypoint Studio- An interactive development environment for MuleSoft developers. See installing Anypoint Studio.Salesforce Developer Edition Org- A free edition of Salesforce. Sign up for a Developer Edition Org.Salesforce Security Token- A case-sensitive alphanumeric key that is used in combination with a password to access Salesforce via API. After you have your Salesforce Developer Edition Org you can reset and obtain your security token by following the instructions here.
Setup CDC in Salesforce
1 - Login to your Salesforce Developer edition Org using the credentials you setup when you signed up. At this point you should know your Salesforce Org username, password and have your security token available.
2 - Navigate to Setup > Home and search for Change Data Capture in the setup menu on the left hand side. This shows the available entities that can publish change event notifications in Salesforce. For this tutorial we will be publishing change events for the Contact object. Highlight Contact Available Entities box and select it.
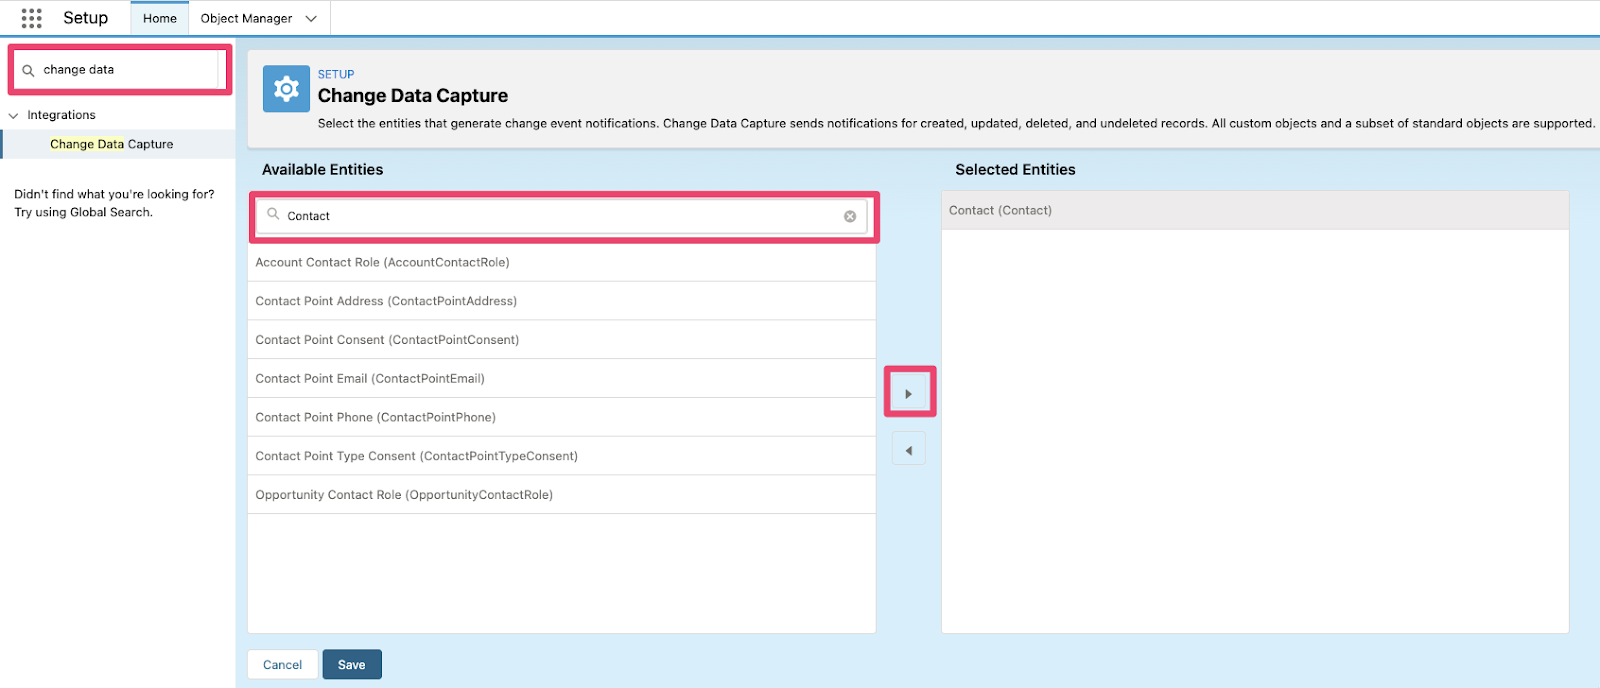
Check that you can see Contact in the Selected Entities box.
3 - Click Save You have now specified that when a change is made to a Contact record an event will be published to a shared event bus. Now we’ll setup a Mule project to subscribe to those events.
Create Mule project
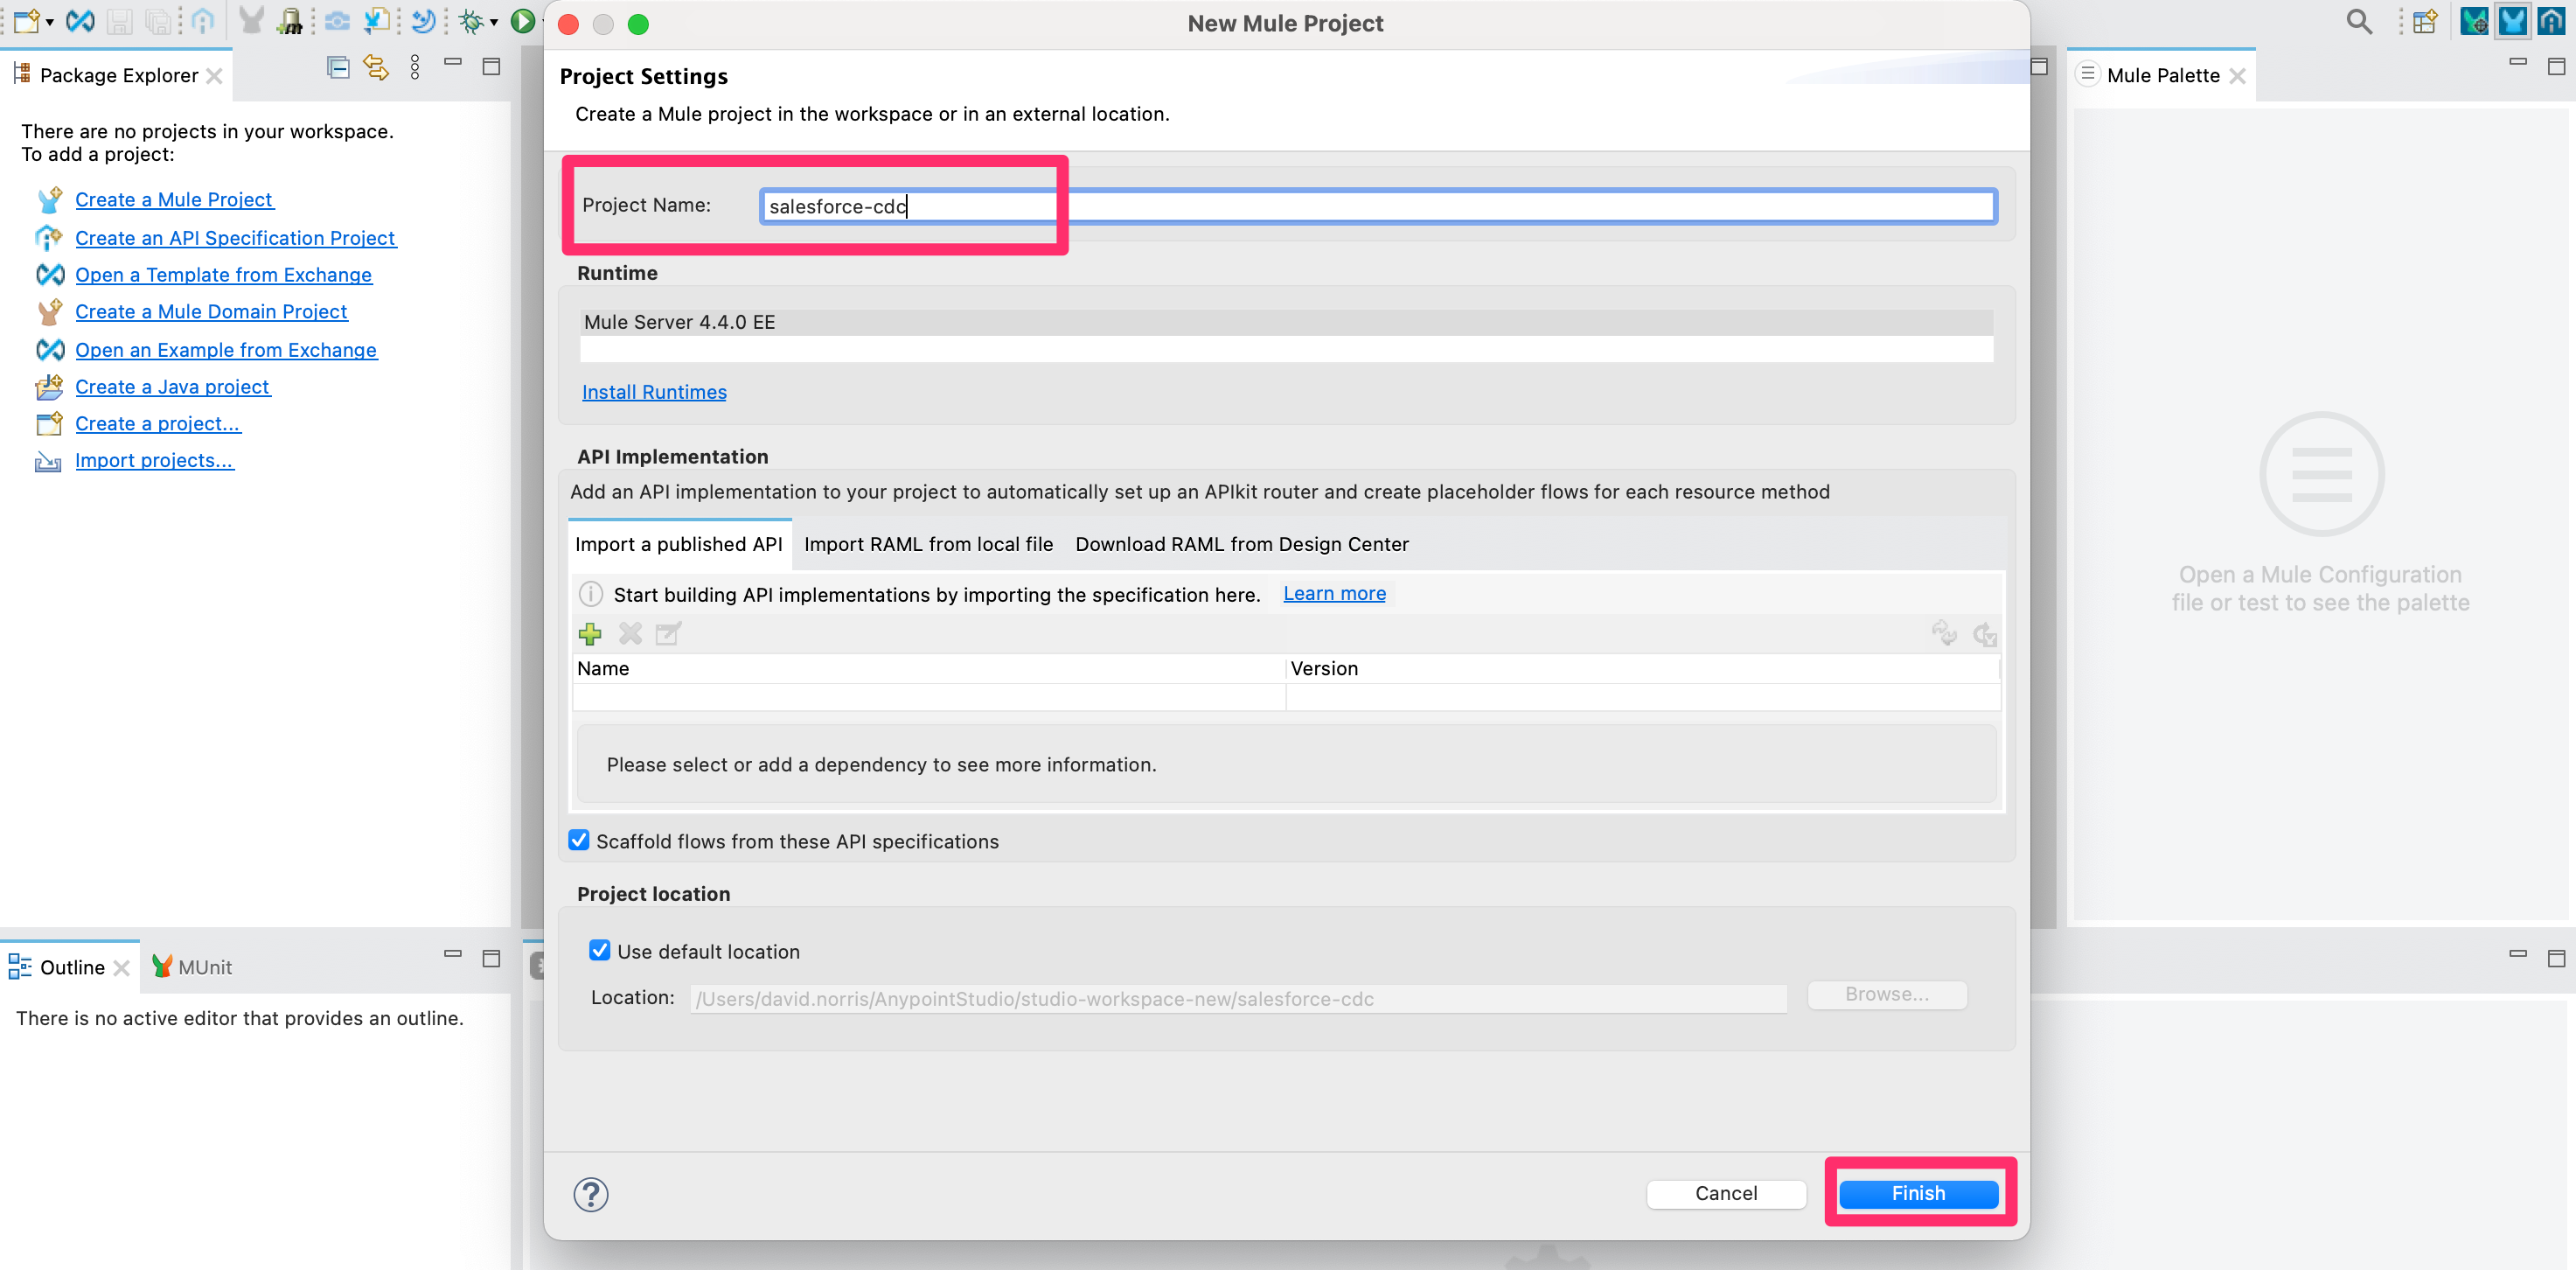
1 - Launch Anypoint Studio, click on File then select New > Mule Project. Call the project salesforce-cdc and click Finish.
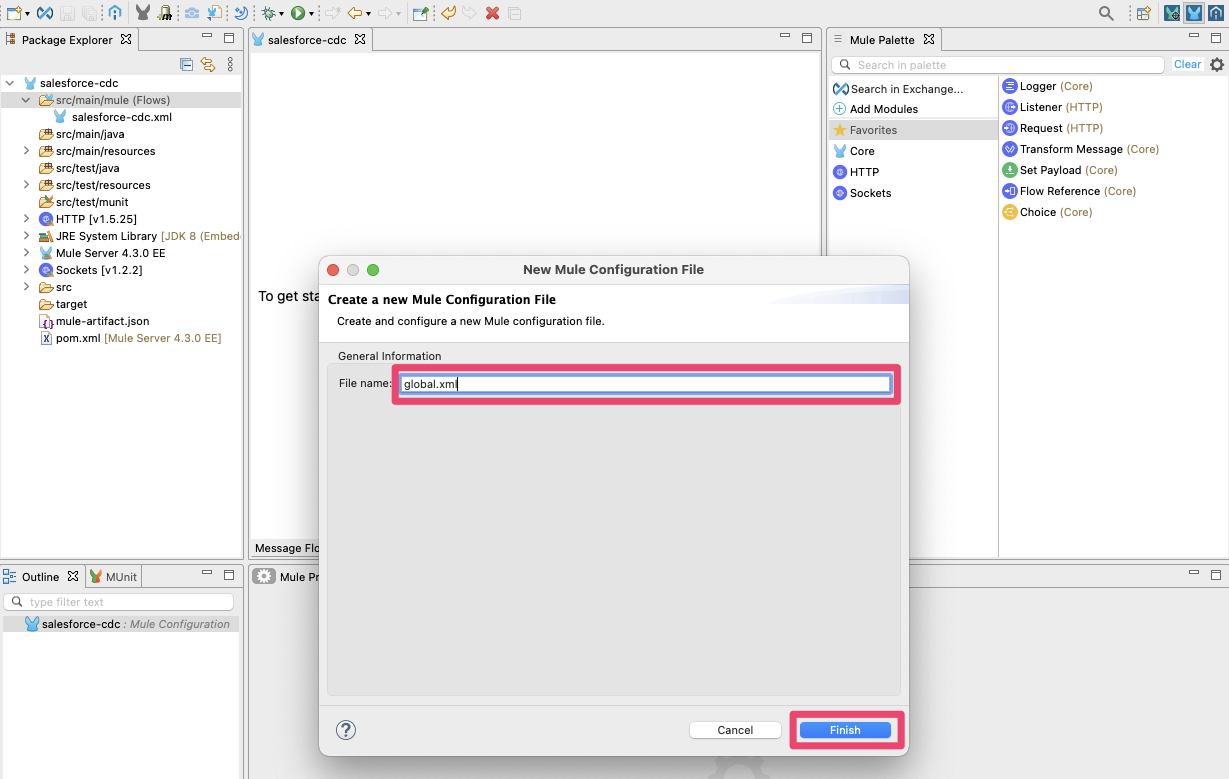
2 - Create a global.xml file to store your connector configuration. Right-click on the src/main/mule folder. Select New > Mule Configuration File.
Creating a global.xml configuration file is considered a best practice to follow. It allows you to share configuration details between multiple Mule flows within the same Mule application. This is where you can put shared error handling, connector configuration details and shared property files. In this tutorial we will be configuring a secured property file and Salesforce connector configuration.
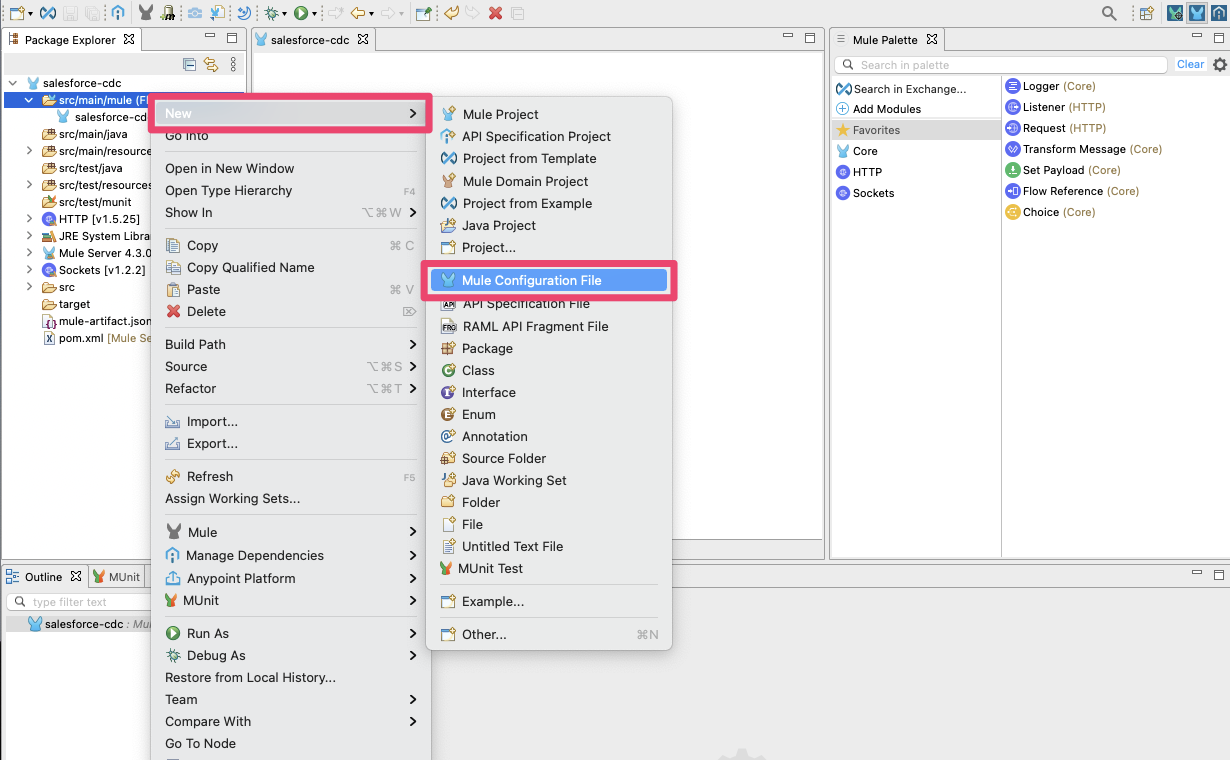
Name the file global.xml and click Finish.
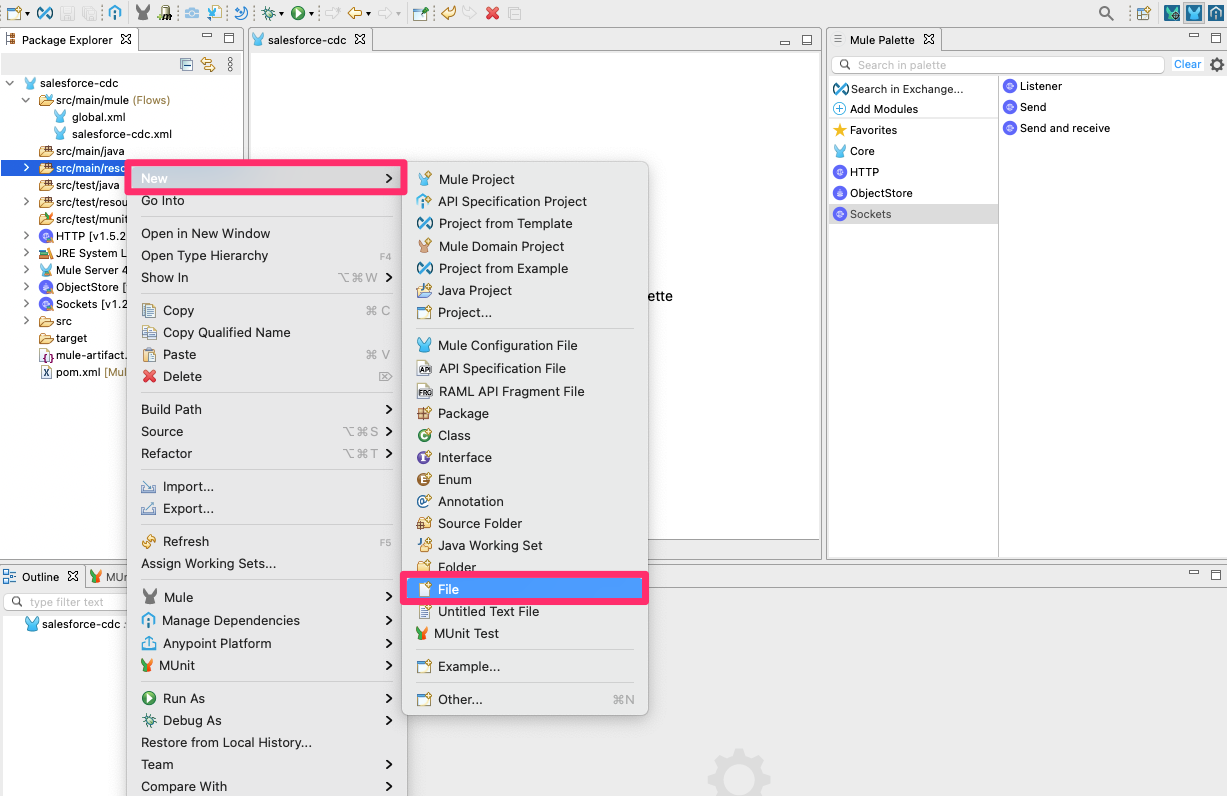
3 - Create a file to store your configuration variables. Right-click the src/main/resources folder, then select New > File to create a properties file to hold our Salesforce environment variables.
It is considered best practice to externalise aspects of your API implementations to make them easier to manage. In this tutorial we will be externalising the Salesforce Org authentication details into a properties file and encrypting sensitive values. Whilst beyond the scope of this tutorial, you should also consider having property files for each environment.
Call the file local.secure.yaml.

Inside the local.secure.yaml file create the following properties by copying and pasting the items below. Note that we’ve left placeholders for the sensitive values, password and token, that we’ll address in the next step by encrypting them. You just need to replace the Salesforce Org username at this stage.
1
2
3
4
5
salesforce:
  username: "<your-username>"
  password: ""
  token: ""
  authURL: "https://login.salesforce.com/services/Soap/u/53.0"
4 - Generate encrypted values to secure your Salesforce credentials. Download the Secure Properties Tool Jar file.
Open a terminal or command line prompt in the directory where this Jar file is located and run the following command replacing the value for <your-encryption-key> to be a unique string used to generate the encrypted value and <your-salesforce-password> which is the password you used to create your Salesforce Developer Org.
1
2
3
4
5
6
7
java -cp secure-properties-tool.jar com.mulesoft.tools.SecurePropertiesTool \
string \
encrypt \
Blowfish \
CBC \
<your-encryption-key> \
<your-salesforce-password>
Output
1
DeftJuh/2bVFRReHvSA4Jg==
Make a note of the encrypted value in the output and repeat the steps to encrypt your Salesforce Org security token.
5 - Add encrypted values to your local.secure.yaml file. After you get the encrypted values from the output, you add it to your local.secure.yaml file using the following syntax:
"![encryptedValue]"If your encrypted value was DeftJuh/2bVFRReHvSA4Jg==, then your property should be ![DeftJuh/2bVFRReHvSA4Jg==]. You should end up with something like this:
1
2
3
4
5
salesforce:
  username: "dave@muledev.demo"
  password: "![DeftJuh/2bVFRReHvSA4Jg==]"
  token: "![WdzupOSeeo4niu1hBQjS7Lz6nrGpbjoD9I5povyKE6w=]"
  authURL: "https://login.salesforce.com/services/Soap/u/53.0"
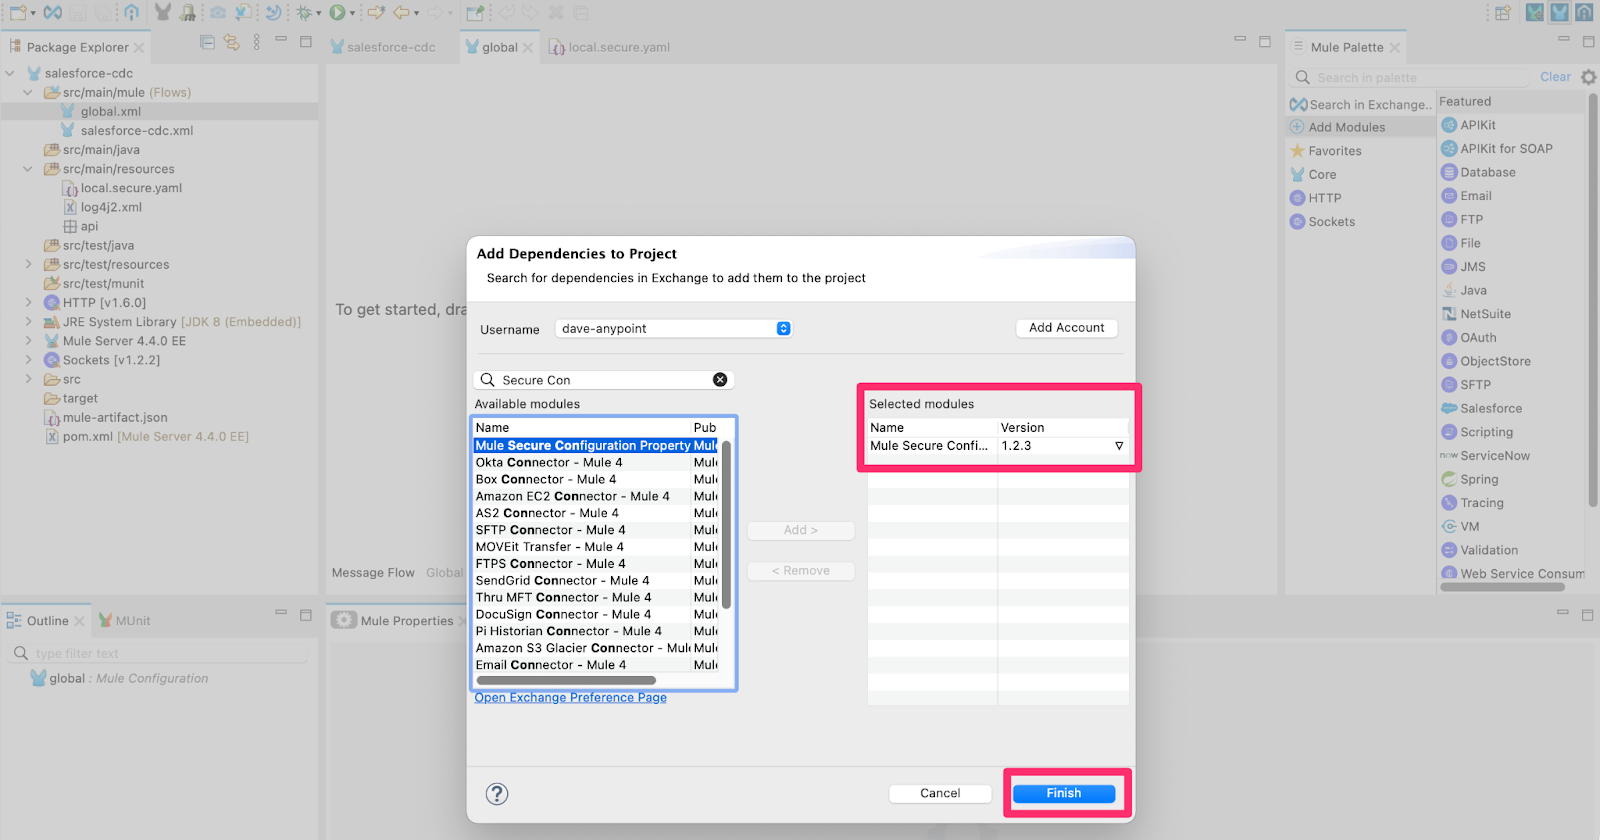
6 - Add the Mule Secure Configuration Properties module. In your global.xml file, select the Search in Exchange option from the Mule Palette. Search for the module and click on Add > then Finish.
7 - Create the secure properties configuration.
In your global.xml file, go to the Global Elements view. Click the Create button and create a Secure Properties Config. Under File, type ${env}.secure.yaml. This is a dynamic file that allows developers to have more than one properties file with different variables per environment (like development, qa and prod) and set a property that is read at runtime to determine which file to use. When we run this project we’ll set a property for local testing that will result in the variables in local.secure.properties from being read at runtime.
Under Key, type ${encryption.key} and select Blowfish as the Algorithm.

The secure key value will be set in this tutorial just before we run the project. Including the value in a property would mean that anyone with access to the source code would be able to decrypt our sensitive data. We will be passing the key every time we start the application, either from our local computer or from CloudHub. We’ll learn how to pass this key later in this tutorial.
8 - Hide encryption.key value from deployment properties.
Open the mule-artifact.json file in Anypoint Studio and add this line before the closing brackets (don’t forget to add a comma at the end of the minMuleVersion line):
1
"secureProperties": ["encryption.key"]
Add the Salesforce connector
1 - Add the Salesforce Connector - Mule 4 Anypoint connector to your project.
Double click on the file salesforce-cdc.xml under src/main/mule.
In the Mule Palette on the right hand side click Search in Exchange…. In the Add Dependencies to Project dialog search for the Salesforce Connector - Mule 4 module. Select the module and click Add then Finish.
Build the integration
Now that we have all the building blocks needed we can create an end to end integration that subscribes to the change data event we activated in Salesforce and outputs the payload received to the log.
1 - Add the Salesforce Connector to your project.
Double click on the file salesforce-cdc.xml under src/main/mule. Drag the Replay channel listener method into your project from the Mule Palette.
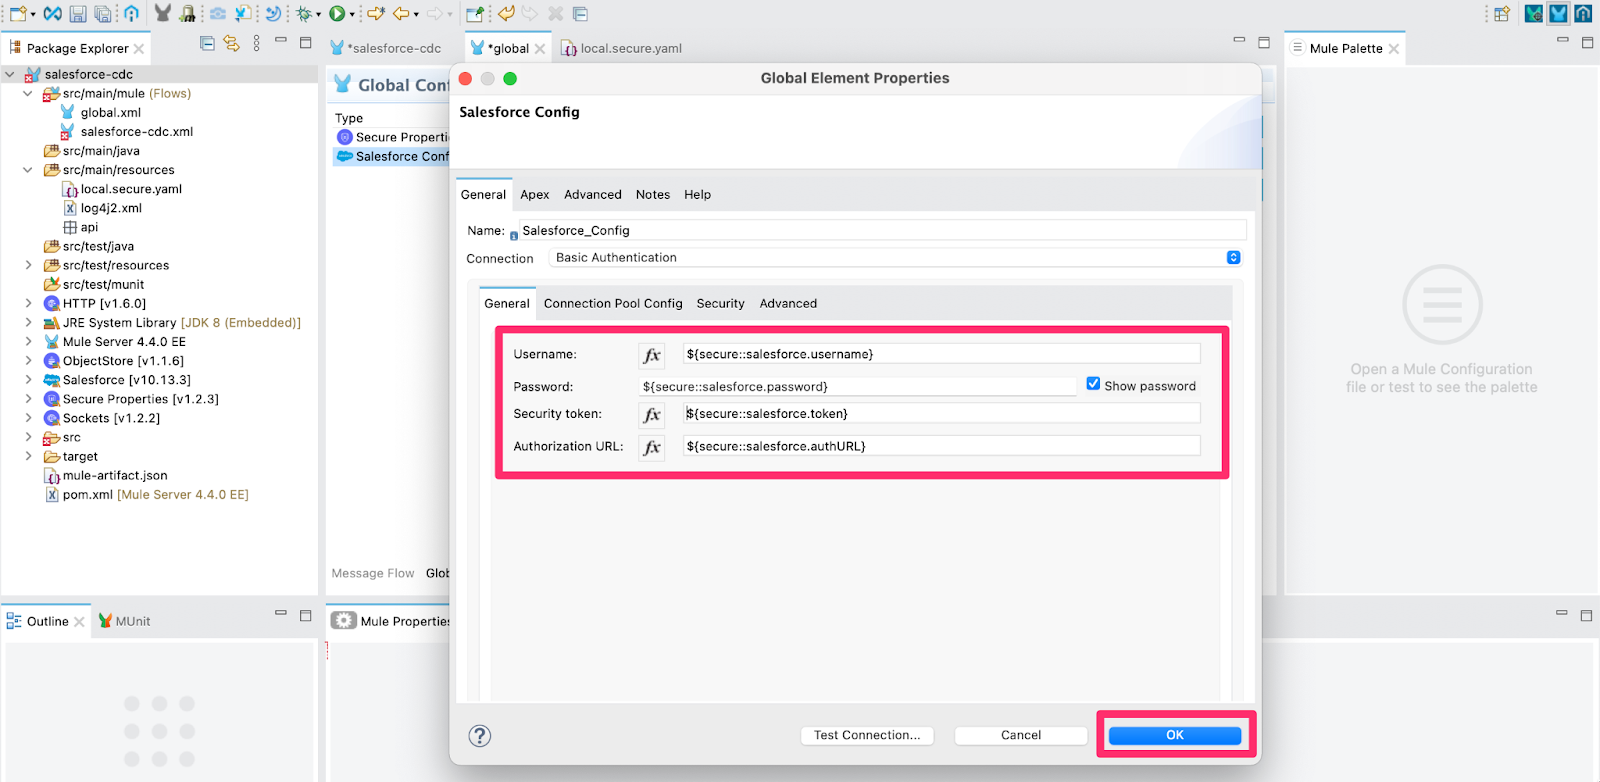
2 - Create a global configuration for the Salesforce Connector. For this tutorial we’ll authenticate to your Salesforce developer edition Org using basic authentication.
Double click on the file global.xml under src/main/mule then navigate to the tab for Global Elements and click Create.
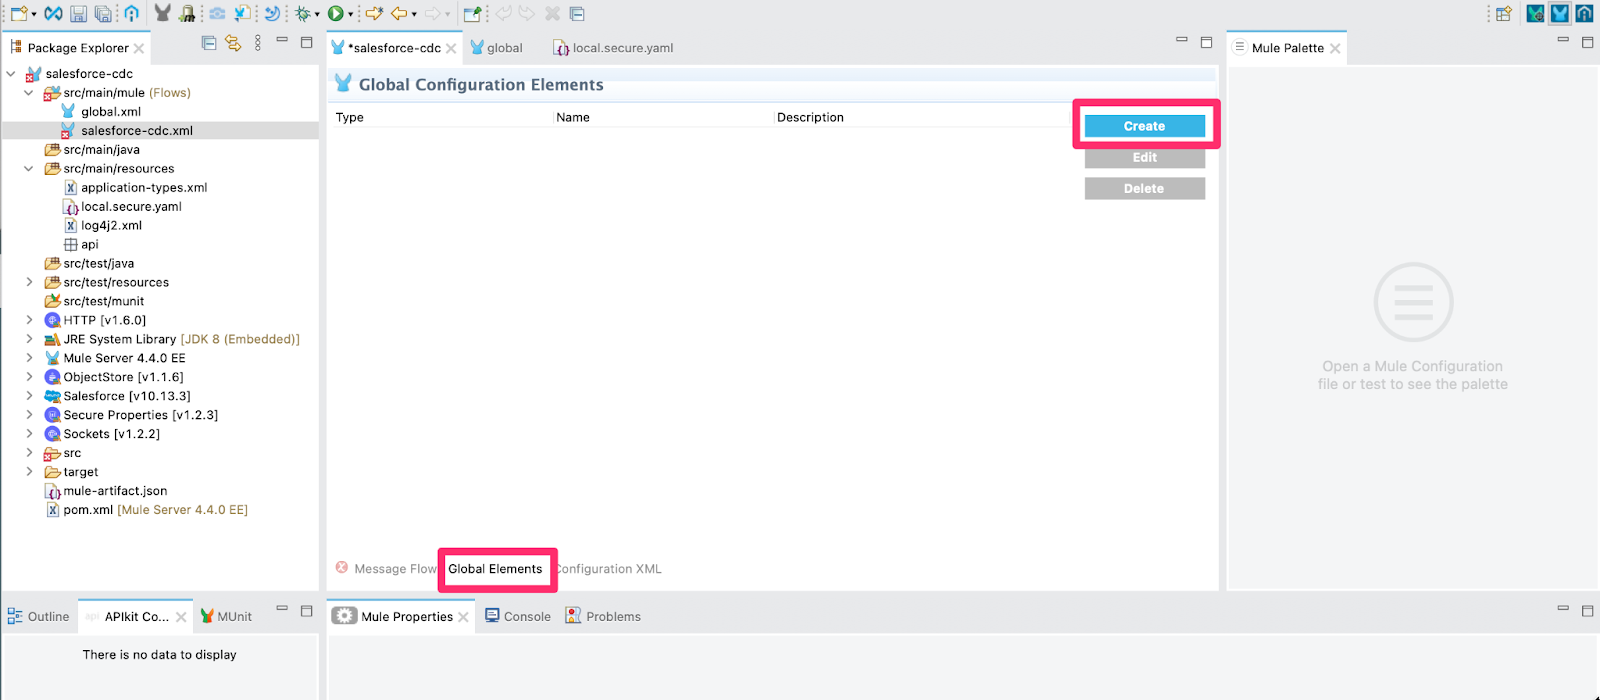
Select Salesforce Config under the Connector Configuration section and click OK.
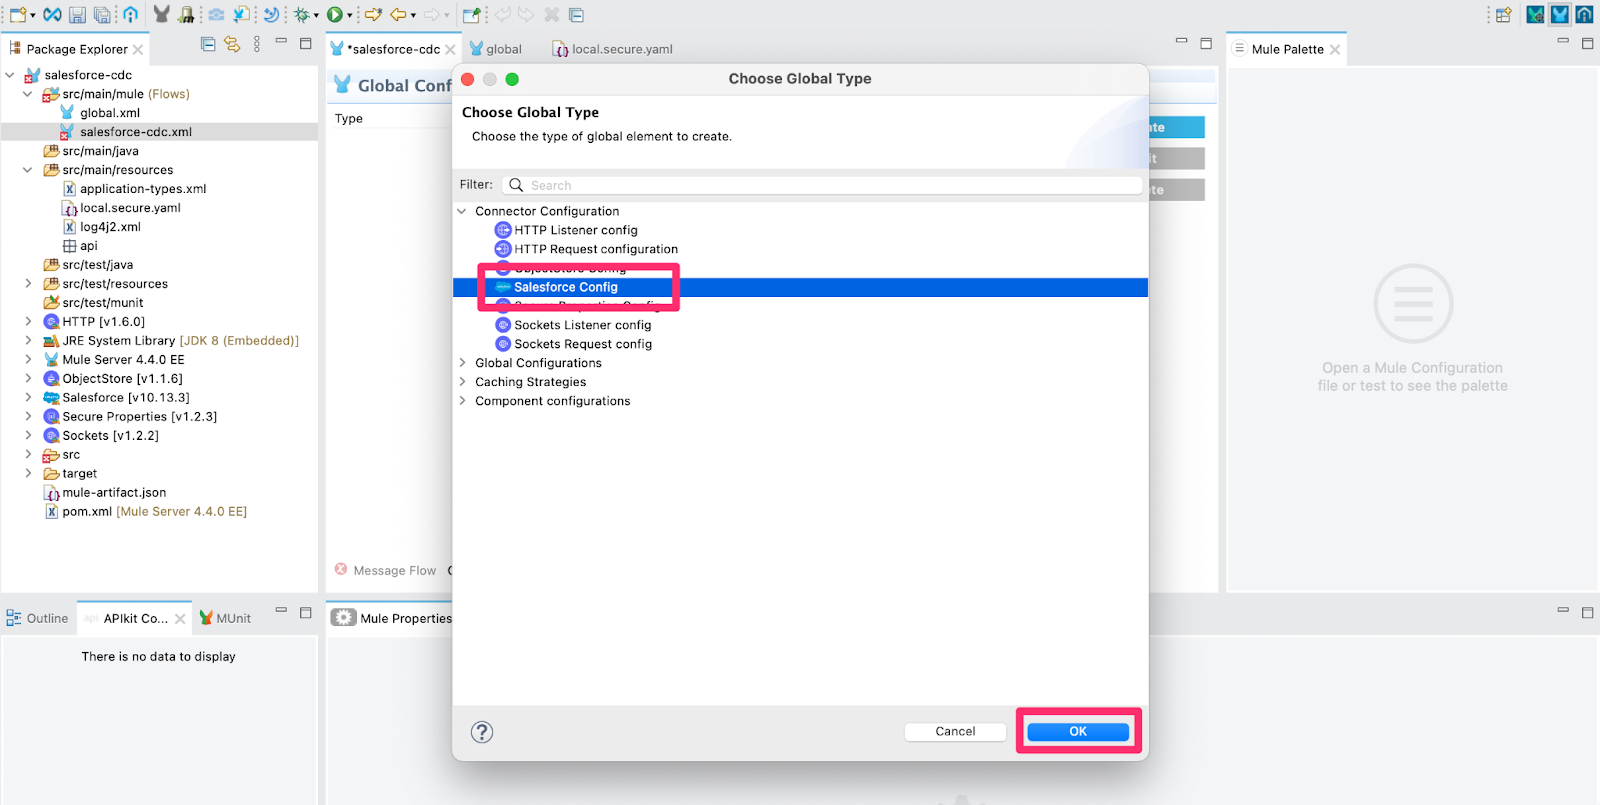
For each property we will use the secure properties file we created earlier to refer to the variables previously entered using the syntax ${secure::property.name}. Enter the values below and click Ok.
At this stage you will not be able to test the Salesforce connection since it will need properties set for {env} and {encryption.key} which will not exist until later in the tutorial.
3 - Specify the event channel to subscribe to
Double click on the file salesforce-cdc.xml under src/main/mule.
Double click on the Salesforce connector and enter the value data/ContactChangeEvent under the property Streaming Channel and select a Replay option.
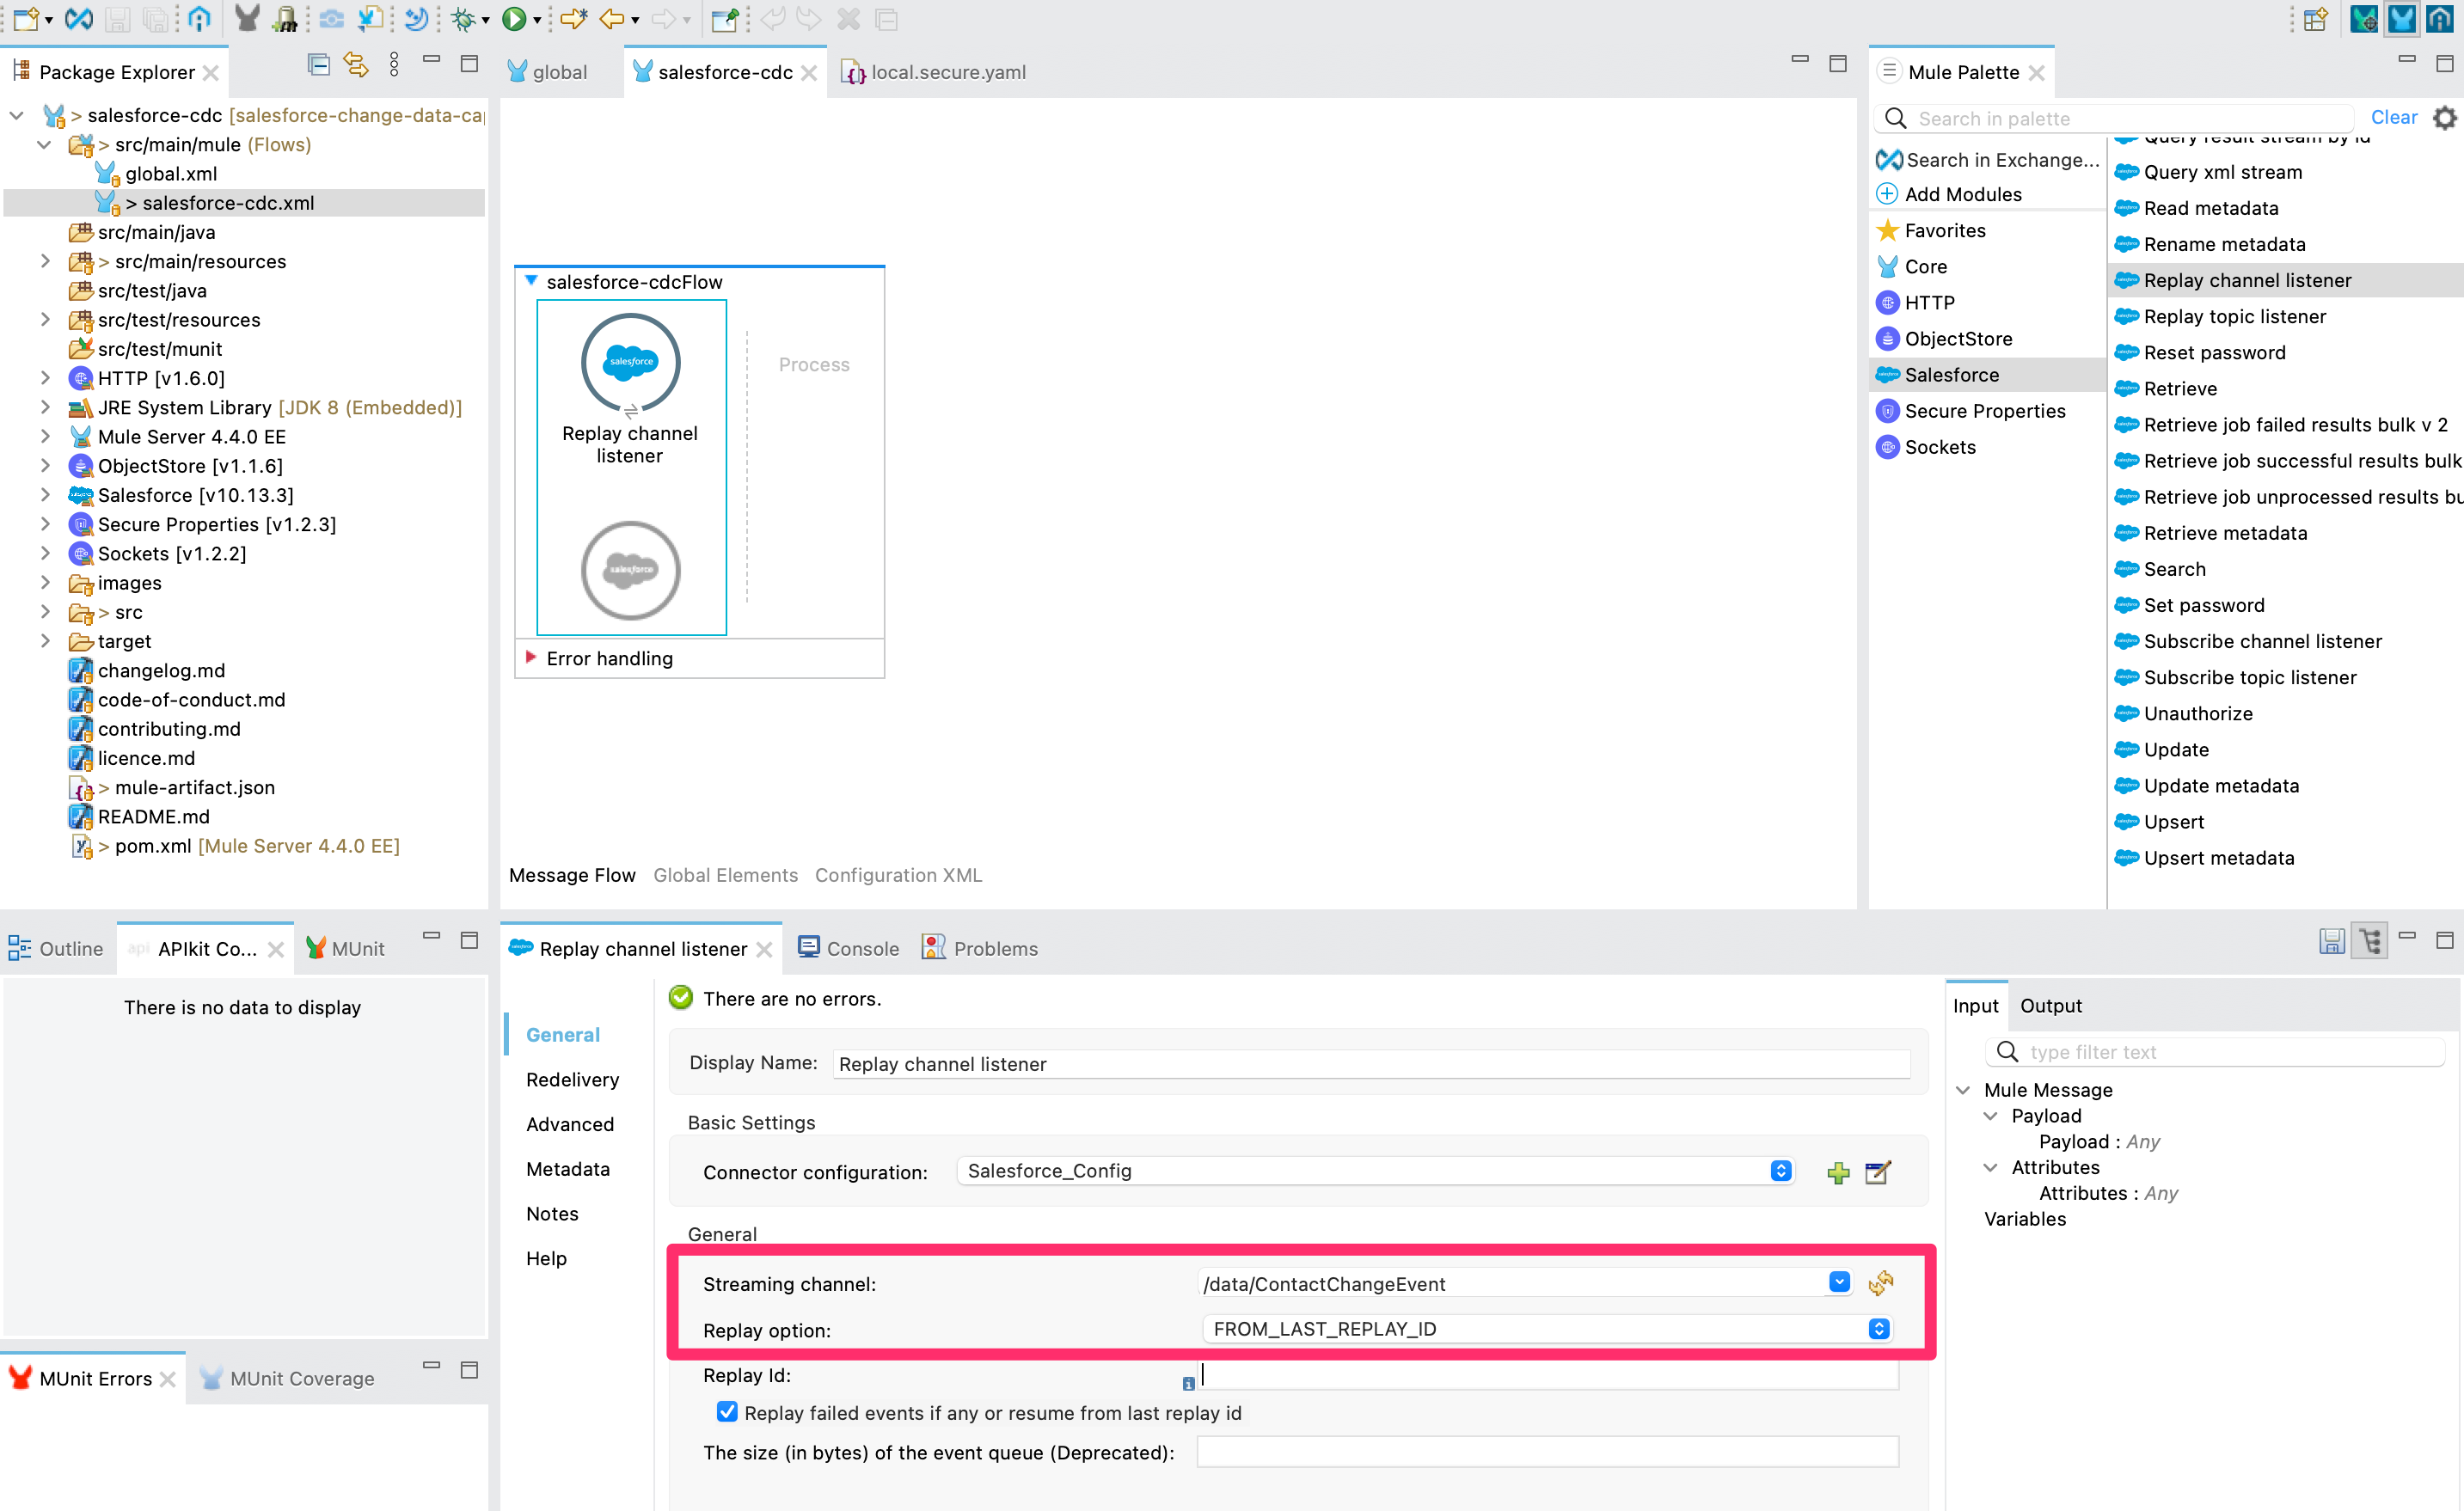
The Replay channel listener operation can use a numeric value assigned by Salesforce, called the Replay Id, to resume operations in the event of failure. For more information see the MuleSoft documentation.
This tutorial uses standard objects. To use change data capture events for custom objects follow the same steps except for the streaming channel value. For a custom object remove the c suffix from the object name. So for a Memo__c custom object the streaming channel is /data/Memo__ChangeEvent.
4 - Log information about the incoming change event
In order to see information about the incoming change let’s add a logger. Drag a logger module from the Mule Palette to the canvas. Set the expression to be as follows:
1
2
3
4
%dw 2.0
output application/json
---
payload.data.payload

Test your project
1 - Set environment variables to set env and encryption.key.
Earlier in the tutorial we setup a dynamic properties file and we secured sensitive data within it using an encryption key. Since env needs to change based on my deployment and encryption.key cannot be in my source code we can use properties set when the application runs.
For testing locally we’ll add 2 runtime configurations to Anypoint Studio. Right-click on the salesforce-cdc project. Select Run As > Run Configurations….
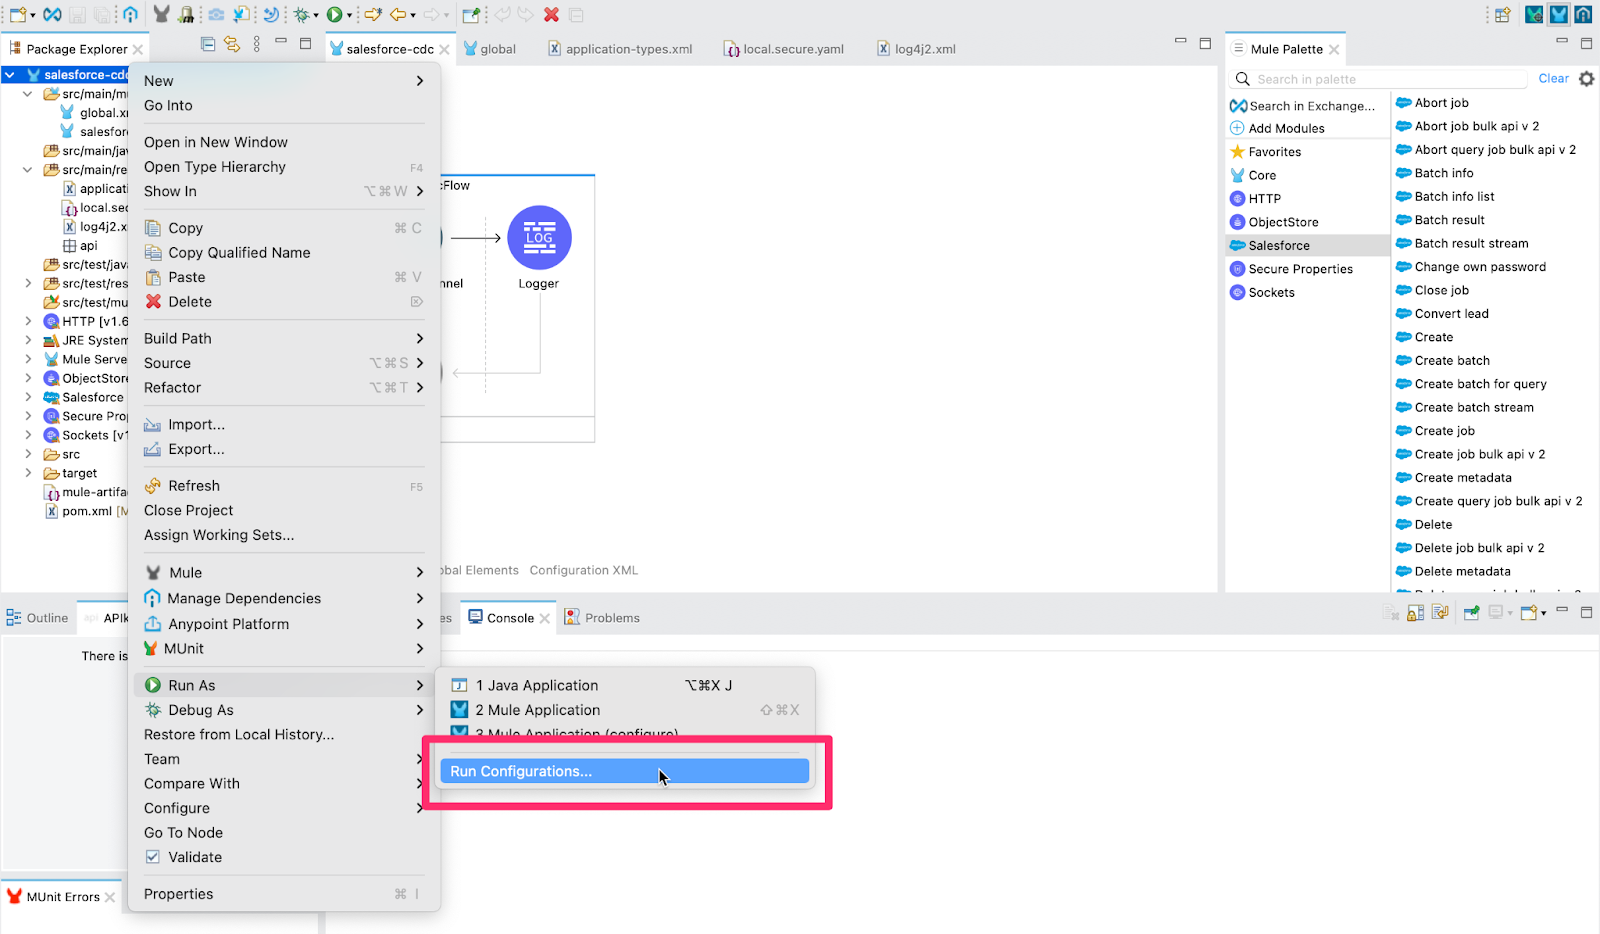
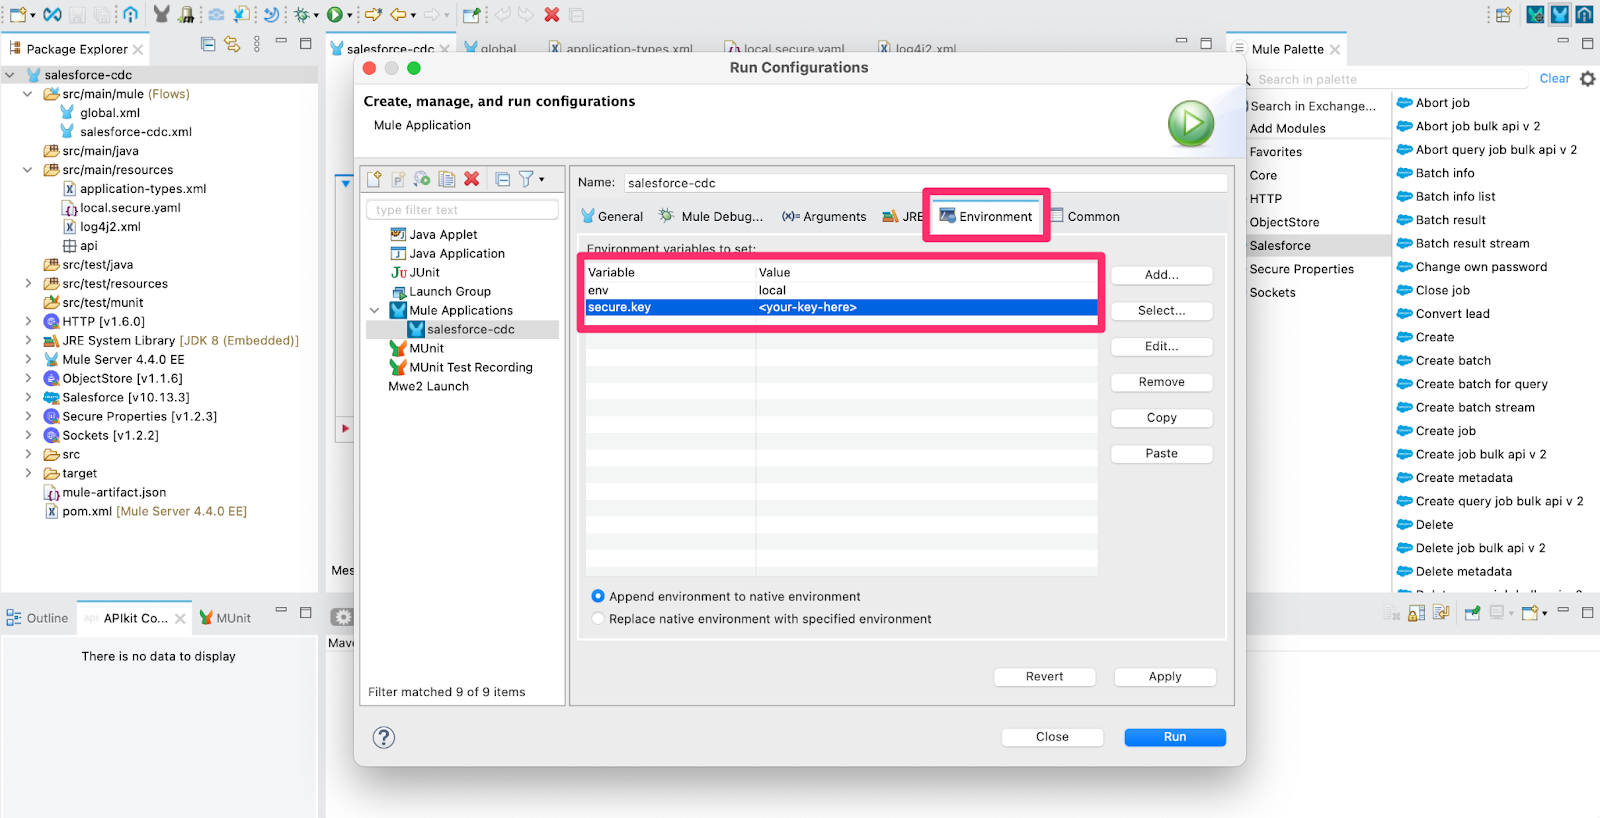
Then select the Environment tab and then Add. Enter the Name env with the value local then click Ok. Repeat the steps to create a new environment variable with the Name encryption.key and then use the key value you used earlier to encrypt your Salesforce password and token.
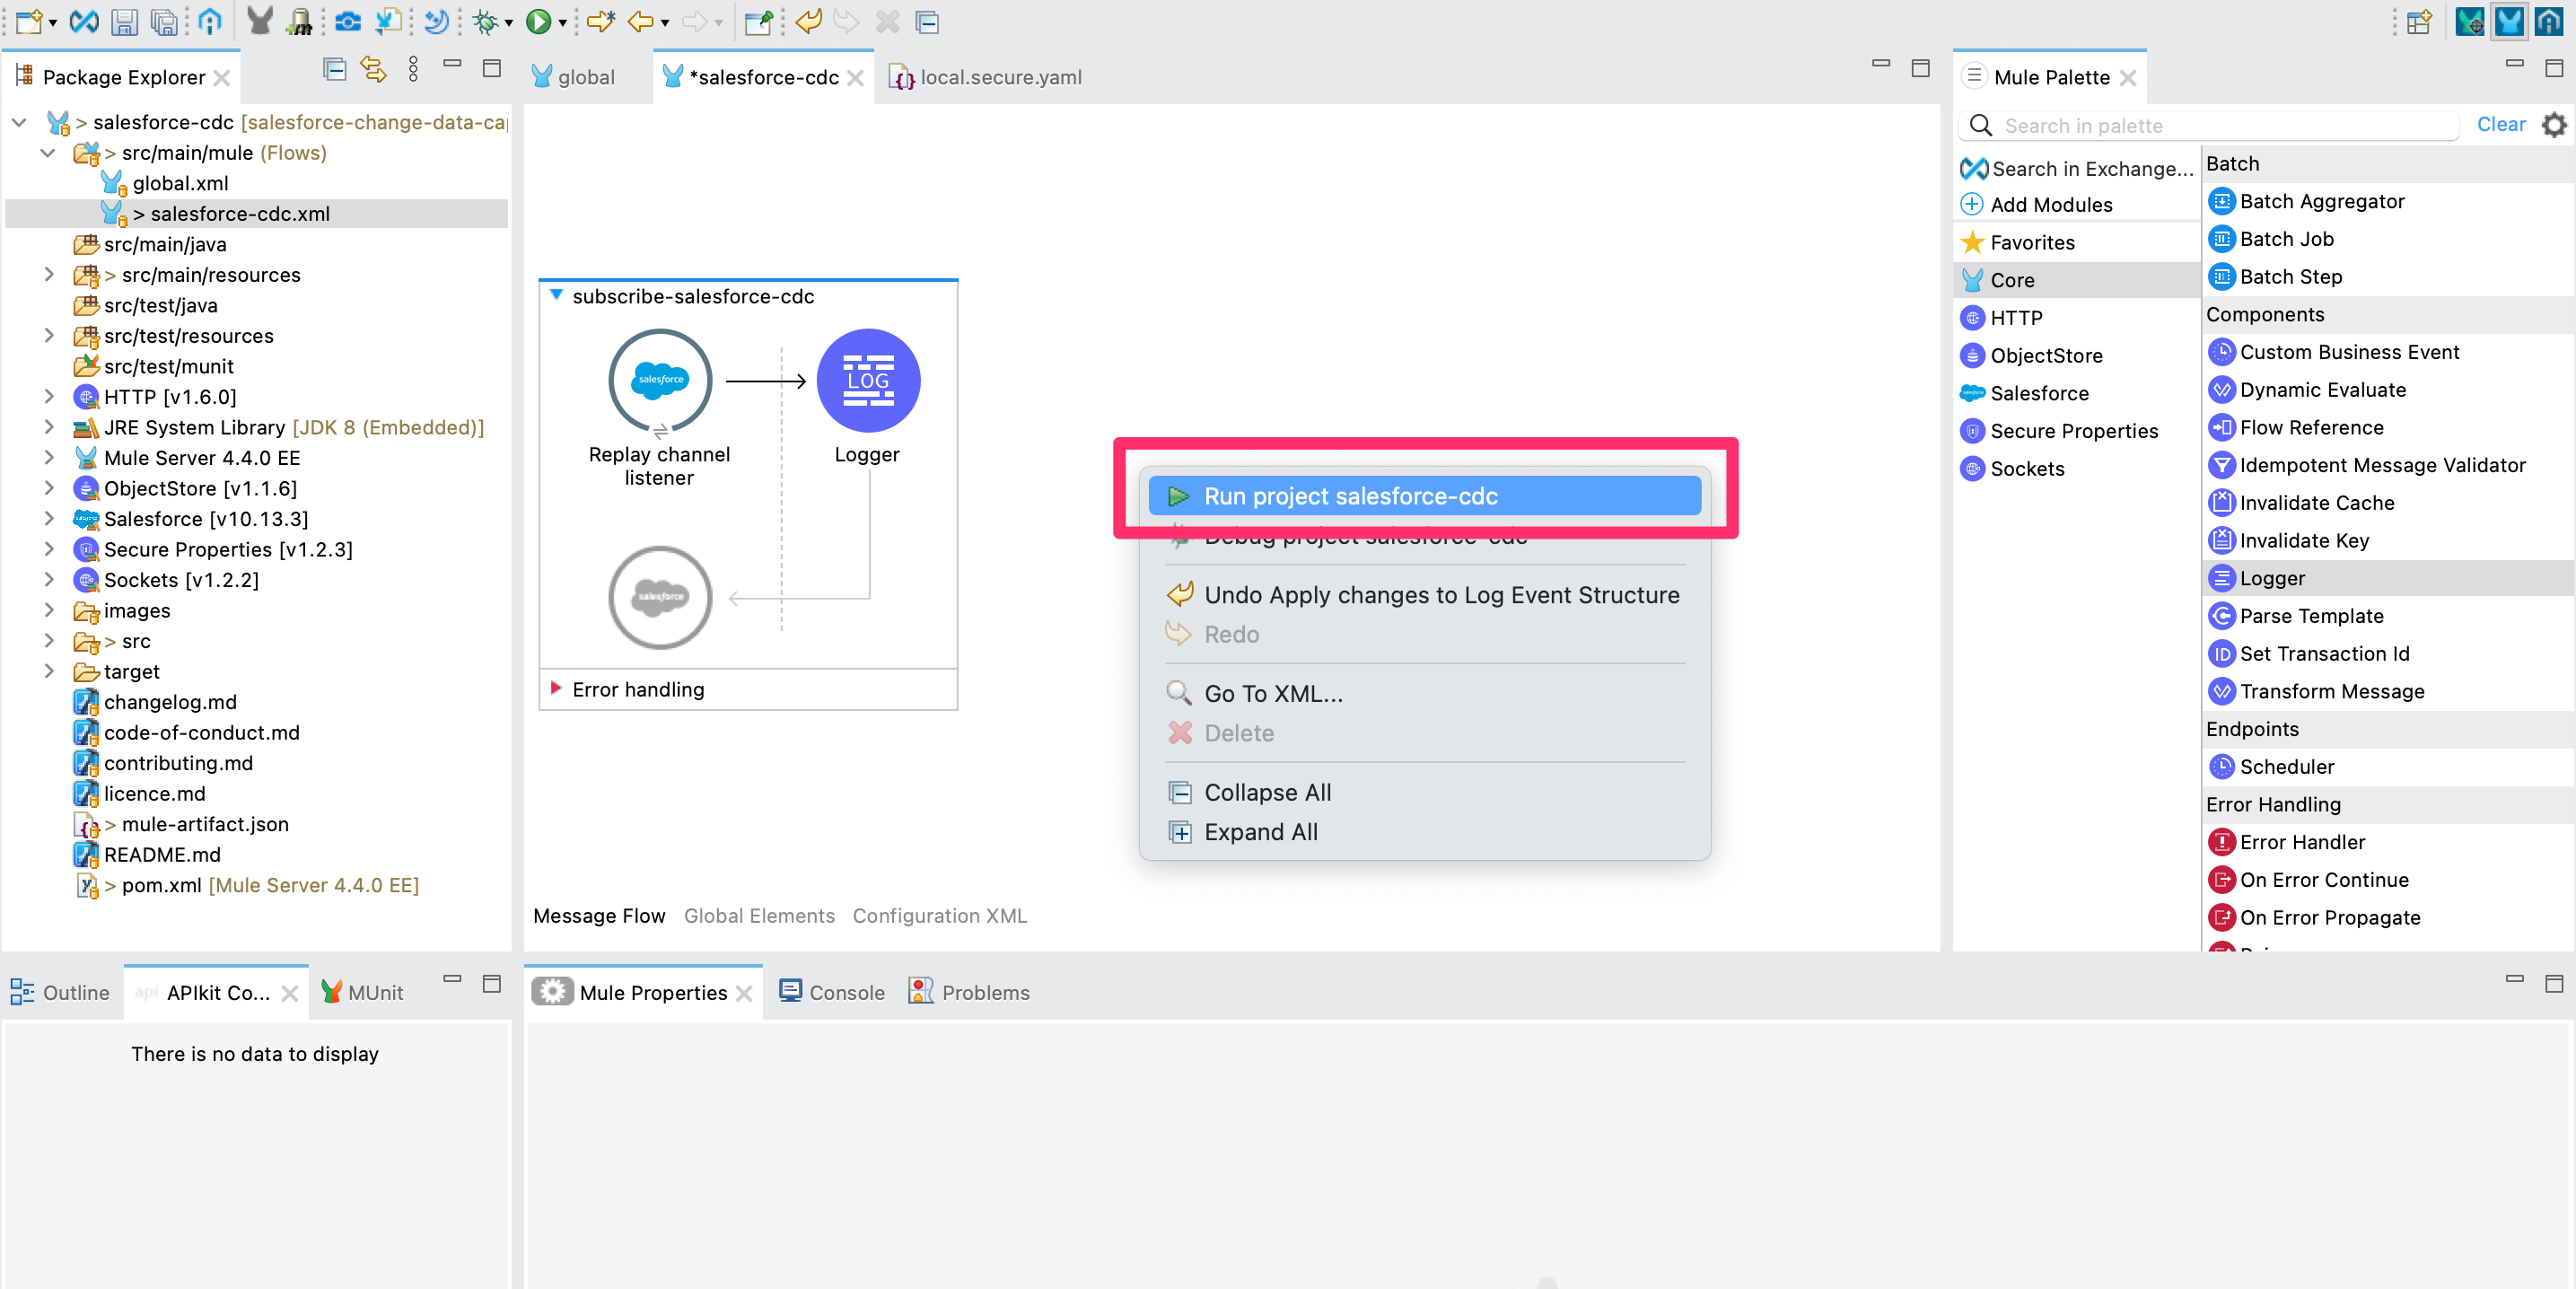
2 - Right click in the canvas and select Run project salesforce-cdc.
3 - Check the application was successfully deployed. Navigate to the console tab and verify the status is DEPLOYED.

4 - Update a Contact in your Salesforce Org to publish a change event. Navigate to the Sales application > Contacts. Find a Contact to update and Edit the record.

Update one or more fields on the Contact record and click Save.

5 - Navigate back to Anypoint Studio to look at the log files. In near real-time you should see the payload of the change event. This payload includes the fields that were updated, their values, the object that was updated and the event type (CREATE, UPDATE, DELETE or UNDELETE).
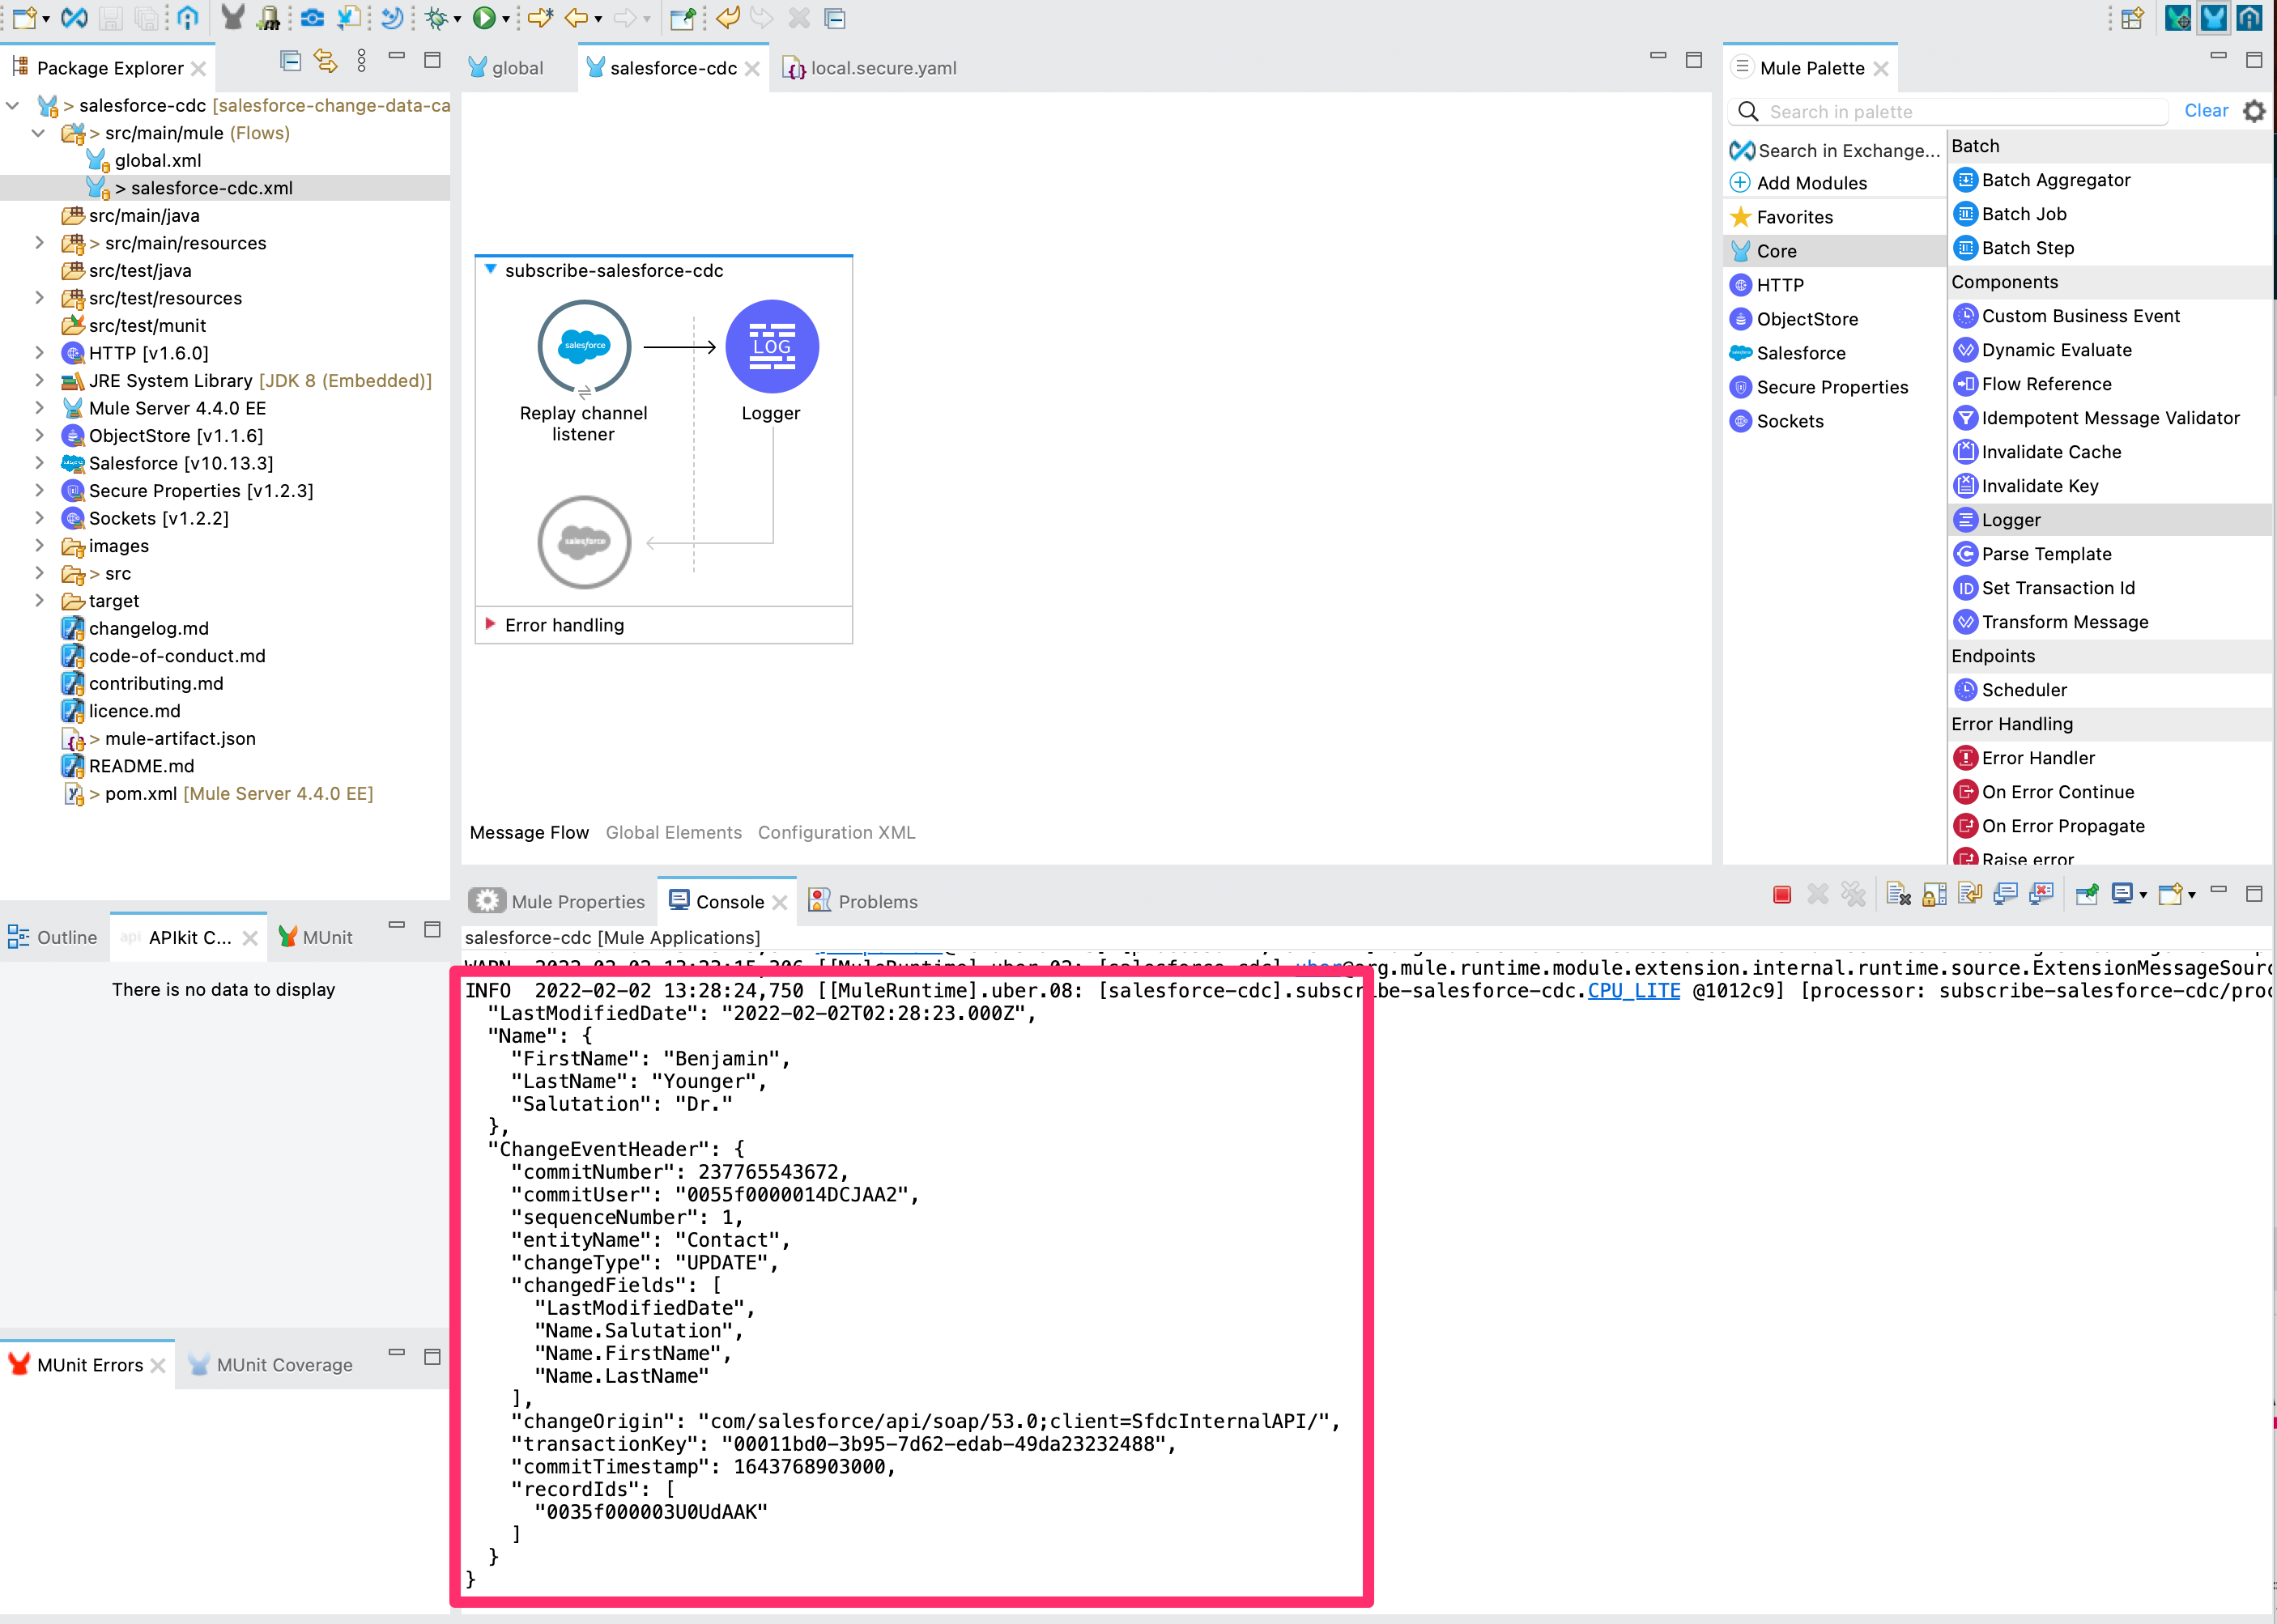
The log shows you the basic structure of an change data capture event from salesforce which we can summarise as:
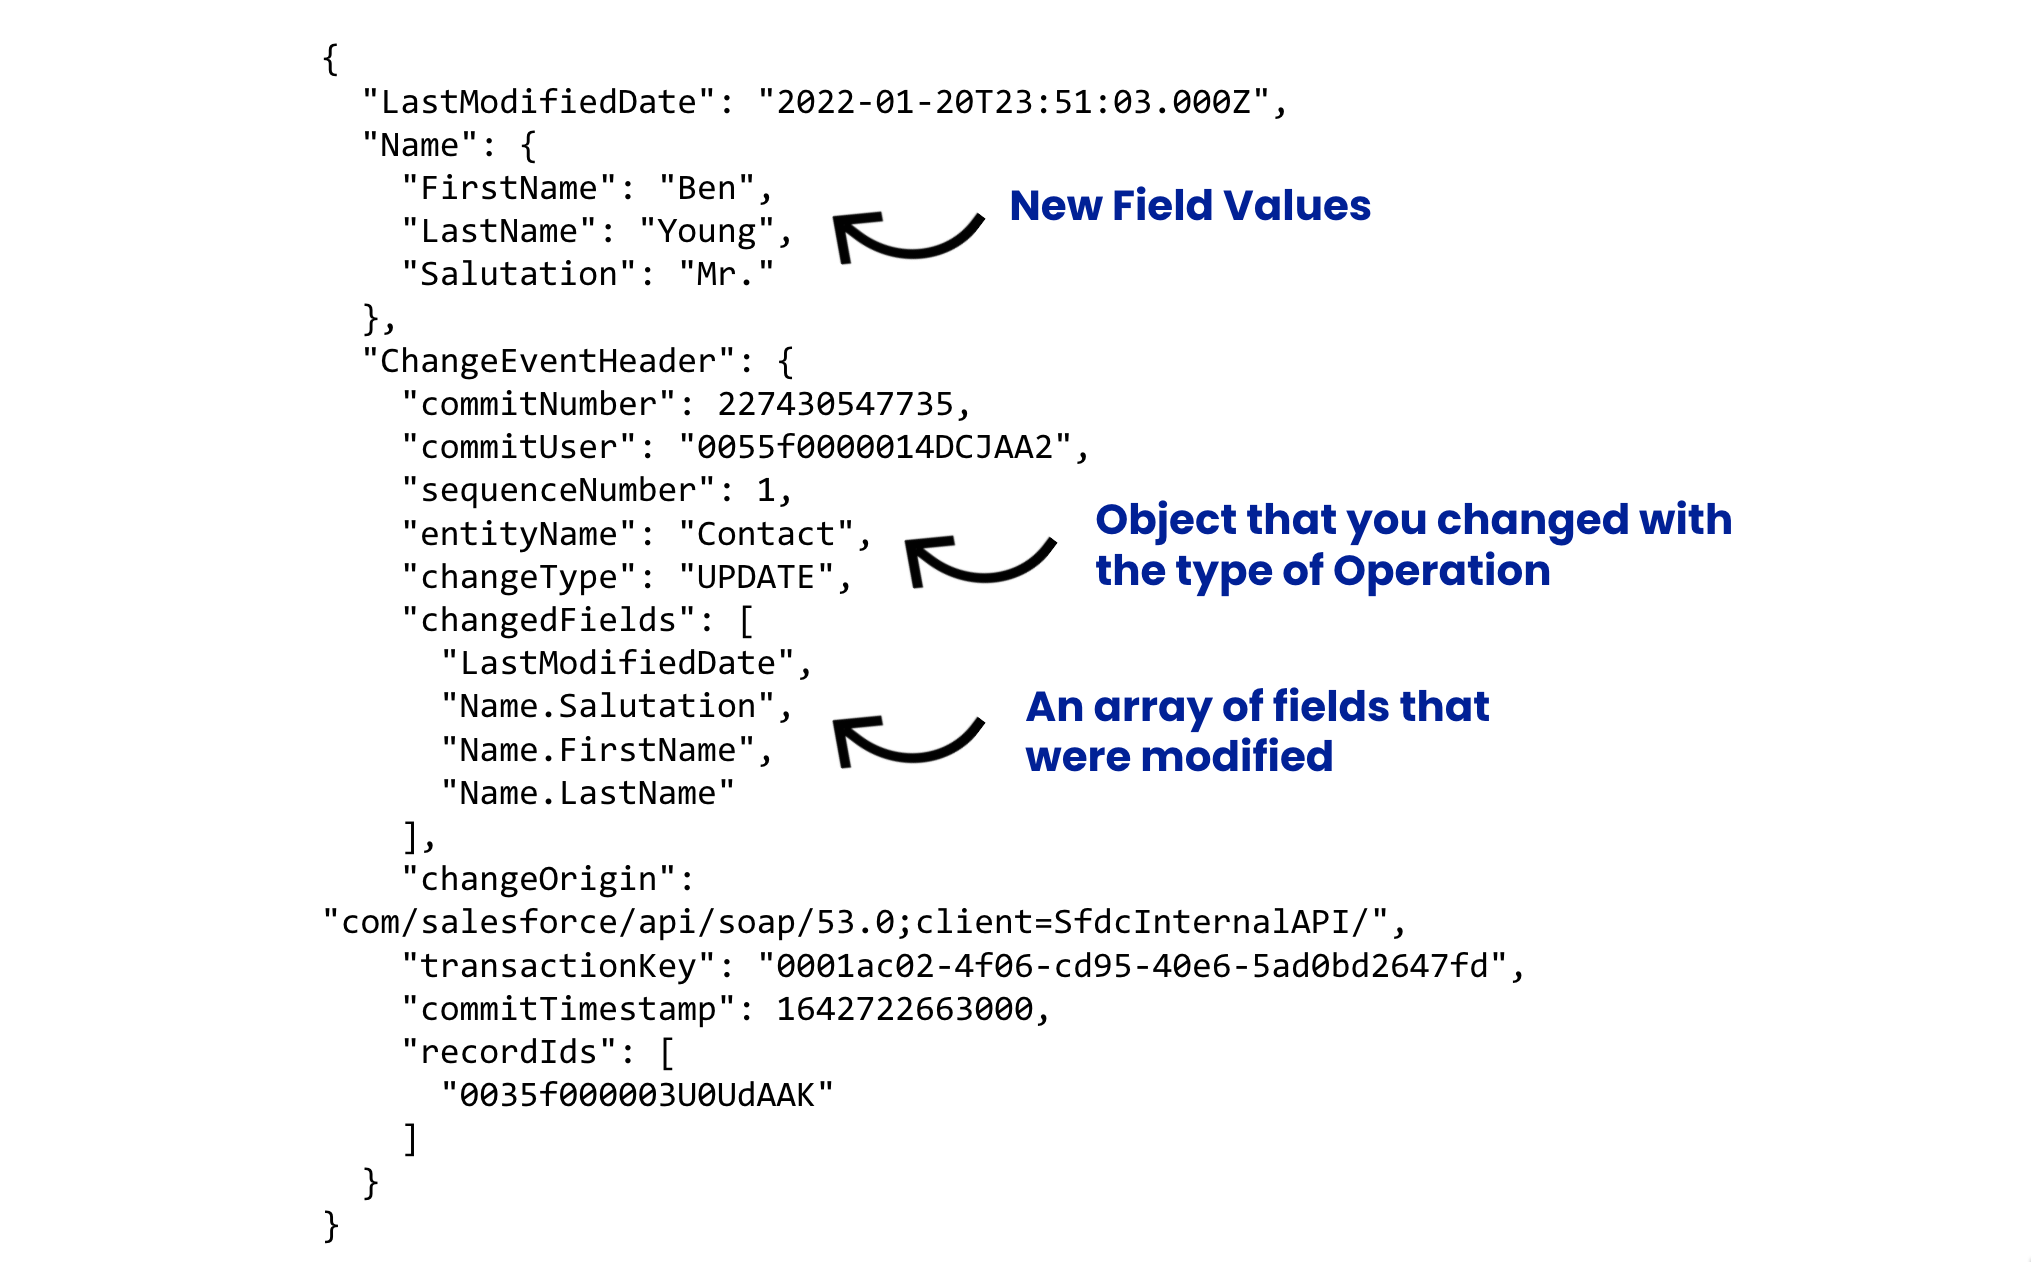
For detailed information on the structure of Change Events from Salesforce take a look at the Change Data Capture Developer Guide.
Congratulations! You now have a basic Mule application that is subscribing to Contact change events without needing to write a single line of code. Use the Replay channel listener and Change Data Capture to update data in an external system instead of doing periodic exports or API polling. Capturing changes with Change Data Capture event notifications ensures that your external data can be updated in real time and stays fresh.
Next Steps
In this tutorial, we walked you through subscribing to and viewing the structure of an inbound Contact Change Data Capture (CDC) event from Salesforce. You learned how to:
- Publish a change data capture event in Salesforce on the Contact object
- Setup the Salesforce Connector
Replay Channel Listenerto subscribe to a Contact change event - View the structure of a change data capture event in Anypoint Studio
When subscribing to Change Data Capture events in Salesforce it is recommended to implement a reliability pattern. A reliability pattern couples a reliable acquisition flow with an application logic flow. Try modifying your Mule application to implement this pattern.
Do you have any questions about the code? You can compare your Mule project with ours to make sure everything was set up correctly.


Try Anypoint Platform for free
Start your 30-day free trial of the #1 platform for integration, APIs, and automation. No credit card required. No software to install.
Questions? Ask an expert.
