What is DataWeave?
Many developers that are new to MuleSoft have never coded in the DataWeave language before. Luckily, DataWeave is easy to pick up and learn since it follows many of the same rules as other functional programming languages. If you have never coded in a functional programming language before, do not worry! This series will walk through how to develop basic transformations with DataWeave.
DataWeave is the MuleSoft expression language for transforming data as it travels through a Mule application. There are many real-life use cases where DataWeave can be used to take one piece of data, and convert it into a different output format by adding or removing values. There are so many different transformations you can do with DataWeave, but for now, let’s keep it simple.
DataWeave scripts are divided into two main sections, the header, and the body. The header defines directives that apply to the body, and the body contains an expression that returns an output. The header is located above the body delimiter which consists of three dashes --- anything above the three dashes is the header, and anything below the three dashes is the body.
To get started with using DataWeave, click the signup button below to create a free account and download Anypoint Studio.
Start free trial
Already have an account? Sign in.
DataWeave Playground
Want to explore DataWeave yourself and try it out live in your browser? Visit http://dwlang.fun/ to follow step by step tutorials on the DataWeave language. Read more by visiting this blog post.
Example flow
In the exampleFlow below, let’s take a look at building the most basic transformation in DataWeave. We start with an Input JSON payload which includes the message hello world. An HTTP Listener is created to listen for an HTTP POST request to hit the endpoint. Once the flow receives the incoming request, the Transform Message runs a DataWeave script which will transform the data in whatever way we wish. The Logger component will then print out the payload in the Console.

As you can see in the above example, the output will only return the message string instead of the entire input JSON payload. This is because we defined the DataWeave script to output payload.message. This output is now accessible in the rest of the flow.
Variables
In DataWeave, there are global and local variables. Global variables are created in the header of the DataWeave script and can be referenced anywhere in the body of that script. Local variables are created in the body of the script and can only be referenced within the scope they are initialized. Let’s take a closer look.
In the below example, the variable is instantiated in the header and can be accessed and used in the body of the script. Below is an example of a global variable where we concatenate the string and add text after the company payload.

Here’s an example of a local variable:

Functions
In DataWeave, you can create functions that are located in the header section of your script. Just remember, functions are FUN in DataWeave, simply create your first function by using the fun declaration in the header of your script. In the below example, we look for the payload to be equal to MuleSoft, and if true return the string Match.

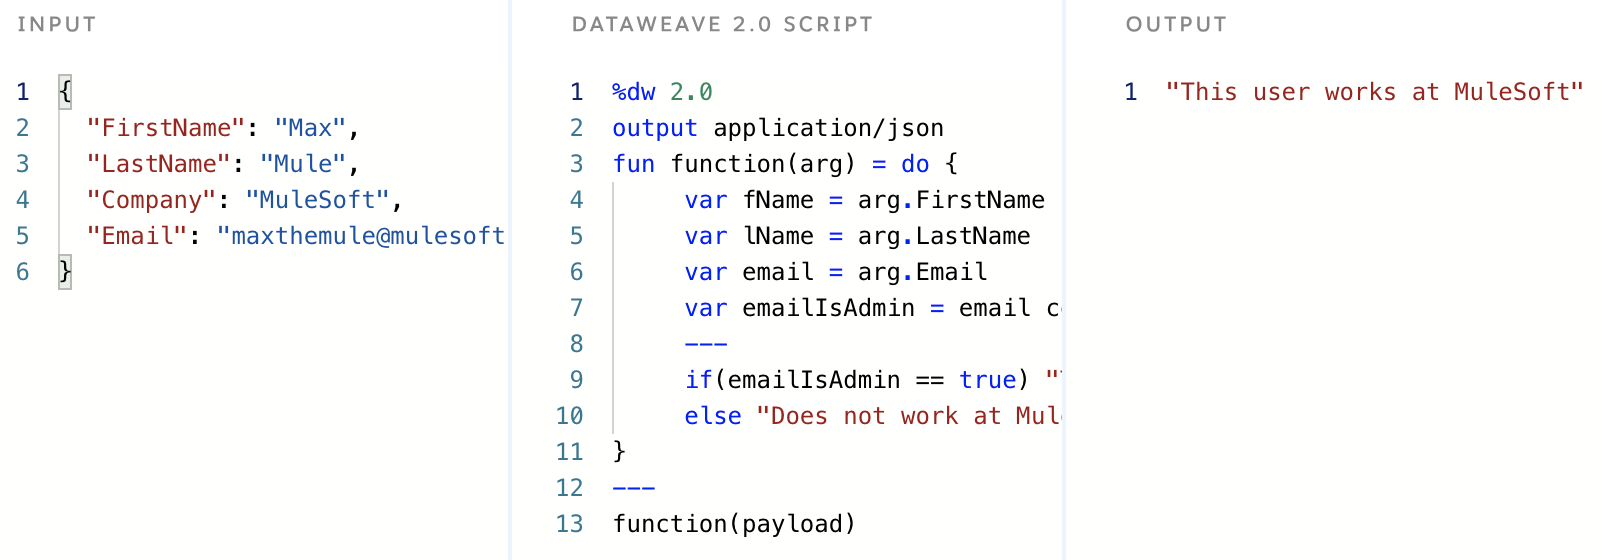
In the script below, observe how we use the do statement to create a scope in our function. The do statement allows new variables, functions, namespaces, and annotations to be created within the scope. The section is subdivded into the header and body with the three dashes --- as demonstrated below.

Match
The match function allows you to match a string and then return the results in an array. If you have ever used Java regex before, the match function uses the same library to allow pattern matching on strings. In the example below, we used the literalMatch case to output “Match” if the payload.Company string is equal to “MuleSoft”. In the script, you will notice a dollar sign in the else statement. A single dollar sign is used for accessing the value passed by the function. You can also replace the dollar sign with arg (in this use-case) and the output will have the same result. There are three different operators you can use in your DataWeave scripts: $ (value), $$ (key), and $$$ (index).

Import libraries
In DataWeave, there are multiple modules that are available for import which is listed on the MuleSoft Documentation. This wide array of modules can do tasks like string manipulation, URL encoding, date formatting, and many more. To view the full list of available libraries check out the link above, this tutorial series will cover some of them more in-depth. To import a library, simply include the import script in the header section of your DataWeave Script as shown below. The below scripts encodes the URL so that the outbound request is valid.

MIME types
Many data transformations require requiring different input and output requirements. In order to support these different read and write formats, you can specify the MIME type for both the input and the output data that flows through the Mule application. To change the MIME type, set the type in the header as shown below. In the examples below, observe the differences in output vs application/json and text/plain.


To view the full list of different output formats and writer properties, check out the documentation on DataWeave Formats by clicking here.
Conclusion
This article only covered the very basics of what’s possible in DataWeave.
Click on the Next button below to continue reading this series on how to map objects and create data transformations in DataWeave.
Next


