Overview
In this tutorial, you will learn how to interface with the Tableau API using MuleSoft to send data from your Mule application and visualize it in Tableau. Sending data to Tableau using MuleSoft is pretty straightforward, and we’ve even built a sample jar file for you to download and try out on your local machine, all you need to do is enter your own credentials. You will learn how to:
- Set up authentication with Tableau
- Fetch all of the current users in Tableau
- Create a new user in Tableau
- Delete an existing user in Tableau
- Initiate a file upload and append a file to upload to Tableau using Multipart
In order to get started, you first need to download Anypoint Studio and create your free Anypoint Platform trial account. Click the button below to get started:
Already have an account? Sign in.
Setting up authentication with Tableau using MuleSoft
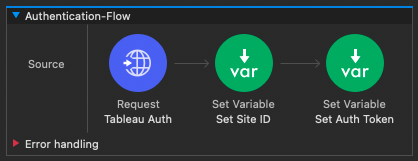
Setting up authentication with Tableau is pretty straightforward using MuleSoft. The first step is to create a new flow called Authentication-Flow. Drag an HTTP Request connector into your flow and setup the configuration file with the following information:
- Base path: /api/3.6
- Protocol: HTTPS
- Host: XXX.online.tableau.com
- TLS Configuration: Edit Inline
For your TLS Configuration, make sure that you create a keystore and add it to your src/main/resources folder in your Mule application. If you have never learned how to create a keystore or secure an HTTPS endpoint, please follow the instructions in this tutorial.
For the HTTP Request settings, make sure you have the following settings
- Method: POST
- Path: auth/signin
For your body, copy and paste the following XML code and add your Personal Access Token Name and Secret and Site ContentURL that you can copy from your Tableau account:
1
2
3
4
5
6
7
<tsRequest>
<credentials
personalAccessTokenName="XXXX"
personalAccessTokenSecret="XXXXXXXXXXXXXXX >
<site contentUrl="myhelloworldsite" />
</credentials>
</tsRequest>
One you send this HTTP Request, Tableau will return you with your Site ID and Auth Token. You will need to save these as variables in your mule flow in order to use them throughout your Mule application.
Attached below is the DataWeave code for both setSiteID and setAuthToken variables:
1
2
3
4
5
%dw 2.0
output application/java
ns ns0 http://tableau.com/api
---
payload.ns0#tsResponse.ns0#credentials.ns0#site.@id
1
2
3
4
5
%dw 2.0
output application/java
ns ns0 http://tableau.com/api
---
payload.ns0#tsResponse.ns0#credentials.@token
Nice job, you have completed your authentication flow and successfully authenticated with Tableau.
How to fetch all current users in Tableau
In this flow, our goal is to return all of the current users in our Tableau instance. Create a new flow by dragging an HTTP Listener onto your canvas. Name the path /query-users and add a flow reference to the Authentication-Flow that you created in the previous step.
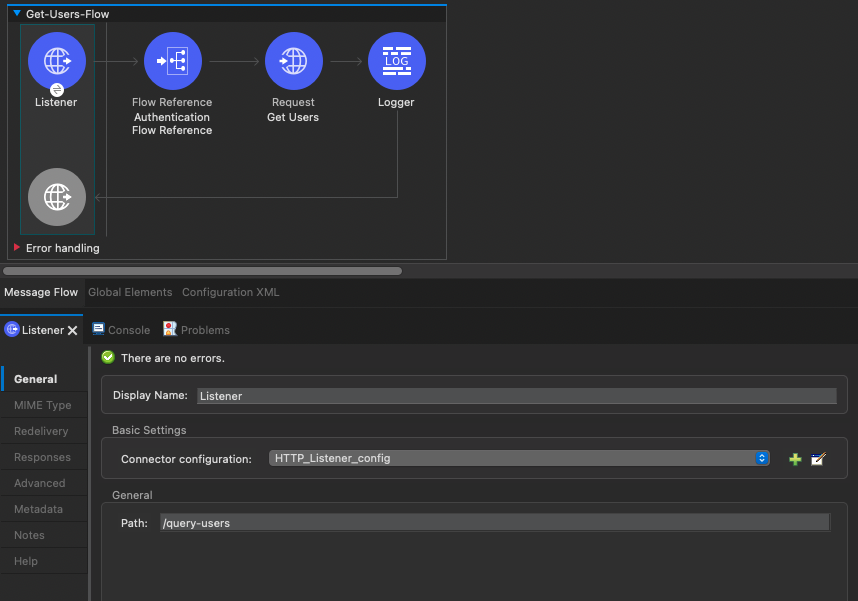
Next, drag an HTTP Request connector into your flow and select the HTTP Request Configuration file you used for your Authentication-Flow that contains the HTTPS endpoint. Add the following configuration to your request:
- Method: GET
- Path: sites/{siteId}/users
- Body: payload
For your Headers, add the following code to add the x-tableau-auth to your request:
1
2
3
4
5
output application/java
---
{
"x-tableau-auth" : vars.setAuthToken
}
For your URI Parameters, add the following code to replace {siteId} with the site ID that you fetch in your Authentication-Flow:
1
2
3
4
5
output application/java
---
{
"siteId" : vars.setSiteId
}
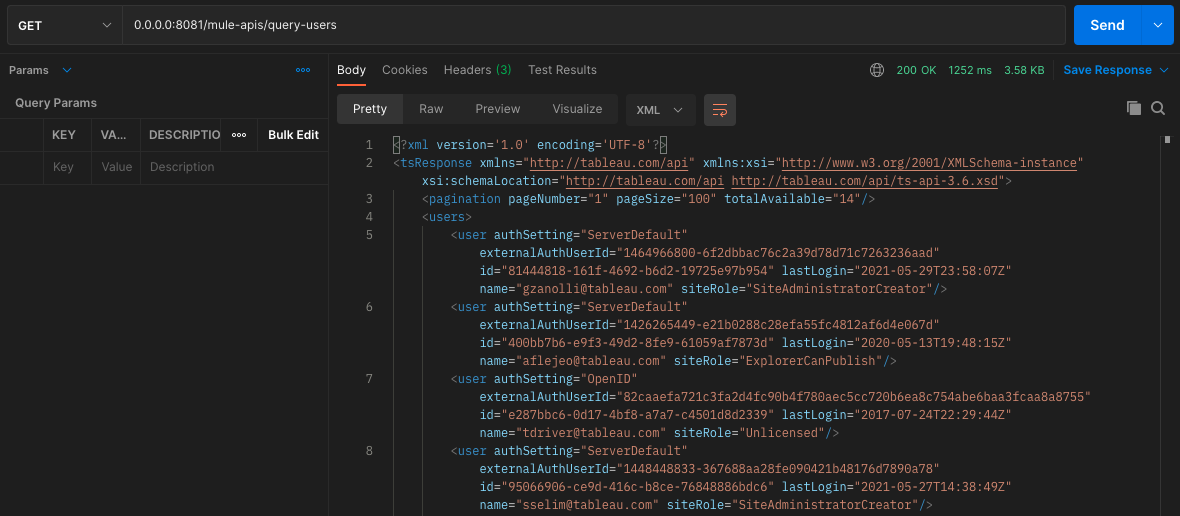
Nice job, you have successfully fetched users from Tableau. To test it out, load up Postman and send a request to /query-users. You should get a request similar to what you see below:
How to create a new user in Tableau
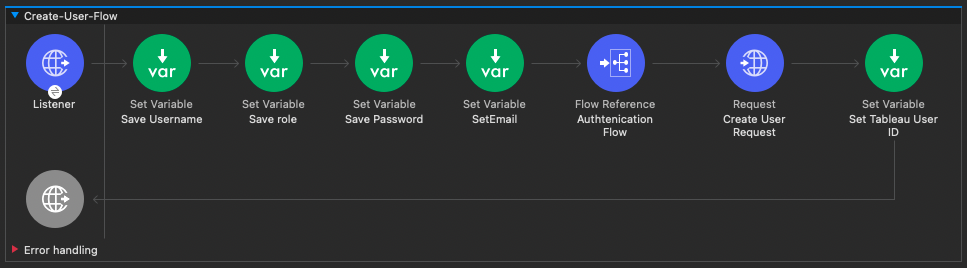
To create a new user in our Tableau dashboard, we are going to create an API endpoint that allows you to submit query parameters that include the following:
- Set Username
- Save Role
- Set Password
- Set Email
You can find all the information on how to add a new user to Tableau if you visit the Tableau API documentation page. You can set various site roles such as Creator, Explorer, Viewer etc.
Create a new flow by dragging an HTTP Listener onto your canvas. Name the path /create-user. Next, create variables for each of the query parameters by using the DataWeave code: attributes.queryParams.username, attributes.queryParams.role, attributes.queryParams.password, attributes.queryParams.email
To read more about how to set up custom headers, query, and URI parameters in DataWeave, make sure to read this article. Next, drag a flow reference to the Authentication-Flow that you created in the previous step and drag an HTTP Request Connector after the authentication flow reference with the following settings:
- Method: POST
- Path: sites/{siteId}/users
For the body of the request add the following JSON:
1
2
3
4
5
6
7
8
9
10
output application/xml
---
{
tsRequest: {
user @(
name: vars."user-name",
siteRole: vars.role
): null
}
}
For your Headers, add the following code to add the x-tableau-auth to your request:
1
2
3
4
5
output application/java
---
{
"x-tableau-auth" : vars.setAuthToken
}
For your URI Parameters, add the following code to replace {siteId} with the site ID that you fetch in your Authentication-Flow:
1
2
3
4
5
output application/java
---
{
"siteId" : vars.setSiteId
}
Delete an existing user in Tableau
To delete an existing user in Tableau, you will need to query a backup owner ID and update ownership for each account. The best way to do this is to download the jar file at the top of the tutorial and load the project into your own Anypoint Studio IDE.
Initiate a file upload and append a file to Tableau using Multipart
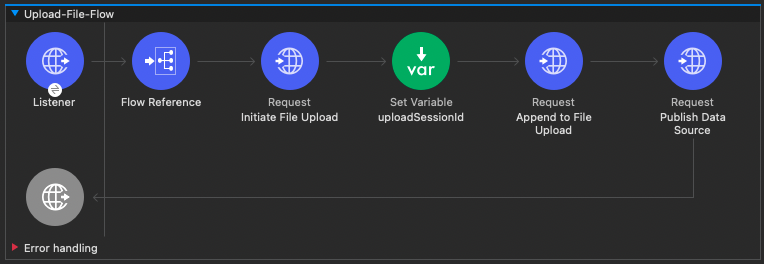
In this flow, our goal is to upload a file to our Tableau server. Create a new flow by dragging an HTTP Listener onto your canvas. Name the path /file-upload and add a flow reference to the Authentication-Flow that you created in the previous step. Next, drag an HTTP Request connector into your flow and use the same HTTP Request Configuration that you’ve used for the previous steps.
- Method: POST
- Path: sites/{siteId}/fileUploads
- Body: payload
For your Headersx, add the following code to add the x-tableau-auth to your request:
1
2
3
4
5
output application/java
---
{
"x-tableau-auth" : vars.setAuthToken
}
For your URI Parameters, add the following code to replace {siteId} with the site ID that you fetch in your Authentication-Flow:
1
2
3
4
5
output application/java
---
{
"siteId" : vars.setSiteId
}
Next, add a Set Variable connector to your flow and name it uploadSessionId. Input the following dataweave code to save the session ID as a variable:
1
2
3
4
5
%dw 2.0
output application/java
ns ns0 http://tableau.com/api
---
payload.ns0#tsResponse.ns0#fileUpload.@uploadSessionId
Next, drag another HTTP Request connector into your flow. This HTTP Request will append a file to upload to Tableau. The contents of this payload are defined on the Tableau API documentation.
- Method: PUT
- Path: sites/{siteId}/fileUploads/{uploadSessionId}
For the body, you will need to format a multipart message that contains your tdsx file which is located in your src/main/resources folder. The file will be sent as a binary, as defined by application/octet-stream and you will need to set a boundary for your multipart message as well in the output header. The following DataWeave script below will transform your JSON message to a Multipart form message:
1
2
3
4
5
6
7
8
9
10
11
12
13
14
15
16
17
18
%dw 2.0
import dw::module::Multipart
output multipart/mixed boundary="-----az1by2cx34dw"
---
{
"parts": {
"file" : {
"headers" : {
"Content-Type" : "application/octet-stream",
"Content-Disposition" : {
"name": "tableau_file",
"filename": "SuperstoreDatasource.tdsx"
}
},
content :  readUrl("classpath://SuperstoreDatasource.tdsx", "application/octet-stream")
}
}
}
For your Headers, add the following code to add the x-tableau-auth to your request:
1
2
3
4
5
output application/java
---
{
"x-tableau-auth" : vars.setAuthToken
}
For your URI Parameters, add the following code to replace {siteId} and {uploadSessionId} with siteID and uploadSessionId that you fetch in your Authentication-Flow:
1
2
3
4
5
6
output application/java
---
{
"siteId" : vars.setSiteId,
“uploadSessionId”: vars.uploadSessionId
}
The next step is to add another HTTP Request connector to your flow. This HTTP Request will publish the datasource to Tableau and will overwrite any existing datasource.
- Method: POST
- Path: sites/{siteId}/datasources?uploadSessionId={uploadSessionId}&datasourceType=tdsx&overwrite=true
For the Body of the response, enter the following DataWeave code and input your own project ID:
1
2
3
4
5
6
7
8
9
10
11
12
13
14
15
16
17
18
19
20
21
22
23
24
25
26
27
%dw 2.0
import dw::module::Multipart
output multipart/mixed boundary="-----az1by2cx34dw"
---
{
"parts": {
"file":{
"headers" : {
"Content-Type" : "text/xml",
"Content-Disposition" : {
"name": "request_payload",
}
},
content : {
tsRequest: {
datasource @(
name: "DataDEVDayDataSource"
): {
project @(
id: "09cdd759-2a6a-4733-8a10-XXXXXXX"
) : null
}
}
}
}
}
}
Copy the Headers and URI Parameters from the previous HTTP Request to finish the publishing of your datasource to Tableau.
Next steps
Now that you have learned how to integrate with the Tableau API, feel free to visit their developer portal to learn about more integrations that you can create with Tableau and MuleSoft. Additionally, if you want to read more MuleSoft tutorials to help you get started with the platform, visit developer.mulesoft.com. If you want to learn how to deploy your Tableau application to CloudHub, visit our Hello Mule tutorial to learn how to publish your first Mule application.

Try Anypoint Platform for free
Start your 30-day free trial of the #1 platform for integration, APIs, and automation. No credit card required. No software to install.
Questions? Ask an expert.
