Overview
In this guide, you’ll use Anypoint Platform to build a polling service that:
- Contains a main flow that runs when the program first starts, and continues to run nightly.
- Gets all customer records from FTP / SFTP.
- Uses watermarks to avoid duplication by storing the last record.
- Adds the records in highly performant asynchronous batches to Salesforce.
Why run batch ETLs on Anypoint Platform?
Anypoint Platform includes Mule runtime, a flexible execution engine that can be used to implement integration patterns––from APIs to a traditional Enterprise Service Bus (ESB), which offers a variety of benefits when developing batch and ETL services, including the ability to:
- Accept and send messages in all major protocols.
- Implement change data capture through Anypoint Platform’s watermark feature to only process net-new records.
- The batch scope allows you to perform operations to a specified number of records per batch, automatically handle any record-level failures, and prevent individual failures from completing batch job.
- Transform messages into formats that are readable by the target system.
- Route messages to both pre-configured or dynamic targets.
The Anypoint Exchange also offers many pre-built examples and templates for popular systems such as SAP and Salesforce.
Setup your project
First, click the button below to signup for a free Anypoint Platform account.
Already have an account? Sign in.
Next, download and install Anypoint Studio by clicking the link. Next, Sign up for a Salesforce Developer account. Take a note of your credentials, we will need that later. Lastly, reset your security token for Salesforce. You will get an email with your token. You will also need this in a later step.
Your application in Anypoint Studio
To begin, launch Anypoint Studio and follow the steps below to:
- Create your new Mule application project.
- Perform business logic.
- Ingress data.
- Transform the data with DataWeave.
- Finally, export the data to the consuming service.
Alternatively, if you are just looking for a pre-built example of a batch ETL integration with Salesforce, you can import the soulution file to Anypoint Studio. To do so:
- Click on the Exchange icon in Anypoint Studio
- Select Provided by MuleSoft in the sidebar
- Search for Creating a batch ETL integration
- Select the Open button to import and open the project within Studio
- Click on the Salesforce connector. Click the edit button to edit the Salesforce configuration.
- Enter your Salesforce details from Get Set Up section
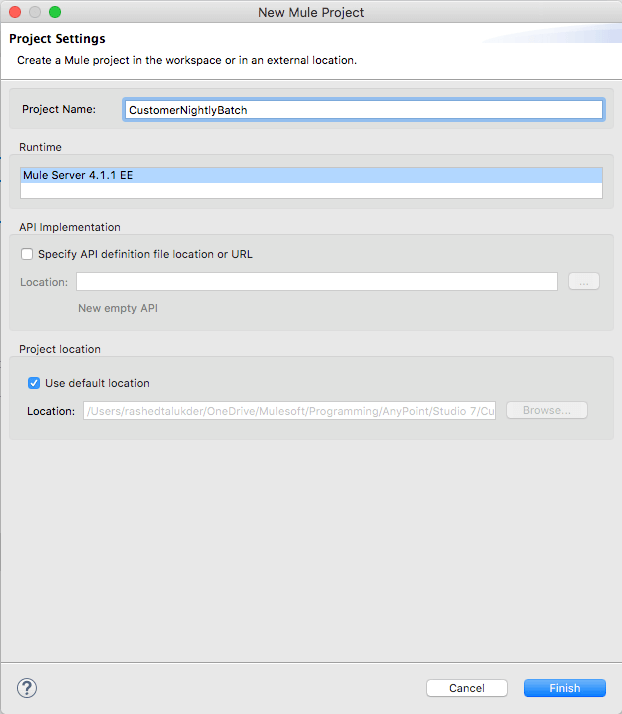
Creating a Mule batch project
Unlike a service that needs to be exposed as an API – as shown in the second quick start guide on developing your first Mule application – this project’s application runs strictly as a scheduled nightly task. As a result, you’ll create a new Mule project without using an API specification.
From within Studio:
- Click File → New → Mule Project.
- Fill in the project name field with a name for your first project.
- (e.g. “CustomerNightlyBatch”)
- Click Finish.
Adding an FTP/FTP trigger
To detect if files in a FTP location have been updated or created in a specific path, there is a connector available that polls for new or updated files on a FTP server. To add the FTP connector to your application canvas:
- Click the search field in the Mule Palette and search for “FTP.”
- Drag the On New or Updated File operation of the FTP connector onto the application canvas.
This creates the main flow of your application. It is triggered by any new or updated file that matches all the settings and conditions set in future steps.
Configuring the FTP Connector
As with most connectors, after adding it to the canvas, the first step is to configure the connector before configuring the operation.
- To configure the connector, click the green + button. Fill in the new modal with the following:
- Host: ftp.devrel.mulesoft.com
- Port: 21
- Username: devrel-mulesoft
- Password: mulesoft123
- Click Test Connection… to verify that everything is working.
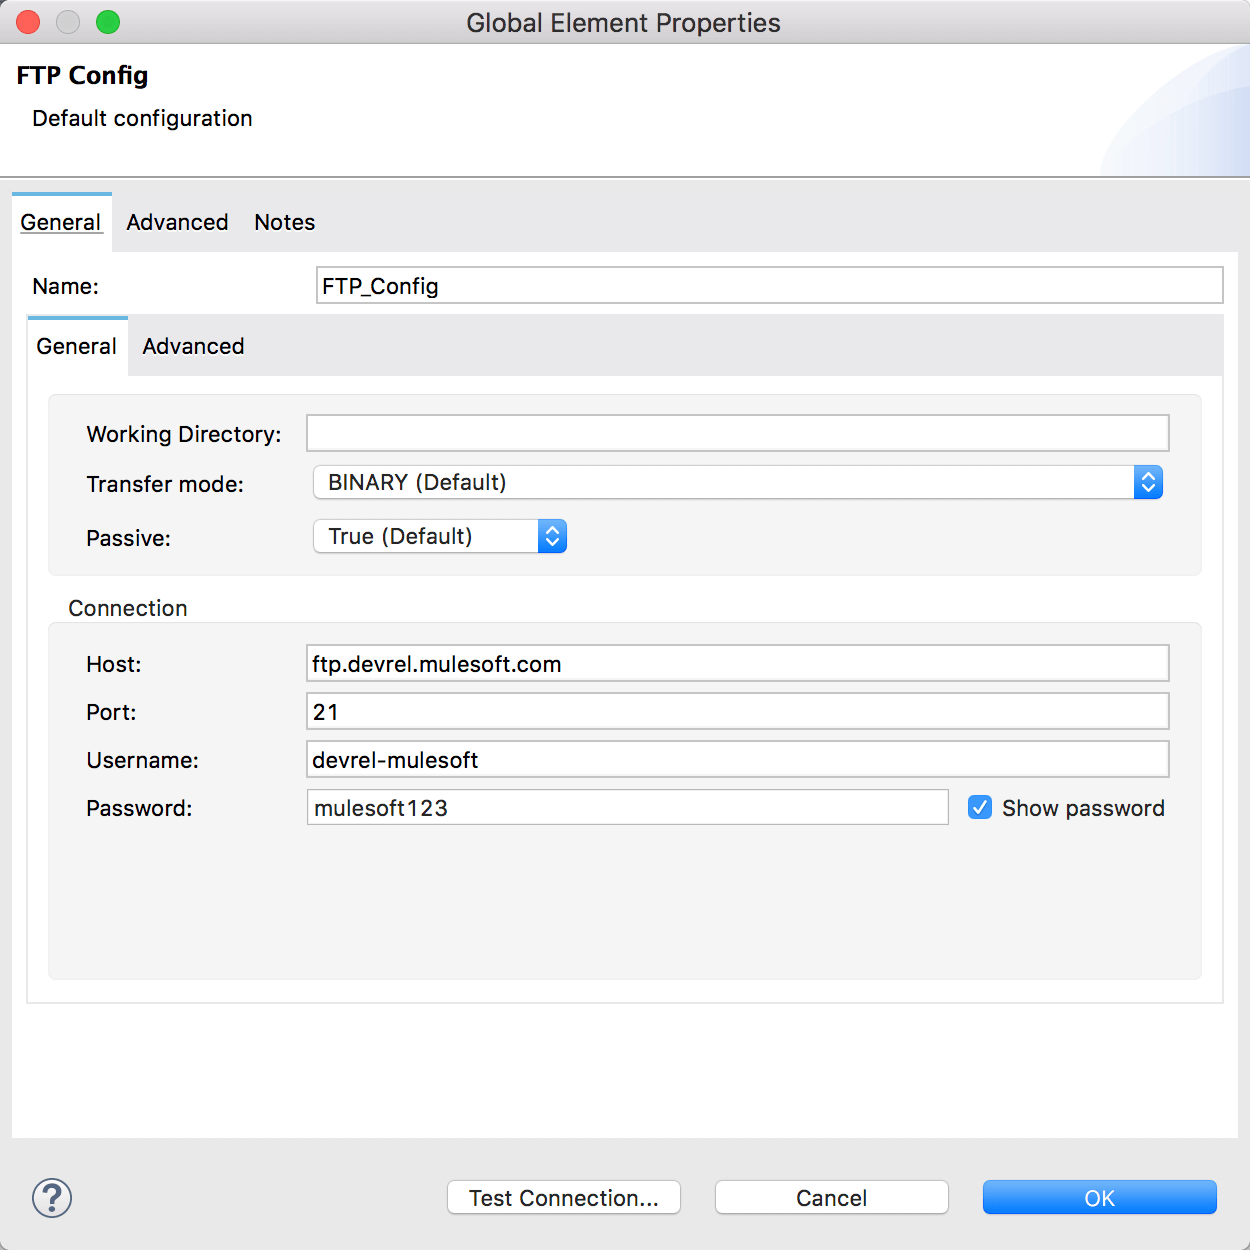
The directory is at the root, so there is no need to change the path.
Extracting via FTP
In this case, you’ll have the FTP connector’s On New or Updated File operation, which will look for a specific file, enable watermarking, and for development purposes, set it to run every minute. Since this account is read-only, you won’t be able to write or delete, so post-processing is false. After processing a file, for many use cases, it is a good idea to move the file to a different directory to avoid duplication should you need to restart the service.
Enabling watermarking automatically keeps track of the timestamp the file was updated and/or created within the in memory object store to ensure that only files newer than the last fetch continues the message processes.
Fill in or select the following to configure the operation:
- Matcher: Edit inline
- Filename pattern: new_customers.csv
- Watermark enabled: checked
- Scheduling Strategy: Fixed Frequency
- Frequency: 1
- Start delay: 0
- Time unit: MINUTES
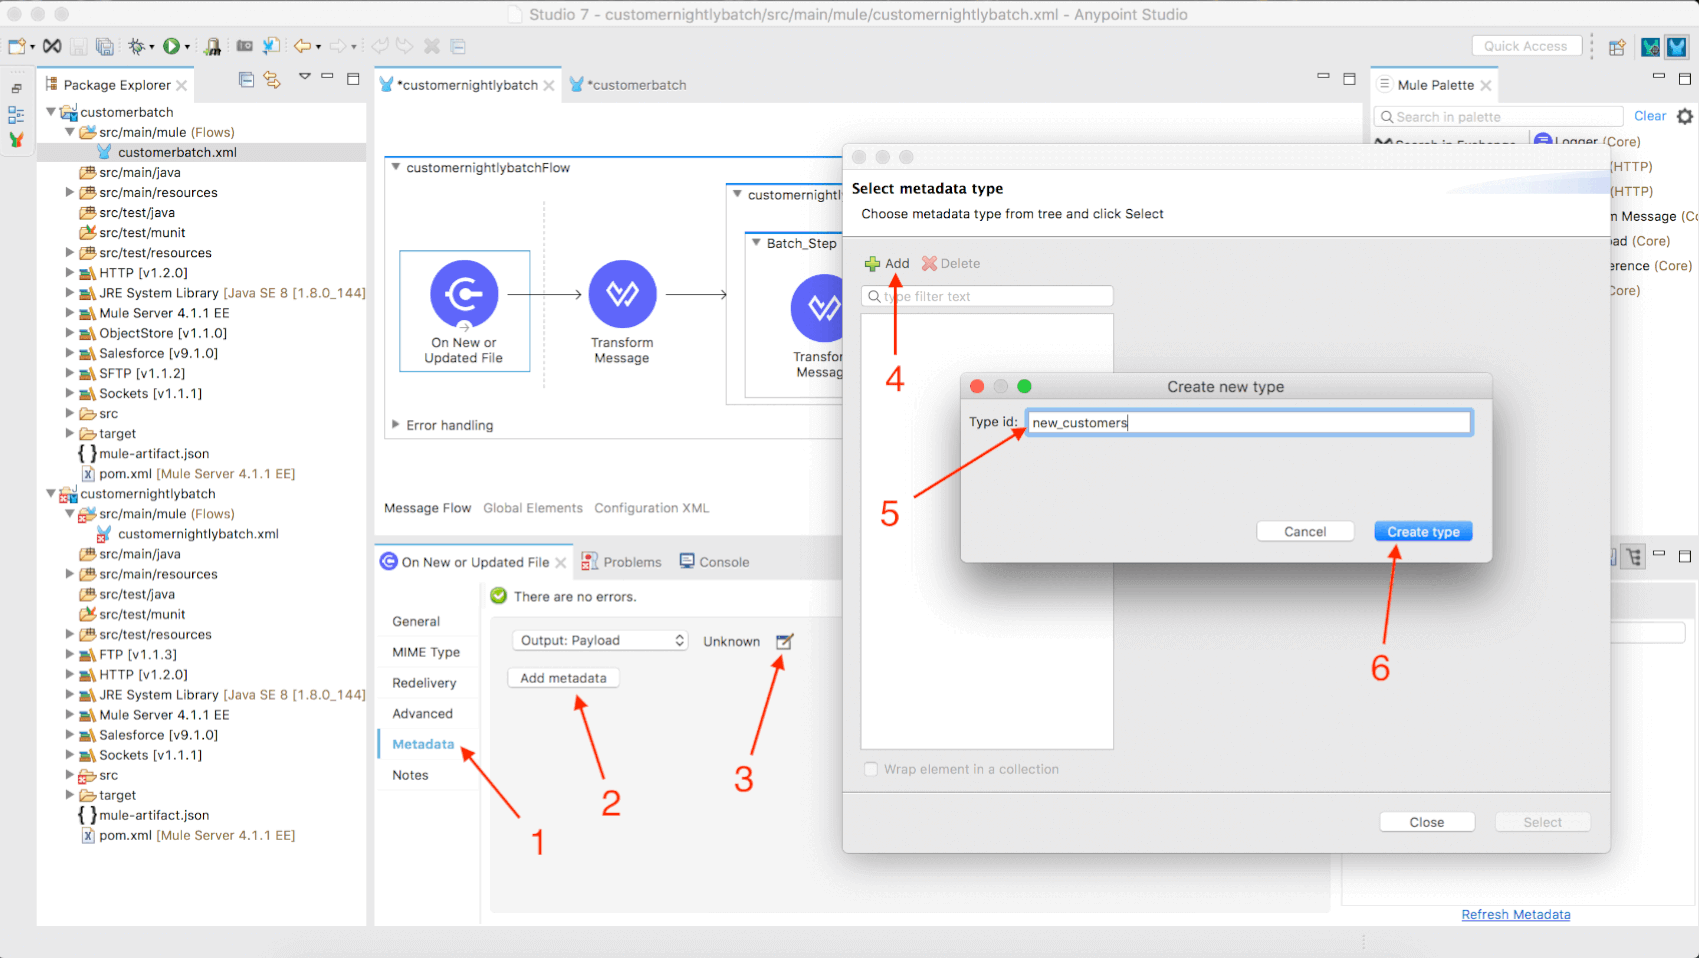
Setting metadata
In order to make data transformations easier, you can set up metadata information to define the data structure of the file. This can then be used by Data Sense to help create visual mappings of the data. Anypoint Studio can derive the metadata by importing an example file. To create data structure metadata using a example file:
- Click the Metadata tab in your On New or Updated File operation configuration window.
- Click Add metadata.
- Click the edit icon.
- Click the Add button in the new modal.
- Type in the name of your new data type.
- E.g. “new_customers”
- Click Create Type.
- From the Type dropdown menu, select CSV.
- Click the Load from example icon.
- Download the CSV below and select the location of the file after pressing the … .
- Click OK.
- Click Select.
Transforming CSV to POJO
Since the file format you’ve fetched is in CSV format, you’ll need to convert it to a Plain Old Java Object (POJO) in order allow the Java-based connectors to use the data. To do so, you’ll use the Transform Message component, which uses powerful DataWeave syntax to transform data.
To add the transform message component, follow similar steps as the FTP connector:
- Search/locate the Transform Message component in the Mule Palette.
- Drag the component into the Process area of your main flow.
- Replace the script with the DataWeave code below:
1
2
3
4
5
6
%dw 2.0
output application/java // Output mime-type as POJO
---
// Convert entire payload variable which currently
// contains the CSV from the FTP connector
payload
Creating a batch job
Adding a batch job and setting the processing rules for records in Anypoint Studio is a simple process. Adding data aggregation to the batch process is also supported to easily enable bulk uploads at customizable record sizes.
Add the batch job to your main flow by:
- Search/locate the Batch Job scope in the Mule Palette.
- Drag the component and place it after the Transform Message component.
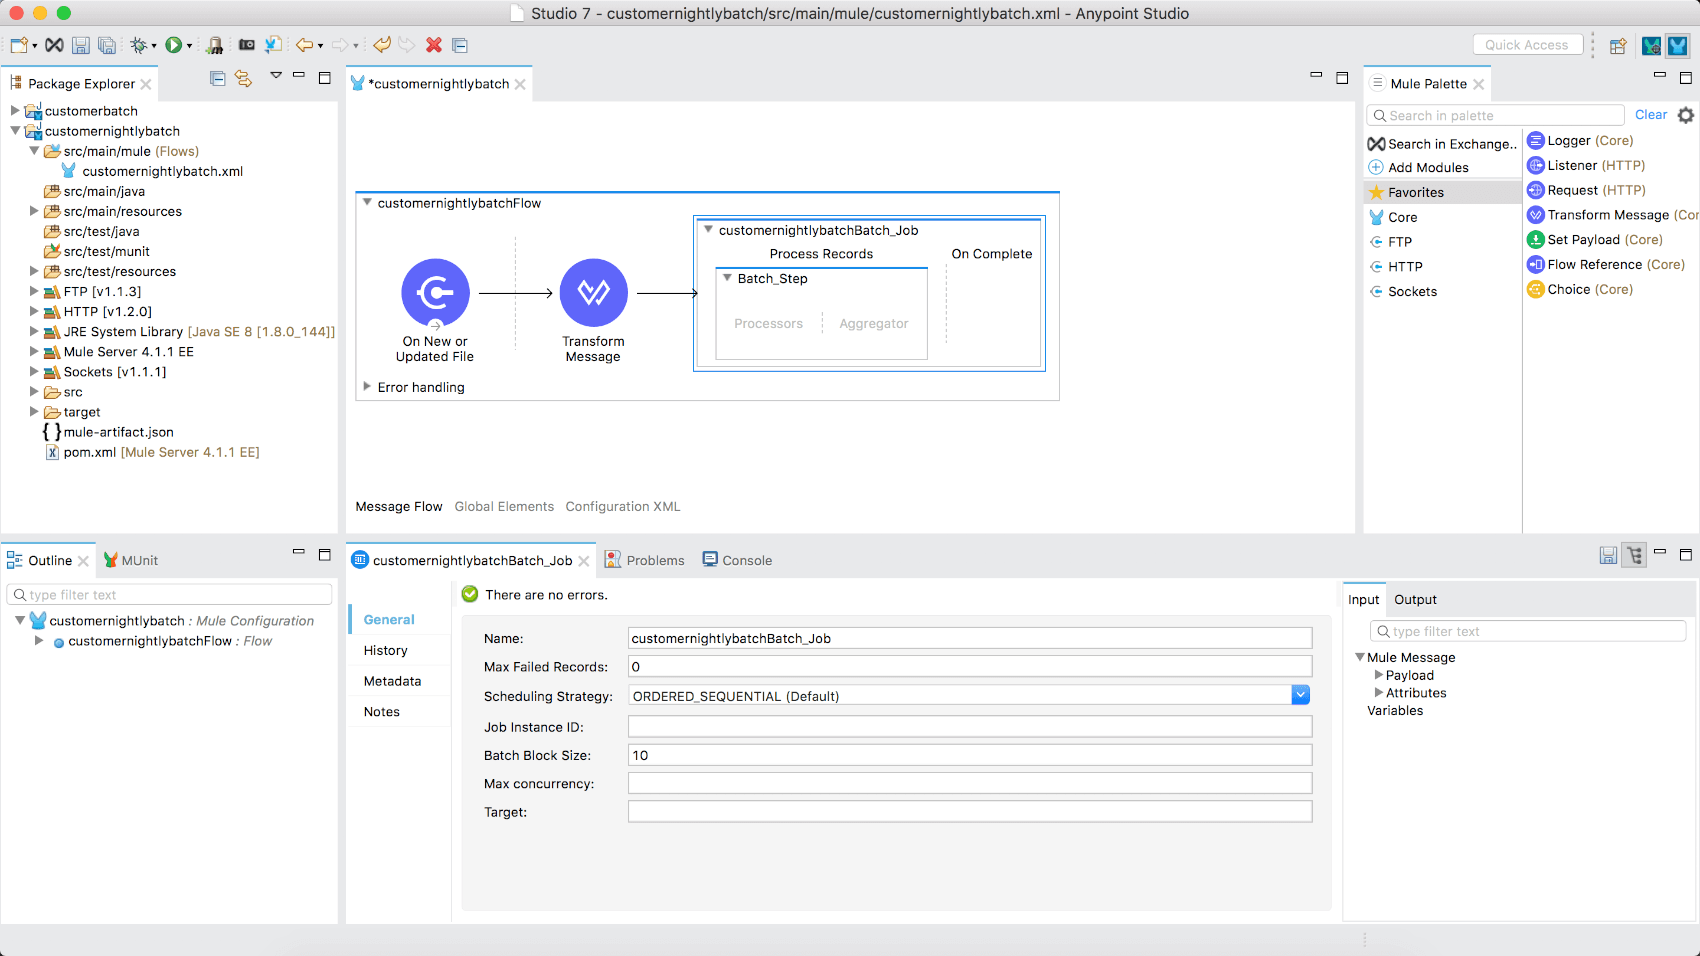
Configuring the batch job
With the batch job placed in the flow, you now have the option of configuring the scheduling strategy, number of records to process per thread, and more. To see the process in action, change the following:
- Batch block size: 40
Block size needs considerations in place. An example is when processing large data records (e.g. images), it is possible to run out of memory (40 records X 10MB x 16 threads = 6.4GB of RAM), or to have the block size too high for only a few records, causing inefficient or synchronous data processing.
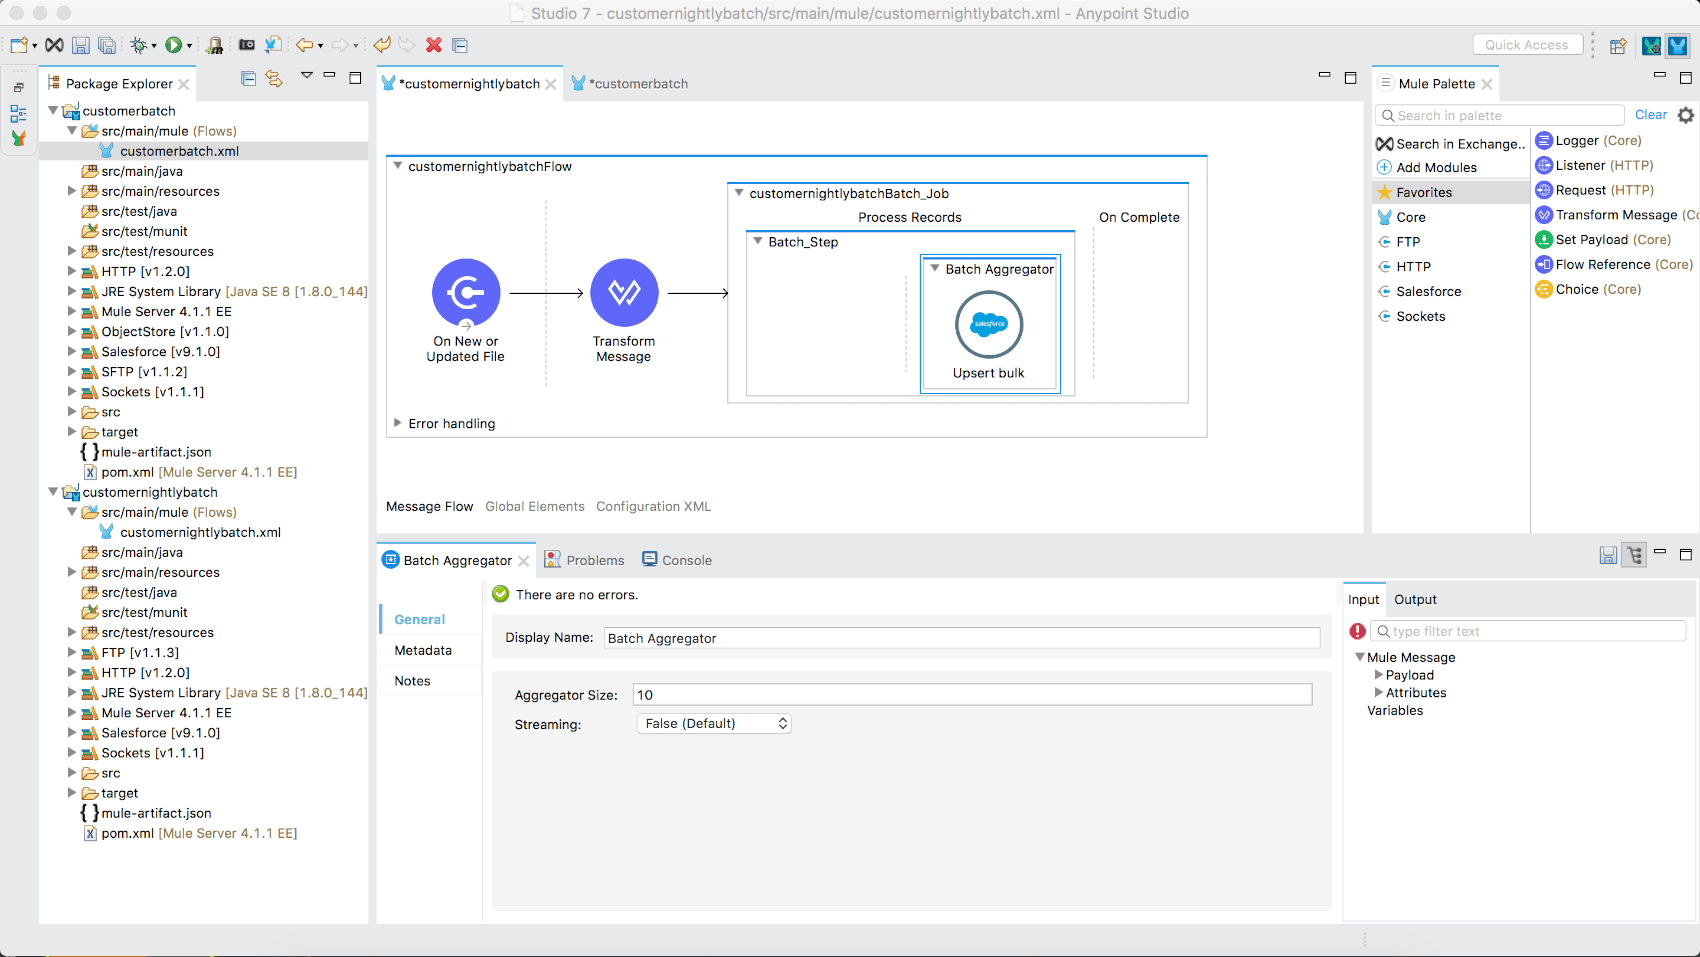
Aggregating batch records for bulk
In order to create a bulk upsert of these customer records to Salesforce, you’ll need to aggregate a subset of the batch records in the queue. To add the Batch Aggregator scope:
- Search/locate the Batch Aggregator component in the Mule Palette.
- Drag the component into the Aggregator area of the Batch Step scope.

Configuring the batch aggregator
The aggregator includes a subset of the batch block size. Due to that constraint, it should be set to equal or less than the total batch block size. For purposes of this demo, configure it to the following:
- Aggregator size: 10
Bulk load to Salesforce
In order to save on API calls to Salesforce and avoid the lengthy process of trying to insert millions of records one at a time, Salesforce has a bulk upsert operation that is built-in to the Salesforce connector. To add and configure the bulk upsert:
- Search/locate the Salesforce component in the Mule Palette.
- Scroll down and drag the Upsert Bulk operation into the Batch Aggregator scope.
- Drag the component into the Aggregator area of the Batch Step scope.
Configure the bulk upsert by doing the following:
- Click the green + button to create a new Salesforce configuration.
- Enter the following global Salesforce configuration:
- Username: (Use credentials from Step 4 of the Get Set Up section)
- Password: (Use credentials from Step 4 of the Get Set Up section)
- Security Token: (Use credentials from Step 5 of the Get Set Up section)
- Click OK to save the configuration.
- Configure the bulk upsert operation by:
- sObject Type: Contact
- External id field name: id
- sObjects: #[payload]
The #[ ] syntax allows to you to place DataWeave code inside the field to dynamically populate inputs. In this scenario, we are upserting the payload as set by the batch aggregator (an array of customers).
Transformations in a batch step
The batch step is where each record from the batch job gets any processing that might need to happen. You can include multiple chained batch steps for each of the records. For this example, there’s only one batch step where you’ll transform the CSV data structure to a Salesforce contact object:
- Search/locate the Transform Message component.
- Drag that onto the canvas and place it into the Batch Step scope’s Processors area.
- Copy and paste in the DataWeave transformation code below:
1
2
3
4
5
6
7
8
9
10
11
12
13
14
15
16
17
18
%dw 2.0
output application/java
---
{
LastName: payload."Last Name",
FirstName: payload."First Name",
Salutation: payload."Salutation",
MailingStreet: payload."Mailing Street",
MailingCity: payload."Mailing City",
MailingState: payload."Mailing State/Province",
MailingPostalCode: payload."Mailing Zip/Postal Code",
MailingCountry: payload."Mailing Country",
Phone: payload."Phone",
Fax: payload."Fax",
MobilePhone: payload."Mobile",
Email: payload."Email",
Title: payload."Title"
}
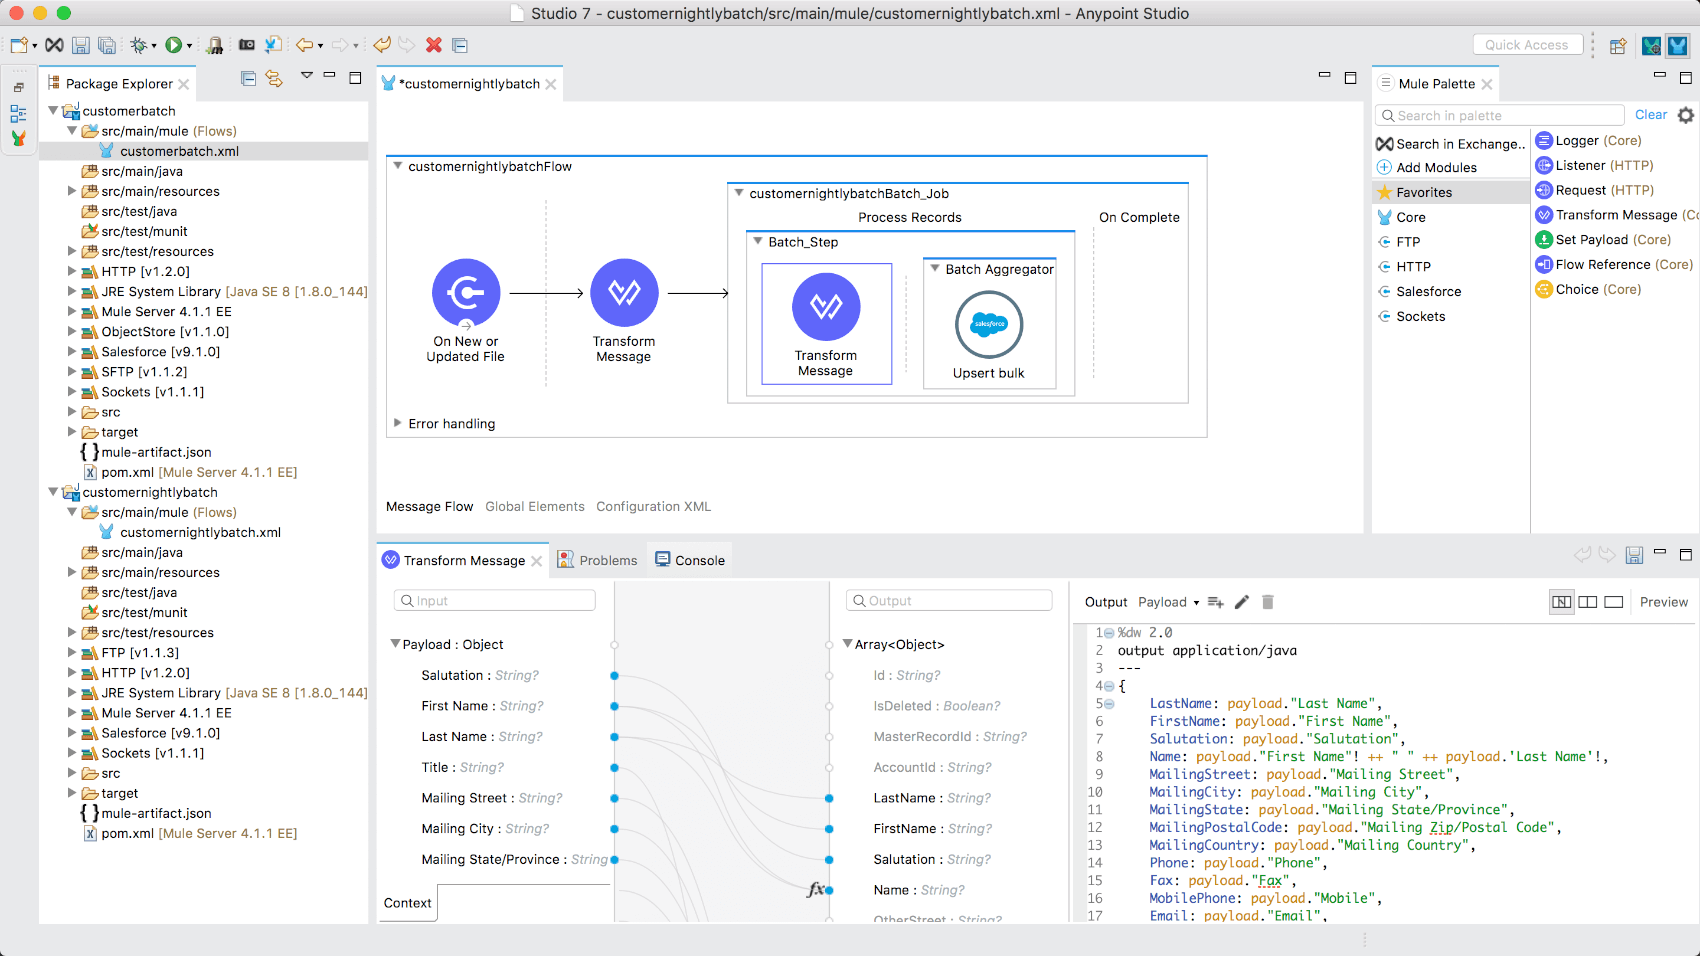
The DataWeave code above is mostly declarative, with the exception of the “Name” parameter, which uses the concatenation operator to combine strings together, as well as the selector modifier to throw an exception if fields are null. You can visually see the mappings via the Data Sense view.
Running the ETL application
To see your application run, simply:
- Click Run in the menu → Run.
From within the console view that loads up, you’ll see the application run the entire batch operation the first time, then it will bypass the batch every time afterwards due to the watermark since the file hasn’t changed every subsequent minute.
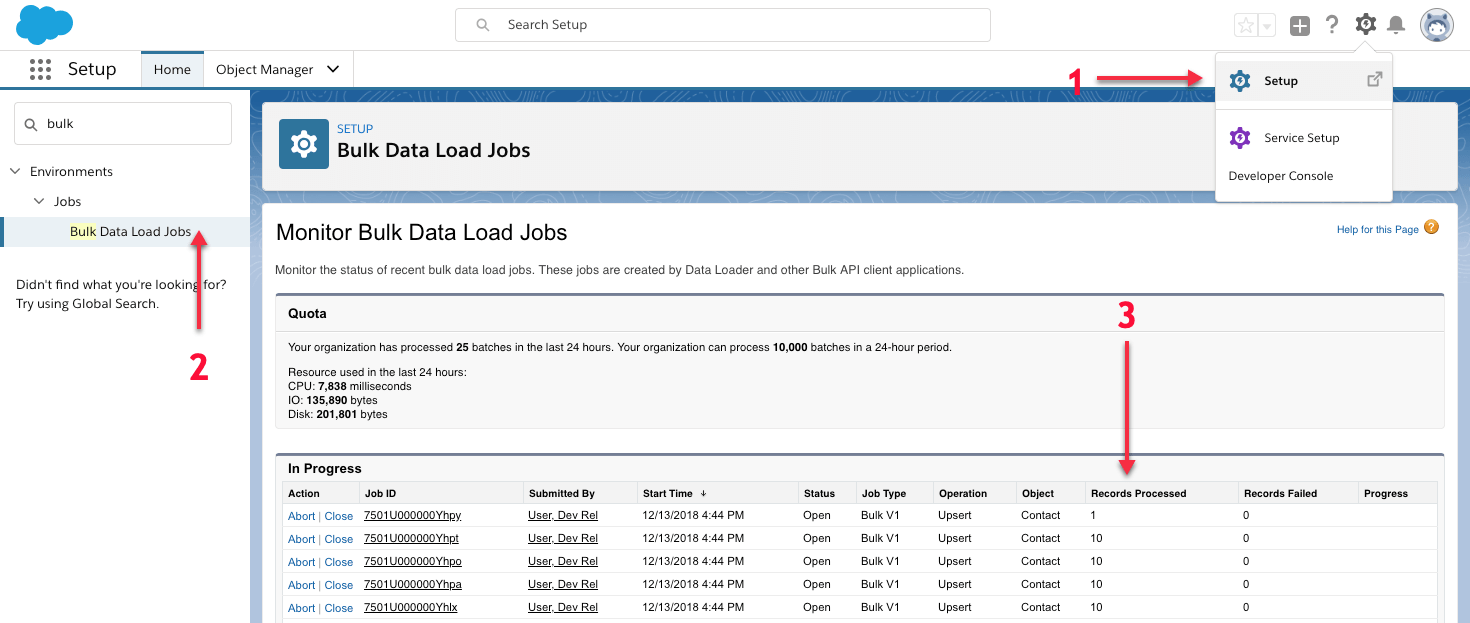
Verify your solution
To see if your batch process ran successfully, you can log into your Salesforce account and check Bulk Data Load Jobs section from the setup view. Here is how you’d do it:
- Switch to setup view by clicking the gear icon from the top left and select “Setup”.
- In the setup search within the right sidebar, search for “Bulk Data Load Jobs” and look at any new jobs.
- You should see 41 records processed within 4 x batches of 10 records and 1 x batch of 1 record as shown below.
- You can also switch back to the user view and search for the new contacts that were created from the global search.
Next steps
Your app is now running on in your local machine and checks every minute. You can modify the On New or Updated File operation of your FTP connector to run at a specified cron so it performs the operation every night at 1AM before sending the list of new contacts as a batch operation to Salesforce!
If your application is ready to be deployed to CloudHub, which you can quickly and easily from within Studio ›


Try Anypoint Platform for free
Start your 30-day free trial of the #1 platform for integration, APIs, and automation. No credit card required. No software to install.
Questions? Ask an expert.
